
✍ Token 이란?
클라이언트에서 인증 정보를 보관하는 방법이다.
세션 기반 인증은 클라이언트에서 유저 정보를 요청 할 때마다 해당 정보를 줘도 되는지에 대해 세션 값 일치여부를 확인했었다. 매 요청마다 DB를 살펴보는 것이 불편하고, 부담이 되었기 때문에 토큰 기반 인증 개념이 생겨났다.
비록 클라이언트에 저장해서 보안에 취약할 수 있다고 생각이 들지만 토큰은 유저 정보를 암호화 한 상태로 담을 수 있고, 암호화했기 때문에 클라이언트에 담을 수 있다
토큰에는 여러 종류가 있다. 그 중에서 개방형이고 웹에서 널리 쓰이는 JWT에 대해서 알아보겠다.
✍ JWT 란?
Json Wep Token 의 약자로 웹에서 쓰이는 json 토큰이다.
종류는 access token, refresh token 두가지다.
🔍 Access Token & refresh token
Access Token은 보호된 정보들에 접근할 수 있는 권한부여에 사용된다.
즉, 클라이언트가 처음 인증을 받게 될 때 (로그인), access token, refresh token 둘다 받게 되지만 실제로 권한을 얻는데 사용하는 토큰은 access token 이다.
권한을 부여받는 데엔 access token만 있으면 된다. 하지만 해커에 의해 토큰이 탈취된다면,로그인을 해서 여러 나쁜 행위들을 할 수 있다. (계좌 로그인이라면 피해자의 돈이 사라질 수 도 있겠다.)
그래서 access token의 만료기간을 짧게 주고 오랫동안 사용할 수 없도록 한다.
access token이 만료될 때마다 refresh token을 통해 말 그래도 access token을 refresh 한다.
그래서 access token은 로그인 정보에 접근할 수 있는 카드키, refresh token은 카드키 재발급이라고 생각하면 기억하기 편할 것이다.
유저의 편의보다 정보로 지키는 것이 더 중요한 웹사이트들은 refresh token을 사용하지 않는 곳도 있다. 그러면 유저는 일정주기 마다 새로 로그인을 해야 할 것이다.
정부사이트는 로그인 제한시간 60분 이렇게 되어있으니까.
access token, refresh token 발급 작성법
const jwt = require('jsonwebtoken');
//access 토큰 발급
const accessToken = jwt.sign(payload, accessSecret, {
algorithm: 'HS256',
expiresIn: '1h'
})
//refresh 토큰 발급
const refreshToken = jwt.sign(payload, refreshSecret, {
algorithm: 'HS256',
expiresIn: '14d'
})
//클라이언트에서 받았을 때 access token은 그냥 응답하고, refresh token은 cookie에 담아서 보내준다. cookie에 담을 때는 쿠키 옵션을 포함해줘서 보낸다.
res.status(200).send({ data: { "accessToken": accessToken }, message: 'ok' }).end()
res.cookie('refreshToken', refreshToken, {
domain: 'localhost',
path: '/',
maxAge: 24 * 6 * 60 * 10000,
sameSite: 'none',
httpOnly: true,
secure: true,
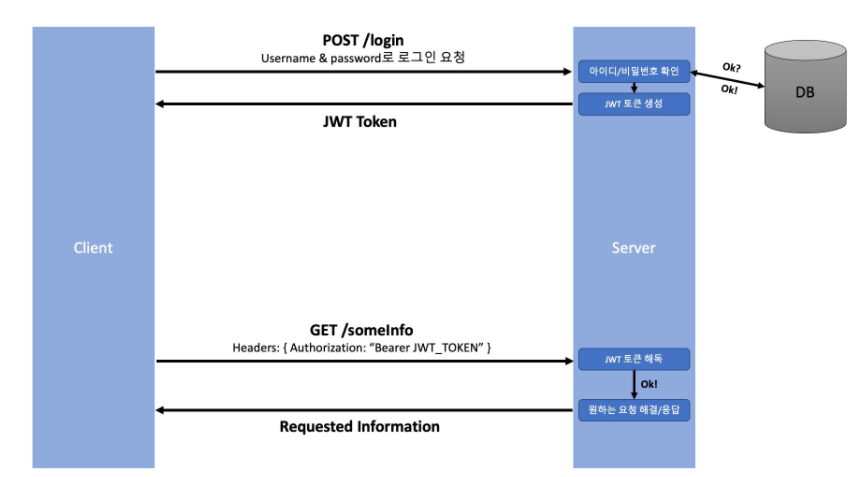
})✍ 토큰기반 인증 절차
클라이언트가 서버에 아이디/비밀번호를 담아 로그인 요청을 보낸다.
서버는 아이디/비밀번호가 일치하는지 확인하고, 클라이언트에게 보낼 Signature 된 토큰을 생성한다.
- access, refresh token을 모두 생성한다.
- 토큰에 담길 정보(payload)는 유저를 식별할 정보, 권한이 부여된 카테고리가 될 수있다.
- 두 종류의 토큰이 같은 정보일 필요는 없다.
const jwt = require('jsonwebtoken');

//access 토큰 발급
const accessToken = jwt.sign(payload, accessSecret, {
        algorithm: 'HS256',
        expiresIn: '1h'
      })
const refreshToken = jwt.sign(payload, refreshSecret, {
        algorithm: 'HS256',
        expiresIn: '14d'
      })
토큰을 클라이언트에게 보내주면, 클라이언트는 토큰을 저장한다.
res.status(200).send({ data: { "accessToken": accessToken }, message: 'ok' }).end()

res.cookie('refreshToken', refreshToken, {
        domain: 'localhost',
        path: '/',
        maxAge: 24 * 6 * 60 * 10000,
        sameSite: 'none',
        httpOnly: true,
        secure: true,
      })
클라이언트가 HTTP 헤더에 토큰을 담아 보낸다.
    axios.get('https://localhost:4000/accesstokenrequest', {
      //req.headers
      withCredentials: true,
      headers: {
        "Content-Type": "application/json",
        Authorization: `Bearer ${this.props.accessToken}`
      }
    })
서버는 토큰을 해독하여 "아 우리가 발급해 준 토큰이 맞네!" 라는 판단이 될 경우, 클라이언트의 요청을 처리한 후 응답을 보내준다.
  const authorization = req.headers.authorization
  if (!authorization) {
    res.status(400).send({ data: null, message: 'invalid access token' })
  } else {
    const token = authorization.split(' ')[1]
    console.log('token=========>', token, typeof (token))
    //토큰에 유저 정보가 있다면 유저정보를 비동기로 가져와서 주어진 형식에 맞게 응답한다.
    jwt.verify(token, accessSecret, async (err, data) => {
      const UserData = await Users.findOne({
        where: { userId: data.userId }
      })
      console.log('UserData=======>', UserData)
      if (!UserData) {
        res.status(400).send({ data: null, message: "유저정보가 없는 토큰입니다." })
      } else {
        let userInfo = {
          id: UserData.id,
          userId: UserData.userId,
          email: UserData.email,
          createdAt: UserData.createdAt,
          updatedAt: UserData.updatedAt
        }
        console.log(userInfo)
        res.status(200).send({ data: { 'userInfo': userInfo }, message: 'ok' })
      }
      //헤더 authorizaion에 jwt 토큰이 있는 경우, 해당 유저의 정보를 리턴하자.

    })
✍ 토큰기반 인증의 장점
🔍 무상태성 & 확장성
- 서버는 클라이언트에 대한 정보를 저장할 필요 없다.
- 클라이언트는 새로운 요청을 보낼 때마다 토큰을 헤더에 포함시키면 된다.
- signature을 받은 토큰을 사용하고, 암호화 키를 노출할 필요가 없기 때문에 안전합니다.
- 어디서나 생성 가능하다.
- 권한 부여에 용이하다.
이제 토큰 인증 스프린트를 정리해보며 토큰기반인증을 코드로 이해해보자.
✍ sprint review
server-token
먼저 로그인 정보가 들어오면 DB와 일치하는지 확인 한 후 access token 과 refresh token을 발급한다.
그 다음 access token은 바로 클라이언트로 응답하고,
refresh token은 cookie에 감싸서 클라이언트로 응답한다.
const { Users } = require('../../models');
const jwt = require('jsonwebtoken');

const accessSecret = process.env.ACCESS_SECRET
const refreshSecret = process.env.REFRESH_SECRET
module.exports = {
  // TODO: urclass의 가이드를 참고하여 POST /login 구현에 필요한 로직을 작성하세요.
  post: async (req, res) => {
    //request로부터 받은 userId, password와 일치하는 유저가 DB에 존재하는지 확인합니다.
    const userInfo = await Users.findOne({
      where: { userId: req.body.userId, password: req.body.password }
    })
    //일치하는 유저가 없을 경우
    if (!userInfo) {
      res.status(400).send({ data: null, message: 'not authorized' })
    } else {
      //필요한 데이터를 담은 두 종류의 JWT(access, refresh)를 생성합니다.
      //생성한 JWT를 적절한 방법으로 반환합니다.
      //access token은 클라이언트에서 react state로 다루고 있습니다.
      //refresh token은 클라이언트의 쿠키에서 다루고 있습니다
      console.log('userinfo=========>', userInfo)
      const payload = {
        id: userInfo.dataValues.id,
        userId: userInfo.dataValues.userId,
        email: userInfo.dataValues.email,
        createdAt: userInfo.dataValues.createdAt,
        updatedAt: userInfo.dataValues.updatedAt
      }
      //access으로 sign 후 발급하여 return.
      const accessToken = jwt.sign(payload, accessSecret, {
        algorithm: 'HS256',
        expiresIn: '1h'
      })

      const refreshToken = jwt.sign(payload, refreshSecret, {
        algorithm: 'HS256',
        expiresIn: '14d'
      })
      //refresh는 cookie에 담아서 필요할 때 쓴다.
      res.cookie('refreshToken', refreshToken, {
        domain: 'localhost',
        path: '/',
        maxAge: 24 * 6 * 60 * 10000,
        sameSite: 'none',
        httpOnly: true,
        secure: true,
        //access는 바로 client에게 응답
        //같이 가는 건 많은데 필요한 것만 코드로 명시
      })
      // console.log("쿠키쿠키큌퀴", res.Set - Cookie)
      res.status(200).send({ data: { "accessToken": accessToken }, message: 'ok' }).end()

    };
  }
}
발급된 access token으로 로그인 요청을 정상 응답하기 위해선 verify 함수를 통해 해당 토큰의 정보가 DB에 있는 정보인지 확인한 후 클라이언트에 응답한다.
const { Users } = require('../../models');
const accessSecret = process.env.ACCESS_SECRET
const refreshSecret = process.env.REFRESH_SECRET;
const jwt = require('jsonwebtoken');

module.exports = (req, res) => {
  //bearer는 클라이언트에서 의도적으로 보내는 요청이다.
  //access token을 보낼 때 bearer + apikey로 요청하는 것은 개발자들이 정한 규칙이다.
  //암호화된 access token
  //client에 담겨져 있는 것은 req.headers에 담겨있다.!!
  console.log('req========>', req.headers.authorization)

  const authorization = req.headers.authorization
  if (!authorization) {
    res.status(400).send({ data: null, message: 'invalid access token' })
  } else {
    const token = authorization.split(' ')[1]
    console.log('token=========>', token, typeof (token))
    //토큰에 유저 정보가 있다면 유저정보를 비동기로 가져와서 주어진 형식에 맞게 응답한다.
    jwt.verify(token, accessSecret, async (err, data) => {
      const UserData = await Users.findOne({
        where: { userId: data.userId }
      })
      console.log('UserData=======>', UserData)
      if (!UserData) {
        res.status(400).send({ data: null, message: "유저정보가 없는 토큰입니다." })
      } else {
        let userInfo = {
          id: UserData.id,
          userId: UserData.userId,
          email: UserData.email,
          createdAt: UserData.createdAt,
          updatedAt: UserData.updatedAt
        }
        console.log(userInfo)
        res.status(200).send({ data: { 'userInfo': userInfo }, message: 'ok' })
      }
      //헤더 authorizaion에 jwt 토큰이 있는 경우, 해당 유저의 정보를 리턴하자.

    })
  }
}
refresh token은 클라이언트의 쿠키에 저장되어 있기 때문에 요청의 쿠키를 통해 토큰을 확인해야 한다.
토큰이 존재한다면 마찬가지로 verify 함수를 통해 쿠키에 담긴 정보가 db에 있는지 확인한다.
존재한다면,