Bottom Sheet의 정의
최근 프로젝트에서 Bottom Sheet를 만들어야 하는 일이 있었다. bottom sheet는 화면 아래단에 위치하며 스크롤로 펴고 닫을 수 있는 화면을 의미하는데 아래 사진을 보면 이해가 빠를 것이다.
출처 : https://www.npmjs.com/package/@gorhom/bottom-sheet
문제는 위의 리액트 라이브러리가 리액트 네이티브 전용 라이브러리라는 것이다;;; 따라서 리액트로 웹뷰를 만드는 본인의 상황에서는 사용할 수 없는 라이브러리었다. 결국 다른 방법을 찾아 이리저리 구글링을 하는 중 아래의 포스트를 발견할 수 있었다.
https://blog.mathpresso.com/bottom-sheet-for-web-55ed6cc78c00
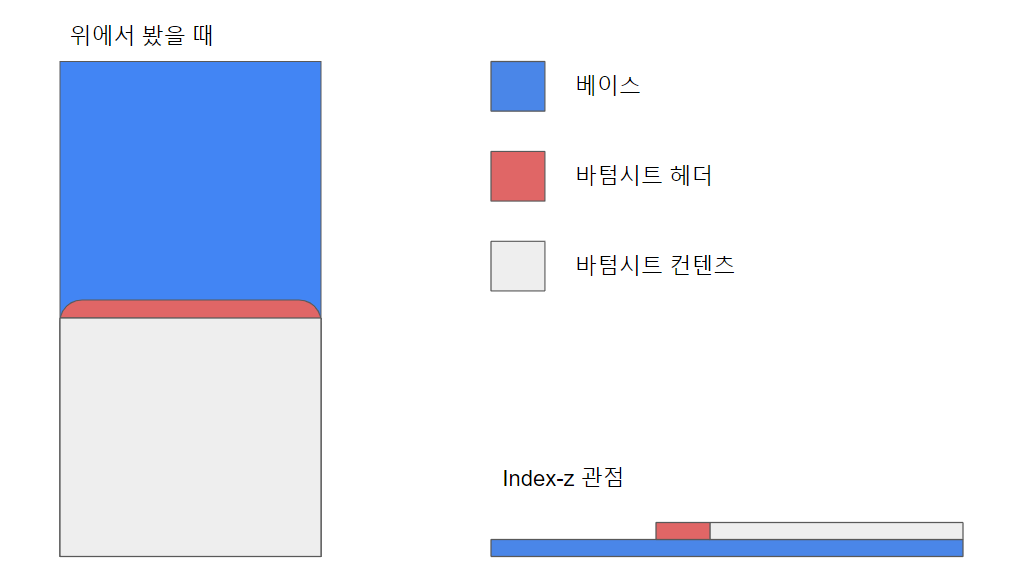
해당 코드를 가지고 본인의 플젝에 맞게 구현을 해보았는데 그 과정은 다음과 같다. 우선 컴포넌트의 구조를 보자면 해당 UI는 4개의 컴포넌트로 이루어져 있는다
- 베이스 : 바텀시트밑에 깔려 있는 컴포넌트
- 바텀시트 헤더 : 바텀시트의 위치를 컨트롤 할 수 있는 헤더 부분
- 바텀시트 컨텐츠이다 : 바텀시트의 내용물
- 바텀시트 : 헤터 + 컨텐츠
그럼이제 구현을 해보자!
사용한 라이브러리
해당 기능을 구현하기 위해서 내가 설치한 라이브러리는 다음과 같다.
styled-component
해당 프로젝트에서는 styled-component로 css를 다룰 것이다 따라서 npm i styled-components 명령어를 사용해서 해당 라이브러리를 설치해주자. 다음으로 컴포넌트에서 아래와 같이 styled-component를 import해주면
import styled from 'styled-components';다음과 같은 에러가 뜬다;;
모듈 'styled-components'에 대한 선언 파일을 찾을 수 없습니다. 'c:/Users/johan/project/ReactBank/react-bank/node_modules/styled-components/dist/styled-components.cjs.js'에는 암시적으로 'any' 형식이 포함됩니다.
해당 항목이 있는 경우 'npm i --save-dev @types/styled-components'을(를) 시도하거나, 'declare module 'styled-components';'을(를) 포함하는 새 선언(.d.ts) 파일 추가ts(7016)
시키는대로 npm i --save-dev @types/styled-components을 해주니 문제가 해결이 되었다. 아마 타입은 별도로 설치를 해야 하는 것 같다.(확실하지는 않음)
framer-motion
다음으로 Div에 애니메이션을 좀 더 수월하게 넣어주기 위해 아래의 명령어를 사용하여 framer-motion을 설치해주도록 하자. 설치가 끝이 났다면 아래와 같이 import를 해주면 된다
import { motion } from "framer-motion";옵션
일단 바텀시트에서 사용할 옵션을 담고 있는 파일을 하나 만들어주자. 파일이름은 BottomSheetOption.ts로 해주었다
export const MIN_Y = 60;
export const MAX_Y = window.innerHeight - 160;
export const BOTTOM_SHEET_HEIGHT = window.innerHeight - MIN_Y;- MIN_Y : 바텀 시트가 최대로 올라 갔을 때의 Y좌표 값
- MAX_Y : 바텀 시트가 최대로 내려갔을 때의 Y좌표 값
- BOTTOM_SHEET_HEIGHT : 바텀시트 높이
위 값이 이해가 가지 않는다면 아래의 링크 참고
컴포넌트 설계
Base.tsx
베이스 컴포넌트는 바텀시트를 가지고 있는 컴포넌트이다.
import React from "react";
import styled from 'styled-components';
import BottomSheet from "./BottomSheet";

const BaseDiv = styled.div`
  height : 100vh;
  width : 100vw;
  background-color: #000000
`

export default function Base() {

  return (
    <BaseDiv>
      <BottomSheet />
    </BaseDiv>
  )
}
바텀시트와의 구별을 위해서 배경색을 검은 색으로 주었다. 바텀시트를 가진 BottomSheet컴포넌트를 호출해서 사용한다.
BottomSheet.tsx
우리가 구현하고 싶어했던 바텀 시트이다.
import React from 'react';
import { BOTTOM_SHEET_HEIGHT} from './BottomSheetOption';
import styled from 'styled-components';
import { motion } from "framer-motion";
import useBottomSheet from './useBottomSheet';
import Header from './Header';
import Content from './Content';

const Wrapper = styled(motion.div)`
  display: flex;
  flex-direction: column;

  position: fixed;
  z-index: 1;
  top: calc(100% - 90px); /*시트가 얼마나 높이 위치할지*/
  left: 0;
  right: 0;

  border-top-left-radius: 12px;
  border-top-right-radius: 12px;
  box-shadow: 0px 0px 10px rgba(0, 0, 0, 0.6);
  height: ${BOTTOM_SHEET_HEIGHT}px;

  background: linear-gradient(359.26deg, #3C41C7 0.02%, #3742B2 83.23%, #3642AE 98.76%);
  box-shadow: 0px 4px 4px rgba(0, 0, 0, 0.25);

  transition: transform 650ms ease-out; /*바텀시트 애니메이션 속도*/
`

const BottomSheetContent = styled.div`
  overflow: auto;
  -webkit-overflow-scrolling: touch;
`

function BottomSheet() {

  const { sheet, content } = useBottomSheet();

  return (
    <Wrapper ref={sheet}>
      <Header />
      <BottomSheetContent ref={content}>
        <Content />
      </BottomSheetContent>
    </Wrapper>
  );
}

export default BottomSheet;
딱히 어려운 부분은 없다. 헤더와 컨텐츠를 가지고 있다. 아직 구현은 하지 않았지만 바텀시트를 컨트롤 해주는 기능을 가진 커스텀 훅인 useBottomSheet에서 받은 useRef를 바텀시트(Wrapper)와 컨텐츠를 담고 잇는 div(BottomSheetContent)에 적용해준다.
useBottomSheet 커스텀훅은 매우 복잡해서 다른 컴포넌트를 설명하고 마지막으로 설명하도록 하겠다.
Header.tsx
손잡이가 포함된 바텀시트의 헤더이다
import React from "react";
import styled from 'styled-components';

const Wrapper = styled.div`
  height : 24px;
  border-top-left-radius: 12px;
  border-bottom-right-radius: 12px;
  position: relative;
  padding-top: 12px;
  padding-bottom: 4px;
`;

const Handle = styled.div`
  width: 40px;
  height: 4px;
  border-radius: 2px;
  background-color: #DEE2E6;
  margin: auto;
`
const Header = () => {
  return (
    <Wrapper>
      <Handle/>
    </Wrapper>
  )
}

export default Header
Content.tsx
버텀시트안에 넣고 싶은 컨텐츠를 여기에 구현하면 된다. 현재글에서는 바텀시트 자체를 구현하는게 목적임으로 이 부분은 건너 뛰도록 하겠다.
import React from "react";

export default function Content(){
  return(
    <div></div>
  )
}
대충 이렇게해서 컴포넌트 소개가 끝이 났다. 이제 핵심기능인 useBottomSheet 커스텀훅에 대해서 설명하도록 하겠다.
useBottomSheet 커스텀 훅
이 부분은 본인의 실력이 미흡하며 자신있게 100% 맞는 설명이라고 확신하기는 힘들다. 글을 읽는 독자분들 / 또는 코드의 원작자 분이 보시기에 잘못된 부분이 있다면 댓글로 알려주시길.
준비물
일단 아래와 같이 사용할 훅과 옵션값을 import해주고 바컴시트를 움직이는데 사용할 타입을 명시해주자
import { useRef, useEffect } from 'react';
import { MIN_Y, MAX_Y } from './BottomSheetOption';

interface BottomSheetMetrics {
  touchStart: {
    sheetY: number;
    touchY: number;
  };
  touchMove: {
    prevTouchY?: number;
    movingDirection: "none" | "down" | "up";
  };
  isContentAreaTouched: boolean;
}
BottomSheetMetrics 타입을 설명하자면 다음과 같다.
- touchStart : 터치 시작 시
- sheetY : 바텀시트의 최상단 모서리의 높이 Y값
- touchY : 내가 터치한 곳의 Y값
- touchMove : 터치하고 움직일 때
- prevTouchY : 움직이는 동안의 Y값
- movingDirection : 움직이는 방향
- isContentAreaTouched : 컨텐츠 영역을 터치 하고 있는지
선언 및 초기화
다음으로 useBottomSheet 커스텀 훅의 선언및 초기화 부분이다.
export default function useBottomSheet() {

  const sheet = useRef<HTMLDivElement>(null);

  const content = useRef<HTMLDivElement>(null);

  const metrics = useRef<BottomSheetMetrics>({
    touchStart: {
      sheetY: 0,
      touchY: 0,
    },
    touchMove: {
      prevTouchY: 0,
      movingDirection: "none",
    },
    isContentAreaTouched: false
  });

  /*
  이 부분은 생략. 아래에 나옴
  */

  return { sheet, content }
}
선언해준 sheet, content는 모두 반환되어 BottomSheet.tsx에서 받아쓸 값들이다. 일단 초기화 단계라서 metrics의 경우 터치를 시작하지도 터치한 상태에서 움직이지도 않았으므로 모두 0,none으로 세팅해준 것을 볼 수 있다.
첫 번째 useEffect
해당 커스텀 훅은 두 개의 useEffect를 가지고 있는데 바텀시트 동작을 위한 함수들은 모두 지금 설명할 useEffect에 포함되어 있다. 해당 useEffect는 렌더링이 끝난 직후와 컴포넌트가 내려갈때 각각 한 번씩 실행되고(즉, 빈 의존성 배열을 가지고 있다.) 다음의 하위 함수들을 포함하고 있다.
- canUserMoveBottomSheet : 바텀시트가 움직일 수 있는지를 체크
- handleTouchStart : touchstart시 실행되는 함수
- handleTouchMove : touchmove시 실행되는 함수
- handleTouchEnd : touchend시 실행되는 함수
canUserMoveBottomSheet
해당 함수는 바텀 시트가 움직일 수 있는지를 판별하는 함수이다.
const canUserMoveBottomSheet = () => {

  const { touchMove, isContentAreaTouched } = metrics.current;

  if (!isContentAreaTouched) {
    return true;
  }

  if (sheet.current!.getBoundingClientRect().y !== MIN_Y) {
    return true;
  }

  if (touchMove.movingDirection === 'down') {
    return content.current!.scrollTop <= 0;
  }
  return false;
}-
if (!isContentAreaTouched)
: 바텀시트에서 컨텐츠 영역이 아닌 부분을 터치하면 바텀시트를 움직인다 -
if (sheet.current!.getBoundingClientRect().y !== MIN_Y)
: 바텀 시트가 최대로 올라와 있는 상태가 아니라면 바텀 시트는 움직일 수 있다 이때 컨텐츠 영역을 터치해도 움직일 수 있게 하는 편이 자연스럽다. getBoundingClientRect()에 대한 설명을 보면 좀 더 이해가 잘 갈 것이다. -
if (touchMove.movingDirection === 'down')
: 터치한 상태에서 손가락을 아래로 움직였는데(아래로 스크롤) 더 이상 컨텐츠 내용을 올릴것이 없다면 즉, 스크롤 탑도 0보다 작다면 바텀시트를 움직이는 편이 자연스럽다 -
위 내용 모두에 해당이 안될 시 바텀시트는 움직일 수 없다.
handleTouchStart
터치가 시작될 때 불려지는 함수이다.
const handleTouchStart = (e: TouchEvent) => {
  const { touchStart } = metrics.current;
  touchStart.sheetY = sheet.current!.getBoundingClientRect().y;
  touchStart.touchY = e.touches[0].clientY;
};
matrics 객체로 부터 touchStart를 받아와서 아래의 작업을 한다.
-
touchStart.sheetY = sheet.current!.getBoundingClientRect().y;
:현재 바텀 시트의 최상단 모서리 값을 touchStart.sheetY에 대입한다. sheetY는 바텀시트의 최상단 모서리의 높이 Y값을 담는 요소이다. -
touchStart.touchY = e.touches[0].clientY;
: 터치한 곳의 수직(Y) 좌표를 touchStart.touchY에 대입한다. touchY는 내가 터치한 곳의 Y좌표를 담는 요소이다.
handleTouchMove
다음은 터치를 유지한 채로 움직일 때(=드레그 할 때) 불려지는 함수이다.
const handleTouchMove = (e: TouchEvent) => {

  const { touchStart, touchMove } = metrics.current;
  const currentTouch = e.touches[0];

  if (touchMove.prevTouchY === undefined) {
    touchMove.prevTouchY = touchStart.touchY;
  }

  if (touchMove.prevTouchY === 0) {
    // 맨 처음 앱 시작하고 시작시
    touchMove.prevTouchY = touchStart.touchY;
  }

  if (touchMove.prevTouchY < currentTouch.clientY) {
    touchMove.movingDirection = 'down';
  }

  if (touchMove.prevTouchY > currentTouch.clientY) {
    touchMove.movingDirection = 'up';
  }

  if (canUserMoveBottomSheet()) {
    e.preventDefault();

    const touchOffset = currentTouch.clientY - touchStart.touchY;
    let nextSheetY = touchStart.sheetY + touchOffset;

    if (nextSheetY <= MIN_Y) {
      nextSheetY = MIN_Y;
    }

    if (nextSheetY >= MAX_Y) {
      nextSheetY = MAX_Y;
    }

    sheet.current!.style.setProperty('transform', `translateY(${nextSheetY - MAX_Y}px)`); //바닥 만큼은 빼야한다

  } else {
    document.body.style.overflowY = 'hidden';
  }
};
해당 함수는 크게 두 부분으로 나뉘는데
1. 드레그의 방행을 정해준다
2. 바텀시트를 움직여 준다.
우선 드래그 방량을 정하는 로직은 다음과 같다.
-
if (touchMove.prevTouchY === undefined)
:일단 prevTouchY의 값이 없다면 터치를 처음 시작했을 때의 y축 값을 대입해준다 -
if (touchMove.prevTouchY === 0)
: 맨 처음 앱이 시작하면 touchMove.prevTouchY가 0이므로 드래그를 천장까지 하는게 아니면 작동하지 않는다. 따라서 이 부분을 넣어서 바로 작동이 되도록 한다 -
(touchMove.prevTouchY < currentTouch.clientY)
: 드래그 한 현재의 Y 값이 이전 터치보다 밑에 있다면 손가락이 아래방향으로 향한 것이다 -
touchMove.prevTouchY > currentTouch.clientY
: 드래그 한 현재의 Y 값이 이전 터치보다 위에 있다면 손가락이 윗방향으로 향한 것이다
다음으로 바텀시트를 움직이는 로직은 다음과 같다.
-
if (canUserMoveBottomSheet())
: 바텀시트를 움직일 수 있는 상황에서 아래의 로직은 유효하다 -
e.preventDefault();
: touchStart() 또는 첫 번째 touchmove 이벤트에서 preventDefault를 호출하면 해당 마우스 이벤트가 실행되는 것을 막는다 - 참고 -
const touchOffset = currentTouch.clientY - touchStart.touchY
: 드래그 된 현재 위치Y 에서 처음 터치할때의 Y값을 빼준다. 이 만큼 이동해야 한다 -
let nextSheetY = touchStart.sheetY + touchOffset;
: 이동 후의 바텀 시트의 최상단 높이 즉, Y좌표를 알 수 있다 -
단 바텀시트의 높이는 MIN_Y 보다 작거나 같고 MAX_Y보다 크거나 같아야한다
-
위 로직에 맞게 움직여 준다
-
document.body.style.overflowY = 'hidden'
: 컨텐츠를 스크롤하는 동안에는 body가 스크롤 되는 것을 막는다
handleTouchEnd
다음으로 드래그가 끝이 났을 때 사용하는 함수이다.
const handleTouchEnd = (e: TouchEvent) => {
  document.body.style.overflowY = 'auto'; //스크롤 설정
  const { touchMove } = metrics.current;

  const currentSheetY = sheet.current!.getBoundingClientRect().y;

  if (currentSheetY !== MIN_Y) {
    if (touchMove.movingDirection === 'down') {
      sheet.current!.style.setProperty('transform', 'translateY(0)');
    }

    if (touchMove.movingDirection === 'up') {
      sheet.current!.style.setProperty('transform', `translateY(${MIN_Y - MAX_Y}px)`);
    }
  }

  // metrics 초기화.
  metrics.current = {
    touchStart: {
      sheetY: 0,
      touchY: 0,
    },
    touchMove: {
      prevTouchY: 0,
      movingDirection: "none",
    },
    isContentAreaTouched: false
  };
}
-
const currentSheetY = sheet.current!.getBoundingClientRect().y;
: 드래그가 끝난 후 바텀시트의 최상단 모서리 Y의 값을 담고 있다. -
(currentSheetY !== MIN_Y)
: 최상단 모서리가 올라갈 수 있는 최대치가 아니라면 아래의 로직을 적용한다 -
if (touchMove.movingDirection === 'down') { }
: 아래로 스크롤하는 경우 바텀 시트가 가장 작은 크기로 축소된다 (원래대로 돌아감) -
if (touchMove.movingDirection === 'up') { }
: 위로 스크롤 하는 경우 바텀 시트가 최대의 크기가 된다 (올라갈 수 있는 최대치로 올라감)
첫 번째 useEffect 마무리
위의 함수들을 이벤트 리스너를 걸어준다.
sheet.current!.addEventListener('touchstart', handleTouchStart);
sheet.current!.addEventListener('touchmove', handleTouchMove);
sheet.current!.addEventListener('touchend', handleTouchEnd);
두 번째 useEffect
첫 번째 useEffect 보다 훨씬 짧다.
useEffect(() => {
  const handleTouchStart = () => {
    metrics.current!.isContentAreaTouched = true;
  }
  content.current!.addEventListener('touchstart', handleTouchStart);
}, []);
컨텐츠 영역을 터치하고 있을 때 isContentAreaTouched레 true값을 대입해 주는 것이 전부이다
커스텀 훅 전체 소스 코드
import { useRef, useEffect } from 'react';
import { MIN_Y, MAX_Y } from './BottomSheetOption';

interface BottomSheetMetrics {
  touchStart: {
    sheetY: number;
    touchY: number;
  };
  touchMove: {
    prevTouchY?: number;
    movingDirection: "none" | "down" | "up";
  };
  isContentAreaTouched: boolean;
}

export default function useBottomSheet() {

  const sheet = useRef<HTMLDivElement>(null);

  const content = useRef<HTMLDivElement>(null);

  const metrics = useRef<BottomSheetMetrics>({
    touchStart: {
      sheetY: 0,
      touchY: 0,
    },
    touchMove: {
      prevTouchY: 0,
      movingDirection: "none",
    },
    isContentAreaTouched: false
  });


  useEffect(() => {

    const canUserMoveBottomSheet = () => {
      const { touchMove, isContentAreaTouched } = metrics.current;


      if (!isContentAreaTouched) {
        return true;
      }

      if (sheet.current!.getBoundingClientRect().y !== MIN_Y) {
        return true;
      }

      if (touchMove.movingDirection === 'down') {
        return content.current!.scrollTop <= 0;
      }
      return false;
    }


    const handleTouchStart = (e: TouchEvent) => {
      const { touchStart } = metrics.current;
      touchStart.sheetY = sheet.current!.getBoundingClientRect().y;
      touchStart.touchY = e.touches[0].clientY;
    };


    const handleTouchMove = (e: TouchEvent) => {

      const { touchStart, touchMove } = metrics.current;
      const currentTouch = e.touches[0];

      if (touchMove.prevTouchY === undefined) {
        touchMove.prevTouchY = touchStart.touchY;
      }

      if (touchMove.prevTouchY === 0) {
        // 맨 처음 앱 시작하고 시작시
        touchMove.prevTouchY = touchStart.touchY;
      }

      if (touchMove.prevTouchY < currentTouch.clientY) {
        touchMove.movingDirection = 'down';
      }

      if (touchMove.prevTouchY > currentTouch.clientY) {
        touchMove.movingDirection = 'up';
      }

      if (canUserMoveBottomSheet()) {

        e.preventDefault();

        const touchOffset = currentTouch.clientY - touchStart.touchY;
        let nextSheetY = touchStart.sheetY + touchOffset;

        if (nextSheetY <= MIN_Y) {
          nextSheetY = MIN_Y;
        }

        if (nextSheetY >= MAX_Y) {
          nextSheetY = MAX_Y;
        }

        sheet.current!.style.setProperty('transform', `translateY(${nextSheetY - MAX_Y}px)`);  //바닥 만큼은 빼야쥬...
      } else {
        document.body.style.overflowY = 'hidden';
      }
    };


    const handleTouchEnd = (e: TouchEvent) => {
      document.body.style.overflowY = 'auto';
      const { touchMove } = metrics.current;

      // Snap Animation
      const currentSheetY = sheet.current!.getBoundingClientRect().y;

      if (currentSheetY !== MIN_Y) {
        if (touchMove.movingDirection === 'down') {
          sheet.current!.style.setProperty('transform', 'translateY(0)');
        }

        if (touchMove.movingDirection === 'up') {
          sheet.current!.style.setProperty('transform', `translateY(${MIN_Y - MAX_Y}px)`);
        }
      }

      // metrics 초기화.
      metrics.current = {
        touchStart: {
          sheetY: 0,
          touchY: 0,
        },
        touchMove: {
          prevTouchY: 0,
          movingDirection: "none",
        },
        isContentAreaTouched: false
      };
    }

    sheet.current!.addEventListener('touchstart', handleTouchStart);
    sheet.current!.addEventListener('touchmove', handleTouchMove);
    sheet.current!.addEventListener('touchend', handleTouchEnd);

  }, [])


  useEffect(() => {
    const handleTouchStart = () => {
      metrics.current!.isContentAreaTouched = true;
    }
    content.current!.addEventListener('touchstart', handleTouchStart);
  }, []);

  return { sheet, content }

}
결과 및 느낀점

일단은 잘되는 것을 확인했다.
세상에 쉬운게 없다지만 진짜 이런 코드를 보면 내가 아직 엄청 미비하다는 것을 느낀다. 어찌 공부를 해야하는지 뭐가 가장 좋은 방법인지는 모르겠으나 앞으로 정진할 뿐이다.
기본이 되는 코드를 제공해주신 Wayne Kim 님께 감사드리며 이만 글을 마치겠다.

4개의 댓글

translateY 말고 translate3D 를 쓰거나 will-change 를 쓰면 더 스무스하게 될거같네요~
중앙정렬
바텀시트의 중첩
내부 사이즈에따른 높이
내부 스크롤뷰
저는 앱이라 각 디바이스별 대응
등의 작업을 했는데...
welcom to hell...