
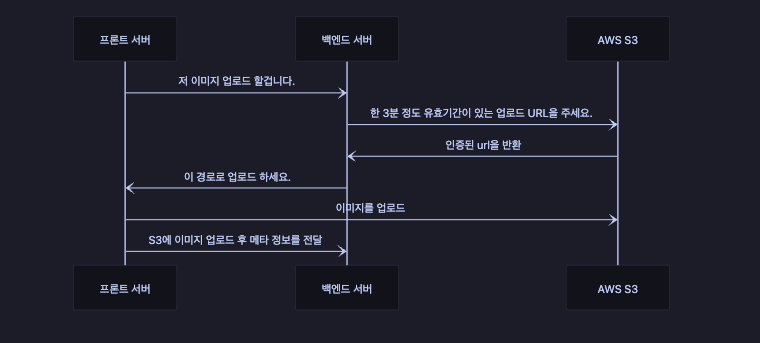
❇️ 요약
- S3 버킷 생성
- [프론트] POST요청을 통해서 presigned URL 생성을 위한 요청을 보냄 ✅
- [백] 프론트에서 버킷 정보와 파일 정보를 받아 AWS S3에 presigned URL 요청(POST)
- [AWS] presigned URL 백엔드에 전달, 백엔드에서는 프론트로 전달
- [프론트] 받아온 presigned URL에 이미지 업로드 요청 보내기(PUT) ✅
프론트에서는 presigned URL생성을 요청한 후, 클라이언트 측에서 put 메서드를 사용해서 그 URL로 직접 파일을 업로드하는 것이다.
더 자세히 풀어서 설명하면,
1. 서버에서 presigned URL 생성
발급받은 presigned URL을 이용하면 ’브라우저’에서 AWS S3 버킷에 바로 파일을 업로드 할 수 있다.
S3에 대한 접근 권한을 인증 받은 뒤 발급 받은 presigned URL을 이용해 브라우저에서 직접 업로드 한다.
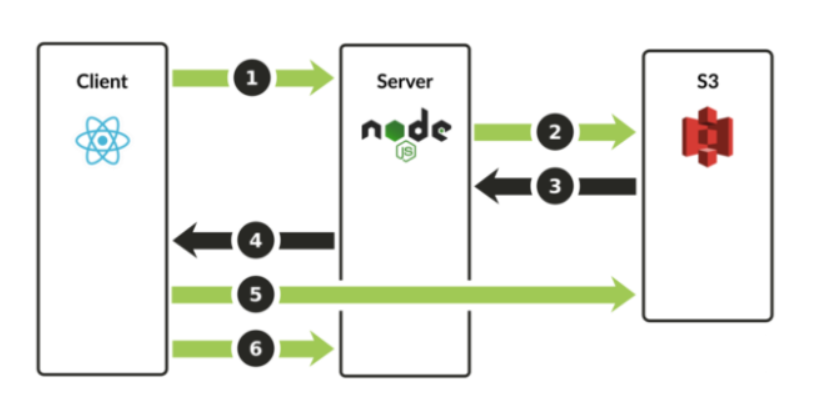
- 이미지 업로드 요청 시 서버 api 호출 // api 연동
- 서버에서 AWS S3에 preSignedURL 요청
- AWS에서 preSignedURL을 return
- 서버는 브라우저로 preSignedURL을 전달
- 브라우저에서 AWS preSignedURL로 이미지 upload
- 서버에게 해당 요청이 종료 되었음을 알림
2. 프론트에서 이미지 선택 및 업로드
- 업로드할 이미지를 선택한다.
react-native-image-picker 라이브러리의launchImageLibrary를 이용한다.
npm install react-native-image-pickerconst selectImage = () => {
launchImageLibrary({ mediaType: 'photo' }, response => {
if (response.didCancel) {
console.log('User cancelled image picker');
} else if (response.error) {
console.log('ImagePicker Error: ', response.error);
} else {
const source = { uri: response.assets[0].uri };
setImageUri(source.uri);
uploadImageToS3(source.uri);
}
});- presigned URL을 요청한다.(axios)
const uploadImageToS3 = async (uri) => {
    try {
      const response = await axios.get('BASE_URL/generate-url', {
        params: { key: 'image.jpg' } // 백엔드 API 명세서에 따라 key 값을 설정
      });

      const presignedUrl = response.data.url;

      const file = {
        uri,
        type: 'image/jpeg',
        name: 'image.jpg',
      };

      const formData = new FormData();
formData.append('file', file);- 받아온 presigned URL을 사용해 S3 버킷에 이미지를 업로드한다.(fetch, put)
 const uploadResponse = await fetch(presignedUrl, {
        method: 'PUT',
        body: formData,
        headers: {
          'Content-Type': 'image/jpeg',
        },
      });
전체 코드
import React, { useState } from 'react';
import { View, Button, Image, Alert } from 'react-native';
import { launchImageLibrary } from 'react-native-image-picker';
import axios from 'axios';

const App = () => {
  const [imageUri, setImageUri] = useState(null);

  const selectImage = () => {
    launchImageLibrary({ mediaType: 'photo' }, response => { // 1) 이미지 선택
      if (response.didCancel) {
        console.log('User cancelled image picker');
      } else if (response.error) {
        console.log('ImagePicker Error: ', response.error);
      } else {
        const source = { uri: response.assets[0].uri };
        setImageUri(source.uri);
        uploadImageToS3(source.uri);
      }
    });
  };

  const uploadImageToS3 = async (uri) => { // 2) presigned URL 요청 (axios)
    try {
      const response = await axios.get('YOUR_BACKEND_API_URL/generate-url', {
        params: { key: 'image.jpg' } // 백엔드 API 명세서에 따라 key 값을 설정
      });

      const presignedUrl = response.data.url;

      const file = {
        uri,
        type: 'image/jpeg',
        name: 'image.jpg',
      };

      const formData = new FormData();
      formData.append('file', file);


     // 3) 받아온 presigned URL을 사용해 이미지를 업로드 (fetch - put 요)

      const uploadResponse = await fetch(presignedUrl, {
        method: 'PUT',
        body: formData,
        headers: {
          'Content-Type': 'image/jpeg',
        },
      });

      if (uploadResponse.ok) {
        Alert.alert('Success', 'Image uploaded successfully!');
      } else {
        Alert.alert('Error', 'Failed to upload image');
      }
    } catch (error) {
      console.error('Error uploading image:', error);
      Alert.alert('Error', 'Error uploading image');
    }
  };

  return (
    <View>
      <Button title="Select Image" onPress={selectImage} />
      {imageUri && <Image source={{ uri: imageUri }} style={{ width: 100, height: 100 }} />}
    </View>
  );
};

export default App;
AWS S3에 프론트가 이미지를 직접 업로드 하는 방식을 단계별로 이해하니까 어렵지 않게 개발할 수 있었다!
처음에는 이해를 못해서 헷갈려서 좀 헤맸다..ㅎ