- 오늘 복습: 교재내용 + 이것이 자바다 두개 보면서 학습1. 클래스에 메소드 넣기
(1) 클래스 메소드
- A클래스 안에 메소드를 넣어서 해당 인스턴스에 세팅된 값을 이용해 필요한 값 생성.
1. 지역변수를 이용하여 여러 개의 사각형과 넓이, 둘레를 구하는 프로그램
double height = 20;
double width = 40;
System.out.println("넓이: " + height * width);
System.out.println("둘레: " + (height*2 + width * 2));

double height1 = 30;
dobule width1=40;
System.out.println("넓이: " + height1 * width1);
System.out.println("둘레: " + (height1*2 + width1 * 2));

- 하지만 여러개가 있을 경우 코드 가독성이 떨어지기에 다음과 같이 수정한다.
public static double height = 20;
public static double width = 40;
public static void area() {
	System.out.println("넓이: " + height * width);
}
public static void periphery() { // 둘레
	System.out.println("둘레: " + (height*2+width*2));
}
public static void main(String[] args) {
	area();
    periphery();
}

2. 전역변수를 이용하여 사각형의 넓이와 둘레를 구하는 프로그램
class Rectangle {
	public double height = 0;
    public double width = 0;
    public void area() {
    	System.out.println("넓이: " + height*width);
   }
   public void area(double height) {
   	System.out.println("넓이: " + height * width);
  }
   public void periphery() {
   	System.out.println("둘레: " + (height*2 + width*2));
  }
- Rectangle 클래스에 static을 붙이지 않고 선언.
- static을 붙이면 new 연산자를 생성과정 없이 전역에서 바로 접근이 가능하지만
- static이 붙지 않은 인스턴스 멤버는 new연산자를 사용하여 생성된 인스턴스에만 접근함.
public static void main(String[] args) {
	Rectangle r1 = new Rectangle();
    r1.height = 40;
    r1.width = 40;
    r1.area();
    r1.periphery();
    Rectangle r2 = new Rectangle();
    r2.height = 20;
    r2.width = 40;
    r2.area();
    r2.periphery();
    Rectangle r3 = new Rectangle();
    r3.height = 20;
    r3.width = 20;
    r3.area();
    r3.periphery();
    }
}
- 결과적으로 클래스 멤버는 전역에서 접근 가능.
- 선언과 동시에 사용가능.
- 인스턴스 멤버는 new연산자를 통해서 필요할때마다 new연산자를 사용하여 생성가능함.
(2) 클래스 메소드(인스턴스 활용) 예제
- 복습용도로 활용하기1. 삼각형, 원 클래스를 생성하여 넓이와 둘레를 구하는 프로그램 구현
1) 삼각형 클래스
public class Triangle {
public double width = 0;
public double height = 0;
public double base = 0;
public void area() {
System.out.println("넓이: " + (height * width) * 0.5);
}
public void area(double height) {
System.out.println("넓이: " + (height * width) * 0.5);
}
public void periphery() {
System.out.println("둘레: " + (base + base + base));
}
}
2) 원 클래스
public class Circle {
public double radius = 0;
public void area() {
System.out.println("넓이: " + Math.PI * radius * radius);
}
public void periphery() {
System.out.println("둘레: " + 2 * Math.PI * radius);
}
}
3) 메인 클래스
public class Main01 {
public static void main(String[] args) {
Triangle t1 = new Triangle();
t1.height = 5;
t1.width = 10;
t1.base = 3;
t1.area();
t1.periphery();
System.out.println();
Circle c1 = new Circle();
c1.radius = 5;
c1.area();
c1.periphery();
}
}
2. 국어, 영어, 수학 점수를 저장하고 총점과 평균을 출력하는 Student클래스를 만들어 사용해보자.
1) 학생 클래스
public class Student {
public double korScore = 0;
public double engScore = 0;
public double mathScore = 0;
public void sum() {
System.out.println("국, 영, 수의 총점은 " + (korScore + engScore + mathScore));
}
public void avg() {
System.out.println("국, 영, 수의 평균은 " + (korScore+engScore+mathScore)/3);
}
}
2) 메인 클래스
public class Main02 {
public static void main(String[] args) {
Student s = new Student();
s.korScore = 95.3;
s.engScore = 83.2;
s.mathScore = 83.0;
s.sum();
s.avg();
}
}
3. 다음 이미지 클래스처럼 동작하는 Car과 CellPhone클래스 만들기
1) Car 클래스
public class Car {
public String name = "";
public int speed = 0;
public Car(String name) {
this.name = name;
}
public void statement() {
System.out.println(String.format("현재 차종%s 속력은 %d입니다.", this.name, this.speed));
}
public void speedUp() {
this.speed = this.speed+10;
}
public void speedDown() {
this.speed = this.speed-10;
}
}
2) 메인 클래스 - Car
public class Main03 {
public static void main(String[] args) {
Car c1 = new Car("소나타");
c1.statement();
c1.speedUp();
c1.speedUp();
c1.statement();
c1.speedDown();
c1.statement();
}
}
3) 휴대폰 클래스
public class CellPhone {
public String masterName = "";
public String masterPhoneNumber = "";
public String sendName = "";
public String sendPhoneNumber = "";
public String message = "";
public CellPhone(String masterName, String masterPhoneNumber) {
this.masterName = masterName;
this.masterPhoneNumber = masterPhoneNumber;
}
public void sendInput(String sendName, String sendPhoneNumber, String message) {
this.sendName = sendName;
this.sendPhoneNumber = sendPhoneNumber;
this.message = message;
}
public void sendMsgButton() {
System.out.println(String.format("%s(%s)님이" + "%s(%s)님에게 '%s' 이라는 메시지를 보냈습니다.", masterName, masterPhoneNumber, sendName, sendPhoneNumber, message));
}
public void sendInput(String sendName, String sendPhoneNumber) {
this.sendName = sendName;
this.sendPhoneNumber = sendPhoneNumber;
}
public void sendButton() {
System.out.println(String.format("%s(%s)님이" + "%s(%s)님에게 전화를 겁니다.", masterName, masterPhoneNumber, sendName, sendPhoneNumber));
}
}
4) 메인 메소드 - 휴대폰 클래스
public class Main04 {
public static void main(String[] args) {
CellPhone phone = new CellPhone("홍길동", "010-1111-1111");
phone.sendInput("홍길남", "010-2222-2222", "안녕");
phone.sendInput("홍길남", "010-2222-2222");
phone.sendButton();
}
}++ this 객체 관련 추가 문제(이것이 자바다)
public class Korean {
// 필드 선언
public String nation = "";
public String name = "";
public String ssn = "";
// 생성자 선언
public Korean(String nation, String ssn) {
super();
this.nation = nation;
this.ssn = ssn;
}
}
2. 클래스의 생성자,메소드
(1) 생성자
- 객체지향 프로그래밍에서 클래스로부터 객체를 생성할때 호출하는 특별한 메소드.
- 즉, 초기화작업을 수행함.
1) 기본 생성자
- 클래스에 생성자가 명시적으로 정의되어 있지 않으면 컴파일러가 자동적으로 기본 생성자 추가
- 생성자 자동완성: 오른쪽마우스 > source > Generate constructor using field 클릭 후 해당 데이터에 대한 생성자 생성.
public Student() { }2) 매개변수를 가진 생성자
- 클래스는 하나 이상의 생성자를 가짐
- 매개변수를 가진 생성자를 정의하여 객체 생성시 초기값 설정 가능
public Student(String name, int age) {
	this.name = name;
    this.age = age;
}
3) 메소드 오버라이딩
- 객체지향 프로그래밍에서 하위 클래스가 상위클래스로부터 상속받아 재정의함.
@Override
public String toString() {
	return "Human [name =" + name + ", age=" + age + ", height=" + height +"]";
}
3. 참조 자료형 비교연산,equals
(1) equals메소드
- equals는 두 객체를 비교할때 사용하는 메소드
- ==는 변수에 들어있는 값을 비교하는 연산자
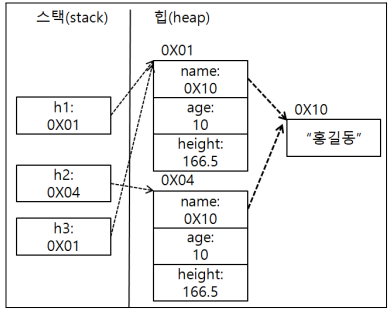
Human h1 = new Human("홍길동",10,166.5);
Human h2 = new Human("홍길동",10,166.5);
Human h3 = h1;
System.out.println(h1==h2);
System.out.println(h1==h3);
System.out.println(h1.equals(h2));
System.out.println(h1.equals(h3));
(2) object 메소드
- object는 객체를 생성하는 최상위 클래스
4. 클래스
(1) 클래스 관련 용어
- 필드: 클래스의 데이터를 저장하는 변수
- 생성자: 객체를 만들때 호출되는 특별한 메소드
- 메소드: 클래스가 제공하는 기능을 나타내는 함수
- 접근 제어자: 클래스의 필드와 메소드에 대한 접근권한 지정(public, private, protected)
- 클래스: 관련있는 코드를 묶어놓은 것. 즉, 객체 형태로 만들어 원하는 기능의 프로그램 만듬.
- 객체: 현실 세계에 존재하는 모든 것.
- 인스턴스: 클래스를 이용하여 프로그램에서 실제 데이터 저장공간을 메모리에 할당받아 프로그램에서 사용할 수 있는 상태
- 인스턴스는 new연산자를 사용함.
1) public
- 프로그램에서 모든 지역 사용 가능
2) private
- 선언된 클래스 내부에서만 접근 가능
3) protected
- 상속된 클래스에만 사용 가능
- this: 해당 클래스의 여러 인스턴스 중 자기 자신을 의미함.
public class Person {
	// 필드 선언
	String name;
	int age;
	// 생성자
	public Person(String name, int age) {
		this.name = name;
		this.age = age;
	}

	//메소드선언
	public void PrintInfo() {
		System.out.println("이름: " + this.name + ", 나이: " + this.age);
	}
}
public class Main {

	public static void main(String[] args) {
		Person person = new Person("John", 30);
		person.PrintInfo();
		Person p1 = new Person("p1", 29);
		Person p2 = new Person("p2", 23);

	}

}
(2) 클래스 구성요소
1. 클래스 구성요소
class Circle {
	// 필드
    	// 클래스 필드: static붙어있음. 전역 사용가능, 한개만 생성
        // 인스턴스 필드: static이 없음. 필요할때 new연산자 사용, 여러개 생성
    // 생성자
    	// 정적 블록: static{로직} 클래스필드 값 초기화
        // 생성자: public Circle{} 인스턴스필드값 초기화
    // 메소드
    	// 클래스 메소드: 클래스필드를 조작
        // 인스턴스 메소드: 인스턴스 필드를 조작
}
===========================================================
<예시>
class Circle {
	// 클래스 필드
	private static int totalCount = 0;
    public static final double PI = 3.14;
    // 인스턴스 필드
    public int serialNumber = 0;
    public double r=0;
    // 정적 블록
    static {
    	Circle.totalCount = 0;
    }
    // 생성자
    public Circle() { this(5); }
    public Circle(int r) {
    this.r = r;
    Circle.totalCount++;
    createSN(); // 시리얼넘버생성
    }
    // 클래스 메소드
    public static int getTotalCount() {
    	return Circle.totalCount;
    }
    // 인스턴스 메소드
    public double area() {
    	return 2 * this.r * Circle.PI;
    }
    public int getSerialNumber() {
    	return this.serialNumber;
   	}
    private void createSN() {
    	this.serialNumber = Circle.totalCount;
    }
}
===========================================================
<예시2> p.307 이미지 참고
// 클래스
public class Card {
	// 필드: 정적필드
	public static int width = 80;
    public static int height = 140;
    // 필드: 동적필드
    public int number = 1;
    public String numberShape = "A";
    public String shape = "하트";

    // 정적 블록
    static { Card.width = 80; Card.height = 140; }
    // 생성자
    public Card() {}
    // 정적 메소드(클래스 메소드)
    public static void displaySize() {
    	System.out.println("카드의 넓이는"+Card.width + " 높이는" + Card.height);
    }
    // 인스턴스 메소드
    public void displayCard() {
    	System.out.println("카드의 넓이는" + Card.width + " 높이는" + Card.height + " 카드 모양은
        + this.shape + "카드 숫자는" + this.numberShape);
===========================================================
<정리: 클래스필드, 인스턴스 필드 선언>
1. 클래스 필드
public(접근 제한자) static int(자료형) getAge()(필드명) {};
2. 인스턴스 필드
public int Circle() {};
<정리2>
- 인스턴스 필드의 경우 인스턴스 메소드나 생성자된 인스턴스 변수에만 접근가능.
- 인스턴스 메소드나 변수가 존재하지 않으면 접근 불가능.
- 인스턴스 메소드는 인스턴스 없이 호출 불가능
(3) 클래스 관련 예제
-복습용도 활용(p.297~299)1. BankAccount
public class BankAccount {
private String accountNumber = "";
private String accountOwner = "";
private double balance = 0;
public BankAccount(String accountNumber, String accountOwner, double balance) {
this.accountNumber = accountNumber;
this.accountOwner = accountOwner;
this.balance = balance;
}
public void deposit(double amount) {
balance += amount;
}
public void withdraw(double amount) {
if(amount <= balance) {
balance -= amount;
} else {
System.out.println("잔액 부족입니다.");
}
}
public void printInfo() {
System.out.println("Account Number: " + accountNumber);
System.out.println("Account Owner: " + accountOwner);
System.out.println("balance: " + balance);
}
}
public class Main06 {
public static void main(String[] args) {
BankAccount account = new BankAccount("123-456-789", "John Smith", 1000.0);
account.deposit(500.0);
account.withdraw(200.0);
account.printInfo();
}
}
2. Circle
public class Circle1 {
private double radius = 0;
private double x = 0;
private double y = 0;
// 기본 생성자
public Circle1() {
this.radius = 0.0;
this.x = 0.0;
this.y = 0.0;
}
// 생성자 메소드
public Circle1(double radius) {
this.radius = radius;
this.x = 0.0;
this.y = 0.0;
}
public Circle1(double radius, double x, double y) {
this.radius = radius;
this.x = x;
this.y = y;
}
// 메소드
public double getArea() {
// Math.pow: 거듭제곱함수
return Math.PI * Math.pow(radius, 2);
}
public double getCircumference() {
return 2 * Math.PI * radius;
}
}
public static void main(String[] args) {
Circle1 c1 = new Circle1(); // 기본생성자를 이용한 객체 생성
Circle1 c2 = new Circle1(5.0); // 반지름이 5인 객체 생성
Circle1 c3 = new Circle1(3.0,2.0,3.0); // 반지름이 3.0이고 중심이 (2,3)인 객체 생성
// 면적과 둘레 출력
System.out.println("원1의 면적: " + c1.getArea());
System.out.println("원1의 둘레: " + c1.getCircumference());
System.out.println("원2의 면적: " + c2.getArea());
System.out.println("원2의 둘레: " + c2.getCircumference());
System.out.println("원3의 면적: " + c3.getArea());
System.out.println("원3의 둘레: " + c3.getCircumference());
}
}(4) 접근 제한자
1) public
- 전역에서 사용 가능하다.
- 어디서든 접근 가능하다.
2) private
- 같은 클래스 내부에서만 접근 가능하다.
- 다른 클래스에서 접근할 수 없다.
3) protected
- 자기자신과 상속한 자식 클래스에서 사용할 수 있음.
4) default
- 같은 패키지에서만 사용 가능
1. private접근제한자
class Rectangle {
	private double height = 20;
    private double width = 40;
}
2. public 접근 제한자
class Rectangle {
	public double height = 20;
    public double width = 40;
}
++ 추가내용(이것이 자바다)
1. 클래스의 접근 제한
- 클래스가 어떤 접근 제한을 갖느냐에 따라 사용가능여부가 결정.
public class 클래스 {}
- public을 생략했다면 자동적으로 default 선언한다.
=============================================================================
<예시>
package A;
class A { }
package A;
public class B {
// 필드 선언
A a; // true
}
package B;
import package A;
public class C {
A a; // false: 같은 패키지가 아니다.
B b; // true
2. 생성자의 접근제한
public class ClassName {
// 생성자 선언
public | private ClassName {}
=============================================================================
<예시>
package A;
public class A {
// 필드 선언
A a1 = new A(true);
A a2 = new A(1);
A a3 = new A("문자열");
// public 접근 제한 생성자 선언
public A(boolean b) { }
// default 접근 제한자 선언
A(int b) { }
// private 접근 제한자 선언
private A(String s) { }
3. 필드와 메소드의 접근 제한
// 필드 선언
public | private 자료형 필드명;
// 메소드 선언
public | private 리턴타입 메소드;
=============================================================================
<예시>
package A;
public class A {
// public, int, private 접근 제한자 선언
public int field1;
int field2;
private int field3;
// 생성자 선언
public A() {
field1 = 1;
field2 = 1;
field3 = 1;
method1();
method2();
method3();
}
// public 접근 제한을 갖는 메소드 선언
public void method1() { }
public void method2() { }
public void method3() { }
Package A;
public class B {
// 객체 생성
A a = new A();
// 필드값 변경
a.field1 = 1;
a.field2 = 1;
a.field3 = 1;
// 메소드 호출
a.method1();
a.method2();
a.method3(); // false: private으로 접근 불가능
Package B;
Public class C {
// 객체 생성
A a = new A();
// 필드값 변경
a.field1 = 1;
a.field2 = 1;
a.field3 = 1;
// 메소드 호출
a.method1();
a.method2(); // false: 다른 패키지이기에 접근 불가능
a.method3(); // false: private이여서 접근 불가능5. final 문자 상수와 접근 제한자
(1) final로 문자상수 만들기
public static final int width=80;- 인스턴스 필드와 클래스 필드에 final을 붙이면 문자상수가 되어 변경할 수 없다
- 문자상수는 변경불가능한 특정 수치로 문자로 대신 사용
- 대표적 예: Math.PI
(2) Getter, Setter
- 사용이유: 클래스의 필드 값을 외부에서 직접적으로 변경하지 않도록 제어.
1) Getter
- 필드의 값을 조회하는 메소드
2) Setter
- 필드의 값을 설정하는 메소드
3) Getter, Setter 생성방법
1. 오른쪽 마우스 클릭 > source > Generate Getters and Setters
2. getter, setter를 추가하고 setter를 0보다 작은 수가 들어가지 않도록 로직 추가
3. source>constructor 이용해 생성자 추가. 생성자를 통해 음수가 들어오지 않도록 로직추가
4. 객체비교와 객체문자열 출력에 필요한 메소드 추가
5. 메인에서 만든 클래스 사용
++ 메모
java.lang.ClassNotFoundException 예외 오류
클래스의 괄호 짝이 맞아야 함.++ 이것이 자바다(추가예제)
package ch06.sec14;
// 필드선언
public int speed;
public boolean stop;
// speed 필드의 Getter/Setter 선언
public int getSpeed() {
return speed;
}
public void setSpeed(int speed) {
if(speed <0) {
this.speed = 0;
return;
} else {
this.speed = speed;
}
}
// stop 필드의 Getter/Setter 선언
public boolean isStop() {
return stop;
}
public void setStop(boolean stop) {
this.stop = stop;
if(stop == true) {
this.speed = 0;
}
}
public class Main08 {
public static void main(String[] args) {
// 객체 생성
Car1 myCar = new Car1();
// 잘못된 속도 변경
myCar.setSpeed(-50);
System.out.println("현재속도: " + myCar.getSpeed());
// 올바른 속도 변경
myCar.setSpeed(60);
System.out.println("현재속도: " + myCar.getSpeed());
// 멈춤
if(!myCar.isStop()) {
myCar.setStop(true);
}
System.out.println("현재속도: " + myCar.getSpeed());
}
} 
AI 실무 전문가가 되기 위한 길