1. 참조형 데이터 클래스
(1) 프로그램 구현 예제
1) 5명의 사람정보를 입력하여 화면에 출력해야 하는 프로그램
package com.human.ex;
import java.util.Scanner;
class Human {
	String name = "";
	int age = 0;
	double height = 0.0;
}
public class Practice {
	public static void main(String[] args) {
		// 5명의 사람정보를 입력하여 화면에 출력하는 프로그램을 구현해보자.
		Human h1 = new Human();
		Human h2 = new Human();
		Human h3 = new Human();
		Human h4 = new Human();
		Human h5 = new Human();
		h1.name = "홍길동";
		h1.age = 20;
		h1.height = 173.3;
		h2.name = "홍길남";
		h2.age = 25;
		h2.height = 171.6;
		h3.name = "홍길연";
		h3.age = 29;
		h3.height = 153.3;
		h4.name = "홍길전";
		h4.age = 30;
		h4.height = 177.5;
		h5.name = "홍길순";
		h5.age = 29;
		h5.height = 174.3;
		System.out.println(h1.name);
		System.out.println(h1.age);
		System.out.println(h1.height);
		System.out.println();
		System.out.println(h2.name);
		System.out.println(h2.age);
		System.out.println(h2.height);
		System.out.println();
		System.out.println(h3.name);
		System.out.println(h3.age);
		System.out.println(h3.height);
		System.out.println();
		System.out.println(h4.name);
		System.out.println(h4.age);
		System.out.println(h4.height);
		System.out.println();
		System.out.println(h5.name);
		System.out.println(h5.age);
		System.out.println(h5.height);
	}
}
2) 사람 2명, 고양이 3마리, 강아지 2마리 정보 입력하여 화면에 출력하는 프로그램
package com.human.ex;
import java.util.Scanner;
class Human {
	String name = "";
	int age = 0;
	double height = 0.0;
}
class Dog {
	String dogColor = "";
	int age = 0;
	String dogName = "";
	String dogOwnerName = "";
}
class Cat {
	String catColor = "";
	int age = 0;
	String catName = "";
	String catOwnerName = "";
}
public class Practice {
	public static void main(String[] args) {
		// 사람 2명, 고양이 3마리, 강아지 2마리 정보 입력하여 화면에 출력하는 프로그램
		Human h1 = new Human();
		Human h2 = new Human();
		Cat c1 = new Cat();
		Cat c2 = new Cat();
		Cat c3 = new Cat();
		Dog d1 = new Dog();
		Dog d2 = new Dog();
		h1.name = "홍길동";
		h1.age = 20;
		h1.height = 173.3;
		h2.name = "홍길남";
		h2.age = 25;
		h2.height = 171.6;
		c1.catColor = "갈색";
		c1.catName = "고양이";
		c1.catOwnerName = "홍길영";
		c2.catColor = "흰색";
		c2.catName = "고양이";
		c2.catOwnerName = "홍길훈";
		c3.catColor = "살색";
		c3.catName = "고양이";
		c3.catOwnerName = "홍길하";
		d1.dogColor = "검정색";
		d1.dogName = "강아지";
		d1.dogOwnerName = "신용장";
		d2.dogColor = "갈색";
		d2.dogName = "강아지";
		d2.dogOwnerName = "신용권";
		System.out.println(h1.name);
		System.out.println(h1.age);
		System.out.println(h1.height);
		System.out.println();
		System.out.println(h2.name);
		System.out.println(h2.age);
		System.out.println(h2.height);
		System.out.println();
		System.out.println(c1.catColor);
		System.out.println(c1.catName);
		System.out.println(c1.catOwnerName);
		System.out.println();
		System.out.println(c2.catColor);
		System.out.println(c2.catName);
		System.out.println(c2.catOwnerName);
		System.out.println();
		System.out.println(c3.catColor);
		System.out.println(c3.catName);
		System.out.println(c3.catOwnerName);
		System.out.println();
		System.out.println(d1.dogColor);
		System.out.println(d1.dogName);
		System.out.println(d1.dogOwnerName);
		System.out.println();
		System.out.println(d2.dogColor);
		System.out.println(d2.dogName);
		System.out.println(d2.dogOwnerName);
		System.out.println();
	}
}
- 대량의 정보를 취급하거나 다양한 객체를 다룰 때 클래스를 이용하여 관리하면 편함.
(2) 클래스를 선언하는 방법
1) Human클래스를 정의하고 선언하는 방법
1. Human 클래스를 정의한다.public class Human { public String name; public int age; public double height; }
- 클래스 변수 선언한다.
Human h = new Human();
Human h2 = new Human();
- 클래스 변수 선언 부분을 잘 보면 기본 자료형 선언하는 것과 동일함.
즉, int a; 처럼 Human h; 같이 기술함.- h에 힙에 생성된 메모리 주소 값을 h에 넣는다. h=new Human();
- new 연산자를 사용하면 클래스 안에 선언된 변수 데이터를 저장할 수 있는 공간이 힙 영역의 메모리에 잡혀 저장하게 된다.
- 클래스 변수가 지역변수라면? 변수의 주소는 스택영역에 변수의 실제값은 힙 영역에 들어감.
- new 연산자를 사용하면 실제 데이터는 힙 영역에 생성되고 지역에 선언된 클래스 변수 안에는 실제 데이터에 들어갈 주소가 저장된다.
- 힙에 생성된 값을 인스턴스라고 함.
(3) 인스턴스
- 인스턴스는 클래스를 프로그램에서 사용할 수 있도록 메모리에 실제로 생성한 상태를 의미함.
- 다시 말해서, Human h = new Human(); 의 Human클래스가 할당되어 h에 주소가 들어간 클래스 변수를 인스턴스라고 함.
- Human h;는 스택에 human데이터를 저장할 변수 h를 선언. 스택에 human객체의 실제데이터 주소의 변수 공간이 생성.
1) 정의한 클래스를 사용할 수 있도록 new연산자와 =연산자를 사용하여 인스턴스 생성
int a = 10; // int 자료형 a 변수명
Human h = new Human(); // Human은 사용자 정의 자료형 클래스 h는 클래스 변수명
new Human(); // 힙에 저장공간을 만들고 해당 주소를 생성함.
h // 힙에 생성된 저장공간 주소가 들어있는 인스턴스
- 즉, 여러 사람을 클래스 인스턴스화하려고 하면 다음과 같음.
Human h1 = new Human();
Human h2 = new Human();
Human h3 = new Human();
Human h4 = new Human();
Human h5 = new Human();
2) 접근 방법: 클래스 인스턴스에 .(주소 연산자)를 찍어 인스턴스에 저장된 값을 접근.
- 인스턴스의 이름, 나이, 키 데이터를 저장하고 출력하는 방법.
// 클래스 사용
Human h = new Human();
h.name = "홍길동"; // 인스턴스에 .을 찍어서 변경하고자 하는 값을 접근가능
h.age = 14; // = 연산자를 사용하여 새로운 값을 할당.
h.height = 123.24;
System.out.println(h.name); // 클래스에 저장된 데이터를 읽어보는 방법.
System.out.println(h.age);
System.out.println(h.height);
package com.human.ex;
class Human {
	public String name = "";
	public int age = 0;
	public double height = 0;
}
public class Practice {
	public static void main(String[] args) {
		// 사용을 위한 클래스 선언
		Human h1 = new Human();
		h1.name = "홍길동";
		h1.age = 25;
		h1.height = 166.5;
		// 클래스 데이터 출력
		System.out.println("name: " + h1.name);
		System.out.println("age: " + h1.age);
		System.out.println("height: " + h1.height);
	}
}
- 상위코드는 사람 관련 변수를 클래스로 작성한 결과물.
- 지역변수는 스택에 참조형 데이터의 실제 데이터 주소. 힙은 실제 데이터.
(4) String 클래스
- String 자료형은 new 연산자를 사용하지 않음.
- 문자열은 특별히 많이 사용되어 str = "문자열데이터";와 같은 형태로 지원함.
- String("문자열데이터"); 같은 형태도 사용가능.
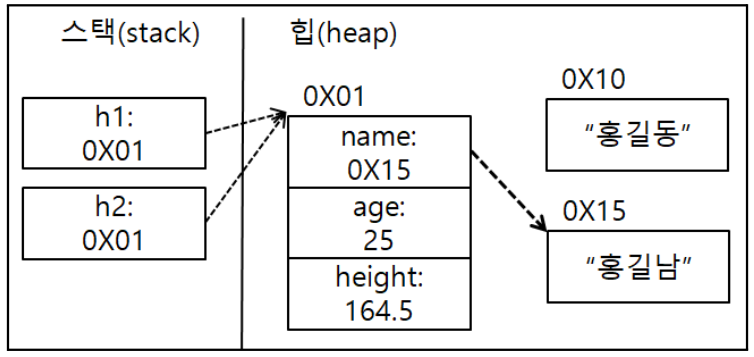
Human h1 = new Human();
h1.name = "홍길동";
h1.age = 25;
h1.height = 166.5;
System.out.println("name: " + h1.name);
System.out.println("age: " + h1.age);
System.out.println("height: " + h1.height);
System.out.println();
h1 = new Human();
h1.name = "홍길남";
h1.age = 26;
h1.height = 164.5;
System.out.println("name: " + h1.name);
System.out.println("age: " + h1.age);
System.out.println("height: " + h1.height);
- h1변수에 새로운 변수를 선언하지 않고 기존 변수 h1에 다시 Human객체를 생성.
- 이럴 경우, 기존 h1 변수의 데이터는 새로 변경된 h1 변수의 데이터로 저장된다.
1) 클래스 필드에 new 연산자를 사용하지 않고 이미 생성해 놓은 클래스 필드주소를 넣었을때
Human h1 = new Human();
h1.name = "홍길동";
h1.age = 25;
h1.height = 166.5;
System.out.println("name: " + h1.name);
System.out.println("age: " + h1.age);
System.out.println("height: " + h1.height);
System.out.println();
Human h2 = h1;
h2.name = "홍길남";
h2.height = 164.5;
System.out.println("h1.name: " + h1.name);
System.out.println("h1.age: " + h1.age);
System.out.println("h1.height: " + h1.height);
System.out.println();
System.out.println("h2.name: " + h2.name);
System.out.println("h2.age: " + h2.age);
System.out.println("h2.height: " + h2.height);
- 화면에 출력하는 것은 홍길동이 아닌 홍길남이 출력된다.
- 이유: 같은 주소로 인스턴스에 접근하였기 때문에 한쪽 변수에서 다른 데이터의 변수로 변경하면 다른쪽 변수에 영향을 미쳐 새로운 변수인 데이터로 변경이 된다.

(5) 클래스를 분리해서 작업하는 방법
- file > new > java project 클릭
- 프로젝트 안의 src 폴더에서 오른쪽 마우스 클릭한다음 new 다음 클래스 파일 생성.
- 만들 클래스명을 작성하고 메소드에 메인 메소드를 출력하는 칸을 해제한다.
- 해당 클래스 파일을 만들었으면 메인 메소드 바이트코드 파일을 생성하기 위해 또 한번 똑같이 진행한다.
- 메인 메소드 바이트코드 파일은 메인 메소드를 출력하는 칸을 체크하면 된다.
(6) Scanner 클래스 보충설명
- 이전에 사용자 입력으로 사용한 Scanner 클래스는 java.util.Scanner로 선언한것과 같은 이유임.
- java.util.Scanner라 하지 않고 java.util.* 이라고 작성하면 Scanner라고 기술해도 큰 문제 없음.
(7) 실습문제
- 우리 주위의 클래스를 만들어서 데이터를 넣고 출력하기.
// 학생 클래스
package com.human.ex;
public class Student {
	String name = "";
	int grade;
	int score;
	String teacherName;
	int rank;
}
// 성적표 클래스(메인) package com.human.ex; import com.human.ex.Student; public class ScoreList { public static void main(String[] args) { Student s = new Student(); s.name = "홍길동"; s.grade = 3; s.score = 98; s.rank = 1; s.teacherName = "한영권"; System.out.println("이름: " + s.name); System.out.println("학년: " + s.grade); System.out.println("점수: " + s.score); System.out.println("순위: " + s.rank); System.out.println("교사 이름: " + s.teacherName); } }
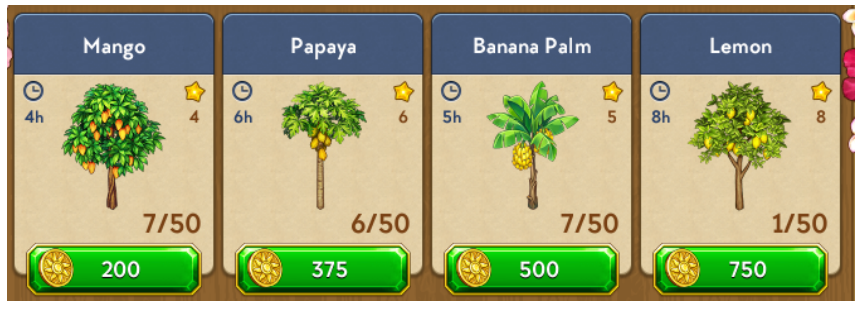
- 다음 이미지를 보고 데이터를 뽑아 Tree 클래스 만들기
객체: 나무 이름, 나무 가격, 소요시간, 경험치, 현재 나무 수, 최대 심을 수 있는 나무 수package com.human.ex; class Tree_info { String name; int price; int hour; int exp; int totalTree; int maxTotalTree; } public class Tree { public static void main(String[] args) { Tree_info t1 = new Tree_info(); t1.name = "Mango"; t1.price = 200; t1.hour = 4; t1.exp = 4; t1.totalTree = 7; t1.maxTotalTree = 50; System.out.println("나무 이름: " + t1.name); System.out.println("나무 가격: " + t1.price); System.out.println("나무 소요시간: " + t1.hour); System.out.println("나무 경험치: " + t1.exp); System.out.println("현재 심은 나무 수: " + t1.totalTree); System.out.println("최대 심을 수 있는 나무 수: " + t1.maxTotalTree); System.out.println(); Tree_info t2 = new Tree_info(); t2.name = "Papaya"; t2.price = 375; t2.hour = 6; t2.exp = 6; t2.totalTree = 6; t2.maxTotalTree = 50; System.out.println("나무 이름: " + t2.name); System.out.println("나무 가격: " + t2.price); System.out.println("나무 소요시간: " + t2.hour); System.out.println("나무 경험치: " + t2.exp); System.out.println("현재 심은 나무 수: " + t2.totalTree); System.out.println("최대 심을 수 있는 나무 수: " + t2.maxTotalTree); System.out.println(); Tree_info t3 = new Tree_info(); t3.name = "Banana Palm"; t3.price = 500; t3.hour = 5; t3.exp = 5; t3.totalTree = 7; t3.maxTotalTree = 50; System.out.println("나무 이름: " + t3.name); System.out.println("나무 가격: " + t3.price); System.out.println("나무 소요시간: " + t3.hour); System.out.println("나무 경험치: " + t3.exp); System.out.println("현재 심은 나무 수: " + t3.totalTree); System.out.println("최대 심을 수 있는 나무 수: " + t3.maxTotalTree); System.out.println(); Tree_info t4 = new Tree_info(); t4.name = "Lemon"; t4.price = 750; t4.hour = 8; t4.exp = 8; t4.totalTree = 1; t4.maxTotalTree = 50; System.out.println("나무 이름: " + t4.name); System.out.println("나무 가격: " + t4.price); System.out.println("나무 소요시간: " + t4.hour); System.out.println("나무 경험치: " + t4.exp); System.out.println("현재 심은 나무 수: " + t4.totalTree); System.out.println("최대 심을 수 있는 나무 수: " + t4.maxTotalTree); System.out.println(); } }
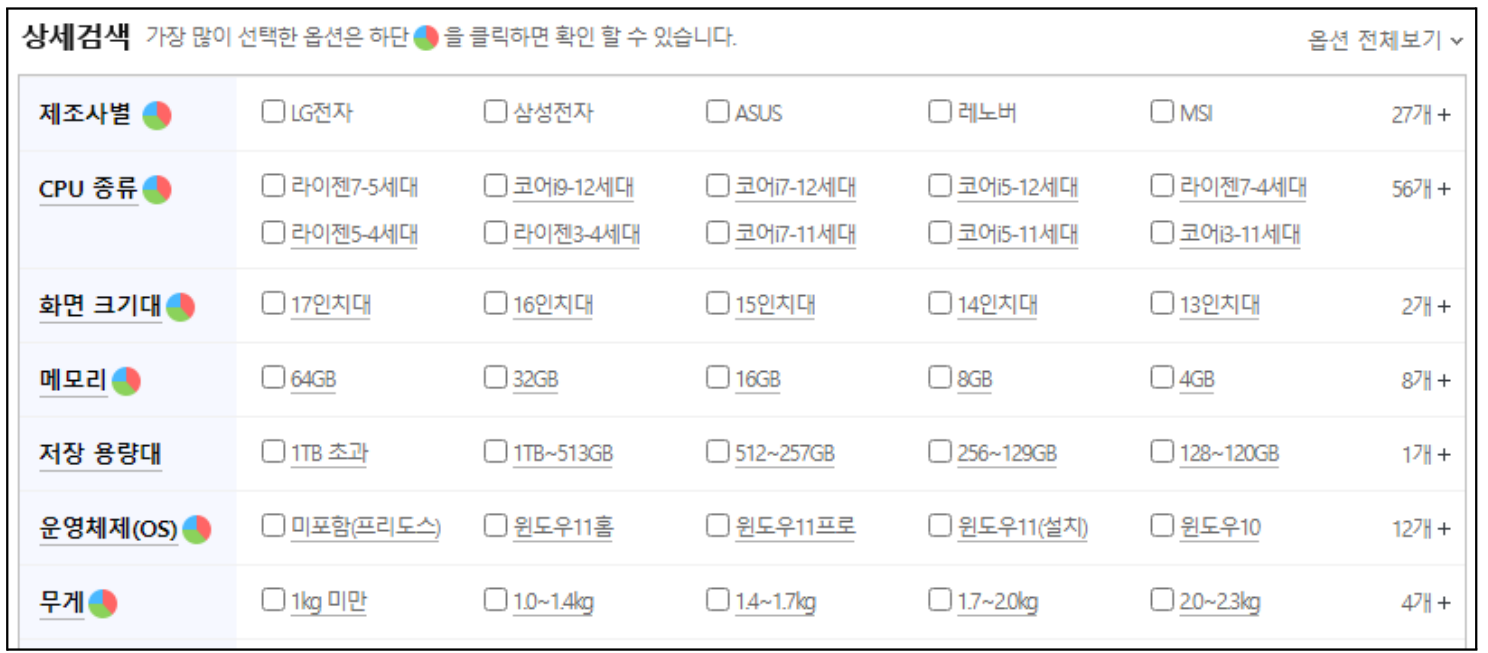
- 아래 이미지는 노트북 관련 데이터들. 원하는 데이터를 뽑아서 클래스를 만들고 다음 이미지의 데이터를 넣어 화면에 출력해보자.
package com.human.ex1;
public class Laptop_data {
	public String itemName;
	public String company;
	public String cpu;
	public String display;
	public String volume;
	public String memory;
	public String os;
	public double weight;
}
package com.human.ex1; import com.human.ex1.Laptop_data; public class Laptop { public static void main(String[] args) { Laptop_data ld = new Laptop_data(); ld.itemName = "ASUS 비보북 프로 15 K3500PC-KJ153"; ld.company = "ASUS"; ld.cpu = "코어i5-11세대"; ld.display = "39.62cm(15.6인치)"; ld.memory = "16GB"; ld.volume = "256GB"; ld.os = "미포함(프리도스)"; ld.weight = 1.65; Laptop_data ld2 = new Laptop_data(); ld2.itemName = "APPLE 2020 맥북에어 MGN63KH/A"; ld2.company = "APPLE"; ld2.cpu = "실리콘 M1"; ld2.display = "33.78cm(13.3인치)"; ld2.memory = "8GB"; ld2.volume = "256GB"; ld2.os = "macOS Big Sur"; ld2.weight = 1.29; System.out.println("품목명: " + ld.itemName); System.out.println("제조사: " + ld.company); System.out.println("cpu 종류: " + ld.cpu); System.out.println("화면크기: " + ld.display); System.out.println("메모리: " + ld.memory); System.out.println("용량: " + ld.volume); System.out.println("운영체제: " + ld.os); System.out.println("무게: " + ld.weight + "kg"); System.out.println(); System.out.println("품목명: " + ld2.itemName); System.out.println("제조사: " + ld2.company); System.out.println("cpu 종류: " + ld2.cpu); System.out.println("화면크기: " + ld2.display); System.out.println("메모리: " + ld2.memory); System.out.println("용량: " + ld2.volume); System.out.println("운영체제: " + ld2.os); System.out.println("무게: " + ld2.weight + "kg"); System.out.println(); } }


(8) 클래스 추가설명
- 클래스는 사용자 정의 변수.
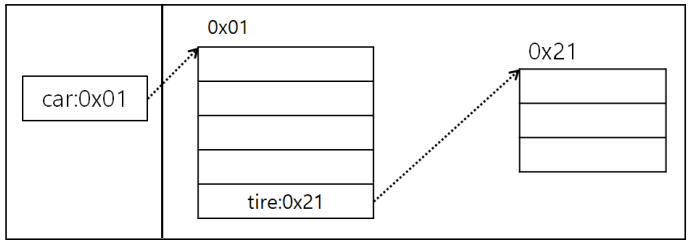
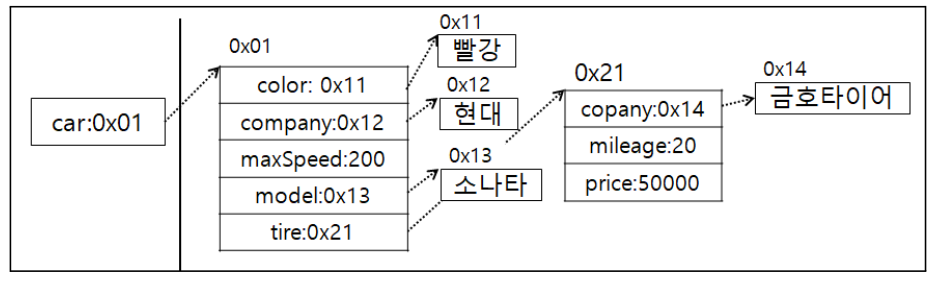
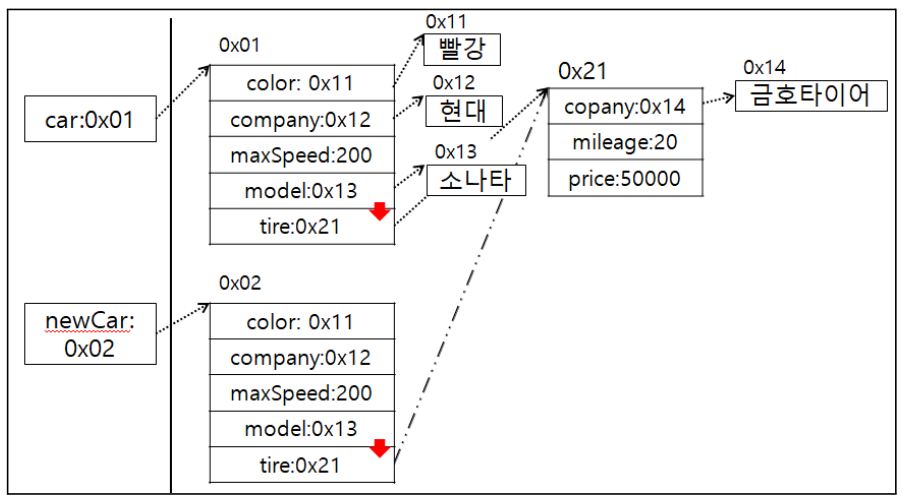
클래스 안에 변수(필드)로 다른 클래스를 사용이 가능하다.package com.human.dto; public class Car { public String color = ""; public String company = ""; public int maxSpeed = 0; public String model = ""; public Tire tire = new Tire(); }package com.human.dto; public class Tire { public String company = ""; public double price = 0; public double mileage = 0; }package com.human.ex; import com.human.dto.Car; public class Start001 { public static void main(String[] args) { Car car = new Car(); car.color="빨강"; car.company = "현대"; car.maxSpeed = 200; car.model = "소나타"; car.tire.company = "금호타이어"; car.tire.mileage = 20; car.tire.price = 50000; Car newCar = new Car(); // newCar = car; newCar.color = car.color; newCar.company = car.company; newCar.maxSpeed = car.maxSpeed; newCar.model = car.model; // newCar.tire = car.tire; newCar.tire.company = car.tire.company; newCar.tire.mileage = car.tire.mileage; newCar.tire.price = car.tire.price; System.out.println(car.color); System.out.println(car.tire.company); System.out.println(newCar.color); System.out.println(newCar.tire.company); } }
- newCar~ : car.tire.price 처럼 지속적으로 .을 찍어서 접근.
- 즉, 값이 분리된 상태의 객체를 만들어 값을 복사하고 객체의 값을 출력함.
- 클래스 안의 클래스는 클래스필드.클래스필드. 과 같이 .을 찍어서 접근이 가능함.
<스택과 힙 메모리: 코드로 보면서 확인하기>
- 14라인(Car newCar = new Car();) 선언x, 15라인 주석 선언할 경우
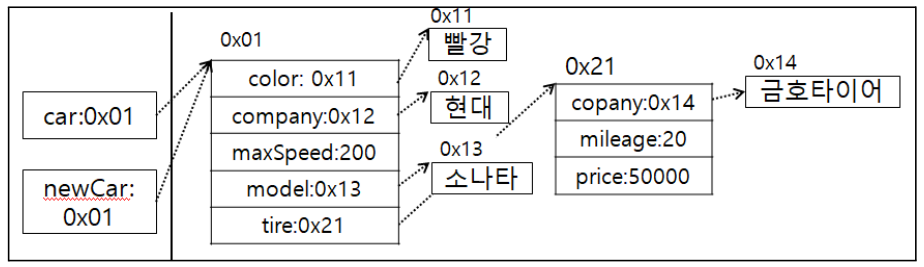
- 14라인 선언한 경우
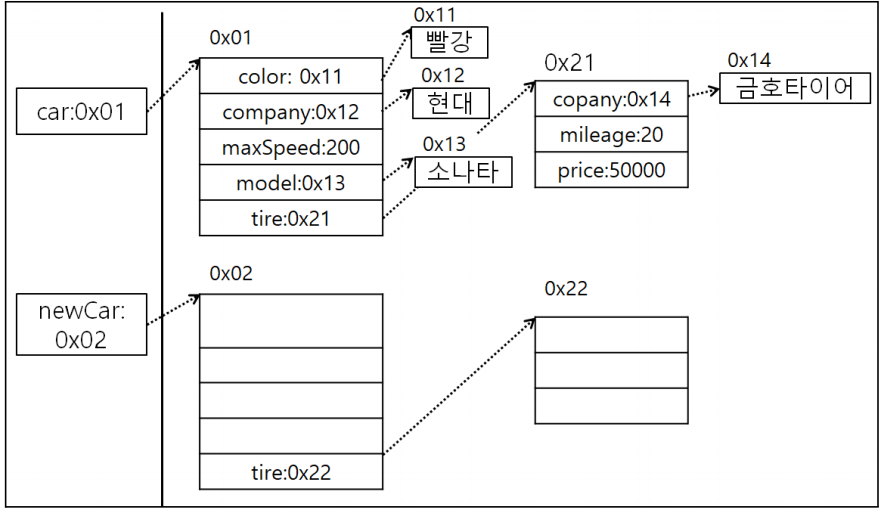
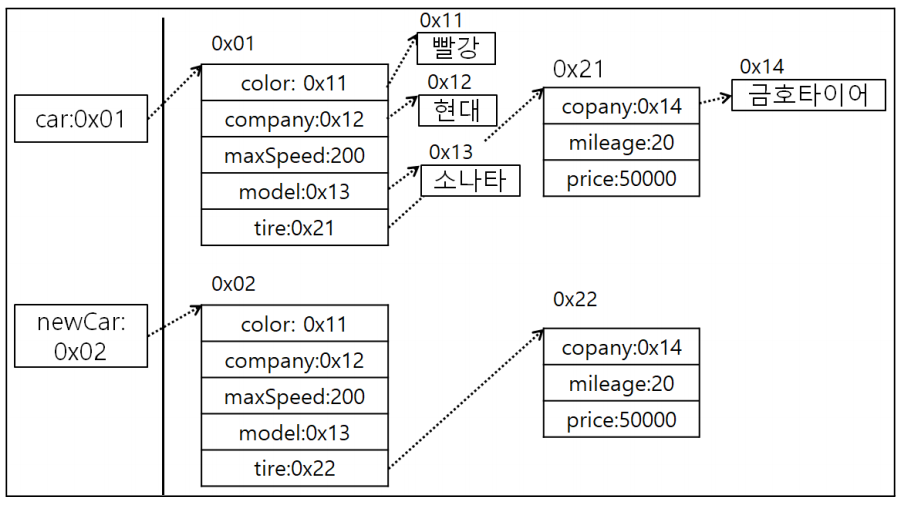
- 데이터를 복사하여 넣는 경우(newCar)
- 문자열 상수는 같은 값을 2번쓴다고 해서 힙 메모리 상수에 2번 들어가지 않음.
- 이유: 상수는 변경이 불가능하고 읽기만 가능한 데이터. 여러개 생성해봐야 의미없음.
- 두개 전부 데이터를 넣고 싶다면 new 연산자를 사용해야 한다.
- 하지만, 힙 메모리에 주소가 다른 2개의 문자열 데이터가 생성되지만 string 클래스는 문자열 값을 변경할 수 있는 방법이 없다.
- 결론은 String 클래스 안에 주소가 같은 값이 들어있어도 변경이 불가능하므로 참조 데이터의 값을 변경해서 생기는 문제는 발생x
- 예를 들면, car 인스턴스를 통해 문자열 데이터를 변경하더라도 newCar 인스턴스에 영향을 미치지 않는다.
(9) String 클래스 == 연산자
- == 연산자는 비교 대상에 들어있는 값을 비교함.
- 클래스 같은 사용자 정의 데이터는 ==을 이용하지 않고 .equals 함수를 사용함.
String name = "홍길동";
String name = new String("홍길동");
- 상위 2개 차이점
- 1번: 힙 영역 상수풀에 생성.
- 2번: 힙 영역 상수풀이 아닌 일반 힙 영역에 생성.
- 상수는 변경 불가능하여 같은 값을 가지는 상수 여러개 기술해도 한개만 생성.
- 하지만, new 연산자를 사용하여 String 클래스를 생성한 경우 일반 힙 영역에 생성된다.
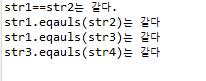
package com.human.ex;
public class Practice {
	public static void main(String[] args) {
		// 참조 자료형에서 String의 equals 메소드는 들어있는 문자열데이터를 비교함.
		// String의 equals메소드는 들어있는 문자열 데이터 비교
		String str1 = "홍길동";
		String str2 = "홍길동";
		String str3 = new String("홍길동");
		String str4 = new String("홍길동");
		if(str1 == str2) {
			System.out.println("str1==str2는 같다.");
		}
		if(str1 == str3) {
			System.out.println("str1==str3는 같다.");
		}
		if(str3 == str4) {
			System.out.println("str3==str4는 같다.");
		}
		if(str1.equals(str2)) {
			System.out.println("str1.eqauls(str2)는 같다");
		}
		if(str1.equals(str3)) {
			System.out.println("str1.eqauls(str3)는 같다");
		}
		if(str3.equals(str4)) {
			System.out.println("str3.eqauls(str4)는 같다");
		}
	}
}
(10) 실습예제문제
- 사용자가 바위를 입력하면 무승부가 출력하는 프로그램
package com.human.ex;
import java.util.Scanner;
public class Practice {
	public static void main(String[] args) {
		Scanner scanner = new Scanner(System.in);
		System.out.print("상대가 바위를 냈습니다. 무승부하기 위해 무엇을 내야 할까요?> ");
		String a = scanner.nextLine();
		if("바위".equals(a)) {
			System.out.println("무승부");
		}
	}
}
- 사용자 입력을 받아 10보다 큰지 크지 않은지 출력하는 프로그램
package com.human.ex;
import java.util.Scanner;
public class Practice {
	public static void main(String[] args) {
		Scanner scanner = new Scanner(System.in);
		System.out.print("정수를 입력해주세요> ");
		int a = Integer.parseInt(scanner.nextLine());
		if(a>10) {
			System.out.println("10보다 큽니다.");
		} else {
			System.out.println("10보다 작습니다.");
		}
	}
}
- 사용자 입력 true를 받아서 'true'가 입력되었습니다, 'true'가 입력되지 않았습니다 출력
package com.human.ex;
import java.util.Scanner;
public class Practice {
	public static void main(String[] args) {
		Scanner scanner = new Scanner(System.in);
		System.out.print("true를 입력해주세요> ");
		String a = scanner.nextLine();
		if(a.equals("true")) {
			System.out.println("true가 입력되었습니다.");
		} else {
			System.out.println("true가 입력되지 않았습니다.");
		}
	}
}
- 사용자에게 숫자를 입력받아 1004이면 '암호가 맞음' 아니면 '암호가 틀림'이 출력되도록 프로그램 구현
package com.human.ex;
import java.util.Scanner;
public class Practice {
	public static void main(String[] args) {
		Scanner scanner = new Scanner(System.in);
		System.out.print("암호를 입력해주세요> ");
		String a = scanner.nextLine();
		if(a.equals("1004")) {
			System.out.println("암호가 맞음.");
		} else {
			System.out.println("암호가 틀림.");
		}
	}
}
- '안녕'을 입력하면 '너도 안녕', '잘자' 입력하면 '너도 잘자' ,'잘가' 입력되면 '너도 잘가' 출력되돌 프로그램 구현
package com.human.ex;
import java.util.Scanner;
public class Practice {
	public static void main(String[] args) {
		Scanner sc1 = new Scanner(System.in);
		System.out.print("친구와 만났습니다. 뭐라고 대답할까요?> ");
		String a = sc1.nextLine();
		if(a.equals("안녕")) {
			System.out.println("너도 안녕");
		}
		System.out.println();
		Scanner sc2 = new Scanner(System.in);
		System.out.print("잘 시간입니다. 뭐라고 대답할까요?> ");
		String b = sc2.nextLine();
		if(b.equals("잘자")) {
			System.out.println("너도 잘자");
		}
		System.out.println();
		Scanner sc3 = new Scanner(System.in);
		System.out.print("친구와 헤어질 시간입니다. 당신은 뭐라고 대답해야 할까요?> ");
		String c = sc3.nextLine();
		if(c.equals("잘가")) {
			System.out.println("너도 잘가");
		}
	}
}
2. 배열 타입
- 변수는 하나의 값만 저장가능. 즉, 저장할 값 수가 많아지면 그만큼 많은 변수가 필요함.
- 예를 들면, 학생 50명의 성적을 저장하고 평균을 구하려고 할때 하나의 자료형과 변수를 선언하고 평균값을 출력해야 한다. 이 방법으로 하면 비효율적임.
- 따라서, 많은 양의 값을 다루는 효율적인 방법을 우리는 배열이라고 한다.
(1) 배열
- 연속된 공간에 값을 나열시키고 각 값에 인덱스를 부여해 놓은 자료구조.
- 인덱스는 대괄호 [ ]와 함께 사용하여 각 항목의 값을 읽거나 저장이 가능.
- 예: score[0]:83, score[1]:90
- 배열의 인덱스를 이용해서 for문을 구할수 있음.
int sum = 0;
for(int i=0; i<50; i++) {
	sum += score[i];
}
int avg = sum / 50;
- 배열은 같은 타입의 값만 관리.
- 배열의 길이는 늘리거나 줄일 수 없다.
(2) 배열 변수 선언
- 배열을 사용하기 위해서 배열 변수를 선언.
- 관례적으로 타입[ ] 변수;를 사용한다.
- 타입은 배열에 저장될 값의 타입.
int[] intArray;
double[] doubleArray;
String[] strArray;
- 배열 변수도 참조 변수.
- 배열도 객체이므로 힙 영역에 생성.
- 배열 변수는 힙 영역의 배열 주소를 저장한다.
- 참조할 배열이 없다면 배열 변수도 null 초기화 가능
- 만약, 배열 변수가 null값을 가진 상태에서 변수[인덱스]로 값을 읽거나 저장하게 되면 NullPointerException 발생.
(3) 값 목록으로 배열 생성
- 배열에 저장될 값이 목록이 있다면 다음과 같이 간단하게 배열 생성
타입[] 변수 = { 값0, 값1, 값2, 값3, ... }
- 중괄호는 나열된 값들을 항목으로 가지는 배열을 힙에 생성. 번지를 리턴함.
- 예: "Spring", "Summer", "fall", "Winter"의 문자열을 갖는 배열
String[] season = { "Spring", "Summer", "fall", "Winter" };
season[1] = "여름";
- 중괄호로 감싼 값의 목록을 배열 변수에 대입할때 주의사항
- 배열 변수를 미리 선언한 후 값 목록을 변수에 대입할 수 없음.
타입[ ] 변수;
변수 = { 값0, 값1, 값2, 값3, ... } ; // 컴파일 에러
- 배열 변수를 선언한 시점과 값 목록이 대입되는 시점이 다르다면 new 타입[ ]을 중괄호 앞에 붙여주면 된다.
변수 = new 타입[ ] { 값0, 값1, 값2, 값3, ... };
(4) (1)~(3) 에 대한 예제문제
- Arrays.toString: 배열의 내용을 String타입의 데이터로 변환
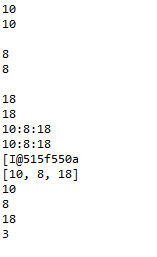
package com.human.ex;
import java.util.Arrays;
public class Practice {
	public static void main(String[] args) {
		// 일반변수와 배열에 3명의 나이를 저장해 출력해보자.
		int humanAge1 = 10;
		int humanAge2 = 12;
		int humanAge3 = 15;
		int humanAgeArr[] = {10, 12, 15};
		// human1의 나이를 출력해보자.
		System.out.println(humanAge1);
		System.out.println(humanAgeArr[0]);
		System.out.println();
		// human2의 나이를 8로 변경해보자
		humanAge2 = 8;
		humanAgeArr[1] = 8;
		System.out.println(humanAge2);
		System.out.println(humanAgeArr[1]);
		System.out.println();
		// human3의 기존 나이에 3을 더해보자.
		humanAge3 = humanAge3 + 3;
		humanAgeArr[2] = humanAgeArr[2]+3;
		System.out.println(humanAge3);
		System.out.println(humanAgeArr[2]);
		// human정보 출력
		System.out.println(humanAge1 + ":" + humanAge2 + ":" + humanAge3);
		System.out.println(humanAgeArr[0]+":"+humanAgeArr[1] + ":" + humanAgeArr[2]);
		// 배열의 주소가 출력
		System.out.println(humanAgeArr);
		// 배열 내용 출력
		System.out.println(Arrays.toString(humanAgeArr));
		// 배열 크기 출력
		for(int i=0; i<3; i++) {
			System.out.println(humanAgeArr[i]);
		}
		System.out.println(humanAgeArr.length);
		}
	}
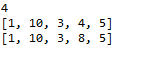
package com.human.ex;
import java.util.Arrays;
public class Practice {
	public static void main(String[] args) {
		int[] numbers = {1, 2, 3, 4, 5};
		// 배열 요소 접근
		int num1 = numbers[0]; // 1
		int num2 = numbers[2]; // 3
		System.out.println(num1 + num2);
		// 배열 요소 변경
		numbers[1] = 10;
		System.out.println(Arrays.toString(numbers));
		numbers[3] = 8;
		System.out.println(Arrays.toString(numbers));
	}
}
package com.human.ex;
import java.util.Arrays;
public class Practice {
	public static void main(String[] args) {
		// 배열 선언 및 초기화
		int[] numbers = {10,20,30,40,50};
		// 배열 요소 합계 계산
		int sum = 0;
		for (int i=0; i<numbers.length; i++) {
			sum += numbers[i];
		}
		// 배열 요소 평균 계산
		double avg = (double) sum / numbers.length;
		// 결과 출력
		System.out.println("합계: " + sum);
		System.out.println("평균: " + avg);
	}
}
package com.human.ex;
public class JavaStart00 {
	public static void main(String[] args) {
		// 배열 선언과 동시에 값 할당
		int[] numbers = {10,20,30,40,50};
		// new 연산자와 함께 배열 선언과 동시에 값 할당
		int[] numbers2 = new int[] {10,20,30,40,50};
		// 타입[] 배열이름 = new 타입[배열크기];
		numbers = new int[5];
		numbers[0] = 10;
		numbers[1] = 20;
		numbers[2] = 30;
		numbers[3] = 40;
		numbers[4] = 50;
		int size = numbers.length; // 5
		// 배열의 크기 출력
		System.out.println(numbers.length);
		// 배열의 주소 출력
		System.out.println(numbers);
		// 배열의 내용 출력		System.out.println(java.util.Arrays.toString(numbers));
		for(int i=0; i<numbers.length; i++) {
			System.out.println(numbers[i]);
		}
		}
}
(5) 참조형 자료 배열
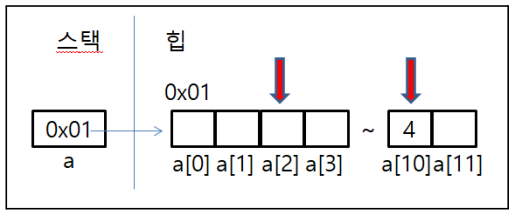
- int a[] = new int[]라고 배열 선언하게 되면 저장할 수 있는 공간이 12개.
- 인덱스가 0부터 시작하여 다음 데이터를 가리킬때마다 1개씩 증가.
- 즉, 첫번째 값 데이터를 접근하려면 a[0]을 접근하면 된다.
- 배열의 값을 변경하려면 배열변수[인덱스] = 바꿀 값으로 넣으면 된다.
- 배열은 참조 자료형이기 때문에 int a[ ] = new int[12]의 경우 실제 데이터는 힙에 연속된 12개 int 정수를 저장할 수 있는 공간이 생김.
- new 연산자에 힙에 데이터를 생성하라는 뜻.
- new 연산자를 사용할 때마다 힙에 새로운 공간이 할당하고 새로운 데이터주소가 저장된다.
- a라는 변수에 배열을 생성하려면 고유한 주소를 가진 힙 메모리에 새롭게 배열을 생성한다음 그 배열의 주소를 변수 a를 넣고 배열 이름 a를 통해서 인덱스를 이용하여 고유 주소에 있는 값을 접근 할 수 있다.
- [ ]: 주소 연산자.
- 예)
//int arr1[] = new int[3];
int arr1[] = {1,2,3};
//double arr2[] = new double[4];
double arr2[] = {1.1,2.1,3.1,4.1};
//String arr3[] = new String[5];
String arr3[] = {"강아지","고양이","붕어"};
//Human arr4[] = new Human[3];
Human arr4[] = {
	new Human();
    new Human();
    new Human();
};
- int 4개를 저장할 수 있는 배열 a 선언. int a = new int[4];
- a라는 배열에 5,2,3을 넣은 다음 a[0]=5, a[1]=2, a[2]=3
- 변수b가 4일때, a배열의 인덱스 1번의 값을 b만큼 증가시킨다면.
- a[1] = a[1] + b;
- a배열의 인덱스 0과 1을 더해서 인덱스 2에 넣는다면
- a[2] = a[0] + a[1];
- a배열의 인덱스 0,1,2를 더한 값을 a[3]에 넣는다면
- a[3] = a[0] + a[1] + a[2];
- a배열의 모든 값의 합을 변수 sum 넣는다면
- sum = a[0] + a[1] + a[2] + a[3];
- sum을 5로 나눈다면
- sum = sum/5
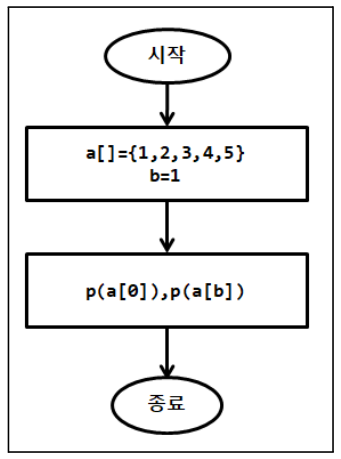
package com.human.ex;
public class Practice {
	public static void main(String[] args) {
		int a[] = {1,2,3,4,5};
		int b = 1;
		System.out.println(a[0]);
		System.out.println(a[b]);
	}
}
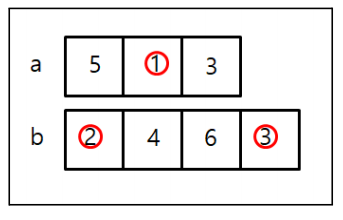
package com.human.ex;
public class Practice {
	public static void main(String[] args) {
		int a[] = {5,1,3};
		int b[] = {2,4,6,3};
		System.out.println(a[0]);
		System.out.println(b[2]);
		System.out.println();
		a[1] = 8;
		b[0] = 1;
		b[3] = a[1] + b[0];
		System.out.println(a[1]);
		System.out.println(b[0]);
		System.out.println(b[3]);
	}
}
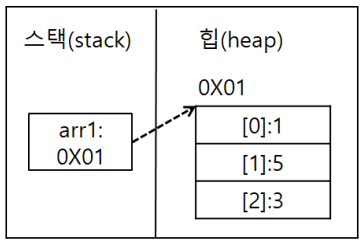
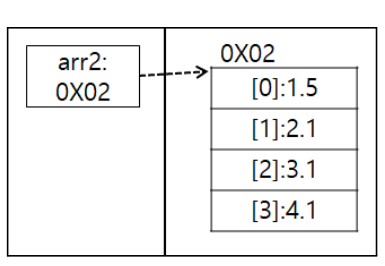
- 배열도 참조 데이터여서 실제 데이터는 힙에 있음
- double arr2[] = {1.1,2.1,3.1,4.1};
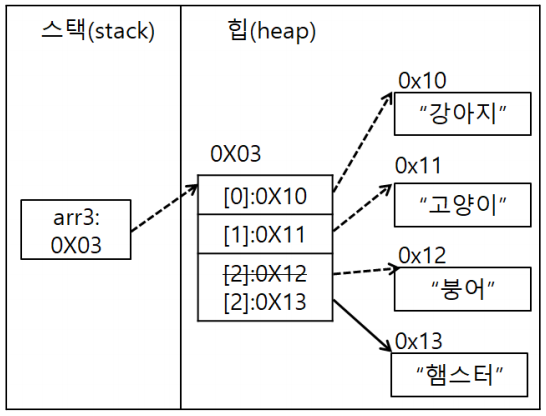
- String arr3[] = {"강아지", "고양이", "붕어"}; arr3[2] = "햄스터";
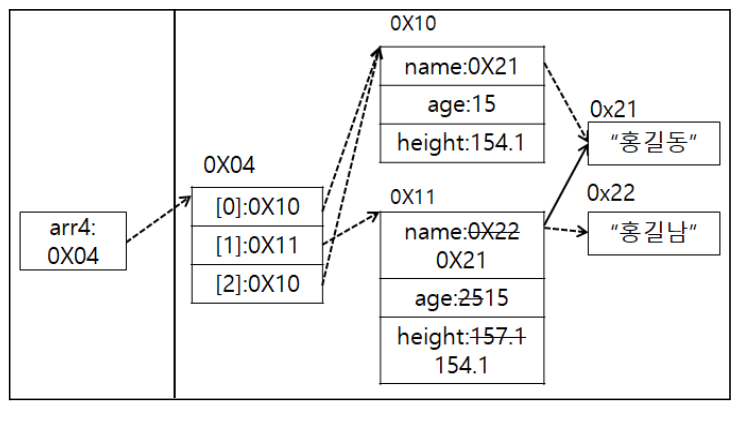
- 참조 자료형의 배열 주의사항: new 연산자에 의해서 힙 메모리에 저장공간이 생기면 실제 객체를 저장할 수 있는 공간이 만들어지는 것이 아니라 참조 자료형의 주소를 담을 수 있는 공간이 여러개 생기는 것이다.
Human arr4[] = new Human[3];
arr4[0] = new Human("홍길동", 15, 154.1);
arr4[1] = new Human();
arr4[1].name = "홍길남"; // 인스턴스 생성 후 값에 접근하는 방법.
arr4[1].age = 25;
arr4[1].height = 157.1;
arr4[2] = arr4[0];
System.out.println(Arrays.toString(arr4));
System.out.println(arr4[0]);
arr4[1].name = "홍길동";
arr4[1].age = 15;
arr4[1].height = 154.1;
System.out.println(arr4[0]==arr4[1]);
System.out.println(arr4[0]==arr4[2]);
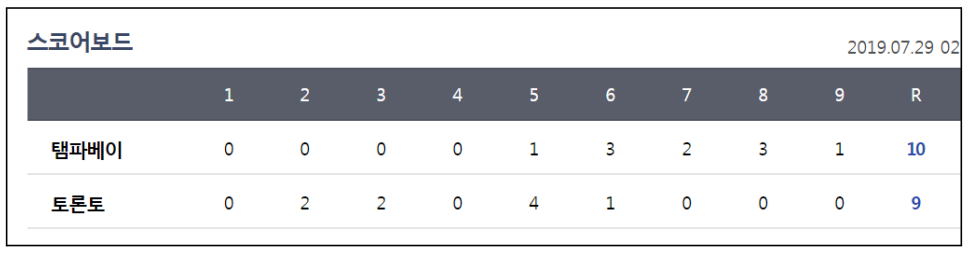
<예> 야구게임 전광판. 팀1의 총 점수를 출력
package com.human.ex;
public class Practice {
	public static void main(String[] args) {
		int team1[] = {0,0,0,0,1,3,2,3,1};
		int team2[] = {0,2,2,0,4,1,0,0,0};
		int sum = 0;
		for(int i=0; i<team1.length; i++) {
			sum += team1[i];
		}
		System.out.println(sum);
	}
}

(6) 예제
- 배열에 53, 6, 85, 3, 5를 넣은 다음 배열의 내용을 화면에 출력하시오.
package com.human.ex;
import java.util.Arrays;
public class Practice {
	public static void main(String[] args) {
		// 배열에 53, 6, 85, 3, 5를 넣은 다음 배열의 내용을 화면에 출력하라.
		int a[] = {53, 6, 85, 3, 5};
		System.out.println(Arrays.toString(a));
	}
}
- 배열 a[]={12,1,53,6,85,3}를 만든 다음 모든 내용을 더한 값을 sum에 저장하여 출력하는 코드
package com.human.ex;
import java.util.Arrays;
public class Practice {
	public static void main(String[] args) {
		// 배열 a[]={12,1,53,6,85,3}를 만든 다음 모든 내용을 더한 값을 sum에 저장하여 출력하는 코드
		int a[] = {12,1,53,6,85,3};
		int sum = 0;
		for(int i=0; i<a.length; i++) {
			sum += a[i];
		}
		System.out.println(sum);
	}
}
- 배열 a에 1,2,3을 넣은 후 배열 내의 모든 값에 2를 더한 값인 3,4,5로 변경
- 배열의 내용을 화면에 인덱스 순서대로 출력, 역순으로 출력
package com.human.ex;
public class Practice {
	public static void main(String[] args) {
		// 배열 a에 1,2,3을 넣은 후 배열 내의 모든 값에 2를 더한 값인 3,4,5로 변경
		// 배열의 내용을 화면에 인덱스 순서대로 출력, 역순으로 출력
		int a[] = {1,2,3};
		a[0] = a[0]+2;
		a[1] = a[1]+2;
		a[2] = a[2]+2;
		for(int i=0; i<a.length; i++) {
			System.out.println(a[i]);
		}
		System.out.println();
		for (int i=a.length-1; i>-1; i--) {
			System.out.println(a[i]);
		}
	}
}
- 배열에 들어있는 값중 짝수만 화면에 출력하시오
package com.human.ex;
public class Practice {
	public static void main(String[] args) {
		// 배열에 있는 값을 짝수만 화면에 출력
		int a[] = {1,2,3,4,5,6,7,8,9,10};
		for (int i=0; i<a.length; i++) {
			if(a[i]%2 == 0) {
				System.out.println(a[i]);
			}
		}
	}
}
- 배열에 들어있는 값중 홀수만 화면에 출력하시오
package com.human.ex;
public class Practice {
	public static void main(String[] args) {
		// 배열에 있는 값을 홀수만 화면에 출력
		int a[] = {1,2,3,4,5,6,7,8,9,10};
		for (int i=0; i<a.length; i++) {
			if(a[i]%2 == 1) {
				System.out.println(a[i]);
			}
		}
	}
}
- tree클래스를 배열로 선언하여 여러개의 데이터를 넣은 후 출력
package com.human.prac;
public class Practice {
	public static void main(String[] args) {
		// tree클래스를 배열로 선언하여 여러개의 데이터를 넣은 후 출력
		Tree treeArr[] = new Tree[4];
		treeArr[0] = new Tree();
		treeArr[0].name = "Mango";
		treeArr[0].price = 200;
		treeArr[0].hour = 4;
		treeArr[0].exp = 4;
		treeArr[0].totalTree = 7;
		treeArr[0].maxTotalTree = 50;
		treeArr[0].ownerName = "홍길동";
		treeArr[0].phoneNumber = "010-1234-5678";
		treeArr[1] = new Tree();
		treeArr[1].name = "Papaya";
		treeArr[1].price = 375;
		treeArr[1].hour = 6;
		treeArr[1].exp = 6;
		treeArr[1].totalTree = 6;
		treeArr[1].maxTotalTree = 50;
		treeArr[1].ownerName = "홍길전";
		treeArr[1].phoneNumber = "010-1534-5678";
		treeArr[2] = new Tree();
		treeArr[2].name = "Banana Palm";
		treeArr[2].price = 500;
		treeArr[2].hour = 5;
		treeArr[2].exp = 5;
		treeArr[2].totalTree = 7;
		treeArr[2].maxTotalTree = 50;
		treeArr[2].ownerName = "홍길순";
		treeArr[2].phoneNumber = "010-7645-6678";
		treeArr[3] = new Tree();
		treeArr[3].name = "Lemon";
		treeArr[3].price = 750;
		treeArr[3].hour = 8;
		treeArr[3].exp = 8;
		treeArr[3].totalTree = 1;
		treeArr[3].maxTotalTree = 50;
		treeArr[3].ownerName = "홍길훈";
		treeArr[3].phoneNumber = "010-1566-2678";
		for(int i=0; i<treeArr.length; i++) {
			System.out.print(treeArr[i].name + " / ");
			System.out.print(treeArr[i].price + " / ");
			System.out.print(treeArr[i].hour + " / ");
			System.out.print(treeArr[i].exp + " / ");
			System.out.print(treeArr[i].totalTree + " / ");
			System.out.print(treeArr[i].maxTotalTree + " / ");
			System.out.print(treeArr[i].ownerName + " / ");
			System.out.print(treeArr[i].phoneNumber);
			System.out.println("");
		}
	}
}

AI 실무 전문가가 되기 위한 길