📕 Security와 JWT를 통해 로그인 검증
JWT(JSON Web Token)사용자의 인증 상태를 관리하는 토큰 시스템
→ 클라이언트와 서버 간의 인증 정보를 유지하고, 이 정보를 토대로 검증
→ 단, JWT는 보안 메커니즘이 없기 때문에, 이는 개발자가 로직을 직접 구현
Spring Security웹 애플리케이션 보안을 위한 다양한 기능 제공
→ 사용자 인증 및 인가 / CSRF 방어 / 세션 관리 등등
JWT의 간편한 토큰 관리와 Spring Security의 강력한 보안 기능을 함께 사용함으로써 보안과 관련된 복잡한 로직을 직접 구현하는 수고 ↓↓↓
💻 개발 환경
Java 17 / Spring Boot 3.2.3 / JWT 0.11.5 / Spring Security 6.2.2 / Spring Data JPA
❓Spring Security 알아보기
1. Spring Security 개념
Security는 Filter 기반으로 애플리케이션의 보안을 담당한다.
먼저 Filter란 무엇인지 알아보자!
Filter란?
Web 애플리케이션에서 관리되는 영역으로 Client로 부터 오는 요청과 응답에 대해
최초/최종 단계의 위치이며 이를 통해 요청과 응답의 정보를 변경하거나 부가적인 기능을 추가한다.
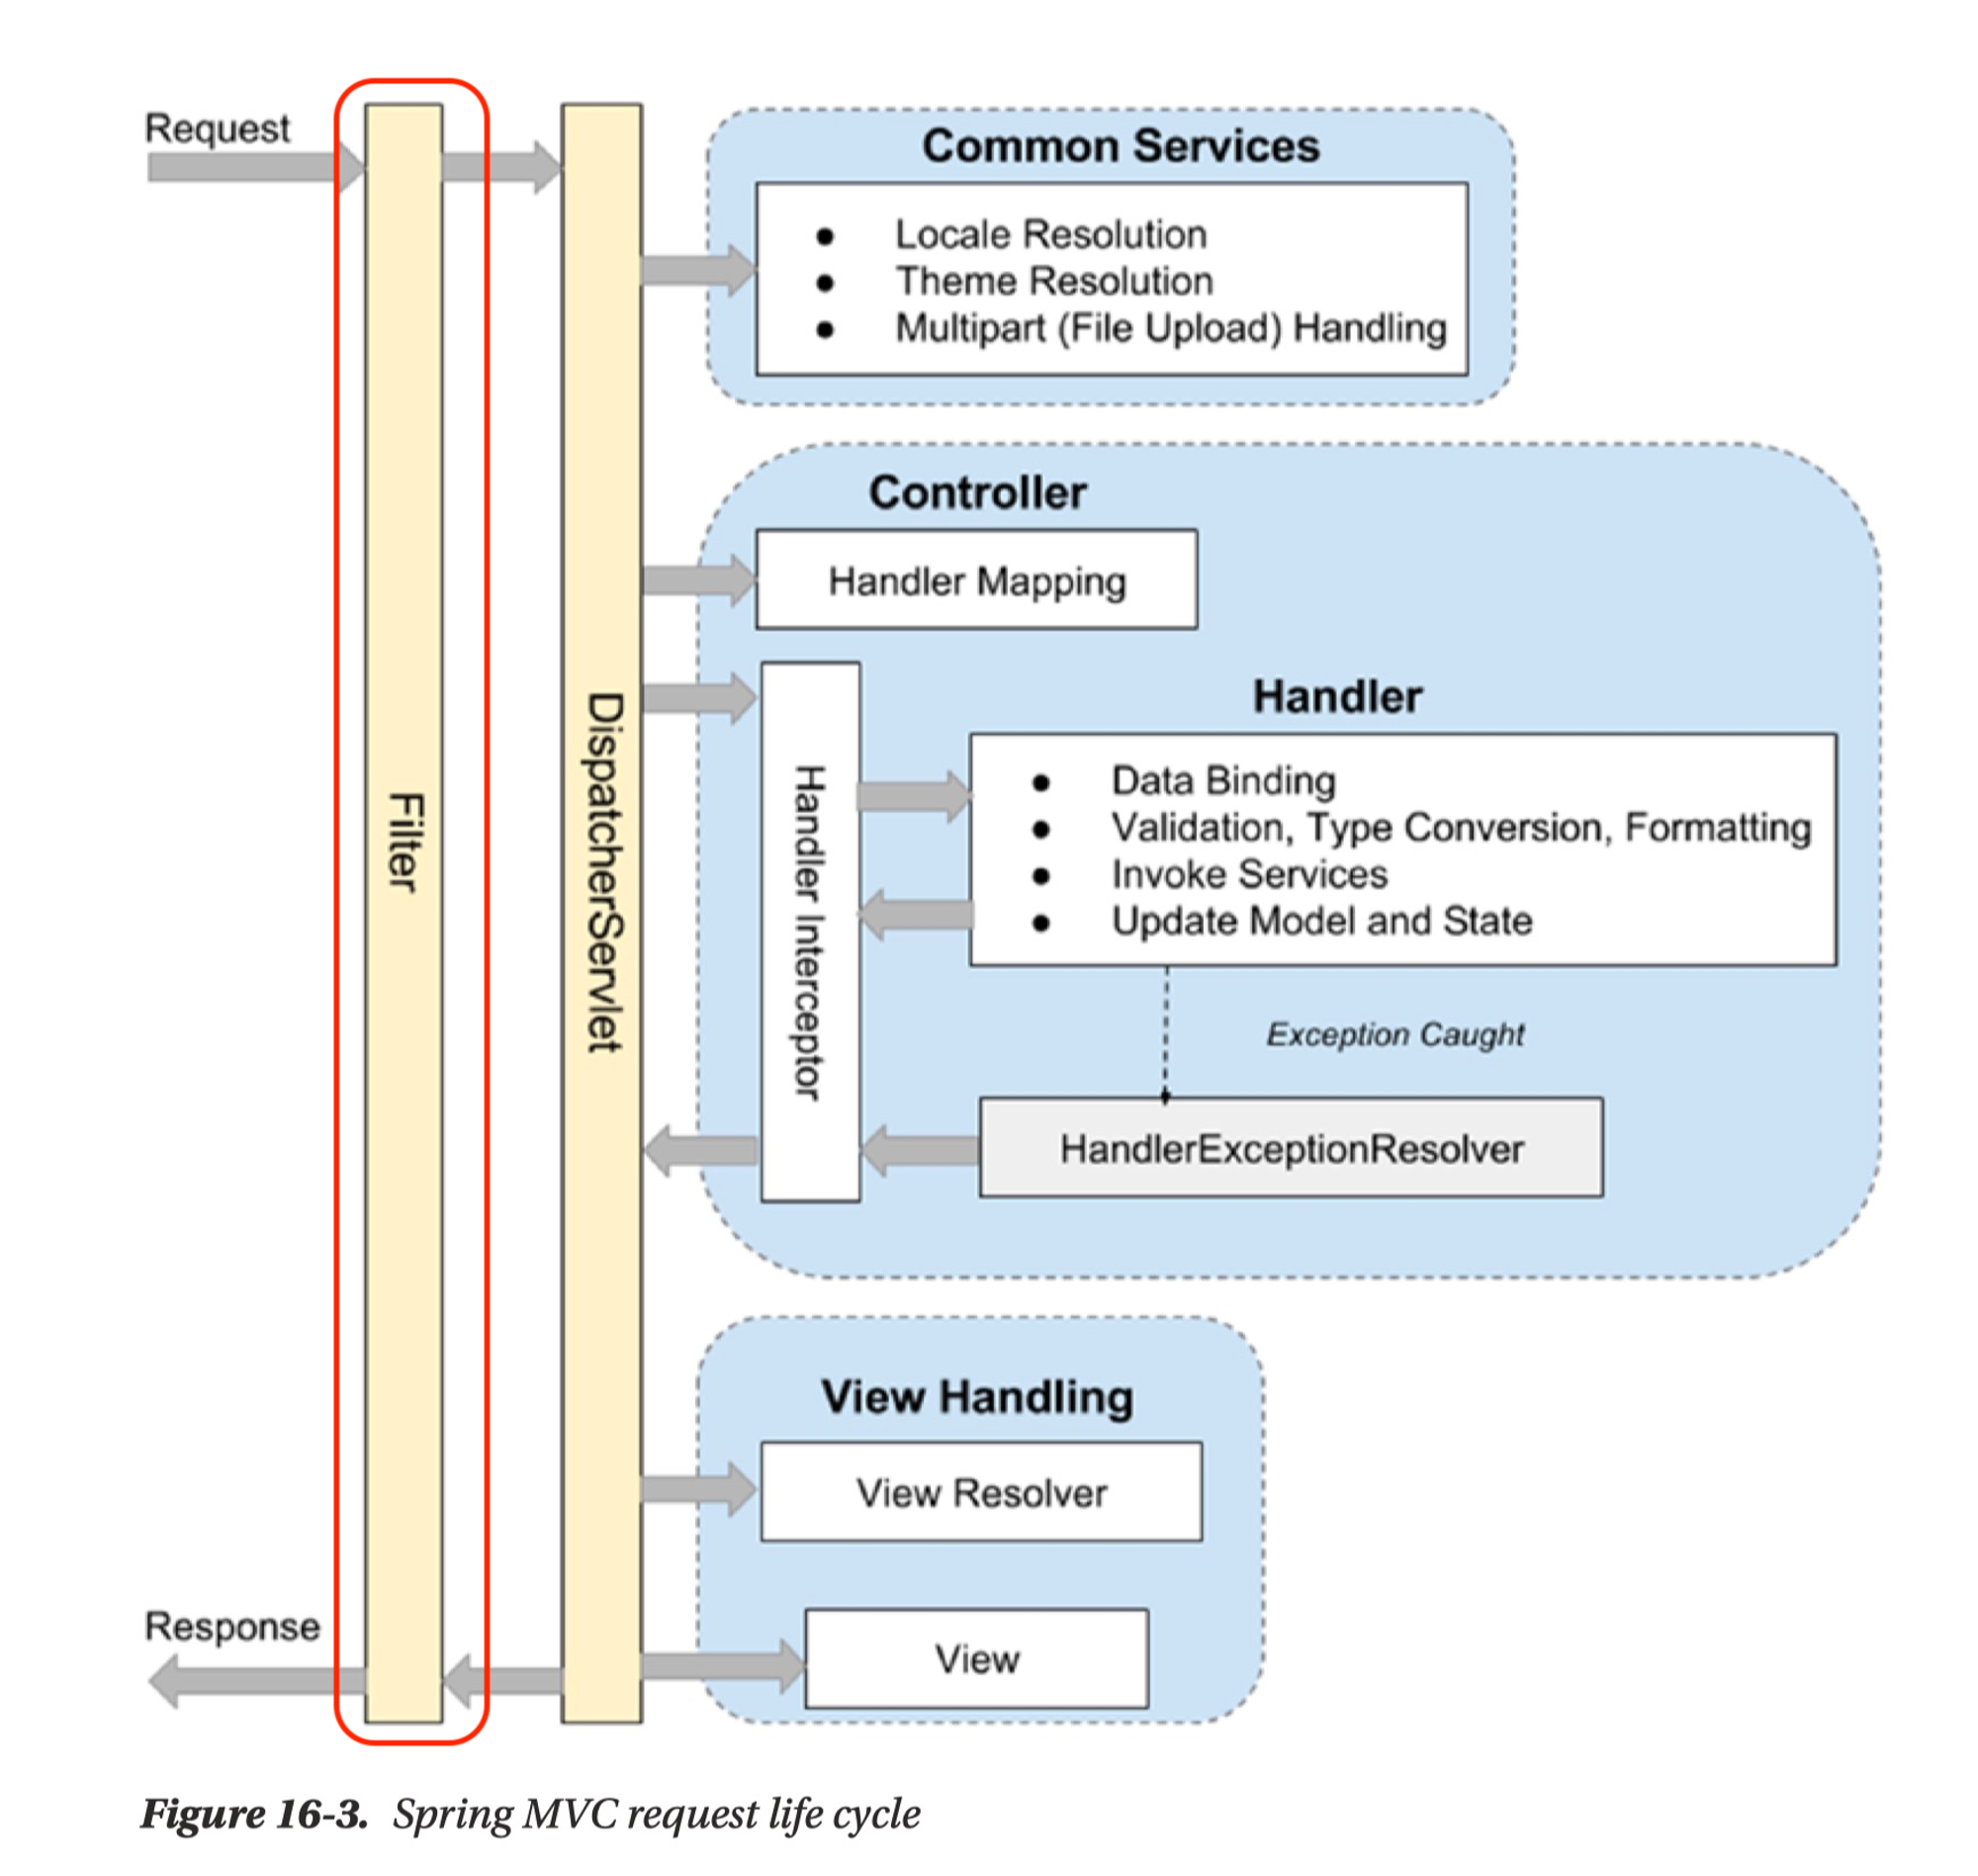
→ DispatcherServlet 이전 단계에 위치하므로, Spring MVC 구조와 분리되어 로직 처리
→ 주로 범용적으로 처리해야 하는 작업들, ex) 로깅 및 보안 처리에 활용
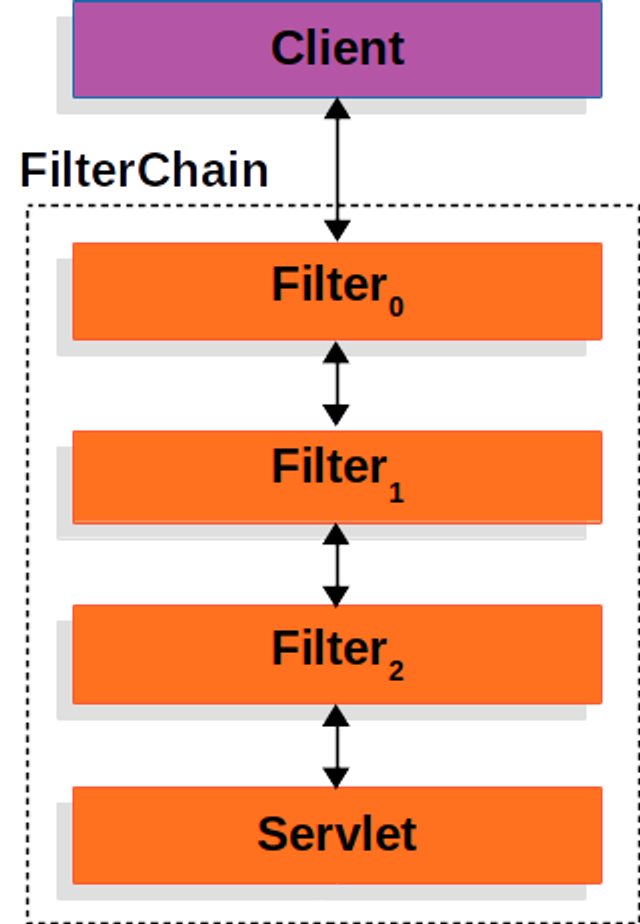
- Filter Chain
→ 여러 Filter가 Chain 형식으로 단계를 거쳐서 로직을 수행
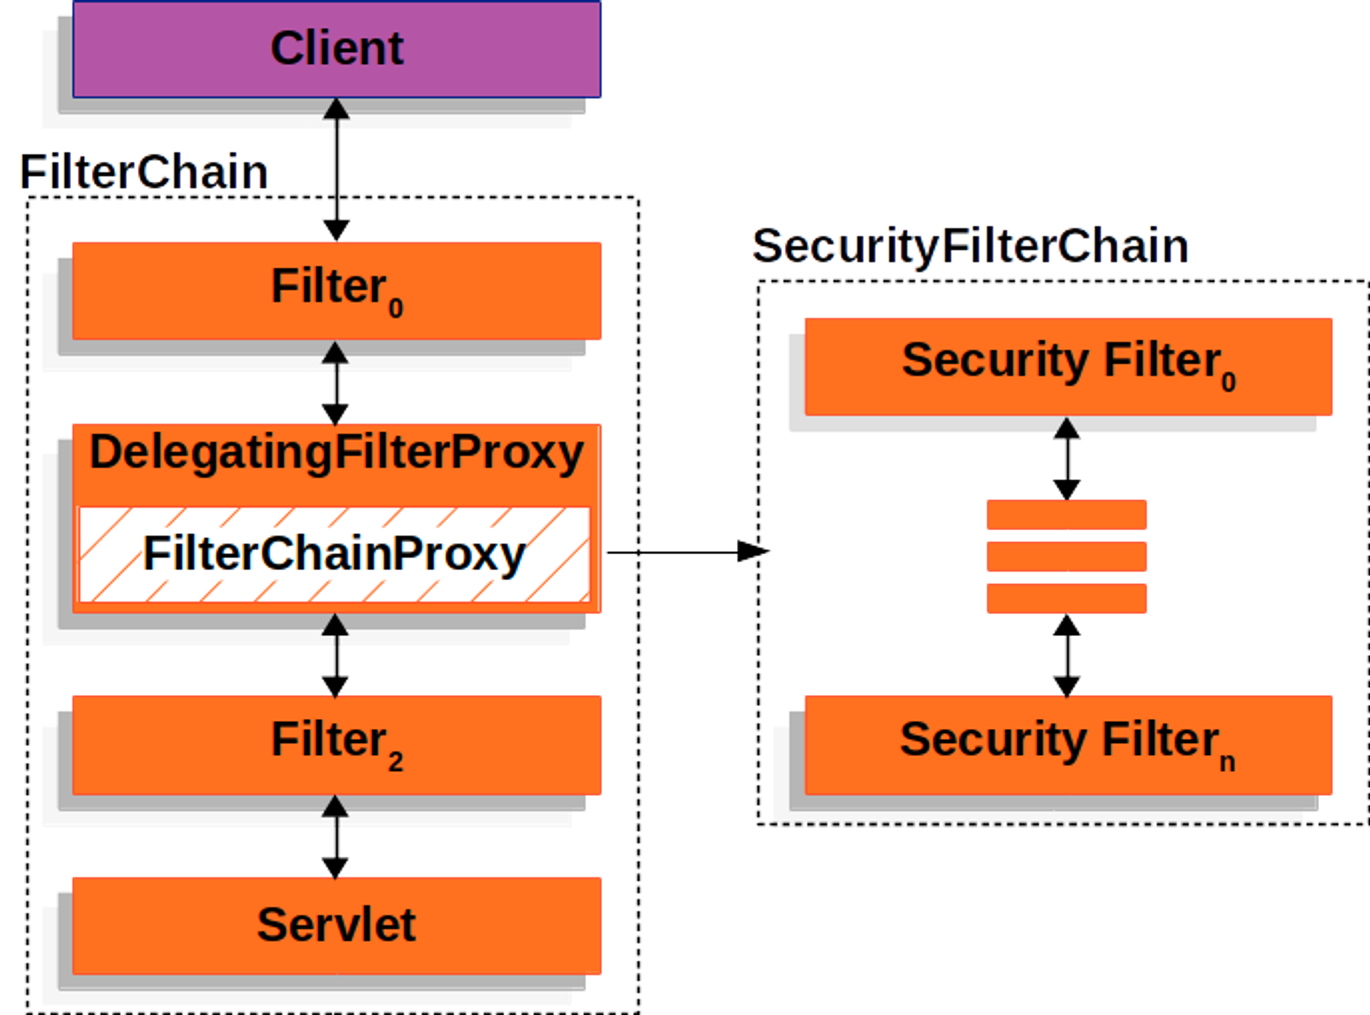
Spring Security의 Filter Chain
→
Spring의 모든 호출은DispatcherServlet을 통과하여, 각 요청을 담당하는Controller로 분배→ 공통적으로 처리해야할 필요가 있을 때,
DispatcherServlet이전에 단계가 필요하며 이것이 Filter→
Spring Security는FilterChainProxy를 통해서 상세로직을 구현
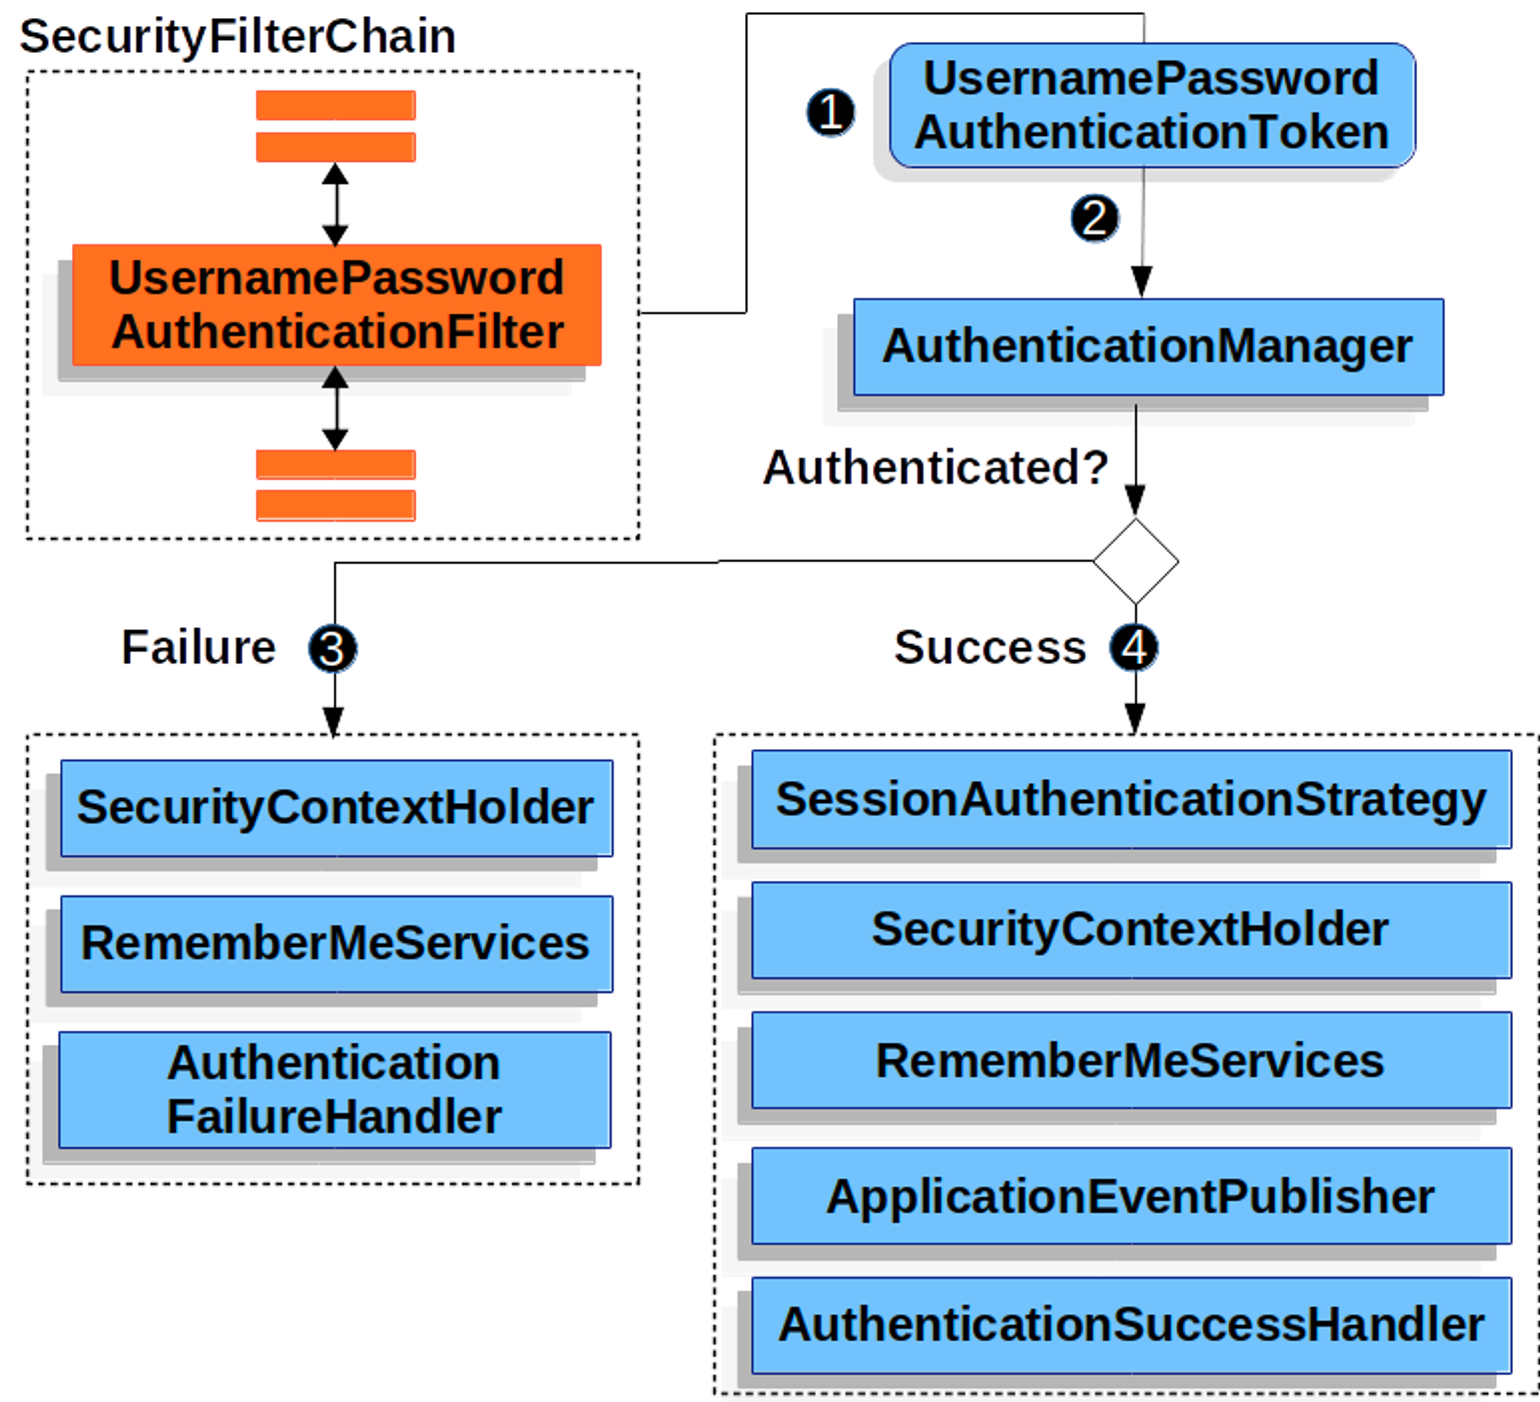
UsernamePasswordAuthenticationFilter 란?
Security Filter Chain중 username과 password를 확인하여, 인증하는Filter- 사용자가 username과 password를 제출하면
UsernamePasswordAuthenticationFilter는 인증된 사용자의 정보가 담기는 인증 객체인Authentication의 종류 중 하나인UsernamePasswordAuthenticationToken을 만들어AuthenticationManager에게 넘겨 인증을 시도- 실패시,
SecurityContextHolder비우기- 성공시,
SecurityContextHolder에Authentication세팅
SecurityContextHolder 란?
인증이 완료된 사용자의 상세 정보(Authentication)를 저장
→ 인증된 사용자 정보 (Principal)
→Principle을 관리하는Authentication
→Authentication을 관리하는SecurityContext
→SecurityContext를 관리하는SecurityContextHolder
→SecurityContextHolder는 전략에 따라 저장 방식이 다르며, 기본적으로ThreadLocal(쓰레드마다 가지고 있는 고유의 저장소)에 저장한다.
SecurityContext context = SecurityContextHolder.createEmptyContext();
Authentication authentication =
				new UsernamePasswordAuthenticationToken(principal, credentials, authorities);
context.setAuthentication(authentication);
SecurityContextHolder.setContext(context);
// SecurityContextHolder의 Context에 사용자의 정보 저장
Authentication 란?
- principal : 사용자를 식별
- Username/Password 방식으로 인증할 때 일반적으로 UserDetails 인스턴스
- credentials : 주로 비밀번호, 대부분 사용자 인증에 사용한 후 비우기
- authorities : 사용자에게 부여한 권한을 GrantedAuthority로 추상화하여 사용
UserDetailsImpl
검증된 UserDetails는 UsernamePasswordAuthenticationToken 타입의 Authentication를 만들 때 사용되며 해당 인증객체는 SecurityContextHolder에 세팅
public class UserDetailsImpl implements UserDetails {
    private final User user;

    public UserDetailsImpl(User user) {
        this.user = user;
    }

    public User getUser(){
        return user;
    }

    @Override
    public Collection<? extends GrantedAuthority> getAuthorities() {
        UserRoleEnum role = user.getAuthority();
        String authority = role.getAuthority();

        SimpleGrantedAuthority simpleGrantedAuthority = new SimpleGrantedAuthority(authority);
        Collection<GrantedAuthority> authorities = new ArrayList<>();
        authorities.add(simpleGrantedAuthority);

        return authorities;
    }

    @Override
    public String getPassword() {
        return user.getPassword();
    }

    @Override
    public String getUsername() {
        return user.getEmail();
    }
}
UsernamePasswordAuthenticationToken는Authentication을 implements한AbstractAuthenticationToken의 하위 클래스로, 인증객체를 만드는데 사용
UserDetailsServiceImpl
검증이 완료된 사용자의 정보를 UserDetailsImpl(UserDetails 구현체)에 담아서 반환
Custom후, Bean으로 등록
@Service
public class UserDetailsServiceImpl implements UserDetailsService {
    private final UserRepository userRepository;

    public UserDetailsServiceImpl(UserRepository userRepository) {
        this.userRepository = userRepository;
    }


    @Override
    public UserDetails loadUserByUsername(String username) throws UsernameNotFoundException {
        User user = userRepository.findByEmail(username)
                .orElseThrow(() -> new UsernameNotFoundException("Not Found " + username));
        return new UserDetailsImpl(user);
    }
}
2. Spring Security 로그인 로직
Controller즉, Spring MVC 이전 단계에 존재하며, 로그인 혹은 접근 권한을 검증
- 인증, 인가 성공 시:
Controller로 Client 요청 전달
- Client 요청 + 사용자 정보 (
UserDetails)- 인증, 인가 실패 시:
Controller로 Client 요청 전달되지 않음
- Client 에게
Error Response보냄

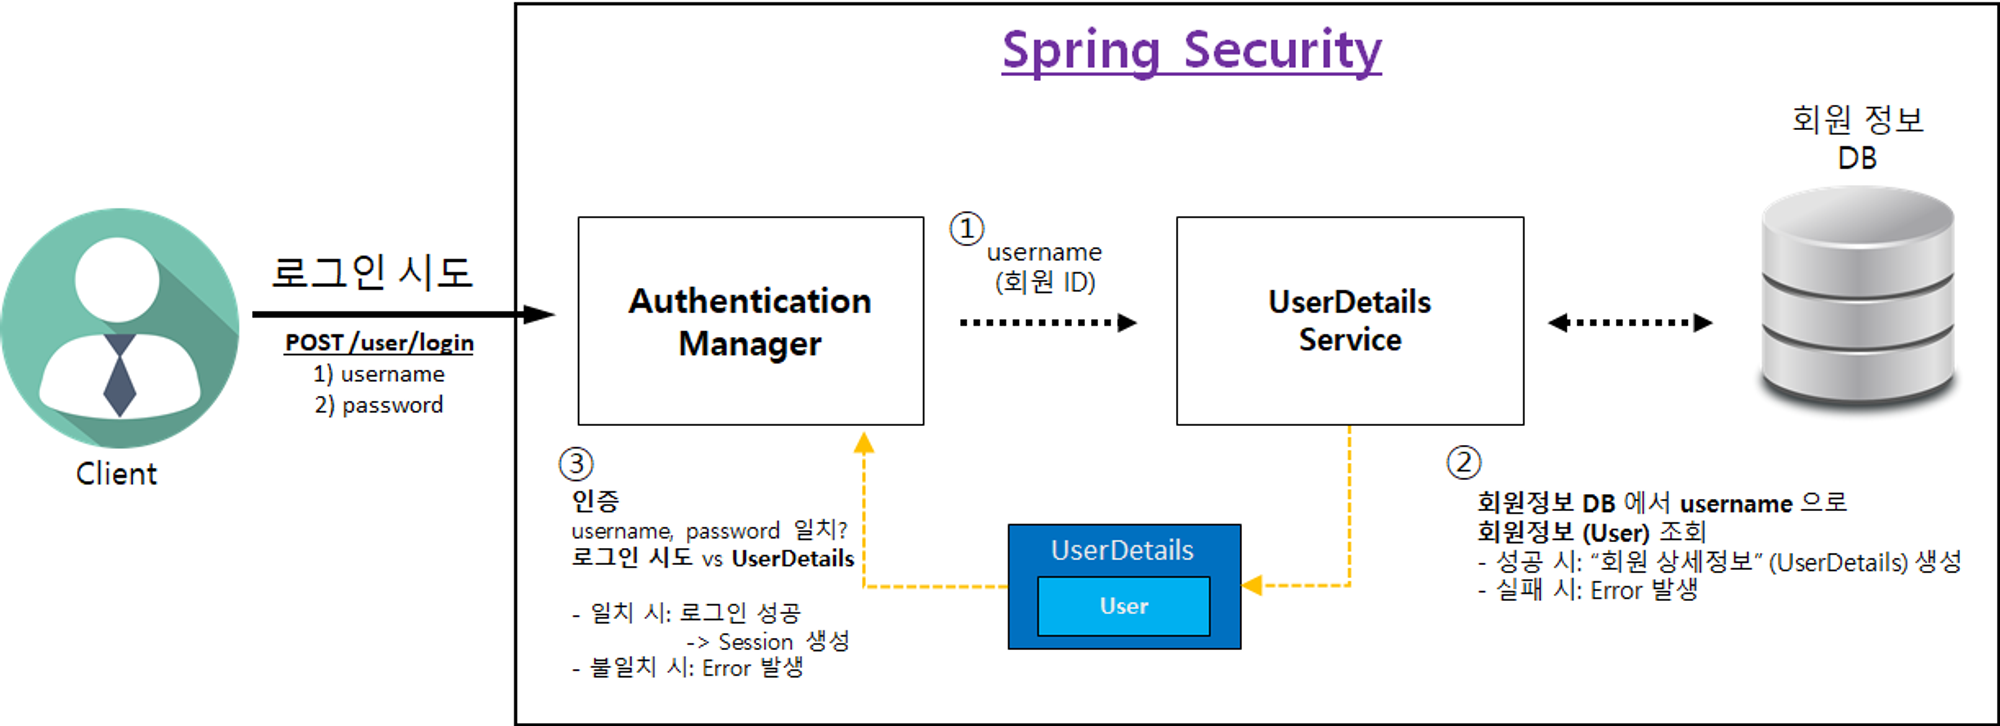
로그인 처리과정
1. 클라이언트 로그인 요청 : username, password 정보를 HTTP body 로 전달 (POST 요청)
→ 로그인 URL은SecurityConfig에서 설정
2. 인증관리자 (Authentication Manager)는 요청에 담겨 온 username을UserDetailsService로 전달하여, 회원의 상세 정보 요청
3.UserDetailsService에서 전달 받은 값을 통해 회원 조회 (DB)@Override public UserDetails loadUserByUsername(String username) throws UsernameNotFoundException { User user = userRepository.findByEmail(username) .orElseThrow(() -> new UsernameNotFoundException("Not Found " + username)); return new UserDetailsImpl(user); }→ 있는 경우,
UserDetails를 인증관리자에게 반환 / 없는 경우, 예외 던지기
4. 인증 관리자는 로그인 요청에서 받은 username과 password를UserDetails의 User 정보와 비교하여 인증 처리
→ 성공 시, 세션에 저장 / 실패 시, Error 발생
3. Spring Security 적용해보기
1) build.gradle 프레임워크 추가
// Security
implementation 'org.springframework.boot:spring-boot-starter-security'
2) Security 설정하기
@Configuration
@EnableWebSecurity // Spring Security 지원을 가능하게 함
public class WebSecurityConfig {

// HttpSecurity는 인증, 인가에 필요한 설정을 변경하는 역할
    @Bean
    public SecurityFilterChain securityFilterChain(HttpSecurity http) throws Exception {
        // CSRF 설정
        http.csrf((csrf) -> csrf.disable());

        http.authorizeHttpRequests((authorizeHttpRequests) ->
                authorizeHttpRequests
                        .requestMatchers(PathRequest.toStaticResources().atCommonLocations()).permitAll() // resources 접근 허용 설정
                        .anyRequest().authenticated() // 그 외 모든 요청 인증처리
        );

        // 로그인 사용
        http.formLogin(Customizer.withDefaults());

        return http.build();
    }
}
3) UserDetailsService
@Service
public class UserDetailsServiceImpl implements UserDetailsService {

    private final UserRepository userRepository;

    public UserDetailsServiceImpl(UserRepository userRepository) {
        this.userRepository = userRepository;
    }

		@Override
    public UserDetails loadUserByUsername(String username) throws UsernameNotFoundException {
        User user = userRepository.findByUsername(username)
                .orElseThrow(() -> new UsernameNotFoundException("Not Found " + username));

        return new UserDetailsImpl(user);
    }
}
4) UserDetails
public class UserDetailsImpl implements UserDetails {

    private final User user;

    public UserDetailsImpl(User user) {
        this.user = user;
    }

    public User getUser() {
        return user;
    }

    @Override
    public String getPassword() {
        return user.getPassword();
    }

    @Override
    public String getUsername() {
        return user.getUsername();
    }

    @Override
    public Collection<? extends GrantedAuthority> getAuthorities() {
        UserRoleEnum role = user.getRole();
        String authority = role.getAuthority();

        SimpleGrantedAuthority simpleGrantedAuthority = new SimpleGrantedAuthority(authority);
        Collection<GrantedAuthority> authorities = new ArrayList<>();
        authorities.add(simpleGrantedAuthority);

        return authorities;
    }

    @Override
    public boolean isAccountNonExpired() {
        return true;
    }

    @Override
    public boolean isAccountNonLocked() {
        return true;
    }

    @Override
    public boolean isCredentialsNonExpired() {
        return true;
    }

    @Override
    public boolean isEnabled() {
        return true;
    }
}
5) @AuthenticationPrincipal로 인증된 유저 받기
public String getProducts(@AuthenticationPrincipal UserDetailsImpl userDetails) {
    User user =  userDetails.getUser();
    System.out.println("user.getUsername() = " + user.getUsername());

    return "redirect:/";
}
6) JWT를 검증하는 Filter 작성
@Slf4j(topic = "로그인 및 JWT 생성")
public class JwtAuthenticationFilter extends UsernamePasswordAuthenticationFilter {
    private final JwtUtil jwtUtil;

    public JwtAuthenticationFilter(JwtUtil jwtUtil) {
        this.jwtUtil = jwtUtil;
        setFilterProcessesUrl("/api/user/login");
    }

    @Override
    public Authentication attemptAuthentication(HttpServletRequest request, HttpServletResponse response) throws AuthenticationException {
        log.info("로그인 시도");
        try {
            LoginRequestDto requestDto = new ObjectMapper().readValue(request.getInputStream(), LoginRequestDto.class);

            return getAuthenticationManager().authenticate(
                    new UsernamePasswordAuthenticationToken(
                            requestDto.getUsername(),
                            requestDto.getPassword(),
                            null
                    )
            );
        } catch (IOException e) {
            log.error(e.getMessage());
            throw new RuntimeException(e.getMessage());
        }
    }

    @Override
    protected void successfulAuthentication(HttpServletRequest request, HttpServletResponse response, FilterChain chain, Authentication authResult) throws IOException, ServletException {
        log.info("로그인 성공 및 JWT 생성");
        String username = ((UserDetailsImpl) authResult.getPrincipal()).getUsername();
        UserRoleEnum role = ((UserDetailsImpl) authResult.getPrincipal()).getUser().getRole();

        String token = jwtUtil.createToken(username, role);
        jwtUtil.addJwtToCookie(token, response);
    }

    @Override
    protected void unsuccessfulAuthentication(HttpServletRequest request, HttpServletResponse response, AuthenticationException failed) throws IOException, ServletException {
        log.info("로그인 실패");
        response.setStatus(401);
    }
}

@Slf4j(topic = "JWT 검증 및 인가")
public class JwtAuthorizationFilter extends OncePerRequestFilter {

    private final JwtUtil jwtUtil;
    private final UserDetailsServiceImpl userDetailsService;

    public JwtAuthorizationFilter(JwtUtil jwtUtil, UserDetailsServiceImpl userDetailsService) {
        this.jwtUtil = jwtUtil;
        this.userDetailsService = userDetailsService;
    }

    @Override
    protected void doFilterInternal(HttpServletRequest req, HttpServletResponse res, FilterChain filterChain) throws ServletException, IOException {

        String tokenValue = jwtUtil.getTokenFromRequest(req);

        if (StringUtils.hasText(tokenValue)) {
            // JWT 토큰 substring
            tokenValue = jwtUtil.substringToken(tokenValue);
            log.info(tokenValue);

            if (!jwtUtil.validateToken(tokenValue)) {
                log.error("Token Error");
                return;
            }

            Claims info = jwtUtil.getUserInfoFromToken(tokenValue);

            try {
                 setAuthentication(info.getSubject());
            } catch (Exception e) {
                log.error(e.getMessage());
                return;
            }
        }

        filterChain.doFilter(req, res);
    }

    // 인증 처리
    public void setAuthentication(String username) {
        SecurityContext context = SecurityContextHolder.createEmptyContext();
        Authentication authentication = createAuthentication(username);
        context.setAuthentication(authentication);

        SecurityContextHolder.setContext(context);
    }

    // 인증 객체 생성
    private Authentication createAuthentication(String username) {
        UserDetails userDetails = userDetailsService.loadUserByUsername(username);
        return new UsernamePasswordAuthenticationToken(userDetails, null, userDetails.getAuthorities());
    }
}
7) SecurityConfig에서 Filter 순서 정하기
 	http.addFilterBefore(jwtAuthorizationFilter(), JwtAuthenticationFilter.class);
    http.addFilterBefore(jwtAuthenticationFilter(), UsernamePasswordAuthenticationFilter.class);
    // 인증 전, 인가 필요
4. 정리
-
SecurityConfig(@Cofiguration - 싱글톤 빈) 생성 시,
JwtUtil,UserDetails,UserDetailsService등을 주입받아 생성
- 필요시, CustomHandler, EntryPoint 등록
- 필요한 Bean 등록 (AuthenticationFilter,AuthorizationFilter...)
-SecurityFilterChain을 통해 필터 설정, 순서 정리
→HttpSecurity를 통해 필요 설정 바꾸기
→ 예외 핸들링 설정
-
SecurityFilterChain에서 설정한 Filter에 따라 Filter 로직 실행 -
Filter는 JWT를 활용하여 커스텀
→JwtAuthenticationFilter/JwtAuthorizationFilter -
AuthenticationFilter과AuthorizationFilter에서HttpServletRequest에 담긴 요청(username, password) 검증을 통해 인증 / 인가 수행
→ 여기서 던지는 예외가 있다면,SecurityConfig에서 핸들링
→AuthenticationFilter를 Bean으로 등록할 때,
AbstractAuthenticationProcessingFilter를 상속한
UsernamePasswordAuthenticationFilter를 상속한
JwtAuthenticationFilter의AuthenticationManager를 세팅
@Bean
    public JwtAuthenticationFilter jwtAuthenticationFilter() throws Exception {
        JwtAuthenticationFilter filter = new JwtAuthenticationFilter(jwtUtil);
        filter.setAuthenticationManager(authenticationManager(authenticationConfiguration));
        return filter;
    }
→ AuthenticationManager는 생성시, AuthenticationConfiguration가 필요하며,
이는 SecurityConfig를 생성할 때, SpringSecurity가 @Configuration으로 등록한 AuthenticationConfiguration 를 사용
- 인증이 완료된 경우, 스프링 프레임워크는 해당 URL에 매핑된 컨트롤러 또는 핸들러로 요청을 전달하여, 필요한 로직을 수행한다.
❓ 전체 요약
클라이언트가 특정 URL로 요청을 보내면, 요청은 먼저 스프링 시큐리티의
FilterChainProxy에 의해 받아진다.FilterChainProxy는 스프링 시큐리티의 필터 체인을 관리하고, 요청을 인증 및 인가 처리를 위해 필터들을 순차적으로 통과시킨다.
이때,SecurityConfig클래스는 스프링 시큐리티의 구성을 담당한다.SecurityConfig클래스는 주로WebSecurityConfigurerAdapter를 상속받아 구현되며, configure() 메서드를 오버라이드하여 보안 설정을 정의한다. 이 설정은HttpSecurity객체를 통해 이루어지며, URL 패턴과 접근 권한을 설정할 수 있다.SecurityConfig클래스에서 설정한 내용은FilterChainProxy에 의해 필터 체인에 적용되어 요청의 보안 처리에 반영된다.
요청이 필터 체인을 통과하면, 스프링 프레임워크는 해당 URL에 매핑된 컨트롤러 또는 핸들러로 요청을 전달한다. 이때, URL 매핑은 스프링의DispatcherServlet에 의해 처리된다.DispatcherServlet은 요청을 적절한 컨트롤러로 라우팅하고, 컨트롤러의 처리 결과를 클라이언트에게 응답한다. 따라서 요청은DispatcherServlet을 통해 해당 URL로 넘어가고, 컨트롤러가 실제로 요청을 처리하게 된다.한줄 정리
클라이언트의 요청은
FilterChainProxy를 거쳐SecurityConfig에서 정의한 보안 처리를 수행한 후,DispatcherServlet을 통해 해당 URL로 전달되고, 컨트롤러가 요청을 처리