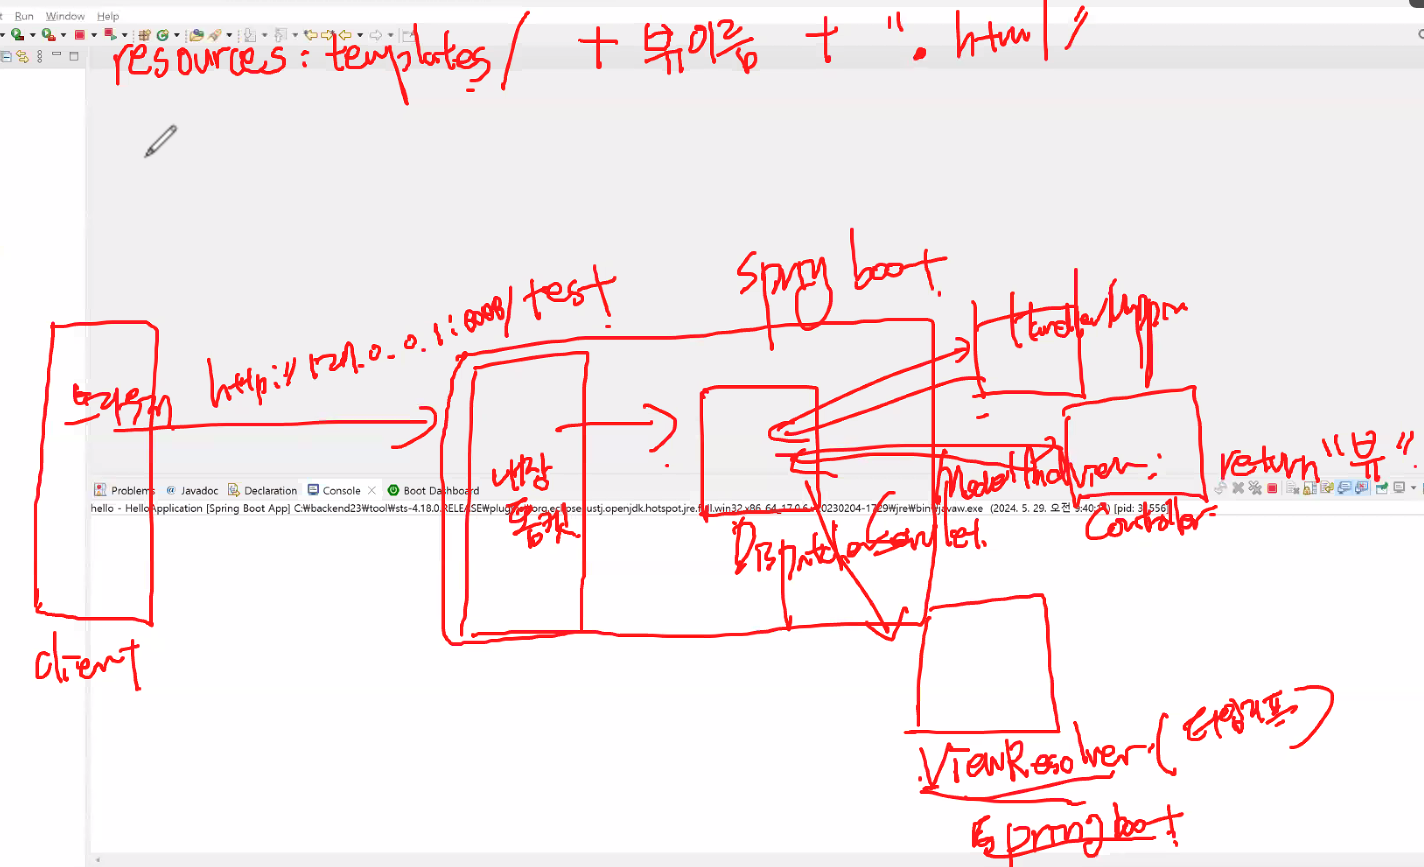
[스프링부트의 핵심기능]
- Tomcat 웹서버를 내장하고 있어서 별도로 웹서버를 설치하지 않아도 된다.
- 라이브러리를 자동으로 관리
=> 스프링과 다른 라이브러리의 버전관리
=> 스프링과 다른 라이브러리의 버전 호환성을 알아서 자동으로 관리 - 프로젝트를 시작하면 스프링과 외부라이브러리의 빈 등록을 자동으로 등록
- 외부설정
=> DB에 대한 정보 설정 - 모니터링을 위한 준비작업을 할 수 있도록 제공
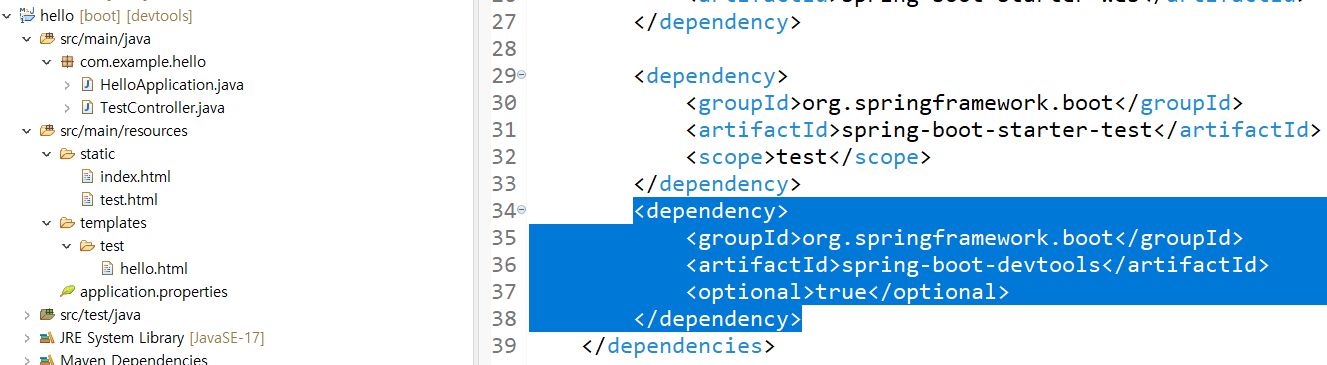
기본 연습
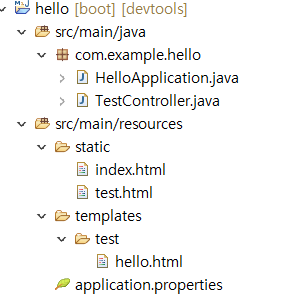
TestController
package com.example.hello;

import org.springframework.stereotype.Controller;
import org.springframework.ui.Model;
import org.springframework.web.bind.annotation.GetMapping;

@Controller
public class TestController {
	@GetMapping("/test")
	public String test(Model model) {
		model.addAttribute("msg","spring boot test###^^change");
		return "test/hello";
	}
}
hello.html
- 타임리프는 템플릿 엔진으로서, 정적인 HTML 파일에 동적인 데이터를 삽입하여 서버 사이드에서 렌더링된 HTML을 생성합니다. 이를 통해 웹 애플리케이션의 동적인 콘텐츠 생성을 돕고, 개발자에게 효율적인 템플릿 작성 방법을 제공합니다.
<!DOCTYPE html>
<html xmlns:th="http://www.thymeleaf.org">
<head>
<meta charset="UTF-8">
<title>Insert title here</title>
</head>
<body>
	<h1 th:text="'안녕하세요~~~~'+${msg}">hello</h1>
</body>
</html>
구조
index.html
<!DOCTYPE html>
<html>
<head>
<meta charset="UTF-8">
<title>Insert title here</title>
</head>
<body>
	<h1>index페이지(정적페이지)</h1>
	<hr/>
</body>
</html>
test.html
<!DOCTYPE html>
<html>
<head>
<meta charset="UTF-8">
<title>Insert title here</title>
</head>
<body>
	<h1>test</h1>
	<hr/>
	<h2>정적문서</h2>
</body>
</html>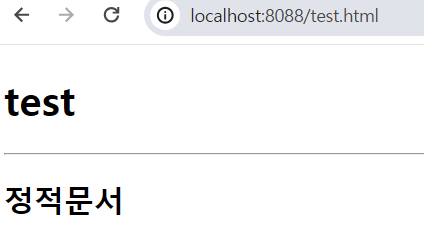
서버 자동 리로드
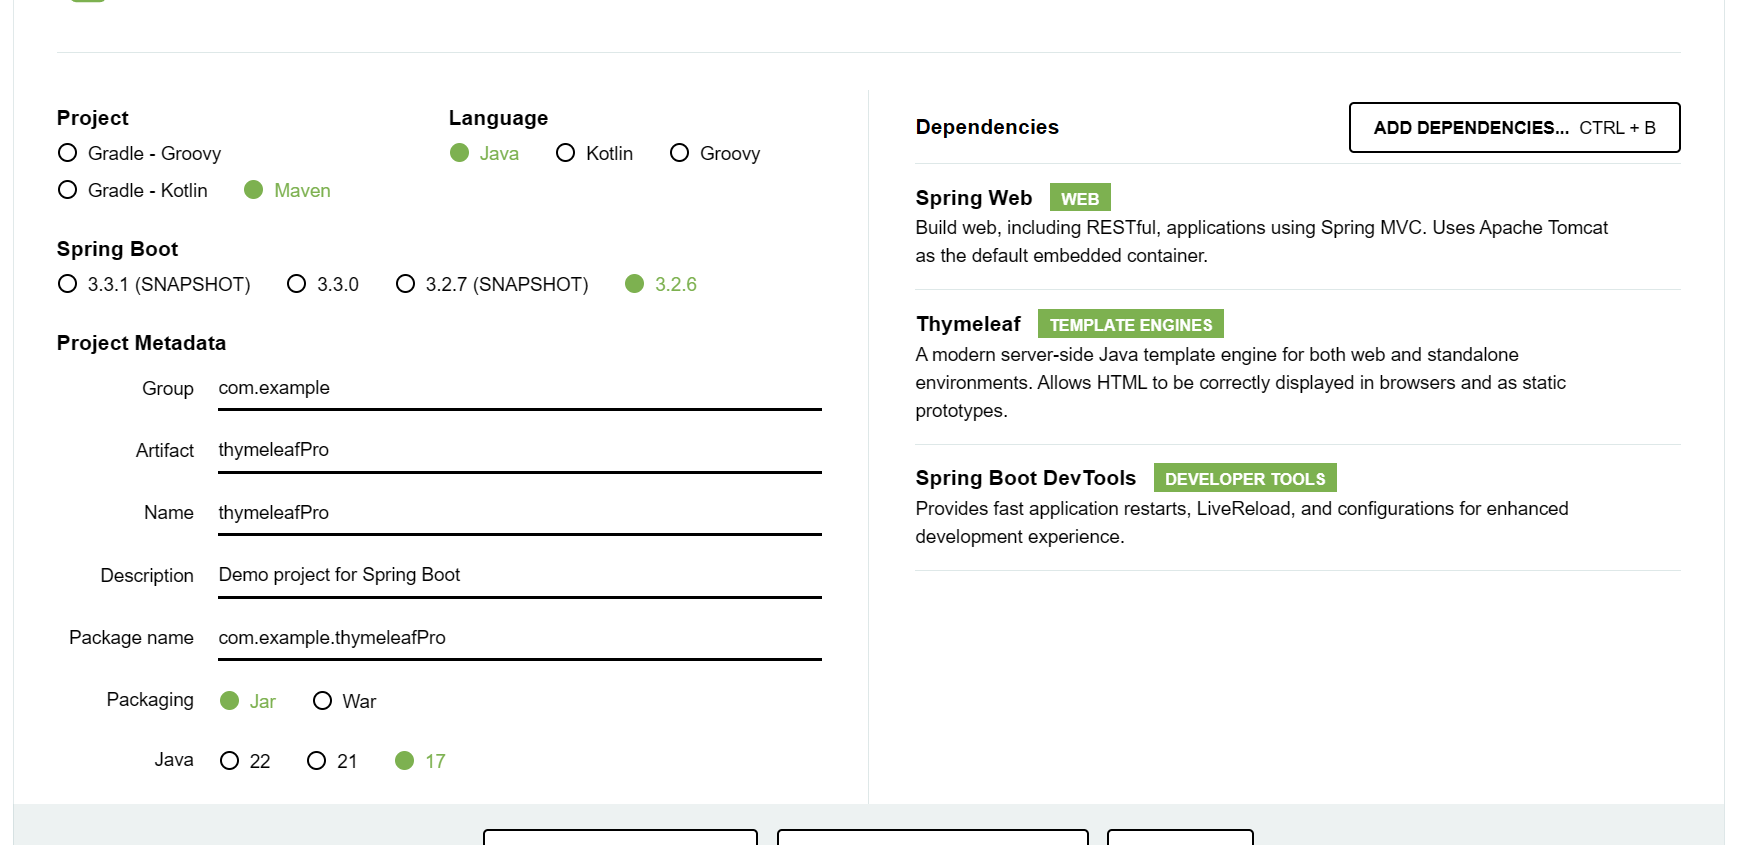
thymeleafPro
새 프로젝트 추가
ThymeleafProApplication- 실행하면 서버연결
package com.example.thymeleafPro;

import org.springframework.boot.SpringApplication;
import org.springframework.boot.autoconfigure.SpringBootApplication;

@SpringBootApplication
public class ThymeleafProApplication {

	public static void main(String[] args) {
		SpringApplication.run(ThymeleafProApplication.class, args);
	}

}
index.html
<!DOCTYPE html>
<html>
<head>
<meta charset="UTF-8">
<title>Insert title here</title>
</head>
<body>
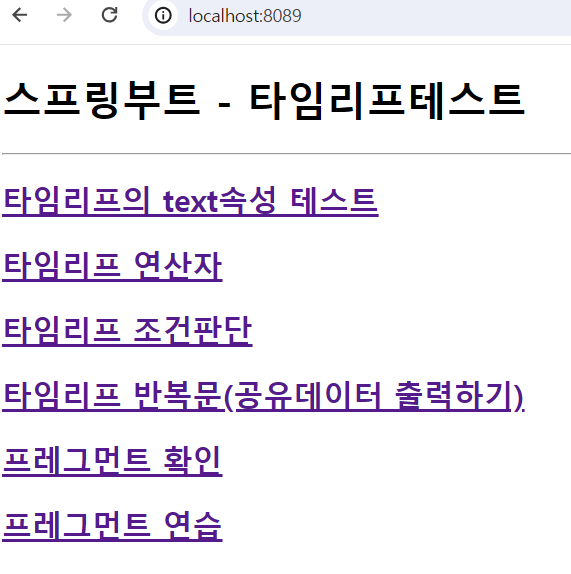
<h1>스프링부트 - 타임리프테스트</h1>
<hr/>
<h2><a href="th/text">타임리프의 text속성 테스트</a></h2>
<h2><a href="th/oprtest">타임리프 연산자</a></h2>
<h2><a href="th/iftest">타임리프 조건판단</a></h2>
<h2><a href="th/foreachtest">타임리프 반복문(공유데이터 출력하기)</a></h2>
<!-- 타임리프를 이용한 레이아웃 관리 -->
<h2><a href="/layout/fragmenttest">프레그먼트 확인</a></h2>
<h2><a href="/layout/mypage">프레그먼트 연습</a></h2>
</body>
</html>port가 8089고 index.html이 static폴더에 있으니 이렇게 하면 index뷰가 뜸
ThymeleafBasicTestController
import java.util.ArrayList;
import java.util.List;

import org.springframework.stereotype.Controller;
import org.springframework.ui.Model;
import org.springframework.web.bind.annotation.GetMapping;
import org.springframework.web.bind.annotation.RequestMapping;

@Controller
@RequestMapping("/th")
public class ThymeleafBasicTestController {
	@GetMapping("/text")
	public String basic(Model model) {
		model.addAttribute("msg", "thymeleaf사용하기");

		return "basic/text_test";
	}

	@GetMapping("/oprtest")
	public String oprtest(Model model) {
		return "basic/opr_test";
	}

	@GetMapping("/iftest")
	public String iftest(Model model) {
		model.addAttribute("myval", 78);
		model.addAttribute("age", 50);
		return "basic/if_test";
	}

	@GetMapping("/foreachtest")
	public String foreachtest(Model model) {
		PersonDTO p1 = new PersonDTO("bts1","1234","진",95);
		PersonDTO p2 = new PersonDTO("bts2","1234","슈가",89);
		PersonDTO p3 = new PersonDTO("bts3","1234","남준",84);
		PersonDTO p4 = new PersonDTO("bts4","1234","뷔",100);
		List<PersonDTO> list = new ArrayList<>();
		list.add(p1);
		list.add(p2);
		list.add(p3);
		list.add(p4);
		//DB에서 조회한 데이터 공유
		model.addAttribute("list", list);
		model.addAttribute("person", p1);
		return "basic/foreach_test";
	}

	@GetMapping("/linktest")
	public String getRequest(Model model, String id, String data1) {
		System.out.println("id=>"+id);
		System.out.println("data1=>"+data1);
		return "redirect:/";
	}
}
text_test.html
<!DOCTYPE html>
<html xmlns:th="http://www.thymeleaf.org">
<head>
<meta charset="UTF-8">
<title>Insert title here</title>
</head>
<body>
	<!-- 태그 속성으로 타임리프 사용, 태그 내부에 정의, 해당사항이 없으면 출력이 안된다. -->
	<h1>1. th:text속성을 사용하기</h1>
	<div>th:text사용=><span th:text="${msg}"></span></div>
	<div>th:text사용=><span th:text="${data}"></span></div>
	<h2>문자열과 컨트롤러가 공유한 메시지를 출력:[[${msg}]]</h2>
	<h2>문자열과 컨트롤러가 공유한 메시지를 출력:[[${data}]]</h2>
</body>
</html>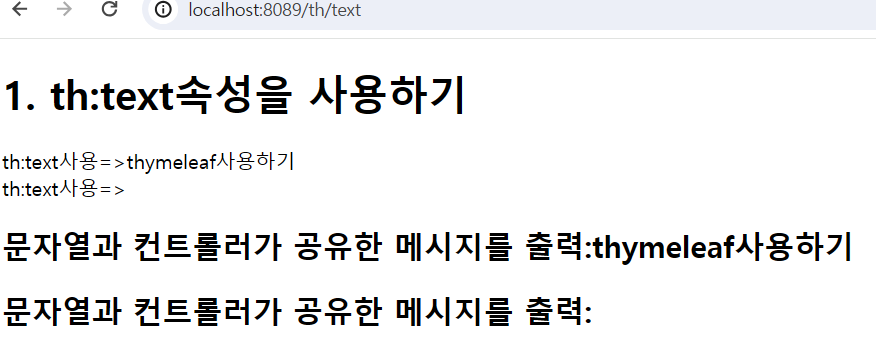
opr_test.html
<!DOCTYPE html>
<html>
<head>
<meta charset="UTF-8">
<title>Insert title here</title>
</head>
<body>
	<h2>산술연산자</h2>
	<ul>
		<li>100+200 =><span th:text="100+200"></span></li>
		<li>100*200 =><span th:text="100*200"></span></li>
		<li>100/3 =><span th:text="100/3"></span></li>
		<li>100-3 =><span th:text="100-3"></span></li>
		<li>100%3 =><span th:text="100%3"></span></li>
		<li>100%3==1 =><span th:text="100%3==1"></span></li>
	</ul>
	<h2>비교연산자</h2>
	<ul>
		<li>100>200 =><span th:text="100>200"></span></li>
		<li>100 gt(lt) 200 =><span th:text="100 gt 200"></span></li>
		<li>100>=200 =><span th:text="100>=200"></span></li>
		<li>100 ge(le) 200 =><span th:text="100 ge 200"></span></li>
		<li>100==100 =><span th:text="100==100"></span></li>
		<li>100!=100 =><span th:text="100!=100"></span></li>
	</ul>
</body>
</html>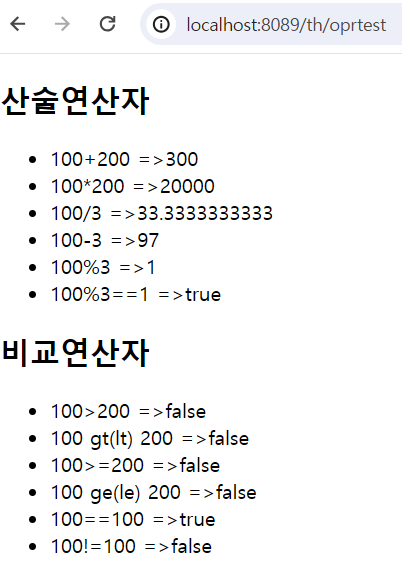
if_test.html
<!DOCTYPE html>
<html xmlns:th="http://www.thymeleaf.org">
<head>
<meta charset="UTF-8">
<title>Insert title here</title>
</head>
<body>
	<h1>조건판단</h1>
	<hr/>
	<h2>공유된 데이터:<span th:text="${myval}"></span></h2>
	<!-- 조건을 만족하지 않으면 출력되지 않는다. -->
	<!-- th:if는 조건을 만족한다면 -->
	<h2>출력결과1:<span th:text="성공" th:if="${myval>=100}"></span></h2>
	<!-- th:unless는 조건이 만족하지 않는다면 즉 th:if와 반대개념 -->
	<h2>출력결과2:<span th:text="실패" th:unless="${myval>=100}"></span></h2>

	<h2>2. switch</h2>
	<div th:switch="${age}">
		<span th:case="10">10대</span>
		<span th:case="20">20대</span>
		<span th:case="30">30대</span>
		<span th:case="40">40대</span>
		<span th:case="50">50대</span>
		<span th:case="*">기타</span><!-- th:case="*"는 자바 스위치문의 default와 같은 역할 -->
	</div>
</body>
</html>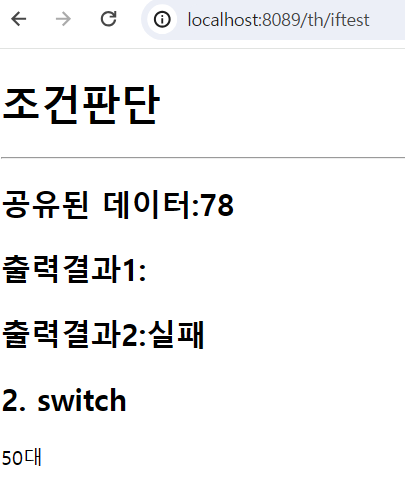
foreach_test.html
<!DOCTYPE html>
<html xmlns:th="http://www.thymeleaf.org">
<head>
<meta charset="UTF-8">
<title>Insert title here</title>
</head>
<body>
	<h1>1. 공유된 객체 출력</h1>
	<div>
		<h2>아이디 : <span th:text="${person.id}"></span></h2>
		<h2>패스워드 : <span th:text="${person.pass}"></span></h2>
		<h2>성명 : <span th:text="${person.name}"></span></h2>
		<h2>점수 : <span th:text="${person.jamsu}"></span></h2>
	</div>
	<h1>2. 공유된 객체 List에서 DTO를 꺼내서 출력(테이블로 출력)</h1>
	<table border="1">
		<tr>
			<th>아이디</th>
			<th>패스워드</th>
			<th>성명</th>
			<th>점수</th>
		</tr>
		<tr th:each="person:${list}">
			<th th:text="${person.id}"></th>
			<th th:text="${person.pass}"></th>
			<th th:text="${person.name}"></th>
			<th th:text="${person.jamsu}"></th>
		</tr>
	</table>

	<h1>3. 조건에 만족하는 값 출력하기</h1>
	<!-- 공유된 list값을 출력
		아이디,패스워드,성명,점수,합격여부
		합격여부 => 점수가 90점 이상이면 합격, 미만이면 불합격 출력하기
		 -->
	<table border="1">
		<tr>
			<th>아이디</th>
			<th>패스워드</th>
			<th>성명</th>
			<th>점수</th>
			<th>합격여부</th>
		</tr>
		<tr th:each="p:${list}">
			<td th:text="${p.id}"></td>
			<td th:text="${p.pass}"></td>
			<td th:text="${p.name}"></td>
			<td th:text="${p.jamsu}"></td>
			<td>
				<span th:text="합격" th:if="${p.jamsu>=90}"></span>
				<span th:text="불합격" th:unless="${p.jamsu>=90}"></span>
			</td>
		</tr>
	</table>

	<h2>4. 하이퍼링크로 요청하기(get방식으로 데이터 보내기)</h2>
	<!-- 파라미터를 하이퍼링크로 요청하면서 보내기
		th:href="@{요청path(파라미터명=값, 파라미터명=값...)}"
		 -->
	<h3><a th:href="@{/th/linktest(data1=${person.name})}">하이퍼링크로 요청하기</a></h3>
	<!-- /th/linktest 요청하며 id는 person의 id, data1은 person의 jamsu -->
	<h3><a th:href="@{/th/linktest(id=${person.id}, data1=${person.jamsu})}">하이퍼링크로 요청하기</a></h3>
</body>
</html>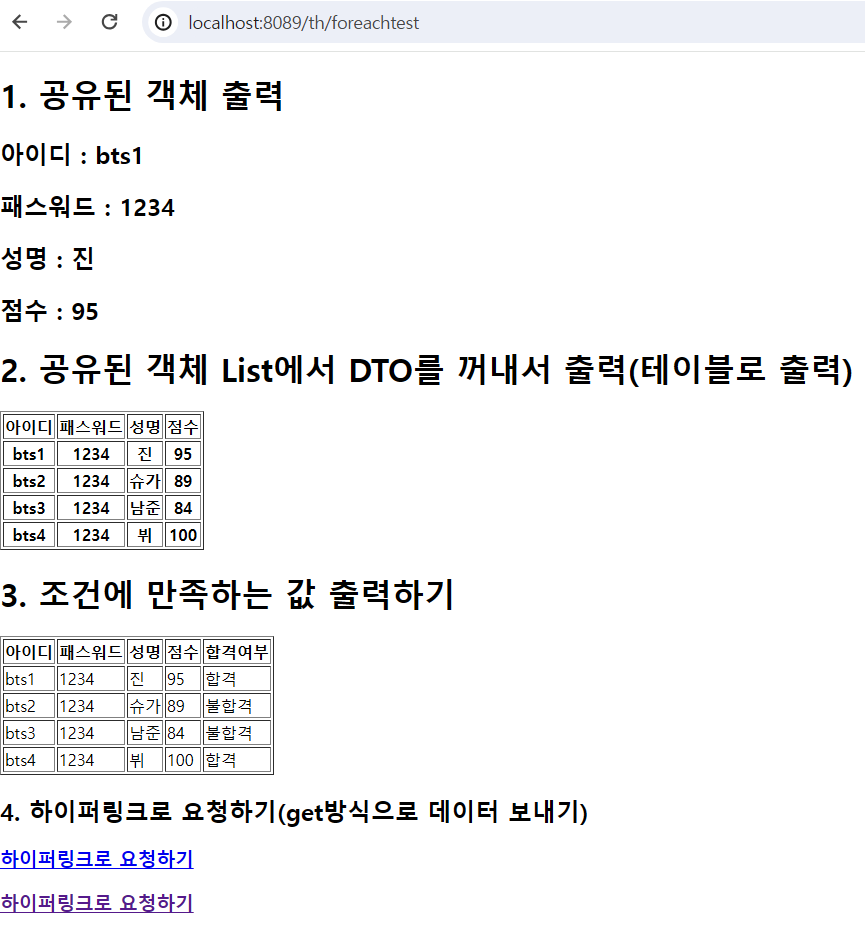
PersonDTO
public class PersonDTO {
	private String id;
	private String pass;
	private String name;
	private int jamsu;
	public PersonDTO() {

	}
	public PersonDTO(String id, String pass, String name, int jamsu) {
		super();
		this.id = id;
		this.pass = pass;
		this.name = name;
		this.jamsu = jamsu;
	}
	@Override
	public String toString() {
		return "PersonDTO [id=" + id + ", pass=" + pass + ", name=" + name + ", jamsu=" + jamsu + "]";
	}
	public String getId() {
		return id;
	}
	public void setId(String id) {
		this.id = id;
	}
	public String getPass() {
		return pass;
	}
	public void setPass(String pass) {
		this.pass = pass;
	}
	public String getName() {
		return name;
	}
	public void setName(String name) {
		this.name = name;
	}
	public int getJamsu() {
		return jamsu;
	}
	public void setJamsu(int jamsu) {
		this.jamsu = jamsu;
	}

}
타임리프 연습
ThymeleafLayoutController
import org.springframework.stereotype.Controller;
import org.springframework.web.bind.annotation.GetMapping;
import org.springframework.web.bind.annotation.RequestMapping;

@Controller
@RequestMapping("/layout")
public class ThymeleafLayoutController {
	@GetMapping("/fragmenttest")
	public String fragment_test() {
		return "fragment/main";
	}

	@GetMapping("/mypage")
	public String mypage() {
		//return "layout/mypageLayout";//1차작업 - 타임리프 프레그먼트를 이용해서 작업
		return "member/mypage";
	}

	@GetMapping("/prdlist")
	public String prdlist() {
		//return "layout/prdlistLayout";//1차작업 - 타임리프 프레그먼트를 이용해서 작업
		return "product/prdlist";
	}
}
main.html
<!DOCTYPE html>
<html xmlns:th="http://www.thymeleaf.org">
<head>
<meta charset="UTF-8">
<title>Insert title here</title>
</head>
<body>
	<h1>프레그먼트 연결하기</h1>
	<div style="background-color: yellow; height: 100px;">
		메인의 영역 ############ --------- 1
	</div>
	<!-- content1,2... 정의한 프레그먼트를 main에 삽입
		프레그먼트를 삽입이나 replace하는 경우
		~{}문법을 써서 경로를 정의하는 것이 기본문법이나 간단한 정의를 하는 경우는 ~{}를 생략가능
		th:insert => 삽입, th:replace => 교체
		th:insert="~{연결될 view의 path :: 정의된 프레그먼트의 이름}"
	 -->
	<div id="top" th:insert="~{fragment/fragment1 :: content1}">

	</div>
	<div style="background-color: yellow; height: 100px;">
		메인의 영역 ############ --------- 2
	</div>
	<div style="background-color: yellow; height: 100px;">
		메인의 영역 ############ --------- 3
	</div>
	<div id="menu1" th:replace="~{fragment/fragment1 :: content1}">

	</div>
	<div id="menu1" th:replace="fragment/fragment1 :: content2">

	</div>
	<div style="background-color: yellow; height: 100px;">
		메인의 영역 ############ --------- 4
	</div>
	<div id="body" th:replace="fragment/fragment2 :: content3('bts','방탄소년단')">

	</div>
</body>
</html>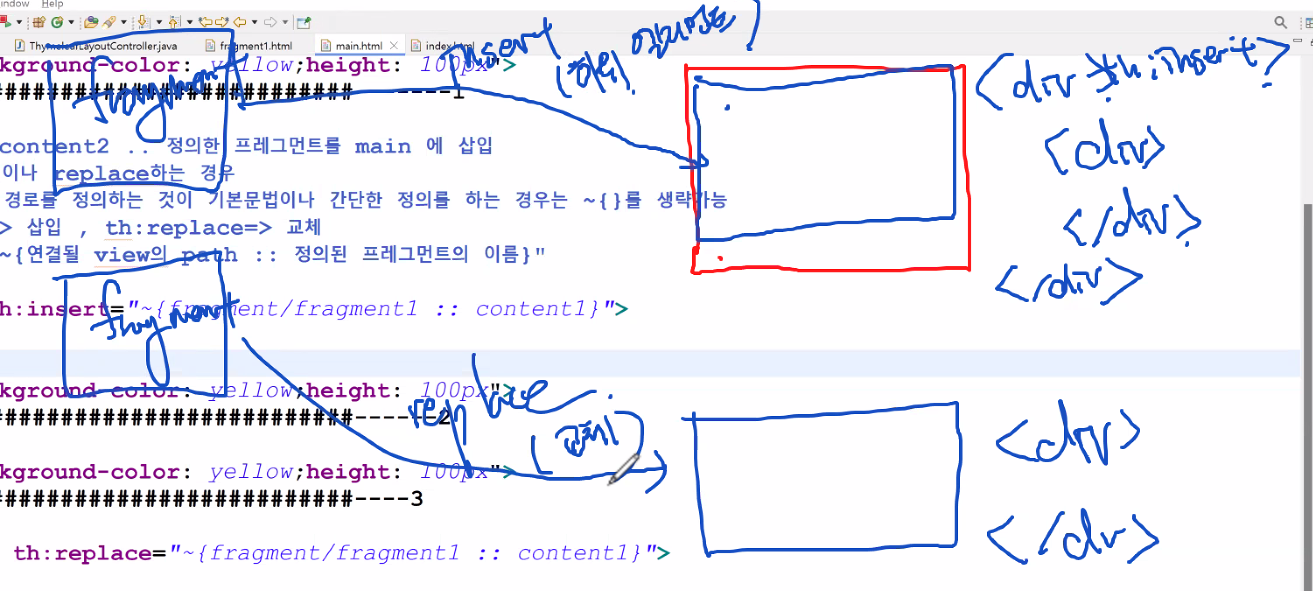
fragment1.html
<!DOCTYPE html>
<html xmlns:th="http://www.thymeleaf.org">
<head>
<meta charset="UTF-8">
<title>Insert title here</title>
</head>
<body>
	<h1>JSP에서 include됐던 페이지가 타임리프는 fragment라 부른다.</h1>
	<!-- th:fragment에 프레그먼트의 이름 -->
	<div style="background-color: pink" th:fragment="content1">
		삽입될 프레그먼트 ------- 1
	</div>
	<div style="background-color: aqua;" th:fragment="content2">
		삽입될 프레그먼트 ------- 2
	</div>
</body>
</html>
fragment2.html
<!DOCTYPE html>
<html xmlns:th="http://www.thymeleaf.org">
<head>
<meta charset="UTF-8">
<title>Insert title here</title>
</head>
<body>
	<h1>JSP에서 include됐던 페이지가 타임리프는 fragment라 부른다.</h1>
	<!-- th:fragment에 프레그먼트의 이름
		파라미터를 전달받아서 사용할 수 있다. -->
		<div style="background-color: orange;" th:fragment="content3(param1,param2)">
			삽입될 프레그먼트 ------ 3
			<h3 th:text="${param1}"></h3>
			<h3 th:text="${param2}"></h3>
		</div>
</body>
</html>
미션
다음과같은 레이아웃을 가진 페이지를 프레그먼트를 이용해서 작업하세요
menu.html
<!DOCTYPE html>
<html xmlns:th="http://www.thymeleaf.org">
<head>
<meta charset="UTF-8">
<title>Insert title here</title>
</head>
<body>
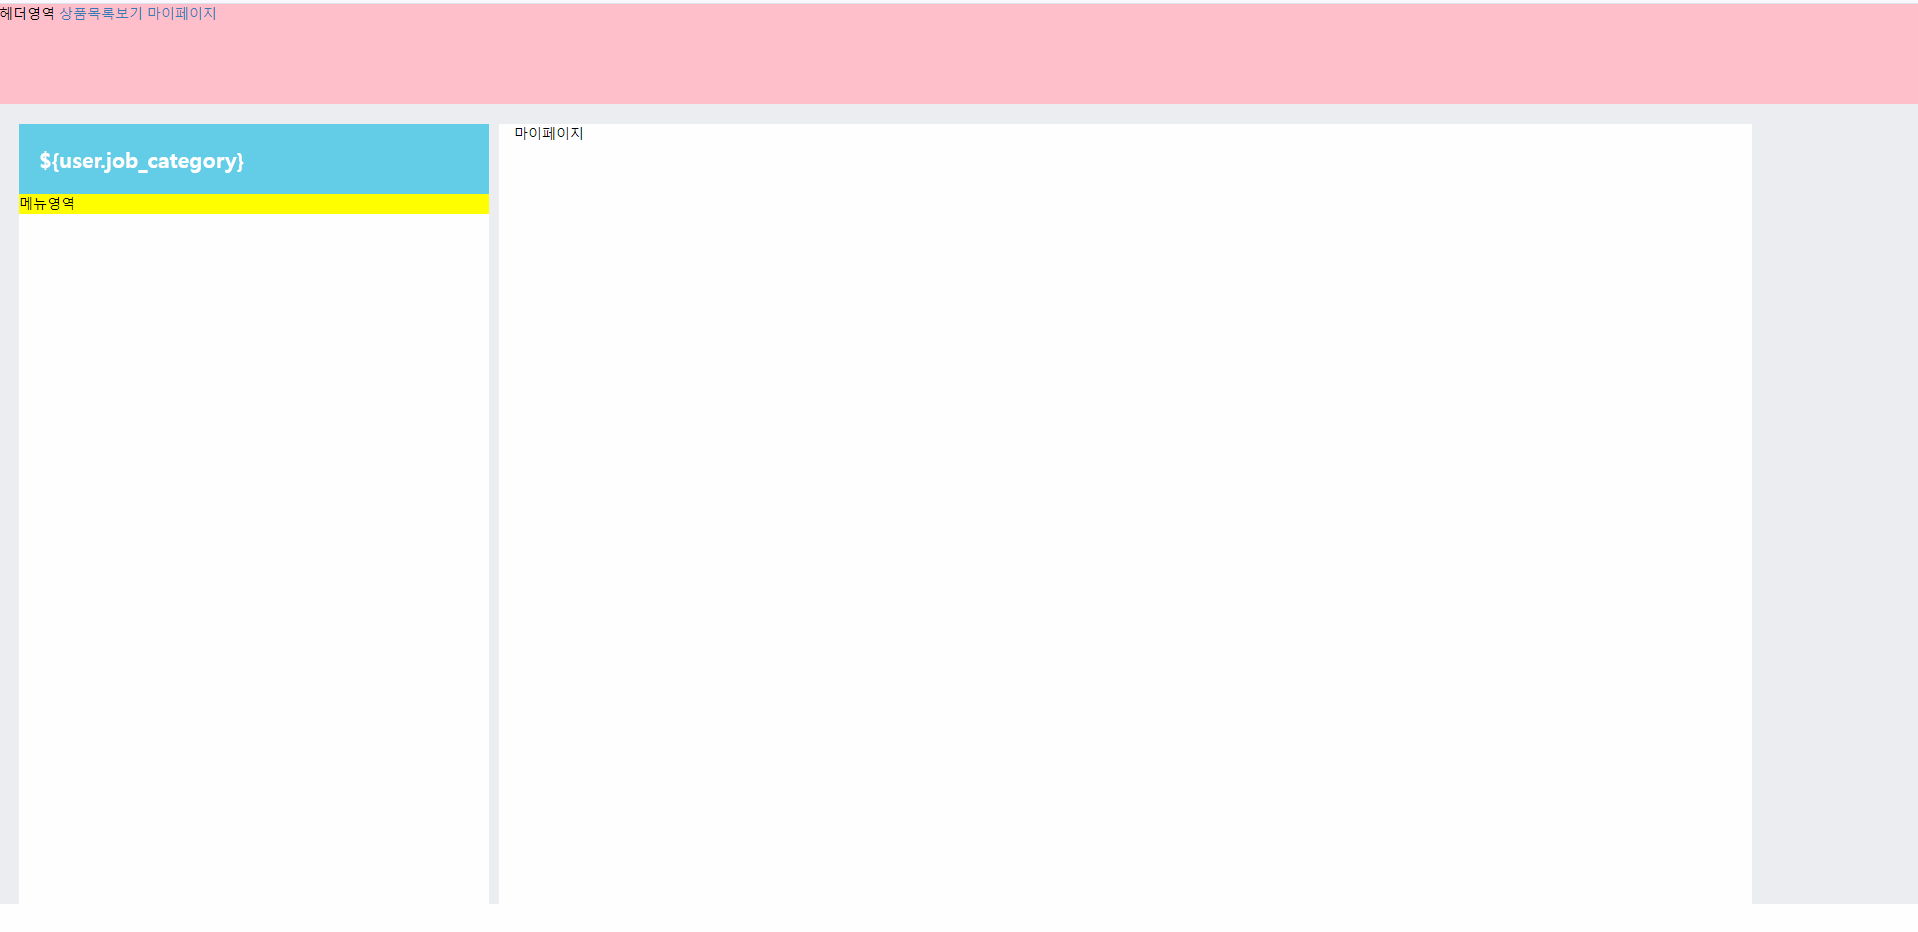
<div style="background-color: yellow;" th:fragment="menu">
메뉴영역
</div>
</body>
</html>top.html
<!DOCTYPE html>
<html xmlns:th="http://www.thymeleaf.org">
<head>
<meta charset="UTF-8">
<title>Insert title here</title>
</head>
<body>
	<div style="background-color: pink; height: 100px" th:fragment="top">
		헤더영역
		<a href="/layout/prdlist">상품목록보기</a>
		<a href="/layout/mypage">마이페이지</a>
	</div>
</body>
</html>
mypageLayout.html
<!DOCTYPE html>
<html xmlns:th="http://www.thymeleaf.org">
<head>
<meta charset="UTF-8">
<meta name="viewport" content="width=device-width, initial-scale=1">
<link rel="stylesheet" href="/erp/common/css/main.css" />
<link rel="stylesheet" href="https://maxcdn.bootstrapcdn.com/bootstrap/3.3.7/css/bootstrap.min.css">
<script src="https://ajax.googleapis.com/ajax/libs/jquery/3.3.1/jquery.min.js"></script>
<script src="https://maxcdn.bootstrapcdn.com/bootstrap/3.3.7/js/bootstrap.min.js"></script>
<style>
/* Remove the navbar's default margin-bottom and rounded borders */
.navbar {
margin-bottom: 0;
border-radius: 0;
}
body{
color: black;
}
/* #toparea{
padding: 30px;
} */
/* body{
background-color: #edeef1
} */
</style>
<title>Insert title here</title>
</head>
<body>
<!-- 프레그먼트 연습할때 작성한 main.html과 동일한 역할, top.html과 menu.html과 mypage.html을 추가
프레그먼트로 추가하고 작업
-->
<div th:insert="~{include/top :: top}">
<!-- 이곳에 top화면을 연결하세요" -->
</div>
<div style="background-color: #edeef1;padding: 20px;height: 800px">
<div class="row" style="margin-left: auto;margin-right: auto;">
<div class="col-sm-3"
style="background-color: white;margin-right:10px;padding: 0px ">
<div
style="border-color:white;height: 800px;">
<div style="background-color:#63cde7;padding: 20px;
font-family:HY-견고딕;font-size: 16pt;color: white;
font-weight: bolder;"></div>
<!-- 이곳에 menu 프레그먼트 연결하세요" -->
<div th:replace="~{include/menu :: menu}">
</div>
</div>
</div>
<div class="col-sm-8" style="background-color: white;height: 800px;">
마이페이지
<!-- 이곳에 content화면을 연결하세요" --> </div>
</div>
</div>
</body>
</html>
prdlistLayout.html
<!DOCTYPE html>
<html xmlns:th="http://www.thymeleaf.org">
<head>
<meta charset="UTF-8">
<meta name="viewport" content="width=device-width, initial-scale=1">
<link rel="stylesheet" href="/erp/common/css/main.css" />
<link rel="stylesheet" href="https://maxcdn.bootstrapcdn.com/bootstrap/3.3.7/css/bootstrap.min.css">
<script src="https://ajax.googleapis.com/ajax/libs/jquery/3.3.1/jquery.min.js"></script>
<script src="https://maxcdn.bootstrapcdn.com/bootstrap/3.3.7/js/bootstrap.min.js"></script>
<style>
/* Remove the navbar's default margin-bottom and rounded borders */
.navbar {
margin-bottom: 0;
border-radius: 0;
}
body{
color: black;
}
/* #toparea{
padding: 30px;
} */
/* body{
background-color: #edeef1
} */
</style>
<title>Insert title here</title>
</head>
<body>
<!-- 프레그먼트 연습할때 작성한 main.html과 동일한 역할, top.html과 menu.html과 mypage.html을 추가
프레그먼트로 추가하고 작업
-->
<div th:insert="~{include/top :: top}">
<!-- 이곳에 top화면을 연결하세요" -->
</div>
<div style="background-color: #edeef1;padding: 20px;height: 800px">
<div class="row" style="margin-left: auto;margin-right: auto;">
<div class="col-sm-3"
style="background-color: white;margin-right:10px;padding: 0px ">
<div
style="border-color:white;height: 800px;">
<div style="background-color:#63cde7;padding: 20px;
font-family:HY-견고딕;font-size: 16pt;color: white;
font-weight: bolder;"></div>
<!-- 이곳에 menu 프레그먼트 연결하세요" -->
<div th:replace="~{include/menu :: menu}">
</div>
</div>
</div>
<div class="col-sm-8" style="background-color: white;height: 800px;">
<h2>상품목록페이지</h2>
<ul>
<li>사과</li>
<li>배</li>
<li>복숭아</li>
<li>오렌지</li>
</ul>
<!-- 이곳에 content화면을 연결하세요" -->
</div>
</div>
</div>
</body>
</html>
타임리프 추가
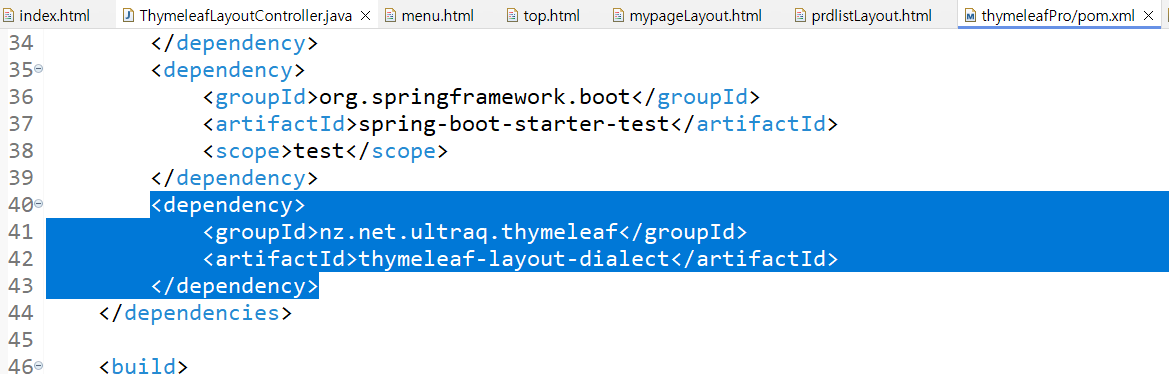
레이아웃구성
과제
ThymeleafLayoutController
package com.example.thymeleafPro;

import org.springframework.stereotype.Controller;
import org.springframework.ui.Model;
import org.springframework.web.bind.annotation.GetMapping;
import org.springframework.web.bind.annotation.RequestMapping;

@Controller
@RequestMapping("/layout")
public class ThymeleafLayoutController {
	@GetMapping("/fragmenttest")
	public String fragment_test() {
		return "fragment/main";
	}

	@GetMapping("/mypage")
	public String mypage() {
		//return "layout/mypageLayout";//1차작업 - 타임리프 프레그먼트를 이용해서 작업
		return "member/mypage";
	}

	@GetMapping("/prdlist")
	public String prdlist() {
		//return "layout/prdlistLayout";//1차작업 - 타임리프 프레그먼트를 이용해서 작업
		return "product/prdlist";
	}

	@GetMapping("/prdread")
	public String prdread(String prdno,String prdname,Model model) {
		System.out.println(prdname+":"+prdno);
		model.addAttribute("prdname",prdname);
		model.addAttribute("prdno",prdno);
		return "product/productRead";
	}
}
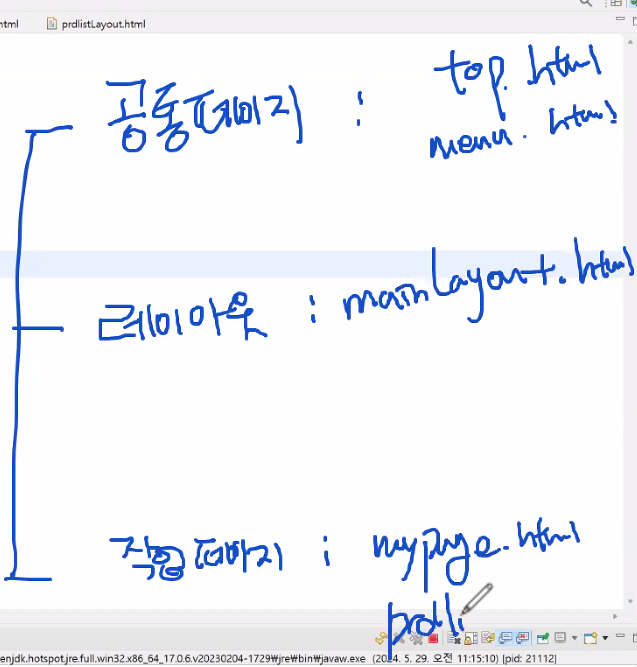
mainLayout.html
<!DOCTYPE html>
<html xmlns:th="http://www.thymeleaf.org"
	 xmlns:layout="http://www.ultraq.net.nz/thymeleaf/layout">
<head>
<meta charset="UTF-8">
<meta name="viewport" content="width=device-width, initial-scale=1">

  <link rel="stylesheet" href="/erp/common/css/main.css" />
  <link rel="stylesheet" href="https://maxcdn.bootstrapcdn.com/bootstrap/3.3.7/css/bootstrap.min.css">
  <script src="https://ajax.googleapis.com/ajax/libs/jquery/3.3.1/jquery.min.js"></script>
  <script src="https://maxcdn.bootstrapcdn.com/bootstrap/3.3.7/js/bootstrap.min.js"></script>
<style>
	/* Remove the navbar's default margin-bottom and rounded borders */
	.navbar {
		margin-bottom: 0;
		border-radius: 0;
	}
	body{
		color: black;
	}
	/*  #toparea{
		padding: 30px;
	}  */
	/* body{
		background-color: #edeef1
	} */
</style>
<title>Insert title here</title>
</head>
<body>
	<div>
		<!-- 이곳에 top화면을 연결하세요" -->
		<th:block th:replace="include/top :: top">
		</th:block>
	</div>
	<div style="background-color: #edeef1;padding: 20px;height: 800px">

			<div class="row" style="margin-left: auto;margin-right: auto;">
			 	<div class="col-sm-3"
			 	style="background-color: white;margin-right:10px;padding: 0px ">
			 		 <div
			 		 style="border-color:white;height: 800px;">
				        <div style="background-color:#63cde7;padding: 20px;
				        font-family:HY-견고딕;font-size: 16pt;color: white;
				         font-weight: bolder;"></div>

				       <!-- 이곳에 menu화면을 연결하세요" -->
					    <th:block th:replace="include/menu :: menu">
						</th:block>
      				 </div>
			 	</div>
			 	<div class="col-sm-8" style="background-color: white;height: 800px;">

			 		<!-- 이곳에 content화면을 연결하세요"
			 			layout:fragement속성을 이용해서 프레그먼트 이름을 정의
			 		-->
			 		<th:block layout:fragment="content">
					</th:block>
			 	</div>
			</div>
	</div>

</body>
</html>
mypage.html
<!DOCTYPE html>
<html xmlns:th="http://www.thymeleaf.org"
	 xmlns:layout="http://www.ultraq.net.nz/thymeleaf/layout"
	 layout:decorate="~{layout/mainLayout}">
	 <!-- layout:decorate="~{layout/mainLayout}는 템플릿으로 사용할 페이지의 이름 -->
<head>
<meta charset="UTF-8">
<title>Insert title here</title>
</head>
<body>
	<!-- 템플릿페이지의 프레그먼트명과 동일하게 정의 -->
	<div layout:fragment="content">
		<h1>마이페이지</h1>
	</div>
</body>
</html>
prdlist.html
<!DOCTYPE html>
<html xmlns:th="http://www.thymeleaf.org"
xmlns:layout="http://www.ultraq.net.nz/thymeleaf/layout"
layout:decorate="~{layout/mainLayout}">
<head>
<meta charset="UTF-8">
<title>Insert title here</title>
</head>
<body>
<div layout:fragment="content">
<!--
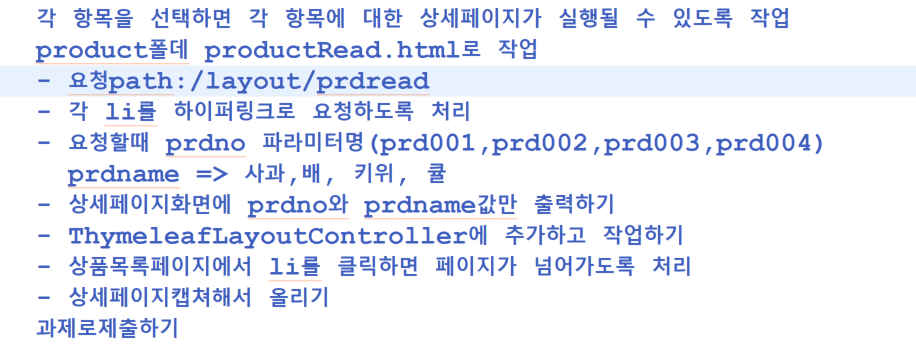
각 항목을 선택하면 각 항목에 대한 상세페이지가 실행될 수 있도록 작업
product폴더 productRead.html로 작업
- 요청path:/layout/prdread
- 각 li를 하이퍼링크로 요청하도록 처리
- 요청할때 prdno 파라미터명(prd001,prd002,prd003,prd004)
prdname => 사과,배,키위,귤
- 상세페이지화면에 prdno와 prdname값만 출력하기
- ThymeleafLayoutController에 추가하고 작업하기
- 상품목록페이지에서 li를 클릭하면 페이직 넘어가도록 처리
- 상세페이지 캡쳐해서 올리기
-->
<h2>상품목록페이지(레이아웃라이브러리 이용)</h2>
<ul>
<li><a th:href="@{/layout/prdread(prdno=${'prd001'}, prdname=${'사과'})}">사과</a></li>
<li><a th:href="@{/layout/prdread(prdno=${'prd002'}, prdname=${'배'})}">배</a></li>
<li><a th:href="@{/layout/prdread(prdno=${'prd003'}, prdname=${'복숭아'})}">복숭아</a></li>
<li><a th:href="@{/layout/prdread(prdno=${'prd004'}, prdname=${'오렌지'})}">오렌지</a></li>
</ul>
</div>
</body>
</html>productRead.html
<!DOCTYPE html>
<html xmlns:th="http://www.thymeleaf.org"
	 xmlns:layout="http://www.ultraq.net.nz/thymeleaf/layout"
	 layout:decorate="~{layout/mainLayout}">
<head>
<meta charset="UTF-8">
<title>Insert title here</title>
</head>
<body>
	<div layout:fragment="content">
		<h2>상품상세보기</h2>
		<hr/>
		<h2>상품번호:<span th:text="${prdno}"></span></h2>
		<h2>상품이름:<span th:text="${prdname}"></span></h2>
	</div>
</body>
</html>
본 포스팅은 멀티캠퍼스의 멀티잇 백엔드 개발(Java)의 교육을 수강하고 작성되었습니다.