Argo Rollouts란?
Argo Rollouts는 Blue/Green, Canary 등의 고급 배포 기능을 지원하는 Kubernetes controller이자 CRDs 세트이며 자동 롤백 및 수동 판단 등을 가능하게 해줍니다.
Argo Rollouts에 대한 자세한 설명은 What is Argo Rollouts?를 참고해 주세요.
Argo Rollouts를 설치하고 배포하는 방법에 대해 알아보겠습니다.
Argo Rollouts 설치
ArgoCD 설치는 EKS에 Helm으로 ArgoCD 설치하기를 참고해 주세요.
helm repo 등록
$ helm repo add argo https://argoproj.github.io/argo-helm등록된 repo 확인
$ helm repo list
NAME       URL
argo       https://argoproj.github.io/argo-helm
Rollout을 위한 Namespace 생성
$ kubectl create ns argo-ro설치
$ helm install argorollout argo/argo-rollouts -n argo-ro
NAME: argorollout
LAST DEPLOYED: Thu Feb 15 15:34:16 2024
NAMESPACE: argo-ro
STATUS: deployed
REVISION: 1
TEST SUITE: None
설치 확인
$ kubectl get all -n argo-ro
NAME                                            READY   STATUS    RESTARTS   AGE
pod/argorollout-argo-rollouts-b95f47dcc-926tq   1/1     Running   0          34s
pod/argorollout-argo-rollouts-b95f47dcc-zxgp8   1/1     Running   0          34s

NAME                                        READY   UP-TO-DATE   AVAILABLE   AGE
deployment.apps/argorollout-argo-rollouts   2/2     2            2           34s

NAME                                                  DESIRED   CURRENT   READY   AGE
replicaset.apps/argorollout-argo-rollouts-b95f47dcc   2         2         2       34s
Argo Rollouts로 배포 테스트
Argo Rollouts는 Canary 배포 설정도 가능하지만 하기 테스트는 Blue/Green 배포로 구성하여 테스트 하였습니다.
helm chart 생성
로컬에 helm이 설치되어 있어야 합니다. helm이 설치되어 있지 않을 경우, Helm 설치하기를 참고하여 설치한 뒤 진행해 주세요.
$ helm create test-rollout-bluegreen생성한 chart의 구조 확인
$ tree test-rollout-bluegreen
test-rollout-bluegreen
├── Chart.yaml
├── charts
├── templates
│   ├── NOTES.txt
│   ├── _helpers.tpl
│   ├── deployment.yaml
│   ├── hpa.yaml
│   ├── ingress.yaml
│   ├── service.yaml
│   ├── serviceaccount.yaml
│   └── tests
│       └── test-connection.yaml
└── values.yaml
helm chart 수정
GitHub argoproj/argo-rollouts/examples/helm-blue-green
/templates을 참고하여 test-rollout-blugreen/templates 경로에 'rollout-bluegreen.yaml'과 'service-preview' 파일을 각각 생성한 뒤 아래와 같이 수정했습니다.
$ vi test-rollout-bluegreen/templates/rollout-bluegreen.yaml

apiVersion: argoproj.io/v1alpha1
kind: Rollout
metadata:
  name: {{ include "test-rollout-bluegreen.fullname" . }}
  labels:
    {{- include "test-rollout-bluegreen.labels" . | nindent 4 }}
spec:
  replicas: {{ .Values.replicaCount }}
  revisionHistoryLimit: 3
  selector:
    matchLabels:
      {{- include "test-rollout-bluegreen.selectorLabels" . | nindent 6 }}
  strategy:
    blueGreen:
      activeService: {{ include "test-rollout-bluegreen.fullname" . }}
      previewService: {{ include "test-rollout-bluegreen.fullname" . }}-preview
  template:
    metadata:
      {{- with .Values.podAnnotations }}
      annotations:
        {{- toYaml . | nindent 8 }}
      {{- end }}
      labels:
        {{- include "test-rollout-bluegreen.labels" . | nindent 8 }}
        {{- with .Values.podLabels }}
        {{- toYaml . | nindent 8 }}
        {{- end }}
    spec:
      containers:
        - name: {{ .Chart.Name }}
          image: "{{ .Values.image.repository }}:{{ .Values.image.deployImgVersion | default "latest" }}"
          imagePullPolicy: {{ .Values.image.pullPolicy }}
          ports:
            - name: http
              containerPort: {{ .Values.service.port }}
              protocol: TCP
          livenessProbe:
            {{- toYaml .Values.livenessProbe | nindent 12 }}
          readinessProbe:
            {{- toYaml .Values.readinessProbe | nindent 12 }}
          resources:
          {{ toYaml .Values.resources | indent 12 }}
      {{- with .Values.nodeSelector }}
      nodeSelector:
        {{ toYaml . | indent 8 }}
      {{- end }}
      {{- with .Values.affinity }}
      affinity:
        {{ toYaml . | indent 8 }}
      {{- end }}
      {{- with .Values.tolerations }}
      tolerations:
        {{ toYaml . | indent 8 }}
      {{- end }}
$ vi test-rollout-bluegreen/templates/service-preview.yaml
apiVersion: v1
kind: Service
metadata:
name: {{ include "test-rollout-bluegreen.fullname" . }}-preview
labels:
{{- include "test-rollout-bluegreen.labels" . | nindent 4 }}
spec:
type: {{ .Values.service.type }}
ports:
- port: {{ .Values.service.port }}
targetPort: http
protocol: TCP
name: http
selector:
{{- include "test-rollout-bluegreen.selectorLabels" . | nindent 4 }}
values.yaml 파일도 수정해 줍니다.
$ vi test-rollout-bluegreen/values.yaml

replicaCount: 1

image:
  repository: nginx
  deployImgVersion: 1.25
  pullPolicy: IfNotPresent
  tag: ""

imagePullSecrets: []
nameOverride: ""
fullnameOverride: ""

service:
  type: ClusterIP
  port: 80

ingress:
  enabled: true
  className: ""
  annotations:
    ...
  hosts:
    - host: ...
      paths:
        - path: /
          pathType: Prefix
  tls: []

livenessProbe:
  httpGet:
    path: /
    port: http
  timeoutSeconds: 5
  initialDelaySeconds: 30
  periodSeconds: 10
readinessProbe:
  httpGet:
    path: /
    port: http
  timeoutSeconds: 5
  initialDelaySeconds: 30
  periodSeconds: 10

autoscaling:
  enabled: false
  # minReplicas: 1
  # maxReplicas: 100
  # targetCPUUtilizationPercentage: 80
  # targetMemoryUtilizationPercentage: 80

volumes: []

volumeMounts: []

nodeSelector: {}

tolerations: []

affinity: {}
Rollout으로 배포되기 때문에 helm chart에 있는 deployment.yaml은 필요가 없어서 제거했습니다. 최종 chart 구성은 다음과 같습니다.
$ tree test-rollout-bluegreen
test-rollout-bluegreen
├── Chart.yaml
├── charts
├── templates
│   ├── NOTES.txt
│   ├── _helpers.tpl
│   ├── hpa.yaml
│   ├── ingress.yaml
│   ├── rollout-bluegreen.yaml #추가됨
│   ├── service.yaml
│   ├── service-preview.yaml #추가됨
│   ├── serviceaccount.yaml
│   └── tests
│       └── test-connection.yaml
└── values.yaml #수정됨
ArgoCD로 배포
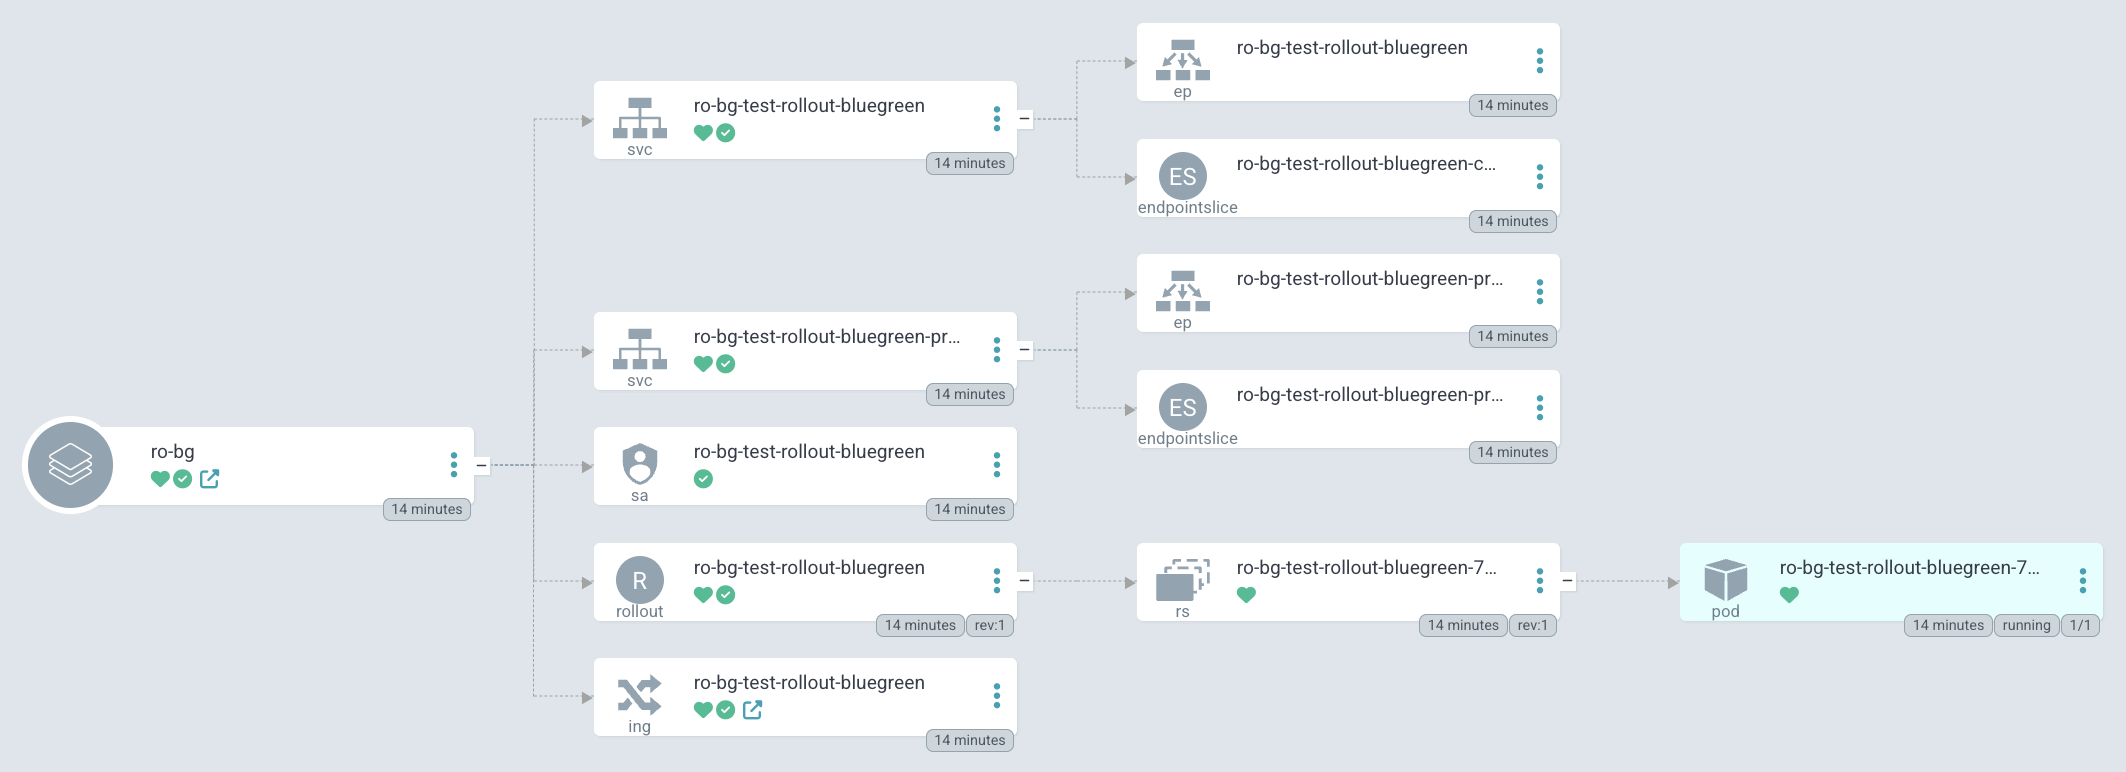
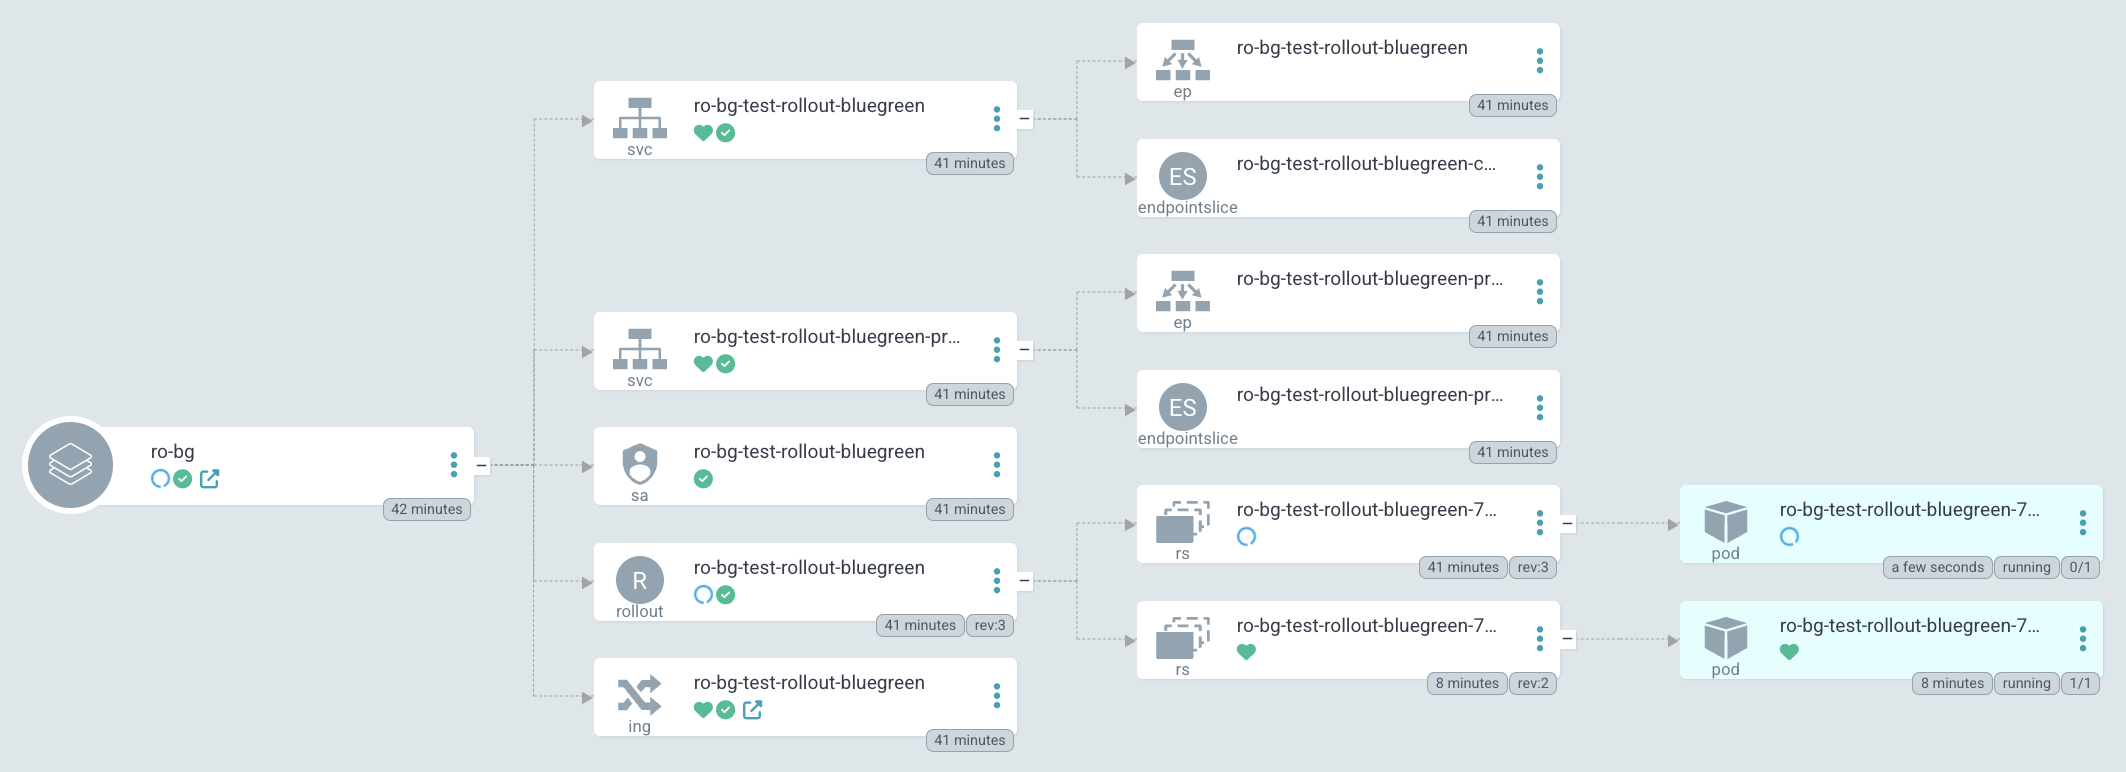
ArgoCD에 접속하여 Application을 생성하고 SYNC를 진행하면 아래와 같이 최초 배포가 되는 것을 확인할 수 있습니다.
이번엔 nginx 버전을 1.25에서 1.25.4로 변경하여 배포해 보겠습니다.
$ vi test-rollout-bluegreen/values.yaml
image:
repository: nginx
deployImgVersion: 1.25.4 #1.25
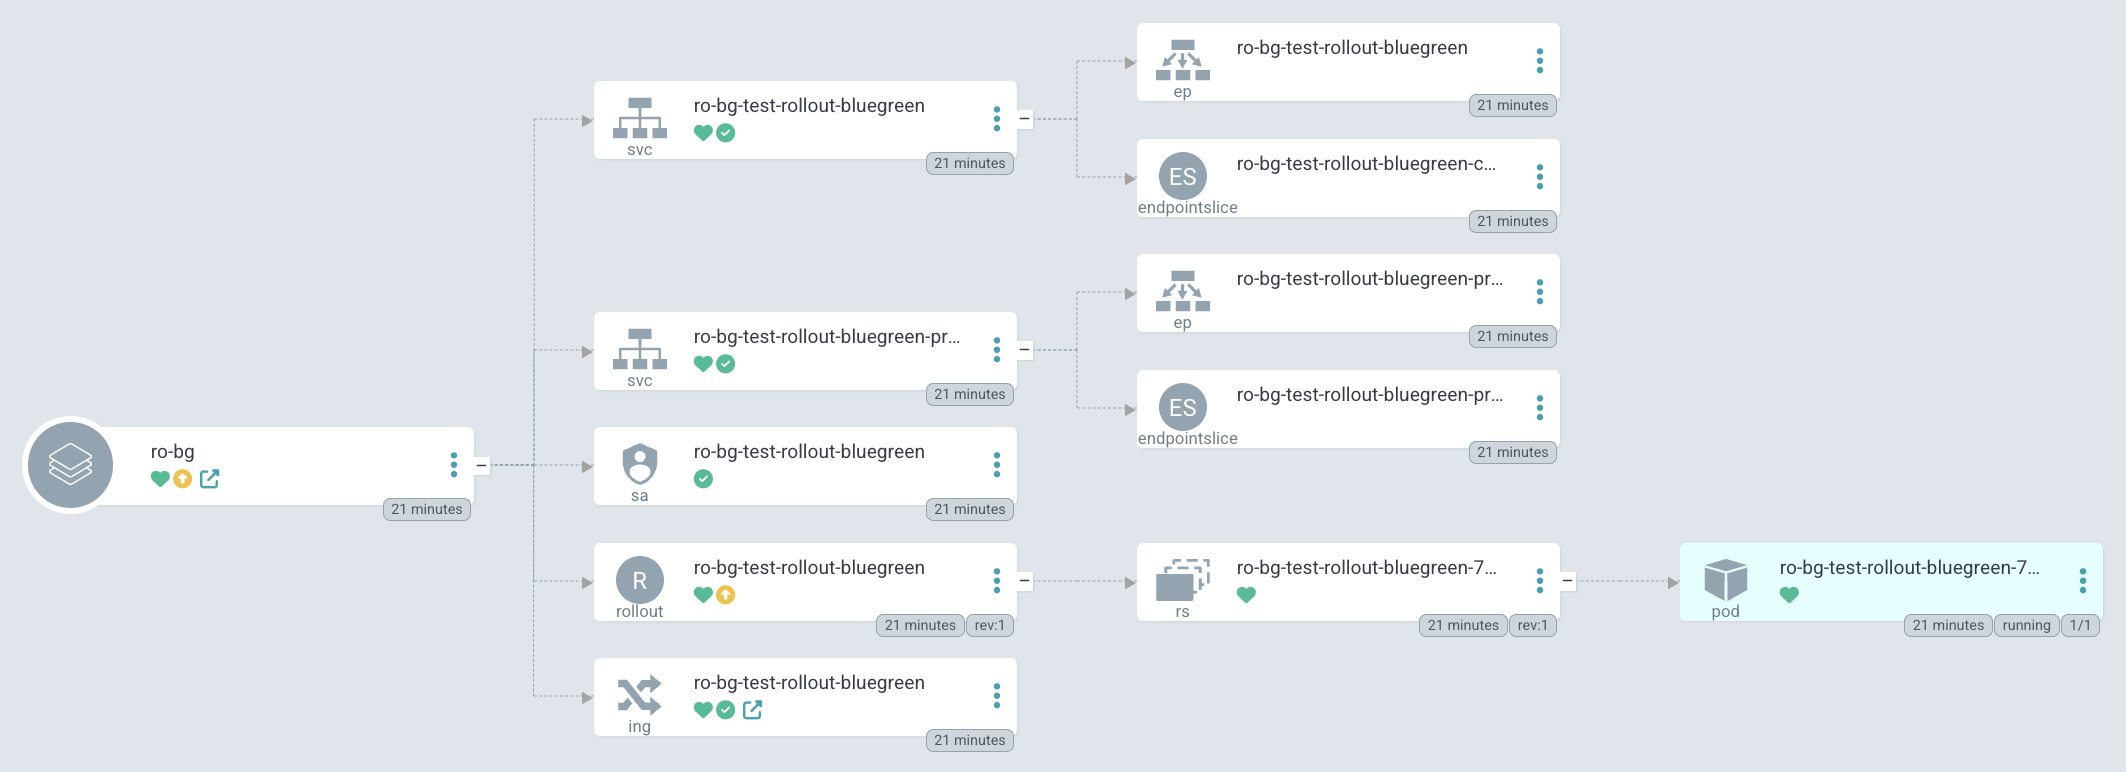
...git push origin main를 진행한 뒤 ArgoCD Project의 REFRESH 버튼을 누르면 아래와 같이 Rollout의 상태가 'OutOfSync'로 변한 것을 확인할 수 있습니다.
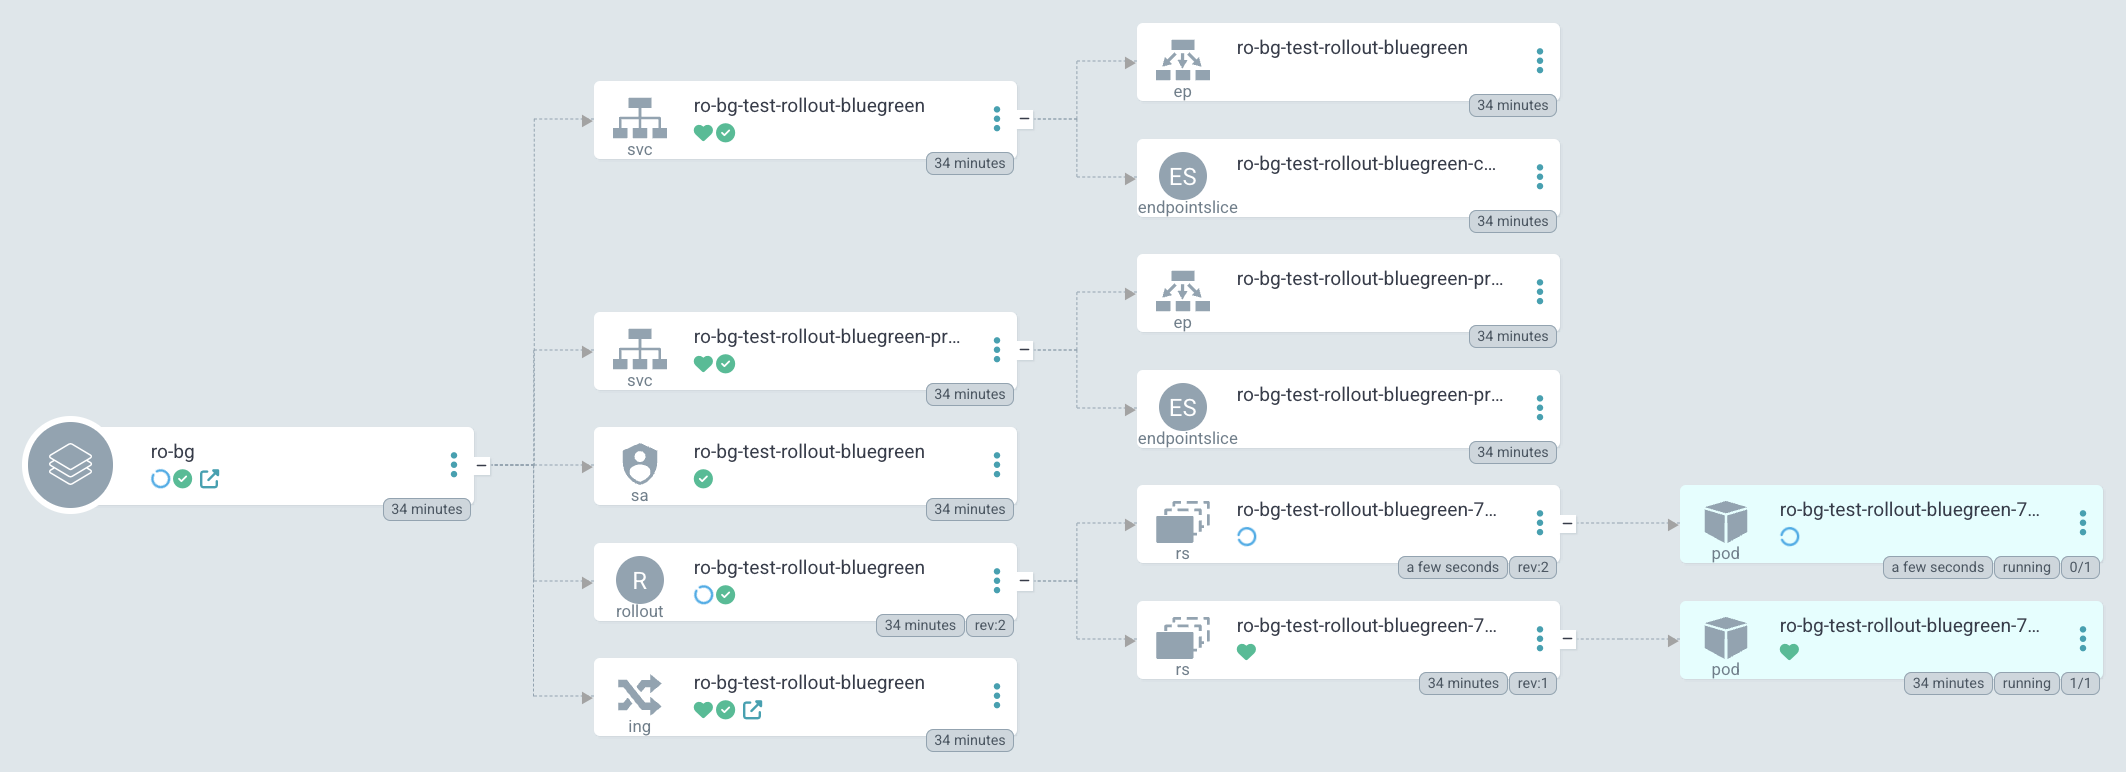
다시 SYNC 버튼을 누르면 아래와 같이 Rollout에서 새로운 ReplicaSet과 Pod가 생성됩니다.
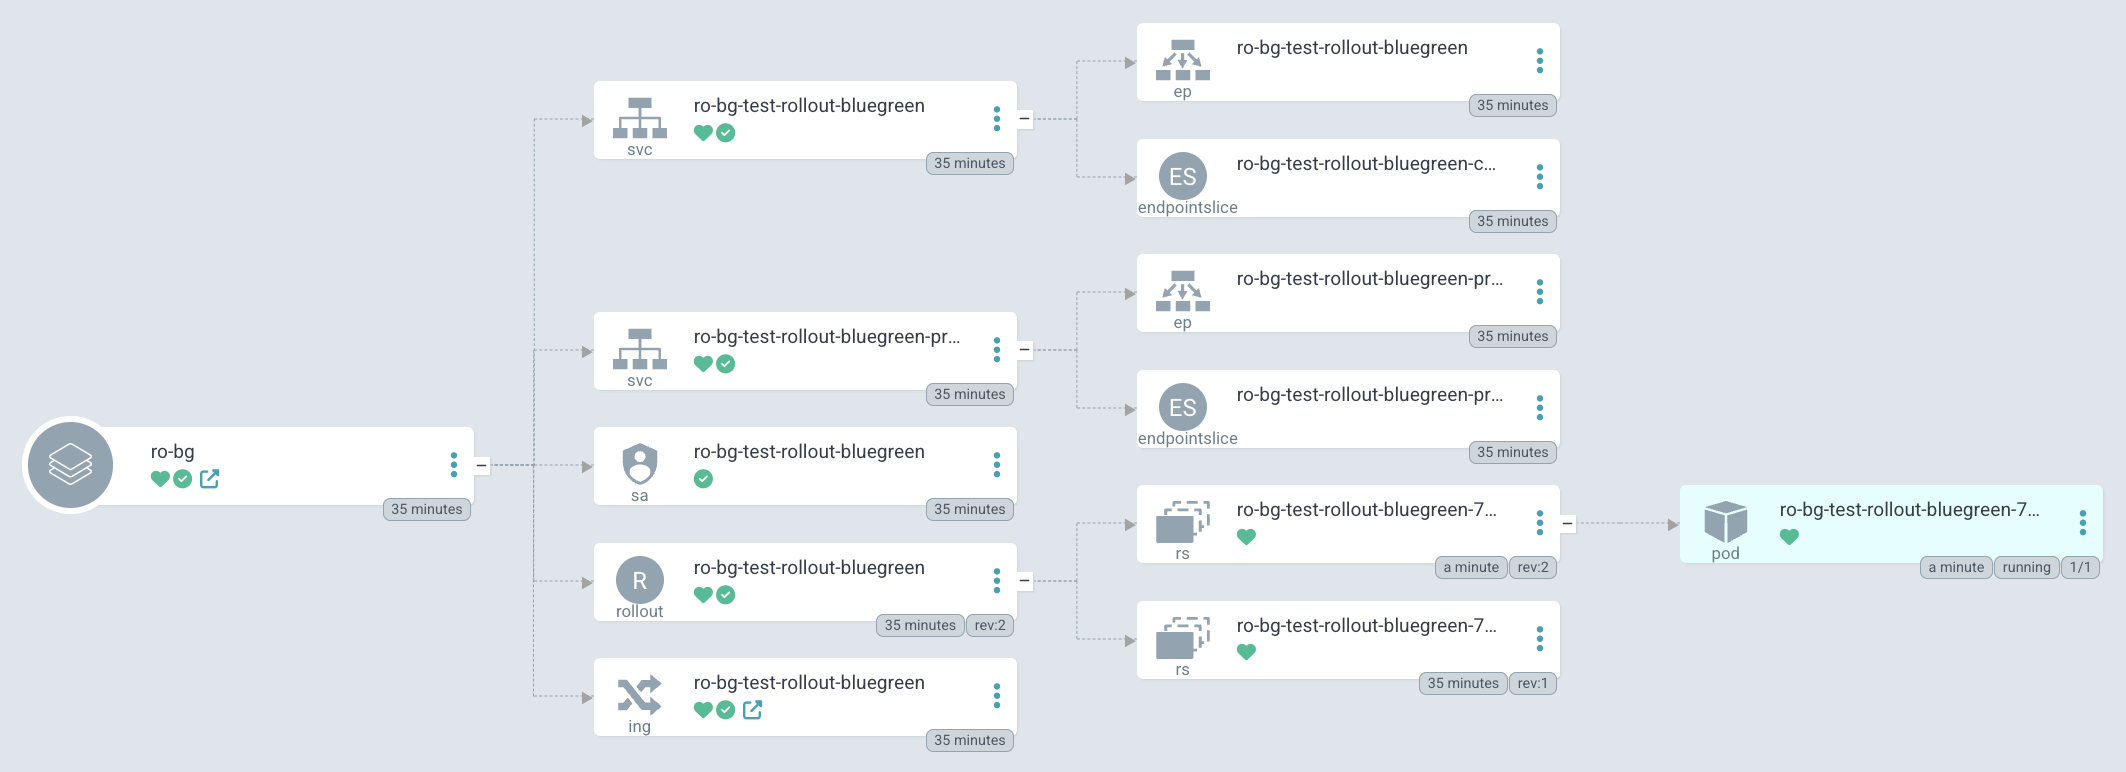
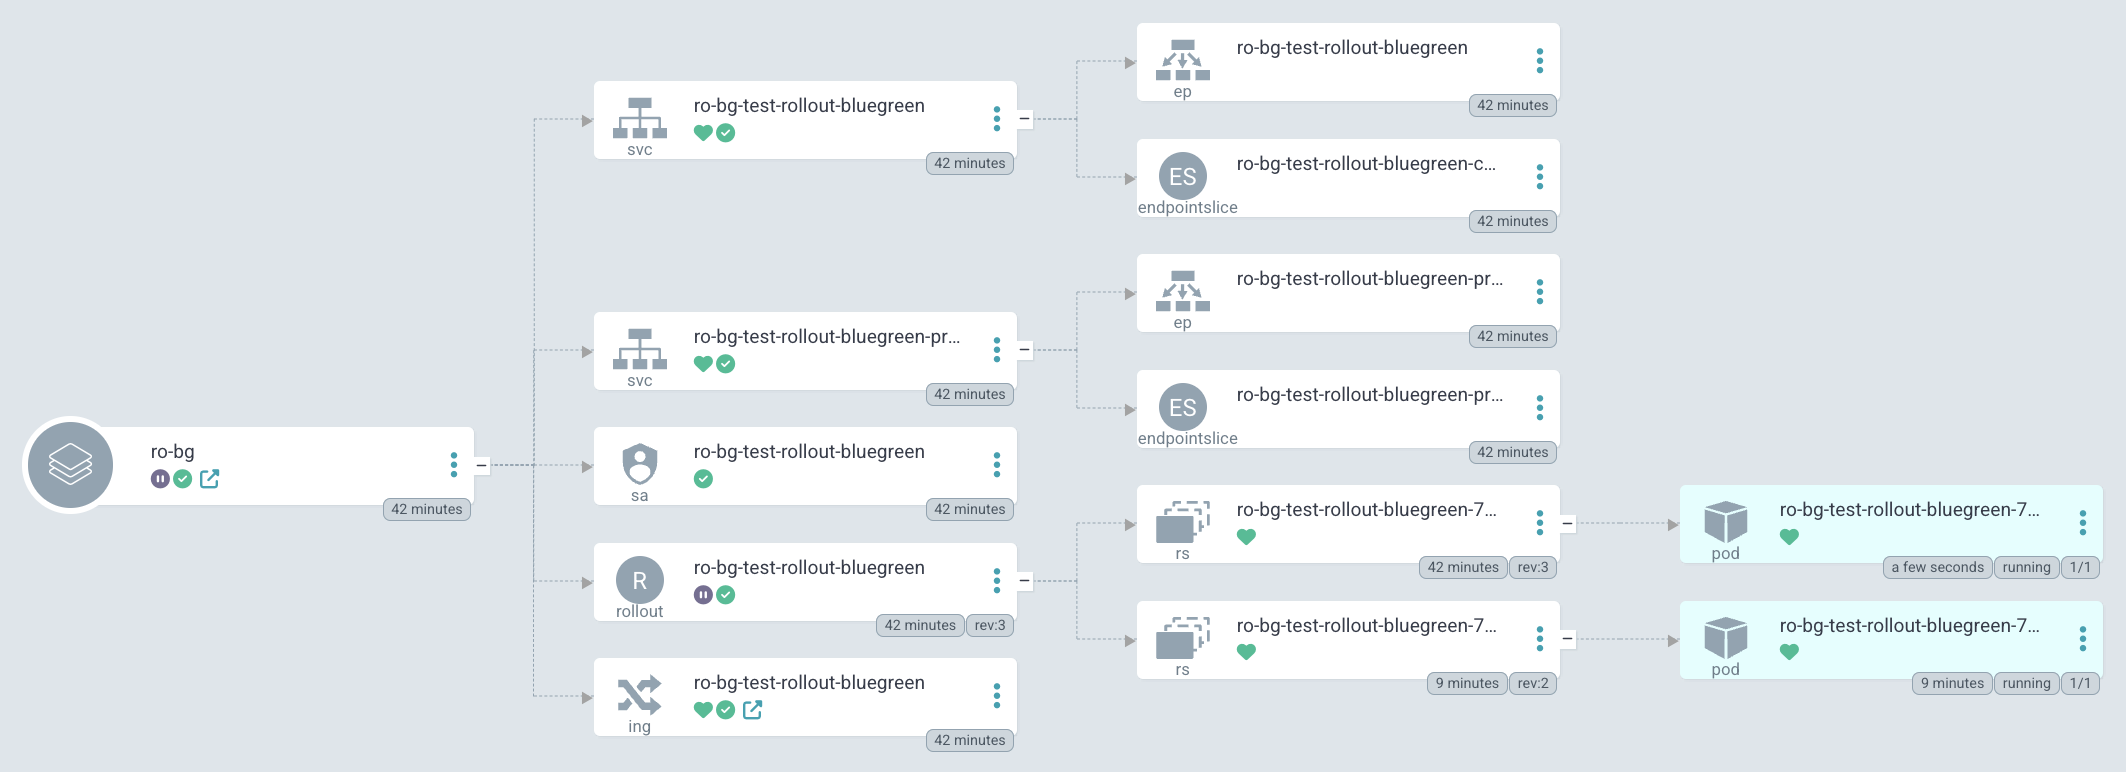
생성이 완료되고 몇 초 뒤, 기존 Pod(Blue)는 아래와 같이 자동으로 삭제됩니다.
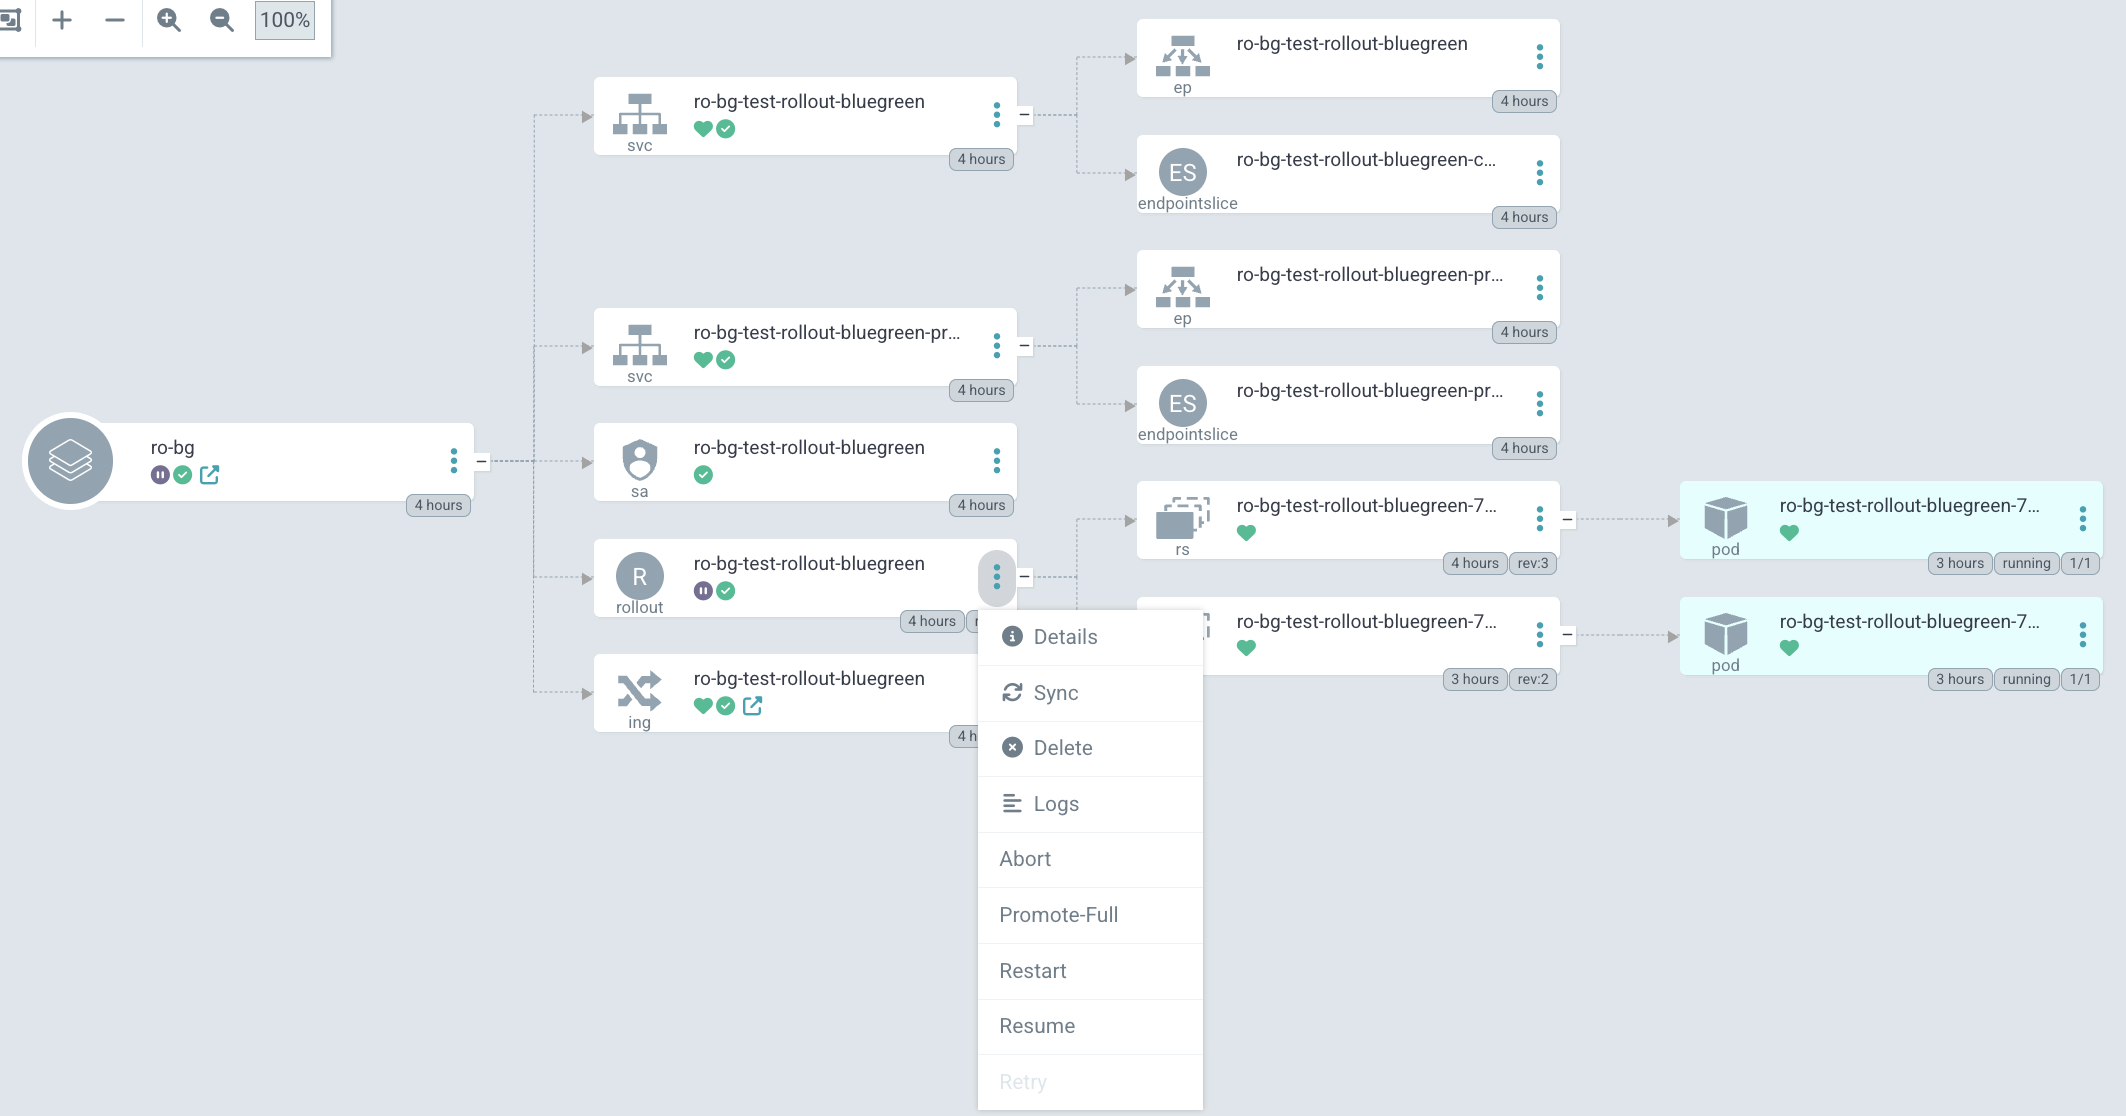
(optional) Blue의 수동 삭제 설정 (Promote-Full)
수동으로 삭제를 하고 싶다면 Rollout의 Promote-Full 설정을 활성화하면 되는데요, rollout-bluegreen.yaml의 strategy에 autoPromotionEnabled 옵션을 추가하여 이 값을 'false'로 지정하면 Blue를 자동이 아닌 수동으로 삭제할 수 있습니다.
설정 방법은 다음과 같습니다.
rollout-bluegreen.yaml
apiVersion: argoproj.io/v1alpha1
kind: Rollout
...
spec:
  ...
  strategy:
    blueGreen:
      ...
      autoPromotionEnabled: {{ .Values.autoPromotion }}  # 추가
values.yaml
autoPromotion: false # 추가위와 같이 'rollout-bluegreen.yaml'과 'values.yaml'를 수정한 뒤 다시 배포하여 Sync하면 기존과 동일하게 새로운 ReplicaSet과 Pod가 생성됩니다.
하지만 기존과의 차이점은 Green이 생성된 뒤, Blue가 자동으로 삭제되지 않고 멈춰있습니다.
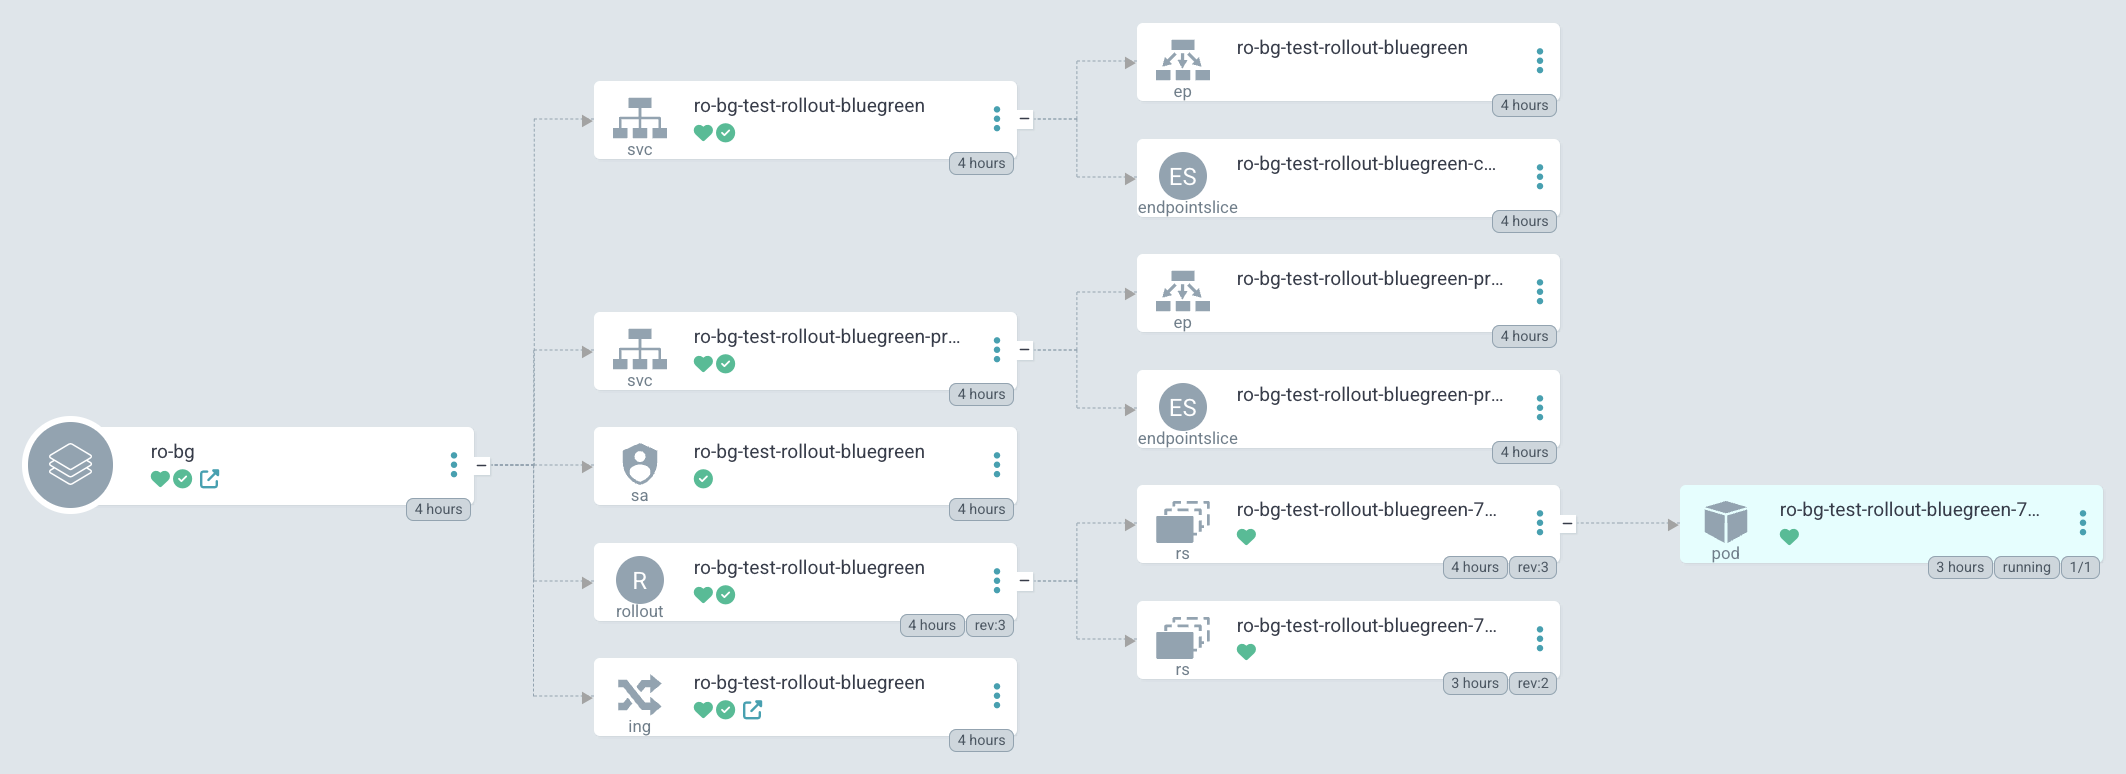
'Promote-Full'을 선택하면 몇 초 뒤 Blue가 삭제됩니다.
삭제 확인!
Reference
- Argo Rollouts - Kubernetes Progressive Delivery Controller
- https://github.com/argoproj/argo-rollouts/blob/master/examples/rollout-bluegreen.yaml
개인적으로 공부하며 작성한 글로, 내용에 오류가 있을 수 있습니다.

안녕하세요. 혹시 배포시에 위 그림과 같이 ArgoCD 화면처럼 새로운 ReplicaSet이 뜨려면 어떻게 해야하나요? 아무리해도 다른 하나의 ReplicaSet은 안뜨고 하나의 ReplicaSet에서 파드만 여러개 뜨고 있습니다. ReplicaSet도 분리를 하고 싶습니다!!