정적파일 사용
방법1. 컴포넌트 기준으로 상대경로로 이미지파일 찾아가기
props 속성
케밥표기법과 카멜표기법
my-address같은 케밥표기법으로 넘기면 반드시 받는 쪽은 myAddress같은 카멜 표기법을 사용한다.
문자형 배열 형식으로 받기
props:[ 'username', 'age', 'myAddress']
props type 지정
v-bind를 통해 자식에 다양한 타입의 값을 전달할 수 있으며.
자식에서는 아래와 같은 데이터타입으로 명시하여 사용할 수 있다.
String,Number, Array, Object, Boolean
    <HelloWorld
      username="홍길동"
      v-bind:age="20"
      my-address="서울"
      v-bind:isMarried="false"
      v-bind:phones="[100, 200, 300]"
      v-bind:author="{
        name:'aaa',
        company:'google.com'
      }"
    />
props:{
username:String,
age:Number,
myAddress:String,
isMarried:Boolean,
phones:Array,
author:Object
}props 기본값 설정
값을 전달받지 않았을 경우에 기본값 설정이 되어있다면 기본값을 할당한다.
props:{
username:String,
age:{
type: Number,
default:100
},
myAddress:{
type:String,
default:"제주"
}
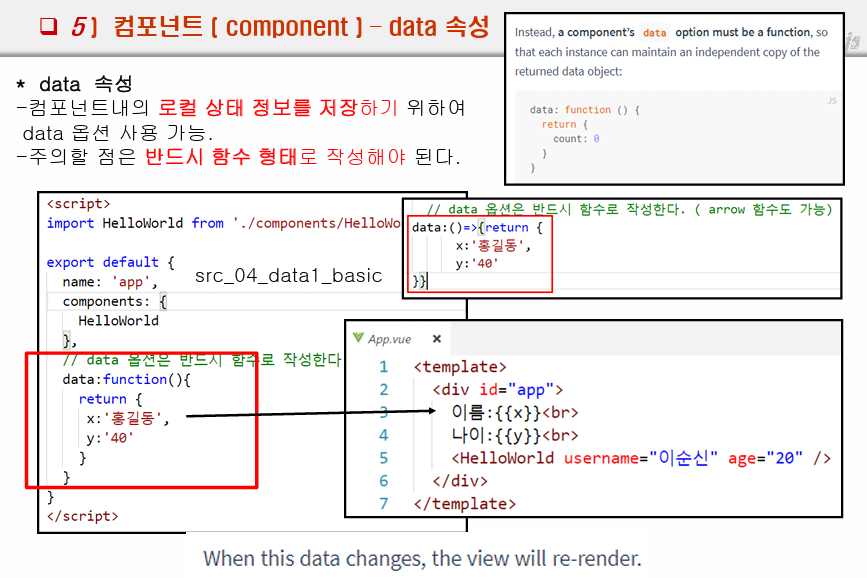
}data 속성
- 컴포넌트 내의 로컬 상태 정보를 저장하기 위하여 사용
- 주의할 점은 반드시 함수 형태의 리턴값에 json객체로 작성해야한다.
<template>
  <div>
    부모 로컬값 : {{ x }}, {{ y }}<br>
    2 : {{ [x, y] }} <br>
    3 : {{ {[x]: y} }} <br>
    <HelloWorld />
  </div>
</template>

<script>
import HelloWorld from './components/HelloWorld';
export default {
  name: 'App',
  components: {
    HelloWorld
  },

// 로컬의 상태를 저장하는 data 옵션은 반드시 함수로 지정해야하며 (arrow 함수 가능.)
// json 형식을 따른다.
  data:function(){
    return {x:"홍길동", y:"100"}
  }

}
</script>
외부 클래스 import 사용
Person.js 를 import해서 사용.
<template>
  <div>
    <HelloWorld />
    객체 : {{ p.username }} , {{ p.getAge() }}
  </div>
</template>

<script>
import HelloWorld from './components/HelloWorld';
import { Person } from './components/Person.js';
export default {
  name: 'App',
  components: {
    HelloWorld
  },
  data:()=>{
    return {
      x:'홍길동',
      y:'40',
      z: [10, 20, 30],
      l: {aa:'hong', bb:30},
      p: new Person("aaa", 20)
    }
  }
}
</script>
부모에서 자식으로 data(로컬변수) 전달
v-bind:속성명=값의 형식으로 전달해야한다.
그렇지 않으면 변수에 들어있는 값이 아닌, 그냥 String으로 전달되기 때문이다.
:속성명=값으로 줄여 사용할 수 있다.
<template>
  <div>
    {{ [aa, bb] }}
    <HelloWorld v-bind:aa="aa" :bb="bb"/>
    <HelloWorld />
  </div>
</template>

<script>
import HelloWorld from './components/HelloWorld';
export default {
  name: 'App',
  components: {
    HelloWorld
  },
  data: ()=>{
    return {
      aa: "홍길동",
      bb: 20
    };
  }
}<template>
<div>
{{ aa }}
{{ bb }}
</div>
</template>
<script>
export default {
props:{
aa:{
type:String,
default: "흠..."
},
bb:{
type:Number,
default: "흠..."
}
}
}
</script>속성명을 동적으로 설정
v-bind:[변수명]="x" 형식으로 사용이 가능하다.
[]대괄호 안에 변수를 넣으면 값을 반환한다.
method 생성과 사용
메서드에서 this 사용시 해당 export 블럭을 지칭. data나 props를 사용할 수 있음
람다 사용시 this가 undefiend.
따라서 일반함수 사용을 권장.
전달받은 값이나 data를 사용시 this를 사용하지 않으면 오류가 발생한다.
{{ 함수() }} 형식으로 사용
<template>
  <div>
    <h1>{{ username }}</h1>
    <h1>{{ age }}</h1>
    <h2>{{ sayEcho() }}</h2>
    <h2>{{ test() }}</h2>
    <h2>{{ test2("ttttttt") }}</h2>

  </div>
</template>

<script>
export default {
  props: ["mesg"],
  data: ()=>{
    return {
      username: "홍길동",
      age: 20
    }
  },
  methods:{
    sayEcho: function(){
      console.log("sayEcho 실실행 ==========");
      return this.username+"\t"+this.age;
    },
    test:function(){
      console.log("test 실행===========");
      return this.username+"\t"+this.age+"\t"+this.mesg;
    },
    test2:(data)=>{
      console.log("test2 실행, lambda ==========");
      return data; // lambda는 this 사용이 불가능
    }
  }
}
</script><template>
<div>
{{ [username, age] }} <br>
{{ {username, age} }} <br>
{{ lambda() }} <br>
{{ hamsu() }} <br>
{{ lambda2() }}
</div>
</template>
<script>
export default {
props:["mesg"],
methods:{
hamsu:function(){
console.log("함수가 기능을 한다.")
return "함함수수 "+this.username+"\t"+this.age;
},
lambda:()=>{
console.log("람다함수가 기능을 한다.");
return "람다다. ";// + this.mesg;
},
lambda2:()=>{
return new Date().toString() + "\t"+this;
}
}, data:()=>{
return {
username:"홍길동",
age:20
}
},
}
</script>뷰의 라이프사이클 메서드 (hook)
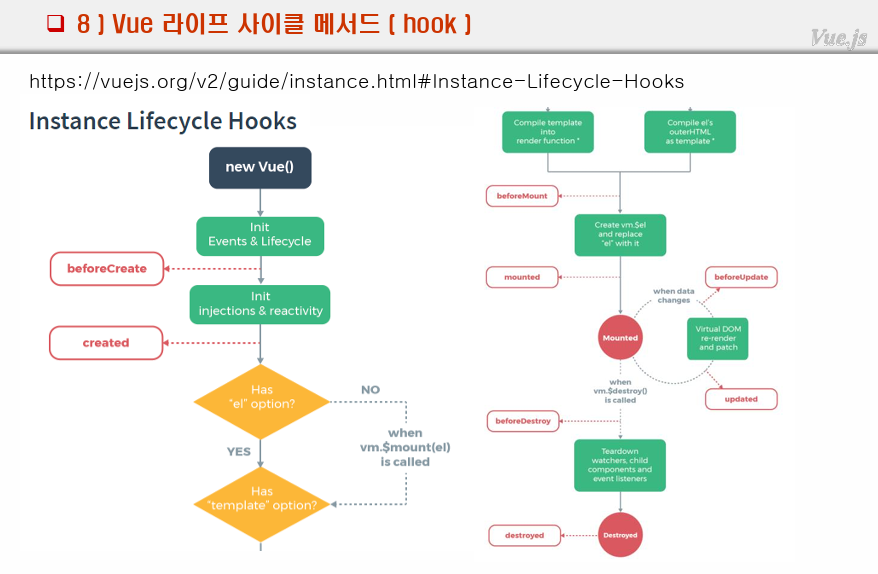
1. 컴포넌트가 최초 호출될때 4가지가 호출 된다는 것.(마운트전)
2. data값이 변경되면 2가지 메서드가 호출 된다는 것.
vue <- spring
백단에서 데이터를 받는 작업을 created에서 함
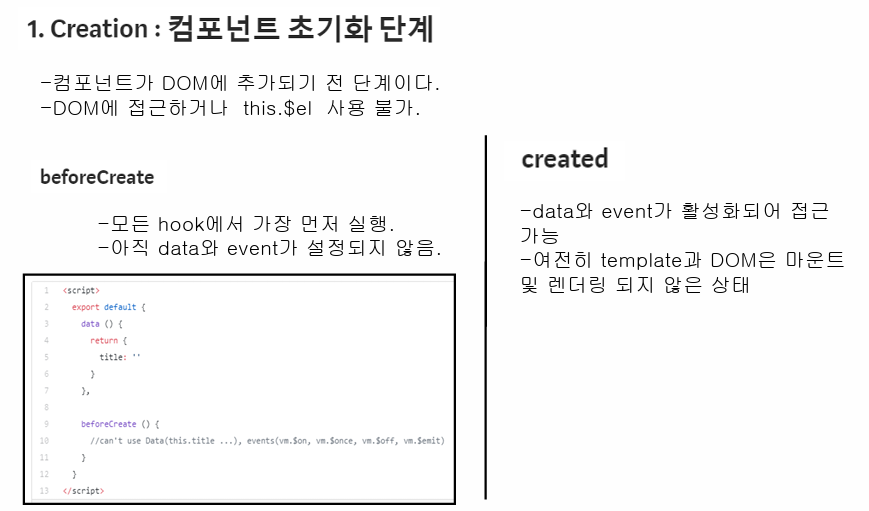
1) Creation
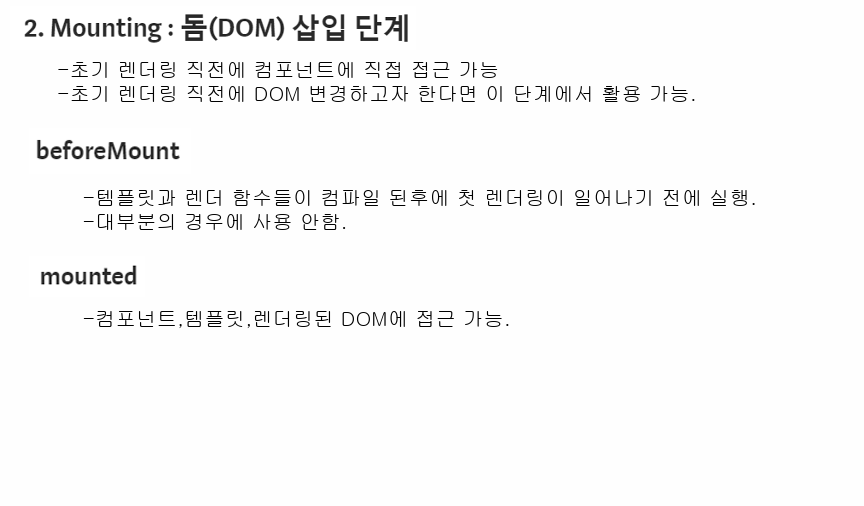
2) Mounting
3) Updating
데이터값이 변결될 때 실행

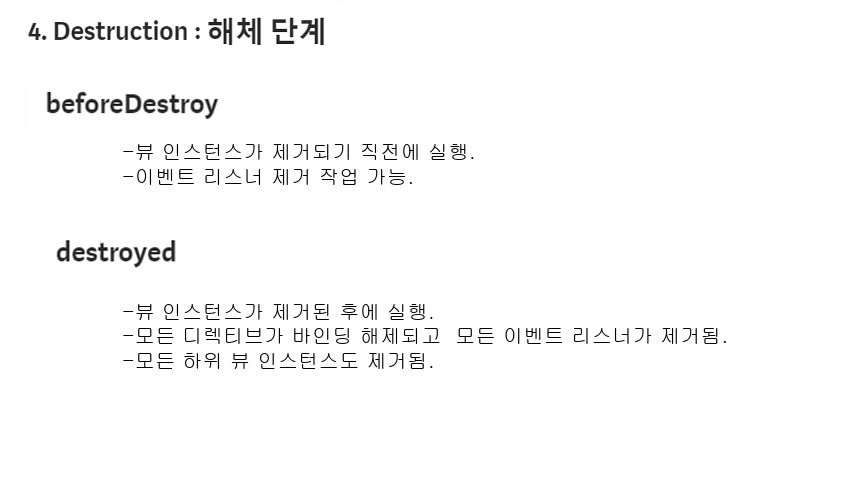
4) Destruction
<template>
  <div>
    {{ mesg }}
  </div>
</template>

<script>
export default {
  data: function(){
    return {mesg:"Hello World"}
  },

  beforeCreate:function(){
    console.log("beforeCreate : ", this);
  },
  created:function(){
    console.log("create");
  },
  beforeMount: function(){
    console.log("beforeMount");
  },
  mounted:function(){
    console.log("mounted1: ", this.$el, this.mesg);
    this.mesg='happy로 변경';
    console.log("mounted: ", this.mesg);
  },
  beforeUpdate: function(){
    console.log("beforeUpdate");
  },
  updated: function(){
    console.log("updated");
  },

  beforeDestroy: function(){
    console.log("beforeDestroy");
  },
  destroyed:function(){
    console.log("destroyed");
  }
}
</script>

<style>

</style>
$el : template보여주는 구문?
beforeCreate 에서 this 사용시 아직 데이터 사용 전이기에 data와 event 사용이 불가능
created에서는 this를 통해 data, event 사용이 가능
부모컴포넌트와 자식 컴포넌트 라이프사이클 순서:
부모->자식->자식마운트->부모마운트
부모가 먼저 진행하고 자식이 마운트될 때까지 기다리다가 부모도 마운트하는 순서다.
<template>
  <div>
    <HelloWorld />
  </div>
</template>

<script>
import HelloWorld from './components/HelloWorld';
export default {
  name: 'App',
  components: {
    HelloWorld
  }, data:()=>{
    return {
      mesg:"App component"
    };
  },

  beforeCreate:function(){
    console.log("app.beforeCreate : ", this);
  },
  created:function(){
    console.log("app.create");
  },
  beforeMount: function(){
    console.log("app.beforeMount");
  },
  mounted:function(){
    console.log("app.mounted1: ", this.$el, this.mesg);
  },
  beforeUpdate: function(){
    console.log("app.beforeUpdate");
  },
  updated: function(){
    console.log("app.updated");
  },

  beforeDestroy: function(){
    console.log("app.beforeDestroy");
  },
  destroyed:function(){
    console.log("app.destroyed");
  }
}
</script>
디렉티브
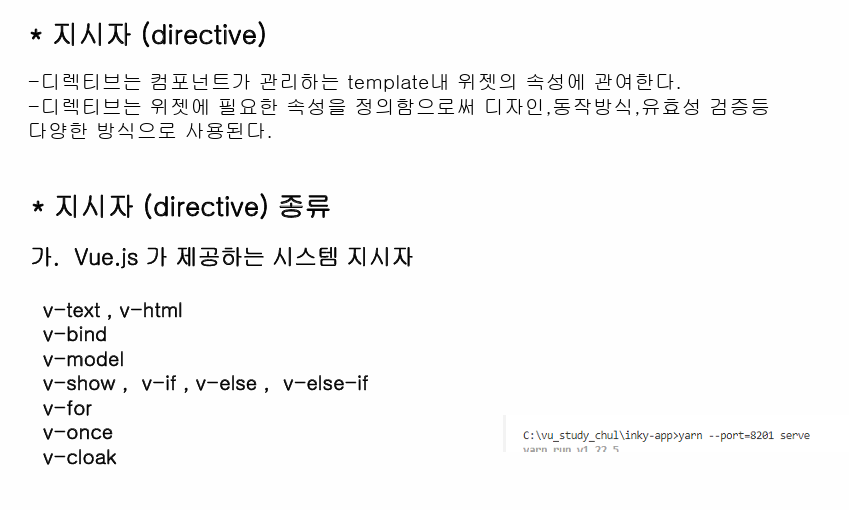
v-text, v-html
태그의 속성으로 사용되며, text와 html을 대체한다. th:text, th:html과 비슷한 맥락
<template>
  <div>
    <h1>디렉티브 : v-text, v-html : 위젯에 필요한 속성의 정의함</h1>
    1)v-text: <span v-text="x"></span><br>
    1)v-text: <span v-text="getX()"></span><br>
    2)v-html: <span v-html="y"></span><br>
    2)v-html: <span v-html="getY()"></span><br>
  </div>
</template>

<script>
export default {
  props:{

  },
  data: ()=>{
    return {
      x:"홍길동",
      y:"<h1>홍길동</h1>"
    }
  },
  methods:{
    getX: function(){
      return this.x;
    },
    getY: function(){
      return this.y;
    }
  }
}
</script>

<style>
  body{
    text-align: center;
  }
  h1{
    color: red;
  }
</style>
v-bind
변수를 value란에 사용하기 위한 것
단방향 바인딩
v-bind: 객체의 속성 단방향 바인딩
v-bind:속성명 = 객체데이터 또는 :속성명=객체데이터
단방향 바인딩 : 한쪽(한방향)에만 데이터를 뿌려주는 것을 뜻함
<template>
  <div>
      로컬 데이터 : {{ mesg }} <br>

      <!-- v-bind: 객체의 속성 단방향 바인딩
      v-bind:속성명 = 객체데이터 또는 :속성명=객체데이터 -->
      mesg: <input type="text" value="mesg"><br>
      v-bind:value="mesg"<input type="text" v-bind:value="mesg"><br>
      :value="mesg" <input type="text" :value="mesg"><br>
  </div>
</template>

<script>
export default {
  props:{
    mesg:String
  }
}
</script>
v-model
양방향 바인딩 : 서로의 데이터 변경이 서로에 영향을 미침
데이터가 수정되면 위에서 배웠듯이 rendering이 다시 되므로 관련된 데이터가 적용된 모든 곳의 값이 전부 변경된다.
v-model은 매우 활용성이 높은 구문이다.
<template>
  <div>
    <!-- v-model="속성명"을 통한 양방향 바인딩 -->
    속성: {{ mesg }}<br>
    v-model="mesg"<input type="text" v-model="mesg"><br>
    v-model="mesg"<input type="text" v-model="mesg"><br>
    v-bind:value="mesg"<input type="text" :value="mesg"><br>
    v-bind:value="mesg"<input type="text" :value="getmesg()"><br>
  </div>
</template>

<script>
export default {
  props:{

  },
  data:function(){
    return {
      mesg:"홍길동"
    }
  }, methods:{
    getmesg: function(){
      return this.mesg;
    }
  }
}
</script>
v-model 수식어
v-model.lazy="" enter를 입력해야 데이터가 변경됨
v-model.number="" 숫자를 먼저 입력할 경우 문자는 제거된다.
v-model.trim="" 공백이 제거된다.
<template>
  <div>
    <h1>수식어 연습</h1>
    <h4>lazy:enter에 반응</h4>
    v-model: <input type="text" v-model="lazy">{{ lazy }}<br>
    v-model.lazy <input type="text" v-model.lazy="lazy">{{ lazy }}<br>
    <hr>
    <h4>number: 숫자만 사용</h4>
    <input type="text" v-model.number="number"> <!--숫자만 123abc abc는 반영안됨-->
        {{ number }}
    <hr>
    <h4>noTrim</h4>
    <input type="text" v-model="noTrim">
    test{{ noTrim }}test
    <hr>
    <h4>Trim</h4>
    <input type="text" v-model.trim="trim">
    test{{ trim }}trim
  </div>
</template>

<script>
export default {
  props:{

  }, data: ()=>{
    return {
      lazy:"",
      number:"",
      aaa:"",
      noTrim:"",
      trim:""
    }
  }
}
</script>

<style>

</style>
v-model 활용
select 태그에 활용
<select v-model="mesg">
<template>
  <div>
    <select v-model="mesg">
      <option>10</option>
      <option>20</option>
      <option>30</option>
      <option>40</option>
    </select>
    <br>
    <input type="text" v-bind:value="mesg"><br>
    <input type="text" v-model="mesg"><br>
      {{ mesg }}
  </div>
</template>

<script>
export default {
  props:{
    // msg:String
  },
  data:function(){
    return {
      mesg:20
    }
  }
}
</script>
체크박스 자동으로 배열에 담기는 활용
체크박스를 체크시 양방향 바인딩을 통해 배열이 자동으로 변경된다.
<template>
  <div>
    <h1>좋아하는 과일을 선택하세요</h1>
    <input type="checkbox" v-model="fruit" value="사과">사과<br>
    <input type="checkbox" v-model="fruit" value="배">배<br>
    <input type="checkbox" v-model="fruit" value="바나나">바나나<br>
    <input type="checkbox" v-model="fruit" value="수박">수박<br>
    <hr>
    선택한 과일은 : <br>
    {{ fruit }}
  </div>
</template>

<script>
export default {
  props:{

  },
  data:function(){
    return {fruit:[]} // 주의
  }
}
</script>
v-show, v-if
v-if 조건에 일치하지 않으면 랜더링 안됨.
v-show는 랜더링은 되지만 화면에 안보임 (false ->display:none 스타일 속성이 붙음)
고로, v-show=false면 자리를 아예 차지하지 않음
(이거 아닌듯)v-show는 조건문이 들어갈 수 없고 true/false만 사용이 가능함
<template>
  <div>
    <!-- v-show="조건" 화면에 안보임 -->
    <p v-show="true">true1</p>
    <p v-show=true>true2</p>
    <p v-show="flag">flag</p>
    <p v-show="! false">! false</p>
    <p v-show="false">! false</p>
    <p v-show=false>false</p>
    <p v-show="! true">! true</p>
  </div>
</template>

<script>
export default {
  props:{

  },
  data: function(){
    return {
      flag:true
    }
  }
}
</script>