이벤트버스 사용 실습
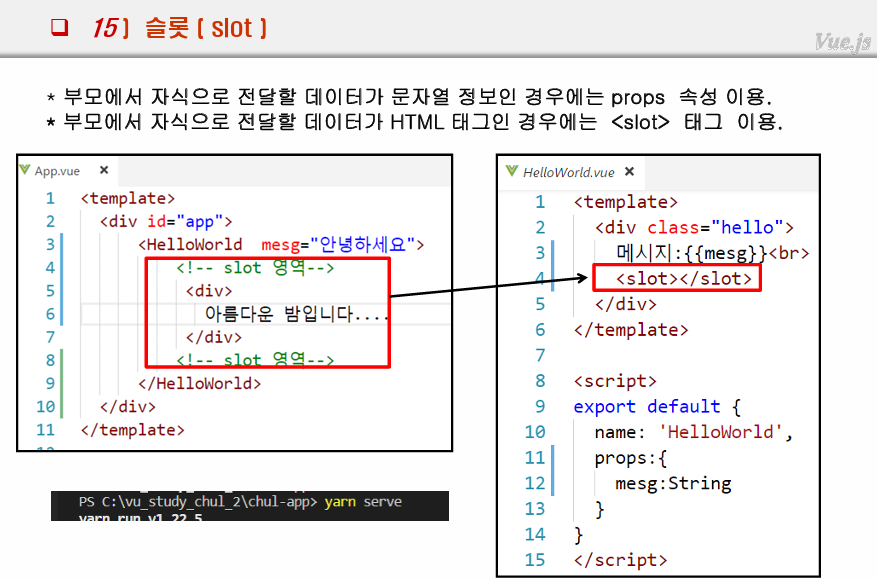
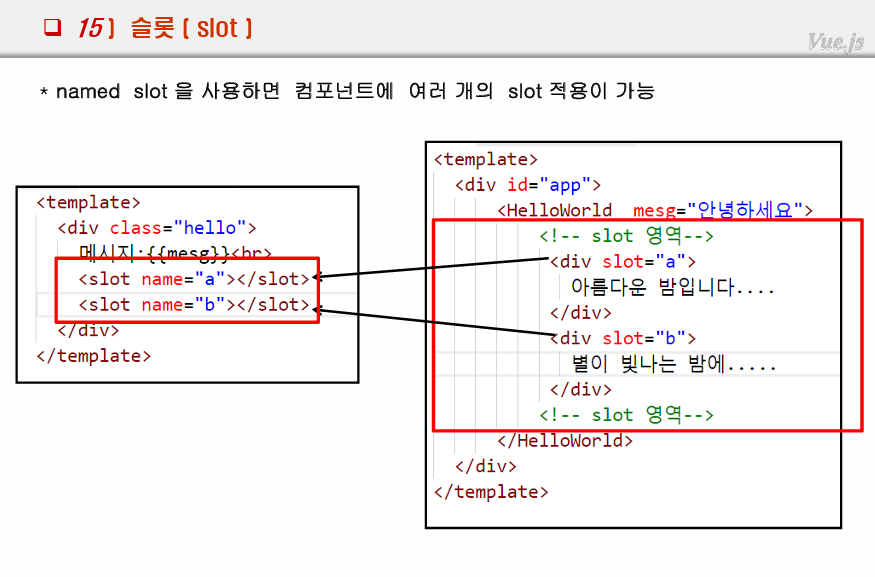
슬롯 (slot)
vue 백엔드 통신
vue에서 spring 서버에 데이터요청
=> 스프링 프로젝트 <=> db dept 테이블의 자료
보통 비동기로 처리함
2번방법이 비동기를 구현하기 비교적 간편함
방법 2가지
1) http객체 이용
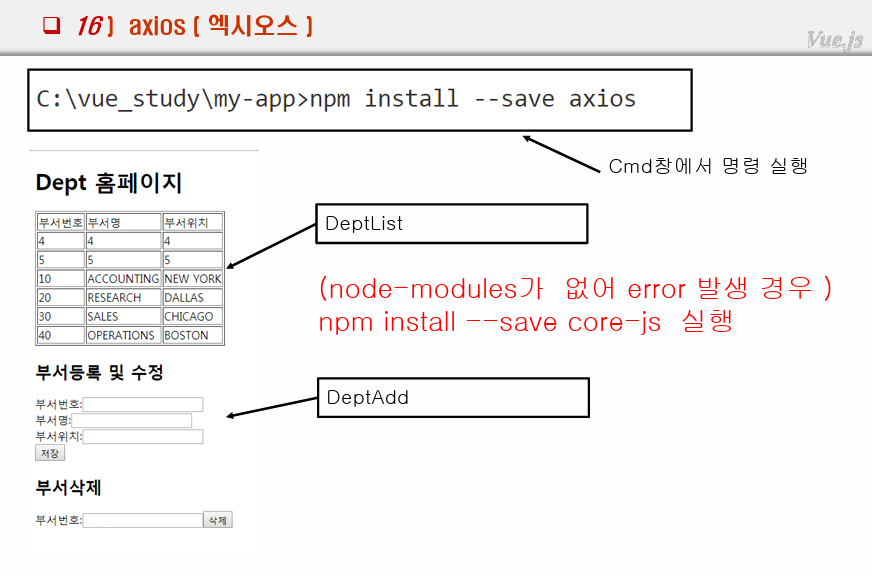
2) anios객체 이용(비동기 동작) : npm 이용 별도 설치 필요
axios
스프링 MVC <-> Vue.js 통신 하기
1. 스프링 MVC 프로젝트 생성
legacy-mve project
pom 버전 설정
디펜던시 추가
<!-- https://mvnrepository.com/artifact/org.mybatis/mybatis -->
		<dependency>
		    <groupId>org.mybatis</groupId>
		    <artifactId>mybatis</artifactId>
		    <version>3.4.6</version>
		</dependency>
		<!-- https://mvnrepository.com/artifact/org.mybatis/mybatis-spring -->
		<dependency>
		    <groupId>org.mybatis</groupId>
		    <artifactId>mybatis-spring</artifactId>
		    <version>1.3.2</version>
		</dependency>


       <!-- https://mvnrepository.com/artifact/org.springframework/spring-jdbc -->
		<dependency>
		    <groupId>org.springframework</groupId>
		    <artifactId>spring-jdbc</artifactId>
		    <version>5.0.8.RELEASE</version>
		</dependency>
		<!-- https://mvnrepository.com/artifact/org.apache.commons/commons-dbcp2 -->
		<dependency>
		    <groupId>org.apache.commons</groupId>
		    <artifactId>commons-dbcp2</artifactId>
		    <version>2.5.0</version>
		</dependency>
		<!-- https://mvnrepository.com/artifact/com.jslsolucoes/ojdbc6 -->
		<dependency>
		    <groupId>com.jslsolucoes</groupId>
		    <artifactId>ojdbc6</artifactId>
		    <version>11.2.0.1.0</version>
		</dependency>


		<dependency>
            <groupId>com.fasterxml.jackson.core</groupId>
            <artifactId>jackson-databind</artifactId>
            <version>2.8.8</version>
        </dependency>
        <!-- https://mvnrepository.com/artifact/com.fasterxml.jackson.core/jackson-core -->
        <dependency>
            <groupId>com.fasterxml.jackson.core</groupId>
            <artifactId>jackson-core</artifactId>
            <version>2.8.8</version>
        </dependency>
2. jdbc.properties 생성
jdbc.driver=oracle.jdbc.driver.OracleDriver
jdbc.url=jdbc:oracle:thin:@localhost:1521:xe
jdbc.username=scott
jdbc.xxx=tiger
3. 매퍼
4. root-context.xml
<?xml version="1.0" encoding="UTF-8"?>
<beans xmlns="http://www.springframework.org/schema/beans"
	xmlns:xsi="http://www.w3.org/2001/XMLSchema-instance"
	xmlns:tx="http://www.springframework.org/schema/tx"
	xmlns:context="http://www.springframework.org/schema/context"
	xsi:schemaLocation="http://www.springframework.org/schema/beans https://www.springframework.org/schema/beans/spring-beans.xsd
		http://www.springframework.org/schema/context http://www.springframework.org/schema/context/spring-context-4.3.xsd
		http://www.springframework.org/schema/tx http://www.springframework.org/schema/tx/spring-tx-4.3.xsd">

	<!-- Root Context: defines shared resources visible to all other web components -->

	<context:property-placeholder
        location="classpath:com/config/jdbc.properties" />

    <bean id="dataSource"
        class="org.apache.commons.dbcp2.BasicDataSource">
        <property name="driverClassName" value="${jdbc.driver}" />
        <property name="url" value="${jdbc.url}" />
        <property name="username" value="${jdbc.username}" />
        <property name="password" value="${jdbc.xxx}" />
    </bean>

    <!-- transaction 처리 -->
    <bean id="transactionManager"
        class="org.springframework.jdbc.datasource.DataSourceTransactionManager">
        <property name="dataSource" ref="dataSource" />
    </bean>
    <tx:annotation-driven />

    <bean id="factoryBean"
    class="org.mybatis.spring.SqlSessionFactoryBean">
    	<property name="mapperLocations">
    		<list>
    			<value>classpath:com/config/DeptMapper.xml</value>
    		</list>
    	</property>
    	<property name="typeAliases">
    		<list>
    			<value>com.dto.Dept</value>
    		</list>
    	</property>
    	<property name="dataSource" ref="dataSource"/>
    </bean>

    <bean id="sessionTemplate"
    class="org.mybatis.spring.SqlSessionTemplate">
    	<constructor-arg name="sqlSessionFactory" ref="factoryBean"/>
    </bean>
</beans>
5. servlet-context.xml
리졸버, 컴포넌트스캔(패키지 위치 맞추기)
6.post로 한글을 보내기 위해선 filter 처리
web.xml에 필터 추가
<!-- post 한글 처리  -->
  <filter>
    <filter-name>filter</filter-name>
    <filter-class>org.springframework.web.filter.CharacterEncodingFilter</filter-class>
    <init-param>
      <param-name>encoding</param-name>
      <param-value>utf-8</param-value>
    </init-param>
  </filter>
  <filter-mapping>
    <filter-name>filter</filter-name>
    <url-pattern>/*</url-pattern>
  </filter-mapping>
7. 컨트롤러, 서비스, DAO - CRUD 작성
다른 포트끼리 통신을 테스트하니 @CrossOrigin 필요함
package com.controller;

import java.util.List;

import org.mybatis.spring.SqlSessionTemplate;
import org.springframework.beans.factory.annotation.Autowired;
import org.springframework.stereotype.Controller;
import org.springframework.web.bind.annotation.CrossOrigin;
import org.springframework.web.bind.annotation.RequestBody;
import org.springframework.web.bind.annotation.RequestMapping;
import org.springframework.web.bind.annotation.RequestMethod;
import org.springframework.web.bind.annotation.ResponseBody;

import com.dto.Dept;
import com.service.DeptService;

@Controller
public class DeptController {

	@Autowired
	DeptService service;

	@RequestMapping("/test")
	@ResponseBody
	public String main() {
//		System.out.println(session);
		return "test";
	}

	@CrossOrigin
	@ResponseBody
	@RequestMapping("/")
	public List<Dept> list() {
		System.out.println("list ===");
		return service.list();
	}

	@RequestMapping("/addForm")
	@CrossOrigin
	public String addForm() {
		System.out.println("addForm");
		return "addForm";
	}

	@RequestMapping(value="/add", method=RequestMethod.GET)
	@CrossOrigin
	public @ResponseBody void add(Dept xxx) {
		System.out.println("add>>>>>>>>>>>>>Get "+xxx);
		service.insert(xxx);
	}
	@RequestMapping(value="/add", method=RequestMethod.POST)
	@CrossOrigin
	public @ResponseBody void add2(@RequestBody Dept xxx) {
		System.out.println("add>>>>>>>>>>>>>Post "+xxx);
		service.insert(xxx);
	}

	//삭제하기
	@RequestMapping(value="/del", method=RequestMethod.DELETE)
	@CrossOrigin
	public @ResponseBody void del(int deptno) {
		System.out.println("/del=======DELETE "+deptno);
		service.delete(deptno);
	}
}
8. vue 터미널에서 axios 설치, 실행
npm install --save axios axios 설치
npm run serve 프로젝트 실행
백단 서버가 실행 중에 있어야 기본적으로 데이터를 요청할 수 있음.
9. Vue axios 비동기처리 코드 구현
axios 기본 문법
axios.[Method(get/post/update/delete)](요청url, 전달데이터)
.then(성공시 실행할 콜백함수(응답데이터){})
.catch(실패시 실행할 콜백함수(에러데이터){})
데이터를 요청하는 서버의 API가 적절히 구현되어있어야함.
9-1. 페이지 로딩시 호출함수 create
created: function(){} 를 이용하여 페이지 로딩시 필요한 데이터들을 비동기로 요청할 수 있음.
10. 배열 데이터를 응답받는 Vue, axios-get
HelloWorld.vue - 리스트 응답받아 출력
<script src=""https://ajax.googleapis.com/ajax/libs/jquery/3.7.1/jquery.min.js></script>
<script>
import axios from 'axios';
export default {
  props:{
    msg: String
  }, data: function(){
    return {
      list:[] //부서목록 저장
    };
  }, created:function(){
    this.deptList();
  },
  methods:{
    deptList: function(){
      // 스프링에서 서버 가동후 브라우저에서 서버 주소 복붙사용
      //
      var xxx = this.list; // 사용하기 위해 따로 저장

      axios.get("http://localhost:8093/app/")
      .then( //비동기 정상처리 후 실행
        (res)=>{
          console.log("응답완료")
          console.log(res);
          res.data.map(function(ele, idx){
            xxx.push(ele);
          });
        }
      ).
      catch( //error 발생시
        (error)=>{console.log(error);}
      )
      console.log("get 이후 처리 코드=========");
    }

  }
}
</script>
axios 비동기처리 주의 사항
주의 사항 : axios ~then ~catch ~ 의 로직에서 then과 catch보다 그 뒤의 코드가 먼저 실행된다. 그 이유는 비동기처리이기 때문에 응답을 기다리며 그 동안 다른 작업을 병행하기 때문이다.
고로 뒤의 코드에서 응답데이터를 사용하려하면 문제가 발생한다.
11. 서버에 새로운 데이터를 insert. Vue, axios-post
HelloWorld.vue (리스트출력 뷰)
<template>
  <div>
    <table border="1">
        <tr>
          <th>부서번호</th>
          <th>부서명</th>
          <th>부서위치</th>
        </tr>
        <tr v-for="(v, i) in list" :key="i">
          <td>{{ v.deptno }}</td>
          <td>{{ v.dname }}</td>
          <td>{{ v.loc }}</td>

        </tr>
      </table>
  </div>
</template>

<script>
import axios from 'axios';
import EventBus from "./EventBus.vue";
import eventBus from './EventBus.vue';

export default {
  methods:{
    getList:function(){
      var url = "http://localhost:8093/app/";
      axios.get(url, {})
      .then(
        (res)=>{
          console.log(res, res.data); //array
          this.list = res.data;
          // res.data.map((ele, idx)=>{
          //   this.list.push(ele);
          // });
        }
      )
      .catch(
        (err)=>{
          console.log(err);
        }
      )
    },
    change:function(v){
      this.list.push(v)
    }
  },
  data:function(){
    return {
      list:[]
    }
  },
  created:function(){
    this.getList();
    eventBus.$on("change", this.change)
  }
}
</script>
DeptAdd (insert 뷰)
<template>
  <div>
    <table border="1">
        <tr>
          <th>부서번호</th>
          <th>부서명</th>
          <th>부서위치</th>
        </tr>
        <tr v-for="(v, i) in list" :key="i">
          <td>{{ v.deptno }}</td>
          <td>{{ v.dname }}</td>
          <td>{{ v.loc }}</td>

        </tr>
      </table>
  </div>
</template>

<script>
import axios from 'axios';
import EventBus from "./EventBus.vue";
import eventBus from './EventBus.vue';

export default {
  methods:{
    getList:function(){
      var url = "http://localhost:8093/app/";
      axios.get(url, {})
      .then(
        (res)=>{
          console.log(res, res.data); //array
          this.list = res.data;
          // res.data.map((ele, idx)=>{
          //   this.list.push(ele);
          // });
        }
      )
      .catch(
        (err)=>{
          console.log(err);
        }
      )
    },
    change:function(v){
      this.list.push(v)
    }
  },
  data:function(){
    return {
      list:[]
    }
  },
  created:function(){
    eventBus.$on("change", this.change)
    this.getList();
  }
}
</script>
11-2. 서버에 새로운 데이터를 insert. Vue, axios-get
데이터 전달 방식이 힘듬 -> url에 데이터를 전부 붙여줘야함
 var url = "http://localhost:8093/app/add?"
            +"deptno="+xxx.deptno+"&dname="+xxx.dname+"&loc="+xxx.loc;
            axios.get(url,
            {   // 전송될 데이터
                deptno:xxx.deptno,
                dname:xxx.dname,
                loc:xxx.loc,
            })
App.vue (부모 Vue)
<template>
  <div>
    <DeptAdd msg="부서 추가"/>
    <DeptAdd2 msg="부서 추가2"/>
    <HelloWorld msg="axios 실습"/>
  </div>
</template>

<script>
import HelloWorld from './components/HelloWorld';
import DeptAdd from './components/DeptAdd';
import DeptAdd2 from './components/DeptAdd2';
export default {
  name: 'App',
  components: {
    HelloWorld,
    DeptAdd,
    DeptAdd2
  }

}
</script>
DELETE메서드로 요청하는 DEL axios 구현
ECMA promise 객체 (면접질문)
강사님이 구글에서 찾아서 꼭 읽어보라하심
then함수와 비슷.
비동기처리에서 주로 사용하고, 언제가 될지는 모르겠지만 언젠간 반드시 호출을 해주겠다라는 기능.
