action 함수 이용한 Form 전송
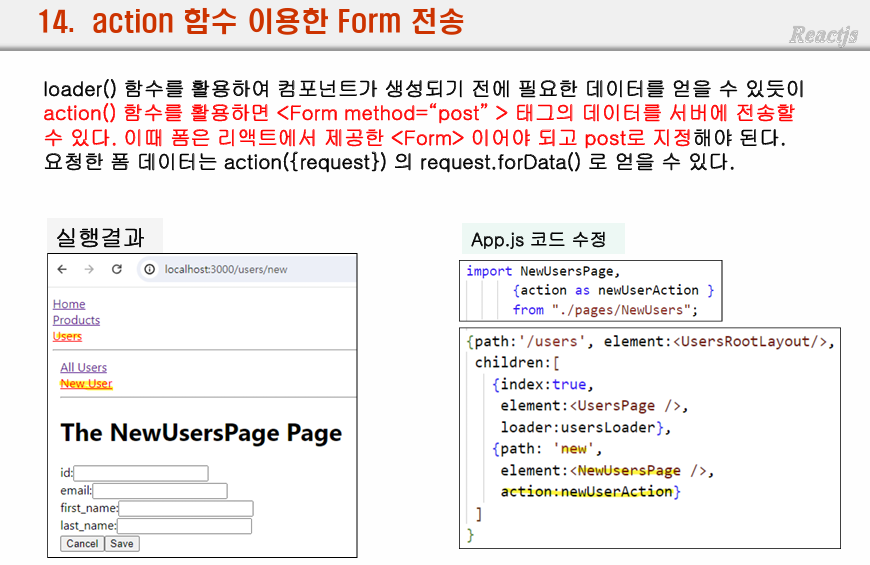
라우터 배열 createBrowserRouter([])의 element로 오는 각 객체들의 속성 중 index:true는 부모와 동일한 주소를 사용한다는 뜻이다.
// index:true -> 부모와 동일한 주소를 사용
- form 에서 기본으로 데이터를 전송하는 기능은 동기 방식
2-1. 비동기로 구현하기 위해선 폼 데이터를 useState 등을 이용해 전부 파싱해서 fetch 등을 통해 비동기 통신을 한다.
2-2. 또 하나의 방식으로 action에 함수를 등록하여 사용하는 것이다.
action에 등록된 함수의 인자에는 request객체가 전달되며 이를 통해 좀 더 수월하게 비동기 통신을 구현할 수 있다.
(해당 방식을 이용하기 위해서는 react-router-dom에서 제공하는 Form을 사용해야한다.)
2-2 방식을 좀 더 풀어써보자면
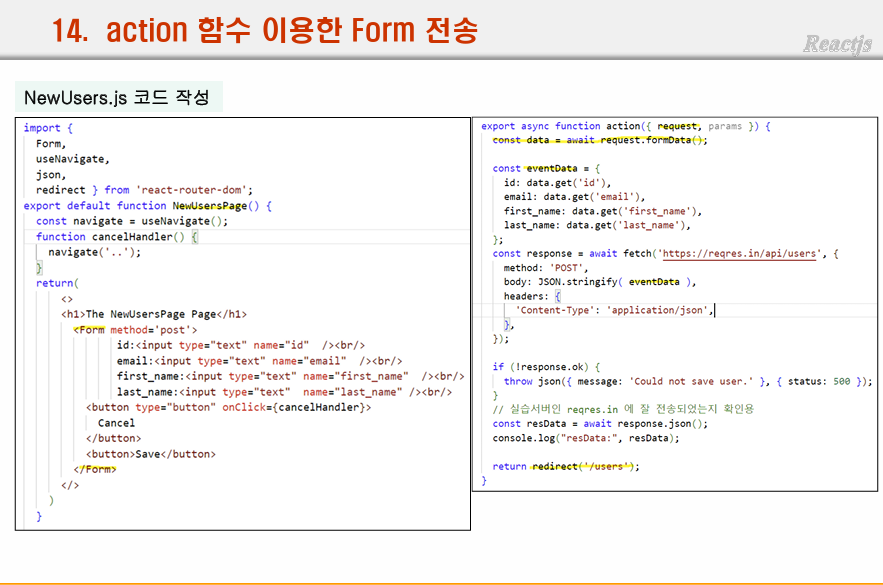
1. 폼 구현을 react-router-dom 의 Form으로 만들어주고
2. action에 등록할 함수 구현
2-1. const data = await request.formData();
	const eventData = {
        id: data.get("id"),
        email: data.get("email"),
        first_name: data.get("first_name"),
        last_name: data.get("last_name"),
        test: data.email
    };
방식으로 값을 파싱하고 정제
2-2. 비동기통신 및 응답 확인
// src12_Routing10_action함수1_Form태그서버전송2_예외처리_useActionData이용
// Form데이터를 받아서 이러쿵 저러쿵 처리할 함수 제작
// App.js에서 action함수로 쓴다고 등록해줘야함
export async function action({request, params}){
    const data = await request.formData();

    // console.log("newUsers: ", data);
    // console.log("newUsers: ", data.get("id"), data.email);
    const eventData = {
        id: data.get("id"),
        email: data.get("email"),
        first_name: data.get("first_name"),
        last_name: data.get("last_name"),
        test: data.email
    };

    console.log("NewUsers.action============ : ", eventData);

    const response = await fetch("https://reqres.in/api/users", {
        method: "post",
        body: JSON.stringify(eventData),
        headers: {
            "Content-Type": "application/json"
        }
    });

    if(!response.ok){
        throw json({message: "Could not save user."}, {status: 500})
    }
    //실습서버인 reqres.in에 잘 전송되었는지 확인차 응답 확인용 코드
    const resData = await response.json();
    console.log("폼 응답데이터 - resData : ", resData);
    return redirect("/users");
}
응답확인용 코드에서 필요한 redirect import
- App.js에 action:액션함수 등록
리마인드 실습 - 일반 로그인 폼 데이터 useState로 관리
-
입력될 때마다 값읠 변경이 발생
-
제출시 입력값 출력
-
팁 : json객체의 키값으로 변수의 value를 사용하고싶다면 [a]:b 이런 방식으로 사용해야한다.
-
팁2 : 또한 json은 키값이 중복되는 경우 뒤의 값으로 덮어씌워진다.
import React, { useRef, useState } from 'react';

function Login(props) {
    const [inputs, setInputs] = useState({
        email: "",
        password: ""
    })
    function handleInputChange(e){
        setInputs({...inputs, [e.target.name]:e.target.value});
    }
    function handleSubmit(e){
        e.preventDefault();
        console.log(inputs);

    }
    return (
        <div>
            <form method='post' onSubmit={handleSubmit}>
                Email <input type='email' onChange={handleInputChange} name="email"></input>
                password <input type='password' onChange={handleInputChange} name="password"></input>
                <button>저장</button>
            </form>

        </div>
    );
}

export default Login;
위 실습 useRef로 변경
form데이터를 전부 뽑아오는 방법
event.target으로 폼태그 전체를 반환받을 수 있다.
이 태그내에 input이 불규칙적으로 존재한다면 뽑기가 어렵다.
FormData 클래스를 이용하면 모든 폼데이터를 쉽게 가져올 수 있다.
사용 법은 아래와 같다.
객체생성(대상폼태그) -> get메서드 이용
import React from 'react';

function Signup(props) {
    function handleSubmit(e){
        e.preventDefault();
        console.log(e.target); // form 태그 반환  -내부에 불규칙적으로 존재하는 input을 다 읽어오는 방법이 기존엔 없음

        // FormData 라는 객체를 생성
        // -> get("뽑아올 input 이름") 으로 값을 얻을 수 있다.
        const fd = new FormData(e.target);
        const email = fd.get("email");
        const password = fd.get("password");
        const address = fd.get("address");
        console.log(email, password, address);
    }
    return (
        <div>
            <form onSubmit={handleSubmit}>
                <h2>Login</h2>
                <div>
                    <div>
                        <label htmlFor="email">Email</label>
                        <input id="email" name="email" type="email"></input>
                    </div>
                    <div>
                        <label htmlFor="password">password</label>
                        <input id="password" name="password" type="password"></input>
                    </div>
                    <div>
                        <label htmlFor="address">address</label>
                        <input id="address" name="address" type="text"></input>
                    </div>
                    <div>
                        <label htmlFor="address2">address2</label>
                        <input id="address2" name="address2" type="text"></input>
                    </div>
                </div>
                <p>
                    <button>Login</button>
                </p>
            </form>
        </div>
    );
}

export default Signup;
액션 함수를 따로 구현하는 이전 방법도 괜찮지만 이 방법이 직관적이며 간편한 것 같다.
폼 입력데이터의 유효성검사 - blur 시점에
blur 시점이란 포커스의 반대로 다른 곳을 클릭하였을 때 전환됨
통과여부를 변수로 관리
src13_form04유효성검사_blur시점에
CSS 적용
CSS
인라인
external style
css module
CSS-in-JS ( Styled Component)

사용하는 이유. 나중에 상속 등을 이용하기 위해
임포트 필요
백틱을 이용
import React from 'react';
import styled from 'styled-components';

const StyledButton = styled.button`
  color: blue;
  backgroundColor: yello;
  fontSize: 16px;
`;

const StyledH1 = styled.h1`
  color: red;
`;

function App(props) {
  return (
    <div>
      <StyledH1>Hello</StyledH1>
      <StyledButton>StyledButton</StyledButton>
    </div>
  );
}

export default App;
실습 예제
import React from 'react';
import Button from './Button';
import styled from 'styled-components';

const StyledH1 = styled.h1`
  color: red;
`
function App(props) {
  return (
    <div>
      <StyledH1>Hello</StyledH1>
      <Button>
        <ul>
          <li>A</li>
          <li>B</li>
        </ul>
      </Button>
    </div>
  );
}

export default App;
import React from 'react';
import styled from 'styled-components';
const StyledButton = styled.button`
color: blue;
background-color: yellow;
font-size: 16px;
`
function Button(props) {
const {children} = props;
console.log(children);
return (
<div>
<StyledButton>{children}</StyledButton>
</div>
);
}
export default Button;module.css
import시 함수처럼 여겨져 alias를 부여한다.
import alias from "App.module.css"
백틱을 이용한 컴포넌트에도 props가 전달, 사용이 가능
보니가 백틱 내 ${} 이거 내에 콜백함수의 인자로 props가 전달되는 것 같음
속성값은 props.xxx 로 접근한다.
왜지 ?
import React from 'react';
import styled from 'styled-components';

const StyledButton = styled.button`
    color: ${(props)=>props.button_color || "blue"};
    background-color: yellow;
    font-size: 16px;
`
function Button(props) {
    const {children, text_color} = props;
    console.log(children);
    return (
        <div>
            <StyledButton button_color={text_color}>{children}</StyledButton>
        </div>
    );
}

export default Button;
스타일 컴포넌트 실습
스타일 컴포넌트의 속성으로 값 전달시 콜백함수로 받아서 사용이 가능하다.
좀 이상하다 어떻게 백틱 문자열이 그냥 생으로 대놓고 문법파괴처럼 쓰일 수 있는건가?
App.js
import React from 'react';
import Button from './Button';
import styled from 'styled-components';

const StyledH1 = styled.h1`
  color: red;
`
function App(props) {
  const text_color = "red";
  const text_font_size ="16px";
  return (
    <div>
      <StyledH1>Hello</StyledH1>
      <Button text_color={text_color} text_font_size={text_font_size}>
        <ul>
          <li>A</li>
          <li>B</li>
        </ul>
      </Button>
    </div>
  );
}

export default App;
Button.js
import React from 'react';
import styled from 'styled-components';

const StyledButton = styled.button`
    color: ${(props)=>props.text_color || "blue"};
    background-color: yellow;
    font-size: ${(props)=>props.text_font_size || "64px"};
`
function Button(props) {
    // const {children, text_color, text_font_size} = props;
    const {children} = props;
    return (
        <div>
            <StyledButton>{children}</StyledButton>
            {/* <StyledButton button_font_size={text_font_size} button_color={text_color}>{children}</StyledButton> */}
            <StyledButton {...props}>{children}</StyledButton>
        </div>
    );
}

export default Button;
스타일 컴포넌트 상속
먼저 선언된 Box 스타일 컴포넌트의 스타일을 상속받는다.
자신의 스타일을 덧붙이는 것도 가능하다.
const Circle = styled(Box)
import React from 'react';
import styled from 'styled-components';

const Box = styled.div`
  width: 100px;
  height: 100px;
  background-color: ${(props)=> props.bgColor}
`
const Circle = styled(Box)`
border-radius:50%`;
function App(props) {
  return (
    <div>
      <Box bgColor={"red"}>Box1</Box>
      <Circle bgColor={"yellow"}>Box2</Circle>
    </div>
  );
}

export default App;