BOM 중 location
location
location 부분 복습 필요 제대로 이해 못함.
두서없이 기록.
폼버튼 클릭시 submit 이벤트 자동 발생 => action 부분 실행
내가 나한테 전송
event.preventDefault() 발생한 이벤트를 정지시켜준다.
- submit이벤트를 정지시켜줌
- 위 이벤트 정지 후 페이지 이동 단 데이터 전달 안됨
중요!! 폼데이터 전송시 action을 건드림 => 데이터 전송됨
폼데이터 전송하려면 action데이터를 건드려야한다.
DOM
this 키워드: 자신의 태그와 하위태그들을 전부 선택하여 반환하는 키워드
- 현재 이벤트가 발생한 dom을 자바스크립트에서 활용할 수 있게 해준다.
setAttribute(속성,값); 연습
getElementsByClassName("클래스명"); 연습
innerText 와 innerHTML 차이점 연습
html 태그에서 이벤트 발생시 함수 호출 및 매개변수로 this 전달하는 연습
html 이벤트 속성에서 자바스크립트 구문 직접 쓰는 연습
<input type="checkbox" 여러개값을 가져올 때 클래스로 묶고 checked된 것만 이용하는 방식으로 체크박스 input을 처리할 수 있다.
DOM이 모두 로딩되기를 기다리기
-
DOM(Document Object Model) 작업시 어려움 중 하나는 DOM이 완전히 로딩 되기 전에 자바스크립트 코드가 실행될 수 있다는 것이다.
-
헤더에 포함된 스크립트와 외부 파일에서 불러온 자바스크립트는 HTML DOM이 실제로 생성되기 전에 실행된다.
따라서 헤더나 외부파일에서 실행된 모든 스크립트는 DOM에 접근할 수 없다.
해결방법>
가. 페이지가 완전히 로딩되기를 기다리기
- 태그내
window.onload = init;을 이용하여 로딩후 실행할 수 있게한다. <body onload:init>을 이용하여 로딩후 실행할 수 있게한다.
나. body 태그의 맨 끝에 스크립트를 추가한다.
Form 객체
이벤트처리
< 목차 >
자바스크립트 이벤트 모델
DOM Level 0
DOM Level 2
이벤트 전파 개념
(캡쳐링과 버블링개념)
자바스크립트 이벤트 처리
자바스크립트 이벤트 모델
자바스크립트는 이벤트 드리븐(event-driven)모델에 기반한다.
웹 페이지 안에서 발생한 여러가지 시간(이벤트)에 따라 대응하는 방법을(이벤트 핸들러) 이용한 처리이다.
이벤트에 대응해 처리를 담당하는 함수를 '이벤트 핸들러'라고 한다.
이벤트 발생 형태
가. 애플리케이션 사용자가 발생시키는 이벤트
예> 버튼클릭, 키보드 입력 등.
나. 애플리케이션 스스로가 발생시키는 이벤트
예> 페이지 로드 등
자바스크립트 주요 이벤트
onload 모든 html이 모두 DOM으로 생성된 후 실행
마우스
click : 클릭
dvlclick 더블클릭
mouseover : 요소에 마우스 포인트거 잡혔을 때
mouseout : 요소에서 마우스 포인트거 벗어났을 때
키
keyup : 키가 눌렸을 때
keypress : 키를 누른 상태
keydown : 키를 떼어 놓았을 때
폼
change : 내용이 변경됐을 때
submit : 서브밋 버튼이 눌렸을 때
reset : 리셋 버튼이 눌렸을 때
포커스
blur : 요소로부터 포커스가 벗어났을 때
focus
...
이벤트와 이벤트 핸들러 연결 (이벤트 모델)
이벤트 모델의 핵심은 ‘이벤트’와 ‘이벤트 핸들러’이다.
HTML의 어떤 요소에서 발생하는 이벤트에 대해서 어떤 이벤트 핸들러를 사
용할지를 정해서 구현한다.
자바스크립트에서는 이벤트와 이벤트 핸들러를 연결하기 위한 방법으로 다음
과 같이 2가지 방법이 제공된다.
가. DOM Level 0
인라인 이벤트 모델,고전 이벤트 모델
나. DOM Level 2
표준 이벤트 모델 방법이다.
DOM Level 0
고전 방식
- 버튼 생성
- window.onload = funcion{} 형태로 코드를 작성
- 버튼을 찾아서 onclick 이벤트를 달아주고 그 익명함수를 할당해준다.
- 각 태그를 선택하고 이벤트="값"을 할당해주는 방식임.
인라인방식
인라인태그에 onclick과 같은 이벤트와 작동할 함수 등을 값으로 넣어주면 된다.
event 키워드 객체 : 이벤트 발생시 사용할 수 있다. 다양한 것들을 포함하고 있다.
모든 html이 모두 DOM으로 생성되기 전에 head태그의 스크립트 태그내에서 아직 생성되지 않은 태그나 속성 등을 참조하려고할 때 문제가 발생한다.
그래서 <body onload=init()> 바디에 onload로 함수 연동하여 바디가 전부 불러와진 뒤에 참조를 시작하게끔 하는 방법과
스크립트 내에서 window.onload = init; 과 같이 함수를 할당해주는 방식이 있다.
고전방식 예제)
<!DOCTYPE html>
<html>
<head>
<meta charset="UTF-8">
<title>Insert title here</title>
<script>
	window.onload=init; //콜백 함수 등록

	function init(){
		console.log("모든 html이 모두 DOM으로 생성된 후 실행");

		document.getElementById("xxx").onclick = function(){
		console.log("clicked");
		};

		document.getElementById("userid").onkeyup = function(){
			console.log(this.value);
		};

		document.getElementById('xyz').onclick=function(){
			console.log(event, event.screenX, event.screeny);
		}
	};

</script>
</head>
<body>
	<button id="xxx">클릭</button>
	<input type="text" name="userid" id="userid">
	<button id="xyz">이벤트 정보</button>
</body>
</html>
인라인방식
<!DOCTYPE html>
<html>
<head>
<meta charset="UTF-8">
<title>Insert title here</title>
<script>
	function func(t){
		document.getElementById("img_m").src = t.src;
	}

</script>
</head>
<body>
	<table border="1">
		<tr>
			<td><img src="../image/a.jpg" width="100" height="100" id="img1" onmouseover="func(this)"></td>
			<td><img src="../image/b.jpg" width="100" height="100" id="img2" onmouseover="func(this)"></td>
			<td><img src="../image/c.jpg" width="100" height="100" id="img3" onmouseover="func(this)"></td>
		</tr>
		<tr>
			<td colspan="3"><img src="../image/a.jpg" width="300" height="300" id="img_m"></td>
		</tr>
	</table>
</body>
</html>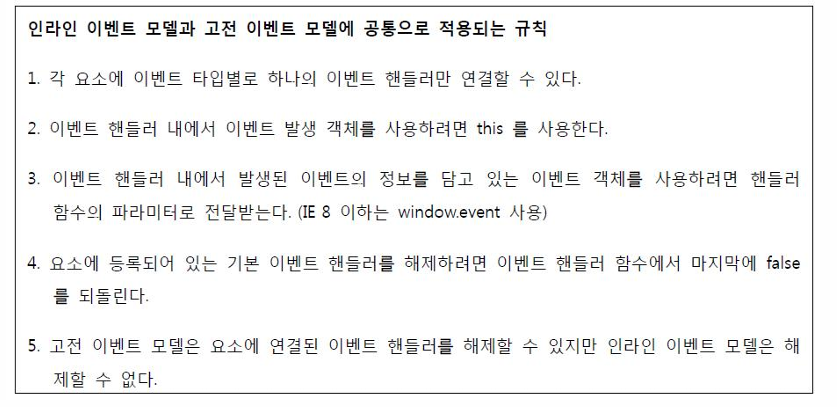
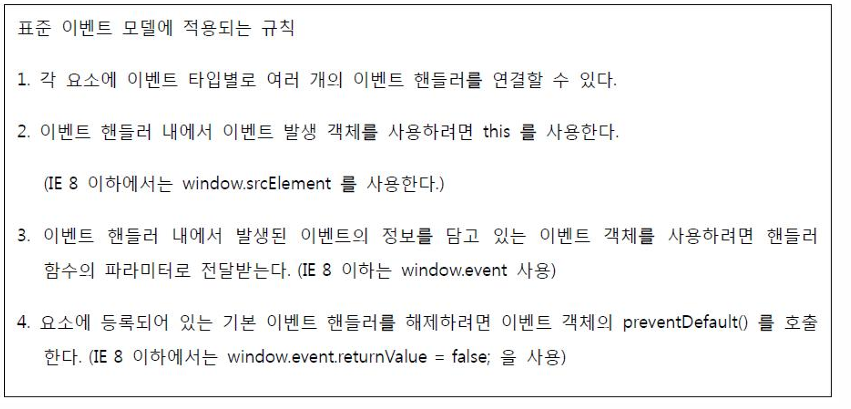
DOM Level 2
- 2000년 11월 W3C에서 이벤트 처리 표준안으로 발표.
- IE 에서는 9 버전부터 지원된다.
- 함수의 파라미터로 이벤트 정보가 전달된다
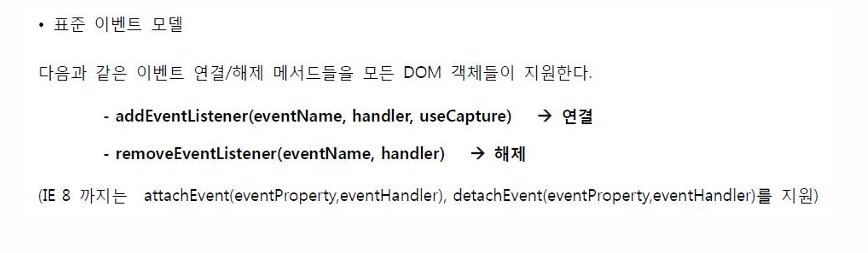
- useCapture
- false : 기본값, 이벤트 버블링으로 이벤트 전파.
- true : 이벤트 캡쳐링으로 이벤트 전파.
생략시 false, 대부분 false 처리
<!DOCTYPE html>
<html>
<head>
<meta charset="UTF-8">
<title>Insert title here</title>
<script>
	window.onload= function(){
		var imgs = document.getElementsByTagName("img");
		for(var i=0; i<imgs.length-1;i++){
			var img = imgs[i];
			//img.onmouseover= function (){
			//	imgs[3].src = this.src;
			//}
			img.addEventListner("mouseover", function(){
				imgs[3].src = this.src;
			}, false)
		}
	}

</script>
</head>
<body>
	<table border="1">
		<tr>
			<td><img src="../image/a.jpg" width="100" height="100" id="img1"></td>
			<td><img src="../image/b.jpg" width="100" height="100" id="img2"></td>
			<td><img src="../image/c.jpg" width="100" height="100" id="img3"></td>
		</tr>
		<tr>
			<td colspan="3"><img src="../image/a.jpg" width="300" height="300"></td>
		</tr>
	</table>
</body>
</html>
폼데이터의 전송 차단 (중요)
- 11Event 폴더 -> 01Event2 ~ 01Event4 까지 참고 (중요)
자주 사용하는 중요한 코드구조 - 유효성검사완성코드
1.return false를 이용한 폼데이터 전송 차단
- form 태그의 onsubmit 이벤트에서 함수가 false를 리턴하여 받으면 데이터 전송이 멈춤
<!DOCTYPE html>
<html>
<head>
<meta charset="UTF-8">
<title>Insert title here</title>
	<script>
		function xxx(){
			console.log("AAAAAAAAAAAA");
			alert("xxx()   submit");
			console.log("BBBBBBBBBBBB");
		}

		function xxx2(){
			var id = document.getElementById("userid2").value;
			var passwd = document.getElementById("passwd2").value;
			var result = false;
			if(id.length>=3 && passwd.length!=0){
				result = true;
			}else{
				result=false;
				alert("xxx2 잘못입력 확인");
			}

			//return result; //true, false, 선택 리턴
			return result;
		}
	</script>
</head>
<body>
	<form action="target.html" onsubmit="xxx()">
		아이디======<input type="text" name="userid"><br>
		비번=======<input type="text" name="passwd"><br>
		<button>버튼</button> <!--xxx() 호출-->
		<input type="submit" value="로그인">
		<input type="reset" value="취소"><br>
	</form>

	<hr>
    유효성검사완성코드<br>
	<form action="target.html" onsubmit="return xxx2()"> <!--전송금지를 위해 return 주의-->
														<!--return값이 false를 받아오면 더 이상 전송이 안됨-->
		아이디======2<input type="text" name="userid" id="userid2"><br>
		비번=======2<input type="text" name="passwd" id="passwd2"><br>
		<button>버튼</button> <!--xxx() 호출-->
		<input type="submit" value="로그인">
		<input type="reset" value="취소"><br>
	</form>
</body>
</html>
2. event.preventDefault() 를 이용한 폼데이터 전송차단.
event.preventDefault() 이용한 전송금지
<!DOCTYPE html>
<html>
<head>
<meta charset="UTF-8">
<title>Insert title here</title>
	<script>
		function xxx(){
			console.log("AAAAAAAAAAAA");
			alert("xxx()   submit");
			event.preventDefault();
			console.log("BBBBBBBBBBBB");
		}

		function xxx2(){
			var id = document.getElementById("userid2").value;
			var passwd = document.getElementById("passwd2").value;
			var result = false;
			if(id.length>=3 && passwd.length!=0){
				result = true;
			}else{
				result=false;
				alert("xxx2 잘못입력 확인");
			}

			//return result; //true, false, 선택 리턴
			return result;
		}

		function xxx3(){   //event.preventDefault() 이용한 전송금지
			alert("xxx3");
			event.preventDefault();
			var id = document.getElementById("userid3").value;
			var passwd = document.getElementById("passwd3").value;
			console.log(id, "\t", passwd);
		}
		function xxx3_1(){   //event.preventDefault() 이용한 전송금지
							// 일정 조건에 부합하지 않을 때만 전송금지
			alert("xxx3");

			var id = document.getElementById("userid3").value;
			var passwd = document.getElementById("passwd3").value;
			if(id.length>=3 && passwd.length!=0){
				alert("xxx3 제출");
			}else{
				alert("xxx3 잘못입력 확인");
				event.preventDefault();
			}
			console.log(id, "\t", passwd);
		}

		function xxx4(){  //버튼 클릭시만 호출 처리됨 -submit버튼과는 상관없음
			alert("xxx4 호출");
			var id = document.getElementById("userid4").value;
			var passwd = document.getElementById("passwd4").value;
			console.log(id, "\t", passwd);
			if(id.length>=3 && passwd.length!=0){
				alert("xxx4 제출");
			}else{
				alert("xxx4 잘못입력 확인");
				event.preventDefault();
			}
		}
	</script>
</head>
<body>
	<form action="target.html" onsubmit="xxx()">
		아이디======<input type="text" name="userid"><br>
		비번=======<input type="text" name="passwd"><br>
		<button>버튼</button> <!--xxx() 호출-->
		<input type="submit" value="로그인">
		<input type="reset" value="취소"><br>
	</form>

	<hr>
	유효성검사완성코드<br>
	<form action="target.html" onsubmit="return xxx2()"> <!--전송금지를 위해 return 주의-->
														<!--return값이 false를 받아오면 더 이상 전송이 안됨-->
		아이디======2<input type="text" name="userid" id="userid2"><br>
		비번=======2<input type="text" name="passwd" id="passwd2"><br>
		<button>버튼</button> <!--xxx() 호출-->
		<input type="submit" value="로그인">
	</form>

	<hr>
	유효성검사완성코드<br>
	<form action="target.html" onsubmit="return xxx3_1()"> <!--전송금지를 위해 event.preventDefault() 활용-->
		아이디======3<input type="text" name="userid"  id="userid3"><br>
		비번=======3<input type="text" name="passwd"  id="passwd3"><br>
		<button>버튼</button> <!--xxx() 호출-->
		<input type="submit" value="로그인">
	</form>

	<hr>

	<form action="target.html" id="test"> <!--onsubmit이벤트가 없음-->
		아이디======4<input type="text" name="userid"  id="userid4"><br>
		비번=======4<input type="text" name="passwd"  id="passwd4"><br>
		<input type="submit" value="로그인"> <!--그냥 제출만함-->
		<button onclick="xxx4()">버튼</button> <!--xxx4() 호출-->
	</form>

</body>
</html>
return은 고전방식에서는 안먹힘 return은 인라인에서만 사용가능.
고로 헷갈리니까 그냥 event.preventDefault()를 사용하는걸 추천
이벤트 버블링 : 자식의 이벤트가 부모의 이벤트로 전파돼서 부모도 이벤트가 실행되는 것.
- useCapture가 false이면 버블링이 실행된다.
- e.stopPropagation()함수사용.으로 막을 수 있다.
이벤트 전파
버블링의 이벤트 전파를 막아야된다.
e.stopPropagation()함수사용.
그냥 이런게 있다 개념만 알아두자.
예제)<!DOCTYPE html> <html> <head> <meta charset="UTF-8"> <title>Insert title here</title> <script> window.onload=function(){ var a = document.getElementById("a"); var b = document.getElementById("b"); a.addEventListener("click",function(){ console.log("a click"); },false) b.addEventListener("click",function(){ console.log("b click"); //event.stopPropagation(); //이벤트 전파 방지 useCapture가 false event.stopPropagation(); },false) } </script> </head> <body> <div id="a" style="background-color: #ff0000;"> a <div id="b" style="background-color: #00ff00"> b <!--window.onload--> </div> </div> </body> </html>
