본 시리즈는 Stanford cs193p 강의(https://cs193p.sites.stanford.edu)를 듣고 필요한 내용을 정리한 것입니다.
MVVM
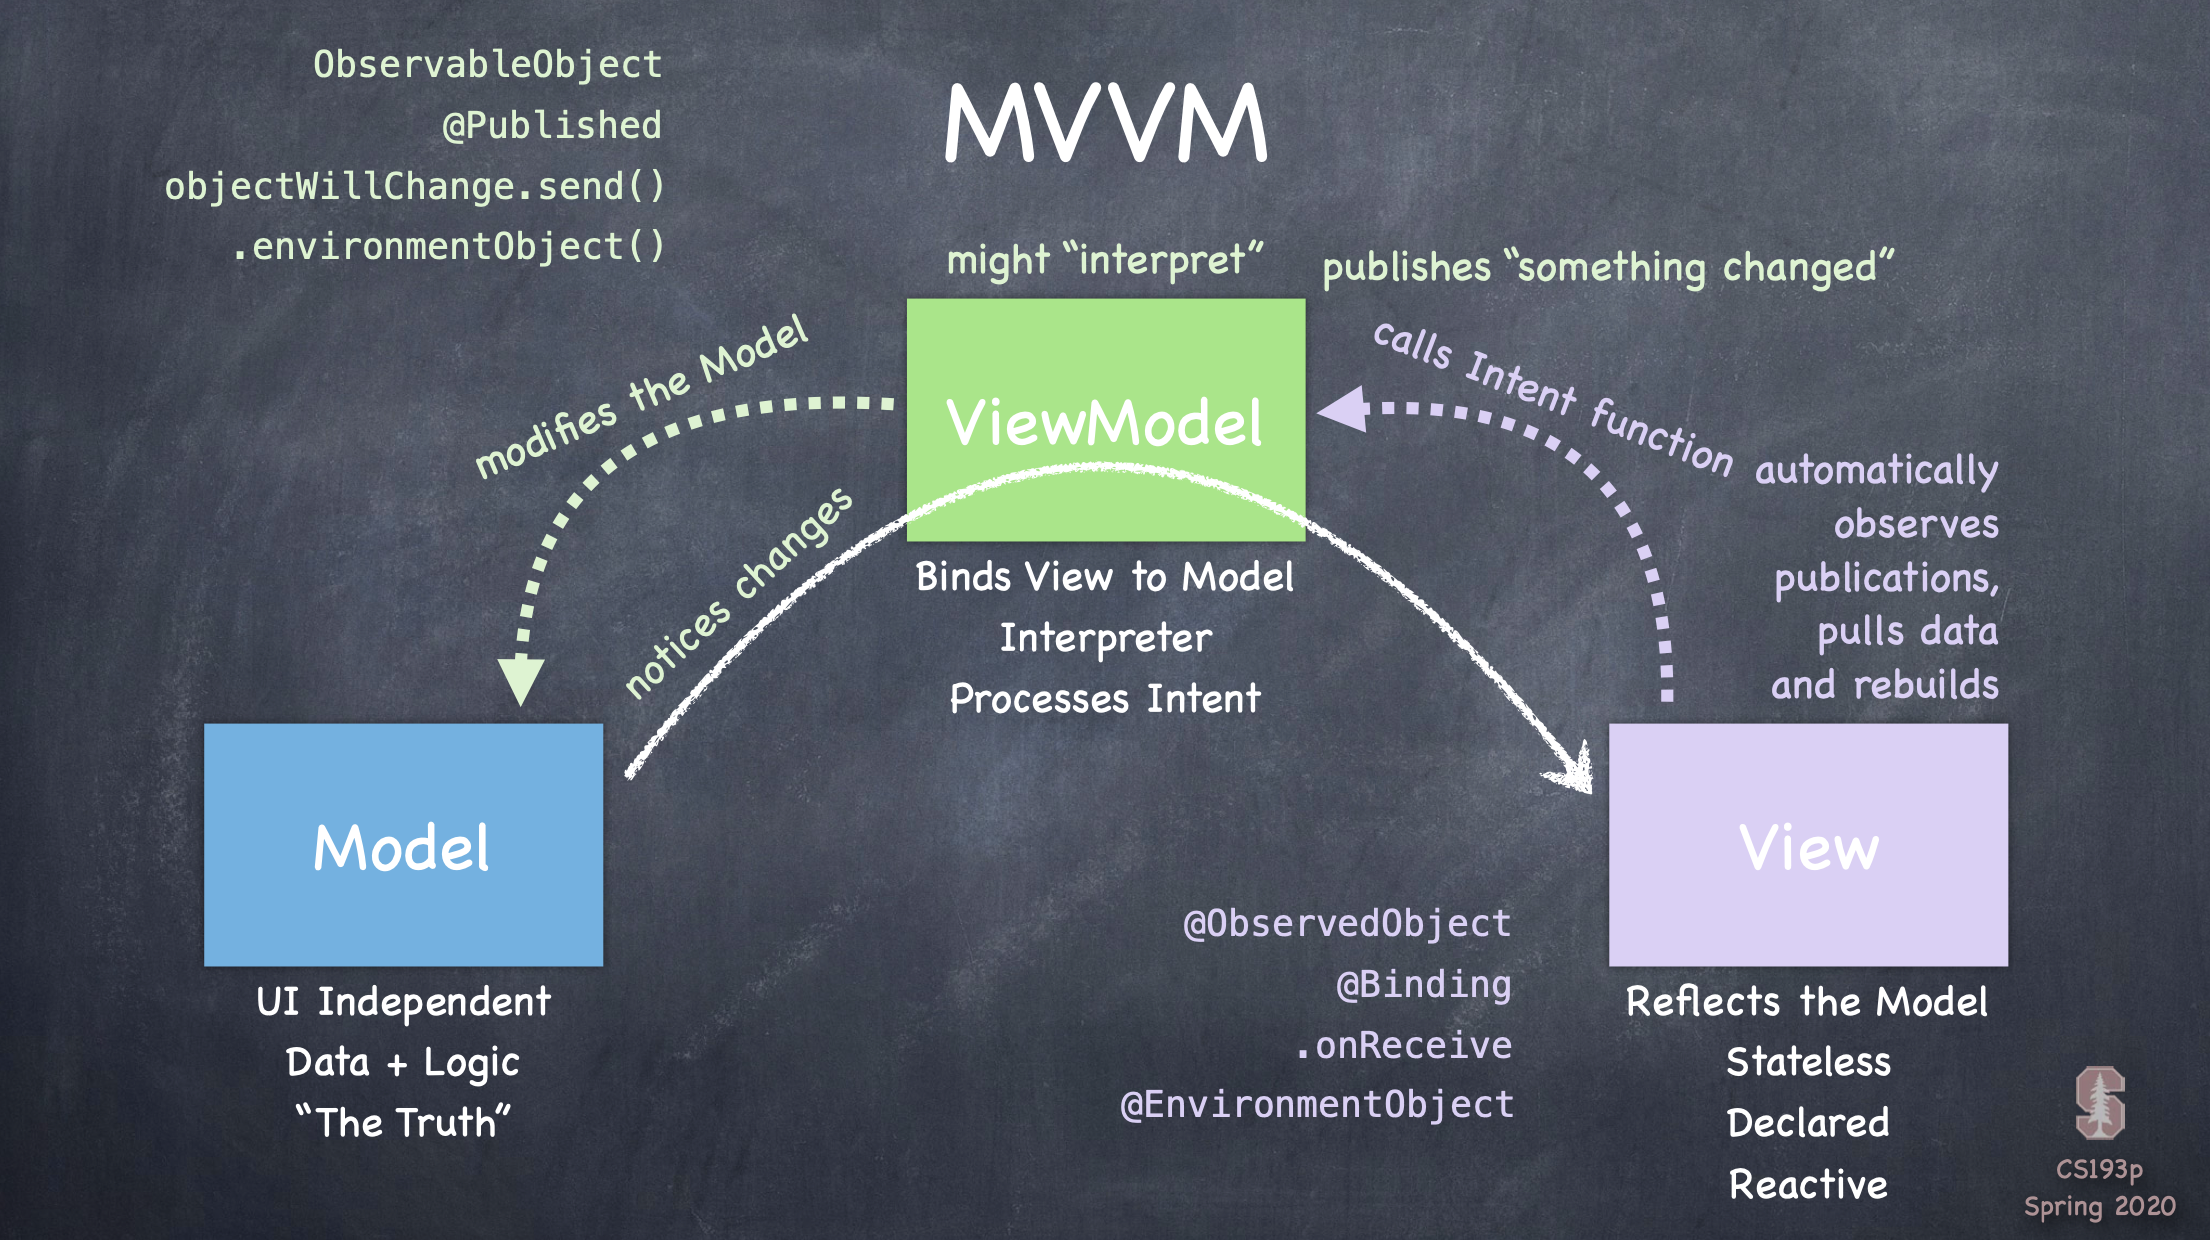
프로그램 디자인 방법론. 모델(Model), 뷰(View), 뷰모델(ViewModel)로 구성돼 있다.
Model
Maybe back-end of application.
UI independent part with the View.
Data + Logic
View
front-end of application.
reflects the Model
Stateless
Declared (여러 함수의 동작 순서를 전부 고려하는 것은 어렵다. declared View는 time independent 하기에, 함수의 동작순서와 관계없이 설계자가 의도한 뷰를 보여준다)
reactive (모델이 바뀌면 바로 뷰는 업데이트돼서 모델의 변화를 반영한다reactive)
ViewModel
모델과 뷰를 연결해 주는것.
모델이 SQL 데이터베이스라면 뷰모델이 이걸 뷰와 연결해준다.
모델은 변화를 뷰모델에게 알린다.
모델이 뷰모델에 모델의 변화를 알리면 뷰모델이 변화를 퍼블리싱한다. 뷰모델은 뷰에 직접 얘기하지 않는다. 뷰는 퍼블리싱된걸 subscript 하다가, 데이터를 끌어오고, 화면을 새로 그린다.
만약 뷰에서의 동작으로 모델이 변화한다면? 뷰는 뷰모델을 향해 intent function 을 호출하고, 뷰모델은 모델을 수정한다.
뷰와 모델, 뷰모델을 비유하자면 뷰는 집안, 모델은 집밖, 뷰모델은 문이다. 뷰가 맘대로 모델(집안에서 집밖으로) 오가면 엉망진창이 된다. 뷰모델은 그 사이를 통제하는 문이 되어야 한다.
구조체(Struct)와 클래스(Class)
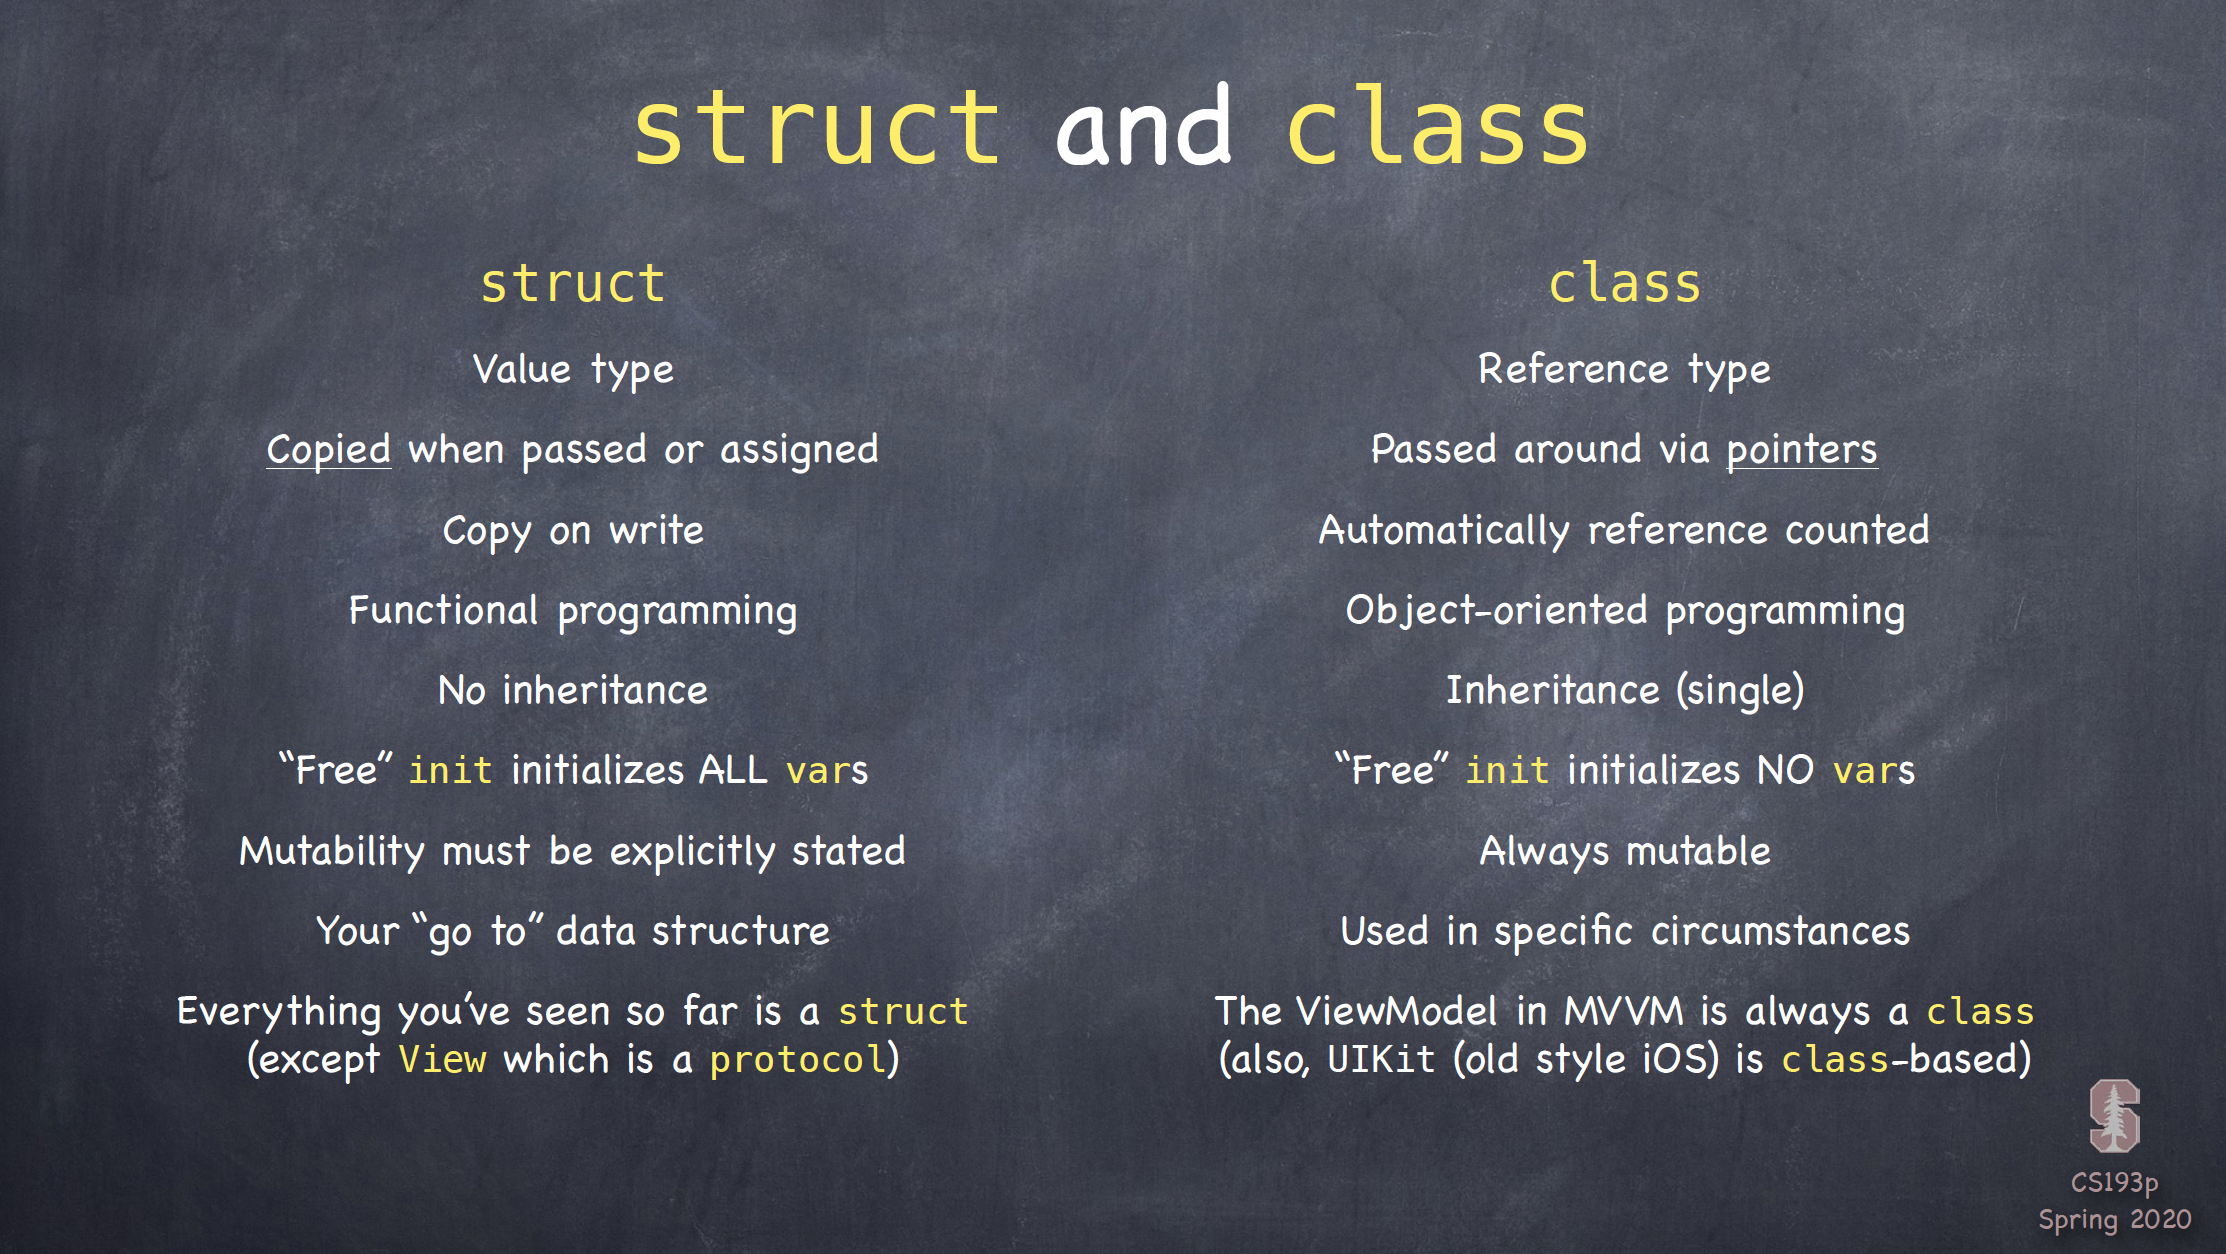
클래스는 힙(heap) 구조로 구현돼 있다. MVVM에서 뷰모델은 클래스를 이용해 구현한다.
MVVM 예제: 카드 짝맞추기 게임(1)
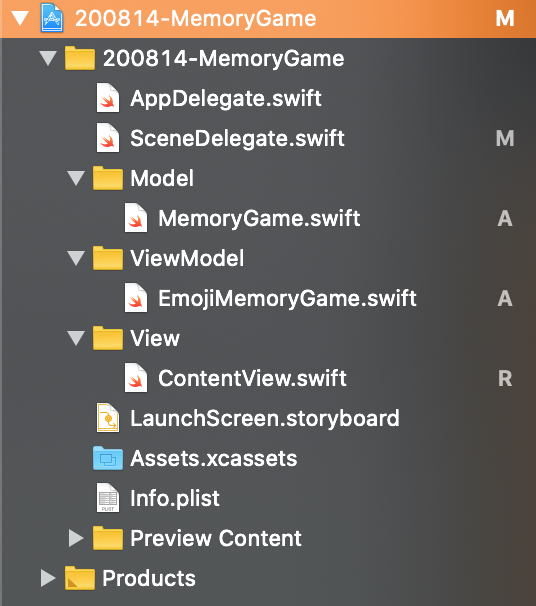
모델 코드 (MemoryGame.swift)
import SwiftUI

struct MemoryGame<CardContent> {

    // Card 가 담겨있는 array
    var cards: Array<Card>

    // 카드를 골랐을때 실행될 함수
    func choose(card: Card) {
        print("card chosen: \(card)")
    }

    // 카드 첫 생성 초기화. 카드짝맞추기 게임이기때문에, 짝수개 카드를 생성한다.
    init(numberOfPairsOfCards: Int, cardContentFactory: (Int) -> CardContent) {
        cards = Array<Card>()
        for pairIndex in 0..<numberOfPairsOfCards{
            let content: CardContent = cardContentFactory(pairIndex)
            cards.append(Card(isFaceUp: false, isMatched: false, content: content, id: pairIndex*2))
            cards.append(Card(isFaceUp: false, isMatched: false, content: content, id: pairIndex*2+1))
        }
    }

    // Card 의 모델 설정. 뷰에서 ForEach 를 사용하기 위해서 Identifiable 프로토콜을 채택.
    struct Card: Identifiable {
        var isFaceUp: Bool
        var isMatched: Bool
        var content: CardContent
        var id: Int
    }
}
뷰모델 코드 (EmojiMemoryGame.swift)
import SwiftUI

// 읽기에는 자유롭게, 수정에는 제한이 있게끔. private(set)

class EmojiMemoryGame {
    // 뷰모델에서 사용할 모델을 불러온다.
    private(set) var model: MemoryGame<String> = createMemoryGame() // set 에 대해서만 private.

    // static func 로 설정한 이유: 그냥 func 로 해두면, func 가 정의되기 전에 model 이 이니셜라이징 돼서 에러가 뜬다. static func 로 하면, createMemoryGame()이 먼저 정의되고, 그 다음에 model이 이니셜라이징 된다.
    static func createMemoryGame() -> MemoryGame<String> {
        let emojis: Array<String> = ["👻","🎃","🕷"]
        return MemoryGame<String>(numberOfPairsOfCards: emojis.count, cardContentFactory: { pairIndex in
            return emojis[pairIndex]
        })
    }
    // computed property. Access to the Model
    var cards: Array<MemoryGame<String>.Card> {
        model.cards.shuffled() // 카드를 섞어주기 위하여 shuffled()
    }

    // Mark: -Intent

    func choose(card: MemoryGame<String>.Card) {
        model.choose(card: card)
    }
}
뷰 코드 (ContentView.swift)
import SwiftUI

struct ContentView: View {
    var viewModel: EmojiMemoryGame

    var body: some View {
        HStack {
            ForEach(viewModel.cards) { element in
                CardView(card: element).onTapGesture {
                    self.viewModel.choose(card: element)
                }

            }
        }.padding().foregroundColor(Color.orange).font(Font.largeTitle)
    }
}

struct CardView: View {
    var card: MemoryGame<String>.Card

    var body: some View {
        ZStack{
            if card.isFaceUp {
                RoundedRectangle(cornerRadius: 10.0).fill(Color.white)
                RoundedRectangle(cornerRadius: 10.0).stroke(lineWidth: 3)
                Text(card.content)
            } else {
                RoundedRectangle(cornerRadius: 10.0).fill()

            }
        }
    }
}
또한 SceneDelegate.swift 의 func scene 부분에 뷰모델을 전달해 주어야한다.
let game = EmojiMemoryGame()
        let contentView = ContentView(viewModel: game)
실행해보면, 카드를 클릭할때마다 해당 카드의 정보가 print 되는걸 확인할 수 있다.
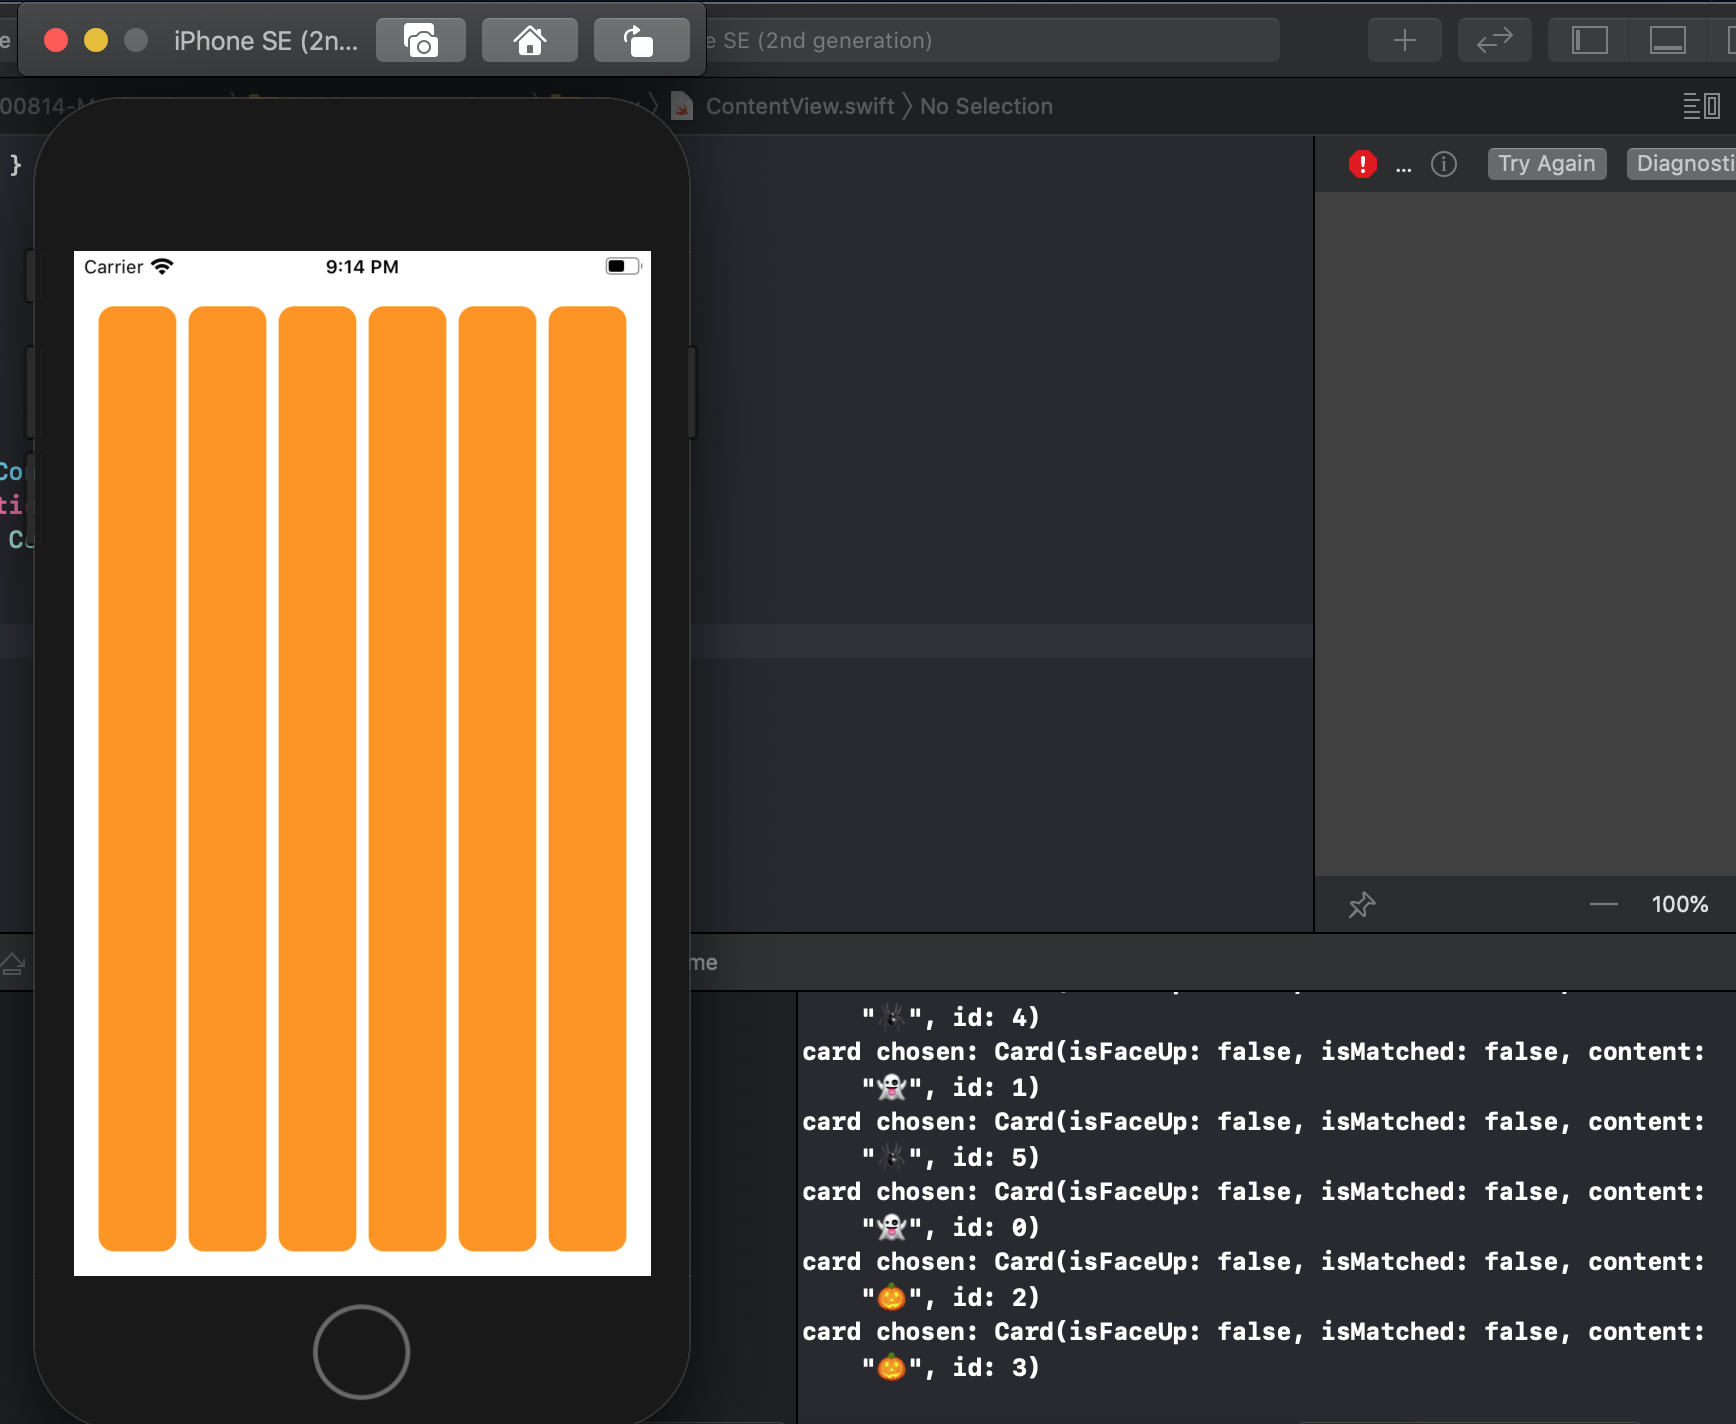
카드 뒤집기 기능 등은 다음 lecture 에서.