개요
해당 포스팅은 공식 문서 와 코드랩 을 기반으로 작성되었습니다.
Java + XML 환경에서는 간단하고 순간적인 애니메이션의 경우, AnimationUtils을 사용할 수도 있지만
모션(클릭, 스와이프)에 대한 애니메이션 구현이 필요한 경우, MotionLayout 을 채택하여 선언적으로 구현할 수 있습니다.
Compose에서도
MotionLayout을 제공합니다.
아직 MotionLayout을 사용해 본 경험이 없기 때문에, 공식 문서와 코드랩 기반으로 개념과 실습을 진행하며 보기 쉽게 내용을 정리합니다.
공식 문서
MotionLayout 은 앱에서 애니메이션 관리에 사용되는 레이아웃입니다.
ConstraintLayout의 하위 클래스이며, 레이아웃 전환과 복잡한 모션 처리에 유용하게 사용할 수 있습니다.
레이아웃 간의 전환 외에도 해당 GIF와 같이 기본 터치 컨트롤 모션 을 지원합니다.
또한, KeyFrame을 지원하기 때문에 필요에 따라 원하는 시점에 완전히 커스텀하게 구현할 수 있습니다.
MotionLayout은 선언적이며 아무리 복잡하더라도 XML에서 모든 전환을 설명할 수 있습니다.
MotionLayout은 뷰 그룹의 직접적인 하위 요소와만 호환되므로, 중첩된 레이아웃 계층 구조 또는 Activity 전환은 지원하지 않습니다.
설계 고려사항
MotionLayout 은 사용자가 상호작용하는 UI 요소(버튼, 타이틀 바 등)를 이동, 크기 조절 및 애니메이션화하는 데 사용됩니다.
따라서 앱에서 모션을 불필요하게 사용하지 말고, 사용자가 어떠한 목적으로 앱과 상호작용할 수 있는지 이해하도록 돕는데 사용하기를 권장하고 있습니다.
시작하기
MotionLayout을 사용하기 위해서는 크게 세 가지 단계를 거쳐야 합니다.
- 종속성 추가
- MotionLayout 구성
- MotionScene 생성
1. 종속성 추가
MotionLayout을 사용하려면 ConstraintLayout 2.0 버전 대의 의존성을 build.gradle에 추가합니다.
com.google.android.material:material의존성이 이미 추가되어 있다면, 해당 라이브러리에 ConstraintLayout이 포함되어 있기 때문에 추가로 설정해주지 않아도 됩니다.
** build.gradle **

dependencies {
    implementation "androidx.constraintlayout:constraintlayout:2.2.0-alpha13"

    // Compose에서 ConstraintLayout 사용하는 경우
    implementation "androidx.constraintlayout:constraintlayout-compose:1.1.0-alpha13"
}** build.gradle.kts **
dependencies {
implementation("androidx.constraintlayout:constraintlayout:2.2.0-alpha13")
// Compose에서 ConstraintLayout 사용하는 경우
implementation("androidx.constraintlayout:constraintlayout-compose:1.1.0-alpha13")
}2. MotionLayout 구성
<!-- 이전: ConstraintLayout -->
<androidx.constraintlayout.widget.ConstraintLayout .../>

<!-- 이후: MotionLayout -->
<androidx.constraintlayout.motion.widget.MotionLayout .../>
앞서 언급한 것처럼, MotionLayout은 ConstraintLayout을 상속합니다.
MotionLayout을 사용하기 위해서는 기존의 ConstraintLayout을 MotionLayout으로 대체해야 합니다.
전체 코드 샘플은 위와 같습니다.
app:layoutDescription 속성에 motion scene 파일을 추가해야 합니다.
MotionScene에는 해당 xml 레이아웃에 대한 모든 모션 설명이 포함됩니다.
3. MotionScene 생성
레이아웃 정보를 모션 설명과 분리하기 위해 각 MotionLayout은 별도의 MotionScene을 참조합니다.
공식문서에 따르면, MotionScene에 정의한 유사한 속성이 MotionLayout에 정의한 설정보다 우선권을 갖습니다.
우선순위 :
MotionScene>MotionLayout
만약 두 파일에서 같은 속성을 정의하고 있다면, MotionScene XML 파일에서의 정의가 적용된다는 의미입니다.
MotionLayout XML 파일 (activity_main.xml)
<androidx.constraintlayout.motion.widget.MotionLayout
    xmlns:android="http://schemas.android.com/apk/res/android"
    xmlns:app="http://schemas.android.com/apk/res-auto"
    android:id="@+id/motionLayout"
    android:layout_width="match_parent"
    android:layout_height="match_parent"
    app:layoutDescription="@xml/scene">

    <ImageView
        android:id="@+id/image_view"
        android:layout_width="100dp"
        android:layout_height="100dp"
        android:layout_marginTop="50dp"
        android:src="@drawable/ic_launcher_foreground"
        app:layout_constraintTop_toTopOf="parent"
        app:layout_constraintStart_toStartOf="parent"
        app:layout_constraintEnd_toEndOf="parent" />

</androidx.constraintlayout.motion.widget.MotionLayout>
Motion Scene XML 파일 (res/xml/scene.xml)
<MotionScene xmlns:android="http://schemas.android.com/apk/res/android">

    <Transition
        app:constraintSetStart="@id/start"
        app:constraintSetEnd="@id/end"
        app:duration="1000">
        <OnSwipe
            app:touchAnchorId="@id/image_view"
            app:touchAnchorSide="top"
            app:dragDirection="dragDown" />
    </Transition>

    <ConstraintSet android:id="@+id/start">
        <Constraint
            android:id="@id/image_view"
            android:layout_width="100dp"
            android:layout_height="100dp"
            app:layout_constraintTop_toTopOf="parent"
            app:layout_constraintStart_toStartOf="parent"
            app:layout_constraintEnd_toEndOf="parent" />
    </ConstraintSet>

    <ConstraintSet android:id="@+id/end">
        <Constraint
            android:id="@id/image_view"
            android:layout_width="150dp" <!-- Motion Scene XML 파일에서 크기를 변경 -->
            android:layout_height="150dp"
            app:layout_constraintTop_toTopOf="parent"
            app:layout_constraintStart_toStartOf="parent"
            app:layout_constraintEnd_toEndOf="parent" />
    </ConstraintSet>

</MotionScene>
예를 들어, 같은 뷰에 대해 MotionLayout XML 파일에서 크기를 정의하고, MotionScene XML 파일에서 다른 크기로 정의한 경우, MotionScene XML 파일에 정의된 크기가 최종적으로 적용됩니다.
위에 작성된 코드처럼 image_view의 크기가
end상태에서 최종적으로 150dp x 150dp로 변경됩니다.
<?xml version="1.0" encoding="utf-8"?>
<MotionScene xmlns:android="http://schemas.android.com/apk/res/android"
xmlns:motion="http://schemas.android.com/apk/res-auto">
<Transition
motion:constraintSetStart="@+id/start"
motion:constraintSetEnd="@+id/end"
motion:duration="1000">
<OnSwipe
motion:touchAnchorId="@+id/button"
motion:touchAnchorSide="right"
motion:dragDirection="dragRight" />
</Transition>
<ConstraintSet android:id="@+id/start">
<Constraint
android:id="@+id/button"
android:layout_width="64dp"
android:layout_height="64dp"
android:layout_marginStart="8dp"
motion:layout_constraintBottom_toBottomOf="parent"
motion:layout_constraintStart_toStartOf="parent"
motion:layout_constraintTop_toTopOf="parent" />
</ConstraintSet>
<ConstraintSet android:id="@+id/end">
<Constraint
android:id="@+id/button"
android:layout_width="64dp"
android:layout_height="64dp"
android:layout_marginEnd="8dp"
motion:layout_constraintBottom_toBottomOf="parent"
motion:layout_constraintEnd_toEndOf="parent"
motion:layout_constraintTop_toTopOf="parent" />
</ConstraintSet>
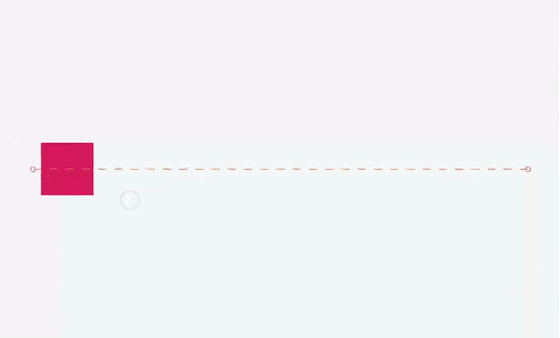
</MotionScene> 위 xml 코드는 포스팅 초반부에서 볼 수 있는 수평 모션을 묘사하고 있습니다.
xml에서 사용된 태그에 대한 설명은 다음과 같습니다.
<Transition>
모션에 대한 기본 정의를 포함합니다.
motion:constraintSetStart 및 motion:constraintSetEnd
- 모션의 시작과 끝점에 대한 참조입니다.
- 해당 속성 값은 xml 하단에 <ConstraintSet> 의 요소에 정의합니다.
motion:duration
- 모션이 완료되는 데 걸리는 시간(ms 단위)를 정의합니다.
<OnSwipe>
모션에 대한 터치 컨트롤 만들 수 있습니다.
motion:touchAnchorId
- 사용자가 스와이프하여 끌 수 있는 뷰 id를 정의합니다.
motion:touchAnchorSide
- 움직일 뷰의 측면을 정의합니다.
- 예를 들어,
top으로 설정되었다면, 해당 뷰의 상단 측면을 터치할 때 스와이프가 시작됩니다.
motion:dragDirection
- 드래그의 진행 방향을 의미합니다.
- 예를 들어,
dragRight로 설정되었다면, 뷰를 오른쪽으로 끌면 진행률이 증가한다는 의미입니다.
<ConstraintSet>
모션을 설명하는 다양한 제약을 정의할 수 있습니다.
해당 예제에서는 모션의 각 엔드포인트에 대해 하나의 <ConstraintSet>이 정의되어 있습니다.
- 엔드포인트는
app:layout_constraintTop_toTopOf="parent"와app:layout_constraintBottom_toBottomOf="parent"를 사용하여 수직 중앙에 배치됩니다. - 가로로는 엔드포인트는 화면의 맨 왼쪽과 오른쪽에 위치합니다.
자세한 내용은 안드로이드 공식문서 - 태그별 설명에서 확인할 수 있습니다.
Interpolated attributes
MotionScene 파일 내에서 ConstraintSet 요소는 추가적인 속성을 포함할 수 있습니다.
위치와 바운드 외에도 alpha, visibility, elevation, rotation[-]X/Y, translationX/Y/Z, scaleX/Y 을 적용할 수 있습니다.
Custom attributes
<Constraint
    android:id="@+id/button" ...>
    <CustomAttribute
        motion:attributeName="backgroundColor"
        motion:customColorValue="#D81B60"/>
</Constraint>
<Constarint> 내에서 <CustomAttribute> 요소를 사용하여 단순히 위치 또는 View와 관련 없는 속성에 대한 전환을 지정할 수도 있습니다.
CustomAttribute에서 motion:attributeName 은 필수이며, 객체의 getter/setter 메서드와 일치해야 합니다.
특히, getter/setter는 특정 패턴과 일치해야 합니다.
예를 들어, 뷰에 기본적으로 getBackgroundColor()/setBackgroundColor() 메서드가 있으므로 backgroundColor가 지원됩니다.
제공해야 하는 속성 값은 타입에 따라 달라집니다.
- Color :
motion:customColorValue - Integer :
motion:customIntegerValue - Float :
motion:customFloatValue - String :
motion:customStringValue - Dimension :
motion:customDimension - Boolean :
motion:customBoolean
Custom Attributes를 지정할 때는 start 및 end <Constraint> 하위에 모두 정의해주어야 합니다.
<ConstraintSet android:id="@+id/start">
    <Constraint
        android:id="@+id/button"
        android:layout_width="64dp"
        android:layout_height="64dp"
        android:layout_marginStart="8dp"
        motion:layout_constraintBottom_toBottomOf="parent"
        motion:layout_constraintStart_toStartOf="parent"
        motion:layout_constraintTop_toTopOf="parent">
        <CustomAttribute
            motion:attributeName="backgroundColor" <!-- 초기 배경 색 -->
            motion:customColorValue="#D81B60" />
    </Constraint>
</ConstraintSet>

<ConstraintSet android:id="@+id/end">
    <Constraint
        android:id="@+id/button"
        android:layout_width="64dp"
        android:layout_height="64dp"
        android:layout_marginEnd="8dp"
        motion:layout_constraintBottom_toBottomOf="parent"
        motion:layout_constraintEnd_toEndOf="parent"
        motion:layout_constraintTop_toTopOf="parent">
        <CustomAttribute
            motion:attributeName="backgroundColor" <!-- 마지막 배경 색 -->
            motion:customColorValue="#9999FF" />
    </Constraint>
</ConstraintSet>
CustomAttribute에 backgroundColor를 지정하였습니다.
하기 GIF와 같이 #D81B60 에서 #9999FF 로 진행률에 따라 서서히 변하는 형태로 구성됩니다.
추가적인 MotionLayout 속성
앞선 예제에서 사용된 속성 외에도, MotionLayout에 지정할 수 있는 다른 속성들이 있습니다.
app:applyMotionScene="boolean": 모션 장면을 적용할지 여부를 나타냅니다. 기본값은 true입니다.app:showPaths="boolean": 모션이 실행되는동안 경로를 보여줄 지 결정합니다. 기본값은 false입니다.app:progress="float": 명시적으로 진행률을 설정할 수 있습니다. 범위는0 ~ 1입니다.app:currentState="reference": 명시적으로 ConstraintSet을 지정할 수 있습니다.app:motionDebug: 모션에 대한 디버그 정보를 표시할 수 있습니다. 가능한 값은SHOW_PROGRESS,SHOW_PATH,SHOW_ALL세 가지입니다.
Refs.

안녕하세요 같은 안드로이드 주니어 개발자입니다 ^^ 간단한 이야기를 좀 나누고싶은데 연락할 수 있는 방법이 있을까요~??