동료 백엔드 개발자분께서 Endpoint라는 용어를 많이 사용하셔서
그게 무엇인가에 대한 궁금증이 계속 남아있었습니다.
또한
제가 맡은 프로젝트에서 공공API를 이용하여 날씨데이터와 강수량 데이터를 가져오는 역할을 맡게되면서 API와 Endpoint를 혼동해서 사용하는 경우가 많다는 생각이 들어
이번 기회에 API, Json 등 관련 개념을 정복해보려고 합니다
API(Application Programming Interface)
API는 두 소프트웨어 구성 요소가 서로 통신할 수 있게 하는 메커니즘입니다.
저의 경우 기상청의 서버와 DB에 접속하기 위해 API를 이용합니다.
API를 이용하여 데이터를 제가 만드려는 어플리케이션에 가져옵니다.
아마존에 정리된 문서에 따르면
Aplication
= 고유한 기능을 가진 모든 소프트웨어
Interface
= 두 애플리케이션 간의 서비스 계약, 이 계약에는 요청과 응답을 사용하여 두 애플리케이션이 서로 소통하는 방법을 정의합니다.
API가 생성된 시기와 이유에 따라 API는 네 가지 방식으로 작동할 수 있다고 합니다.
- SOAP API
이 API는 단순 객체 접근 프로토콜을 사용합니다. 클라이언트와 서버는 XML을 사용하여 메시지를 교환합니다. 과거에 많이 사용되었으며 유연성이 떨어집니다. - RPC API
이 API는 원격 프로시저 호출이라고 합니다. 클라이언트가 서버에서 함수나 프로시저를 완료하면 서버가 출력을 클라이언트로 다시 전송합니다. - WebSocket API
WebSocket API는 JSON 객체를 사용하여 데이터를 전달하는 또 다른 최신 웹 API 개발입니다. WebSocket API는 클라이언트 앱과 서버 간의 양방향 통신을 지원합니다. 서버가 연결된 클라이언트에 콜백 메시지를 전송할 수 있어 REST API보다 효율적입니다. - REST API
오늘날 웹에서 볼 수 있는 가장 많이 사용되고 유연한 API입니다.
클라이언트가 서버에 요청을 데이터로 전송합니다. 서버가 이 클라이언트 입력을 사용하여 내부 함수를 시작하고 출력 데이터를 다시 클라이언트에 반환합니다.
그렇다면 EndPoint는 무엇일까요? EndPoint 는 API가 서버에서 자원(resource)에 접근할 수 있도록 하는 URL입니다.
저는 프로젝트를 하면서 단순히 API로 받아오는 건 성공했지만
데이터를 다시 Json으로 만드는 것을 어떻게 넣어야 하는지에 대해
갈피를 못잡고 있습니다.
사람들의 코드를 분석해보니 아래 3가지 개념에 대해서 짚고 넘어가야 제가
받아온 Json데이터를 다시 Json으로 값을 반환할 수 있는거 같습니다.
공식문서를 통해 정리한 부분이 많습니다! (공식 문서는 항상 우선시되어야 합니다. 여기에 모든 정보가 있습니다!)
MessageConverter
제가 알고 있는 MessageConverter의 역할은 @ResponseBody 또는 @RestController가 붙은 컨트롤러에서 객체를 리턴하면 HttpMessageConverter 가 객체를 Json 타입으로 변환해서 리턴 시키는 것입니다.
즉 정리하면
HTTP 요청을 모델에 바인딩하고 클라이언트에 보낼 HTTP 응답을 만들기 위해 뷰를 사용했던 방식과는 달리, HTTP 요청 본문과 HTTP 응답 본문을 통째로 메세지로 다루는 방식
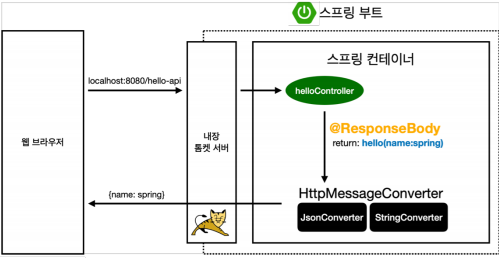
예시를 보면 위 그림은 @ResponseBody 어노테이션을 통해서 viewResolver가 아닌 문자를 반환합니다. HttpMessageConverter 가 동작하여 HTTP의 BODY에 문자 내용을 직접 반환합니다.
즉 기존의 html을 만들어서 반환하는 것이 아니라 메세지로 만들어 반환합니다.
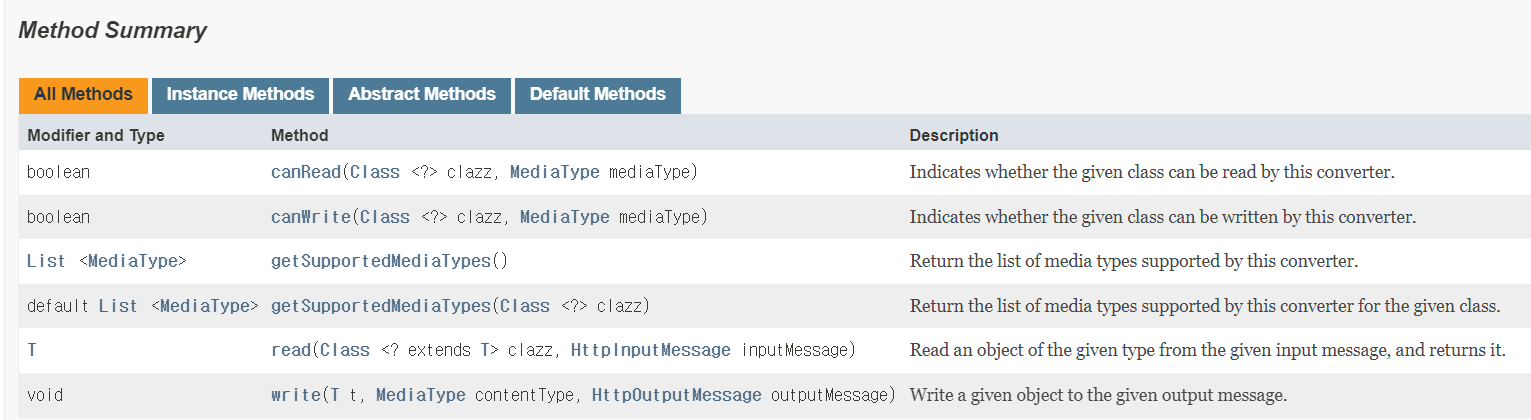
스프링 공식 문서를 통해서 HttpMessageConverter에 대해 살펴보면
야크의 털깎기가 될까요?
저기서 MediaType class에 대한 의문이 생겼습니다.
MediaType이란 무엇일까?
사실 여기서 하나 더 짚고 넘어야가야 할 것이 있습니다.
바로 Content-Type Header 와 Accept Header의 차이점입니다.
Content-Type 헤더와 Accept 헤더 둘 다 데이터 타입(MIME)을 다루는 헤더입니다.
-
Content-Type 헤더
HTTP 메세지(응답과 요청 모두)에 담겨 보내는 데이터의 형식을 알려주는 헤더
HTTP 요청의 경우 GET 방식인 경우에는 모조건 URL 끝에 쿼리스트링으로 value=test 형식으로 보내지기 때문에 Content-Type은 필요가 없습니다. 즉 GET 방식으로 데이터를 전송하면 웹서버 입장에서는 value=test 형식 데이터라는 것을 알 수 있습니다.따라서 Content-Type은 POST나 PUT처럼 메시지 BODY에 데이터를 보낼 때 필요로 합니다.
예를 들어 브라우저 기준으로 설명하면 AJAX를 통해 json 형식의 데이터를 전송하는 경우 Content-Type값은 application/json으로 지정하여 보냅니다.<form>태크를 통해 첨부파일 등을 전송하는 경우하면 브라우저가 자동으로 Content-Type을 multipart/form-data로 설정하며 요청 메세지를 보냅니다. -
Accept 헤더
브라우저에서 웹서버로 요청시 요청메시지에 담기는 헤더로 우리는 이런 타입의 응답만 허용하겠다는 내용을 담고 있습니다.
만약 요청 메시지의 Accept 헤더 값을 application/json이라고 설정하면 클라이언트는 웹서버에게 json 데이터만 처리할 수 있으니 json 데이터 형식으로 응답을 돌려달라는 의미입니다.
이제 Content Type와 Accept에 대해서 알아봤으니 다시 MediaType으로 넘어가겠습니다.
웹의 동작은 Request, Response의 결과로 동작하게 됩니다.
클라이언트에서 request를 하면 서버에서는 response로 응답합니다.
spring의 관점에서 말하면 Controller가 존재하고 GetMapping 또는 RequestMapping 등으로 요청받을 수 있습니다. 그 때 핸들러가 요청과 응답을 보낼 때 특정 타입에만 응답할 수 있도록 만들 수 있습니다.
Request에서는 consumes
Responset에서는 produces를 통해서 가능합니다.
-
consumes의 경우
package com.example.demo;

import org.springframework.http.MediaType;
import org.springframework.stereotype.Controller;
import org.springframework.web.bind.annotation.GetMapping;
import org.springframework.web.bind.annotation.ResponseBody;

@Controller
public class SampleController {
	@GetMapping(value = "/hello" , consumes = MediaType.APPLICATION_JSON_VALUE)
	@ResponseBody
	public String hello() {
		return "hello";
	}
}
위 Controller는 json type의 데이터를 담고 있는 요청만 처리하겠다는 의미입니다.
즉 앞서 배운 Content-Type이 application/json의 요청만 처리하겠다는 것입니다.
consumes = MediaType.APPLICATION_JSON_VALUE ( application/json ) -
produces의 경우
@RestController
@RequestMapping(value = "/ex1", method = "RequestMethod.GET", produces="application/json")
public String ex1() {
	return "ex1";
}
생산 가능한 미디어 타입의 목록을 지정해서 주요 매핑을 제한할 수 있습니다. Accept 요청헤더가 이러한 값 중 하나와 일치할 때만 요청이 매칭 됩니다.
정리하면 consumes는 브라우저가 서버에게 보낼때 거르는 것이고, produces는 반대로 서버에서 브라우저에게 보낼 때 거르는 것입니다.
다시 돌아와서 HttpMessageConverter
Method Details를 살펴보면
-
canRead
Indicates whether the given class can be read by this converter.
Parameters:
clazz - the class to test for readability
mediaType - the media type to read (can be null if not specified); typically the value of a Content-Type header.
Returns:
true if readable; false otherwisecanRead의 매개변수 mediaType은 Content-Type header의 값입니다.
이 media type을 읽을 수 있는지를 boolean의 형태로 반환합니다. -
canWrite
Indicates whether the given class can be written by this converter.
Parameters:
clazz - the class to test for writability
mediaType - the media type to write (can be null if not specified); typically the value of an Accept header.
Returns:
true if writable; false otherwisecanWrite의 매개변수 mediaType은 Accept header의 값입니다.
이 media Type으로 쓸 수 있는지를 boolean의 형태로 반환합니다. -
read(), write() : 메시지 컨버터를 통해서 메시지를 읽고 쓰는 기능을 지원합니다.
-
HTTP 요청 데이터 읽는 과정
- HTTP 요청이 들어오고, 컨트롤러에서 @RequestBody 혹은 HttpEntity 파라미터를 사용하는 상황
- MessageConverter가 메시지를 읽을 수 있는지 확인하기 위해서 canRead()메서드를 호출해서 대상 클래스 타입을 지원하는지, Http 요청의 Content-Type MediaType을 지원하는지 체크합니다.
- canRead() 조건을 만족할 경우 read() 메서드를 호출해서 객체 생성 후 반환
-
HTTP 응답 데이터를 생성하는 과정
- 컨트롤러에서 @ResponseBody 혹은 HttpEntity로 값이 반환되는 상황
- MessageConverter가 메시지를 쓸 수 있는지를 확인하기 위해 canWrite() 메서드 호출해서 대상 클래스 타입을 지원하는 HTTP 요청의 Accept MediaType을 지원하는지 체크합니다.
- canWrite() 조건을 만족할 경우 write() 메서드를 호출해서 HTTP 응답 메시지 바디 내 데이터를 생성합니다.
-
주로 사용하는 메시지 컨버터 3가지 (우선순위 0,1,2)
- 0 : ByteArrayHttpMessageConverter
byte[] 데이터 처리
클래스 타입 : byte[]
미디어 타입 : /
HTTP 요청 예시 : @RequestBody byte[]
HTTP 응답 예시 : @ResponseBody return byte[] (쓰기 Mediaa Type : application/octet-stream) - 1 : StringHttpMessageConverter
String 문자열로 데이터 처리
클래스 타입 : String
미디어 타입 : /
HTTP 요청 예시 : @RequestBody String example
HTTP 응답 예시 : @ResponseBody return example (쓰기 Media Type : test/plain) - 2 : MappingJacksonHttpMessageConverter
application/json 처리
클래스 타입 : 객체 또는 HashMap
미디어 타입 : application/json
HTTP 요청 예시 : @RequestBody Example example
HTTP 응답 예시 : @ResponseBody return example (쓰기 Media Type : applicaion/json)@ResponseStatus(HttpStatus.OK) @ResponseBody @GetMapping("/response-body-json") public Example responseBodyJson(@RequestBody Example example) { return example; }
스프링에서 메시지 컨버터를 선정할 때 대상 클래스 타입과 미디어 타입을 체크 후 여부를 결정하고, 만족하지 않은 경우 다음 우선순위에 있는 메세지 컨버터로 넘어갑니다.
- 0 : ByteArrayHttpMessageConverter
자 이제 MessageConverter를 이용해서 응답을 보내기 위한 방법만이 남았습니다.
바로 HttpEntity를 이용하는 것입니다.
HtppEntity
HttpEntity란
Represents an HTTP request or response entity, consisting of headers and body.
Spring Framework에서 제공하며 HTTP 요청(Request) 또는 응답(Response)에 해당하는 HttpHeader와 HttpBody를 포함하는 클래스입니다.
✅ 활용
공식 문서에 따르면
- RestTemplate와 결합되어 주로 사용되거나
또는HttpHeaders headers = new HttpHeaders(); headers.setContentType(MediaType.TEXT_PLAIN); HttpEntity<String> entity = new HttpEntity<>("Hello World", headers); URI location = template.postForLocation("https://example.com", entity);HttpEntity<String> entity = template.getForEntity("https://example.com", String.class); String body = entity.getBody(); MediaType contentType = entity.getHeaders().getContentType(); - Spring MVC에서 @Controller가 붙은 메서드의 반한값으로 쓰인다고 합니다.
 @GetMapping("/handle")
 public HttpEntity<String> handle() {
 HttpHeaders responseHeaders = new HttpHeaders();
 responseHeaders.set("MyResponseHeader", "MyValue");
 return new HttpEntity<>("Hello World", responseHeaders);
}
✅ 생성자
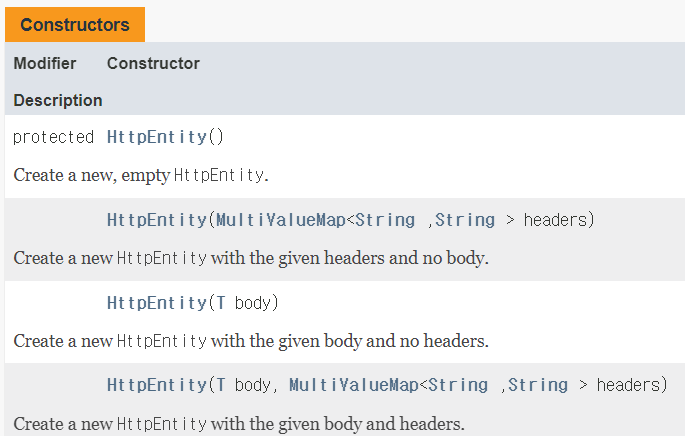
4가지 종류의 생성자가 존재합니다.
생성자를 만들기 위해서는 body 또는 header에 대한 정보가 필요합니다.
ResponseEntity
public class ResponseEntity<T> extends HttpEntity<T>
public class HttpEntity<T> {

	private final HttpHeaders headers;

	@Nullable
	private final T body;
}
Extension of HttpEntity that adds an HttpStatusCode status code. Used in RestTemplate as well as in @Controller methods.
공식문서에 따르면
상태코드를 포함한 HttpEntity의 확장.
@Controller 메서드 뿐만 아니라 RestTemplate에서 주로 사용된다.
라고 설명되어 있습니다.
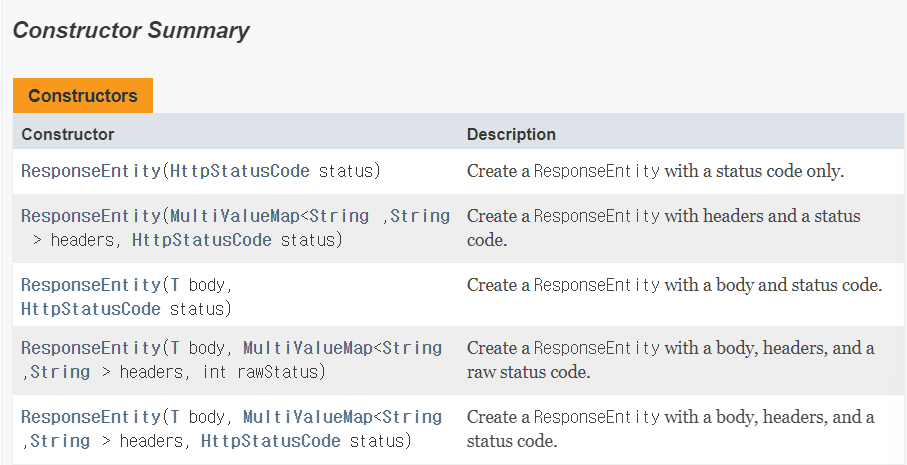
앞서 상태코드를 포함한 HttpEntity의 확장이라고 말한 이유에 대해서 납득이 갈 것이라고 생각합니다.
생성자를 보면 HttpEntity에 상태코드가 포함되었다고 생각하면 됩니다.
다음과 같이 상태코드만을 담을 수도 있습니다.
@RestController
public class SampleController {

    @GetMapping("users")
    public ResponseEntity getAllUsers() {
        return new ResponseEntity(HttpStatus.OK);
    }
}
그리고 다음과 같이 상태코드, 헤더, 응답데이터를 담는 생성자도 존재합니다.
public class ResponseEntity<T> extends HttpEntity<T> {

	public ResponseEntity(@Nullable T body, @Nullable MultiValueMap<String, String> headers, HttpStatus status) {
		super(body, headers); // HttpEntity의 생성자
		Assert.notNull(status, "HttpStatus must not be null");
		this.status = status;
	}
}
실제로 프로젝트에서 사용하는 방법
-
private final T body;의 T의 형태를 정해준다.import lombok.Data; @Data public class Message { private StatusEnum status; private String message; private Object data; public Message() { this.status = StatusEnum.BAD_REQUEST; this.data = null; this.message = null; } } -
상태코드로 보낼 몇 가지의 예시를 적어놓은 enum을 만든다.
public enum StatusEnum { OK(200, "OK"), BAD_REQUEST(400, "BAD_REQUEST"), NOT_FOUND(404, "NOT_FOUND"), INTERNAL_SERER_ERROR(500, "INTERNAL_SERVER_ERROR"); int statusCode; String code; StatusEnum(int statusCode, String code) { this.statusCode = statusCode; this.code = code; } } -
Controller를 통해서 Message 클래스를 통해서 상태, 메시지, 데이터를 담아 클라이언트에 응답을 보낸다.
@RestController public class UserController { private UserDaoService userDaoService; public UserController(UserDaoService userDaoService) { this.userDaoService = userDaoService; } @GetMapping(value = "/user/{id}") public ResponseEntity<Message> findById(@PathVariable int id) { User user = userDaoService.findOne(id); Message message = new Message(); HttpHeaders headers= new HttpHeaders(); headers.setContentType(new MediaType("application", "json", Charset.forName("UTF-8"))); message.setStatus(StatusEnum.OK); message.setMessage("성공 코드"); message.setData(user); return new ResponseEntity<>(message, headers, HttpStatus.OK); } } -
아래와 같은 응답을 보내게 됩니다
{
  "status" : "OK",
  "message" : "상태 코드",
  "data" : {
    "id" : 1,
    "name" : "Kim Byeol",
    "joinDate" : "2023-05-20",
    "password" : "password1234",
    "ssn" : "970121-111111"
   }
}
RestTemplate
Synchronous client to perform HTTP requests, exposing a simple, template method API over underlying HTTP client libraries such as the JDK HttpURLConnection, Apache HttpComponents, and others. RestTemplate offers templates for common scenarios by HTTP method, in addition to the generalized exchange and execute methods that support less frequent cases.
스프링 공식 문서에 따르면
HTTP 요청을 수행하기 위한 동기식 클라이언트입니다.
JDK HttpURL Connection, Apache HttpComponents 등의 기본 HTTP 클라이언트 라이브러리에 단순한 템플릿 메서드 API를 보여줍니다.
RestTemplate는 빈도가 낮은 사례를 지원하는 일반적인 exchange그리고 execute 메서드 외에도 HTTP 방법에 의한 일반적인 시나리오에 대한 템플릿을 제공합니다.
12개의 메서드가 존재합니다.
RestTemplate으로 REST endpoint를 사용할 수 있습니다.
| 메서드 | 용도 | 기능설명 |
|---|---|---|
| exchange(...) | any | 지정된 HTTP 메서드를 URL에 대해 실행하며, Response Body와 연결되는 객체를 포함하는 responseEntity를 반환합니다. |
| execute(...) | any | 지정된 HTTP 메서드를 URL에 대해 실행하며, Response Body와 연결되는 객체를 반환합니다. |
| getForEntity(...) | GET | HTTP GET 요청을 전송하며, Response Body와 연결되는 객체를 포함하는 ResponseEntity를 반환합니다. |
| getForObject(...) | GET | HTTP GET 요청을 전송하며, Response Body와 연결되는 객체를 반환합니다. |
| headForHeaders(...) | HEAD | HTTP HEAD 요청을 전송하며, 지정된 리소스 URL의 HTTP 헤더를 반환합니다. |
| optionsForAllow(..) | OPTIONS | HTTP OPTIONS 요청을 전송하며, 지정된 URL의 Allow 헤더를 반환합니다. |
| patchForObject(..) | PATCH | HTTP PATCH 요청을 전송하며, Response body와 연결되는 결과 객체를 반환합니다. |
| postForEntity(..) | POST | URL에 데이터를 POST하며, Response body와 연결되는 객체를 포함하는 ResponseEntity를 반환합니다. |
| postForLocation(..) | POST | URL에 데이터를 POST하며, 새로 생성된 리소스의 URL를 반환합니다. |
| postForObject(..) | POST | URL에 데이터를 POST하며, Response body와 연결되는 객체를 반환합니다. |
| put(..) | PUT | 리소스 데이터를 지정된 URL에 PUT합니다. |
| delete(..) | HTTP | 지정된 URL의 리소스에 HTTP DELETE 요청을 수행합니다. |
활용 예시
-
RequestEntity
//header 생성 HttpHeaders headers = new HttpHeaders(); headers.add("Accept", MediaType.APPLICATION_JSON_VALUE); headers.add("Content-Type", MediaType.APPLICATION_FORM_URLENCODED_VALUE + ";charset=UTF-8"); //url 생성 URI url = URI.create("https://https://mchch.tistory.com/"); //requestEntity 생성(방법1) //header, method, url 을 파라미터로 하여 생성자 호출 RequestEntity<String> req1 = new RequestEntity<>(headers, HttpMethod.GET, url); //body 생성 String body = "test" //requestEntity 생성(방법2) RequestEntity<String> req2 = RequestEntity.post(new URI("https://https://mchch.tistory.com/")) .accept(MediaType.APPLICATION_JSON) .body(body); -
exchange메서드
RestTemplate restTemplate = new RestTemplate(); //RequestEntity와 responseType을 파라미터로 명시함 //ResponseEntity를 리턴받음 ResponseEntity<String> res = restTemplate.exchange(req, String.class); -
ResponseEntity
RestTemplate template = new RestTemplate();
//getForEntity : 요청한 URL 주소로 HTTP GET 요청을 보내고,  ResponseEntity를 반환받음
ResponseEntity<String> entity = template.getForEntity("https://example.com",      String.class);

//body 추출
String body = entity.getBody();
//헤더부의 contentType 추출
MediaType contentType = entity.getHeaders().getContentType();
//statusCode 추출
HttpStatus statusCode = entity.getStatusCode();
Reference
https://webstone.tistory.com/66
https://pozafly.github.io/spring/MediaType/
https://wecandev.tistory.com/41
https://mchch.tistory.com/173