우아한 테크코스 레벨 2 지하철 노선도 미션 중, 리뷰어 희봉이 DataSource에 대해 공부해보면 좋을 것 같다고 추천해주셔서, DataSource에 대해 알아보았습니다!
DataSource
DB Connection을 위해, DriverManager를 사용하면 개발자가 직접 Connection을 맺어야 합니다.
public class JdbcConnector {

    private static final String URL = "jdbc:mysql://localhost:3306/chess";
    private static final String USER = "user";
    private static final String PASSWORD = "password";

    public static Connection getConnection() {
        Connection connection = null;
        try {
            connection = DriverManager.getConnection(URL, USER, PASSWORD);
        } catch (SQLException e) {
            e.printStackTrace();
        }
        return connection;
    }
}
이후에, JdbcTemplate을 통해 DB에 접근했는데요. Connection을 맺어주지 않았는데, DB에 접근이 가능해서 왜 가능하지? 라는 생각이 들었습니다. 어떻게 가능할까요?
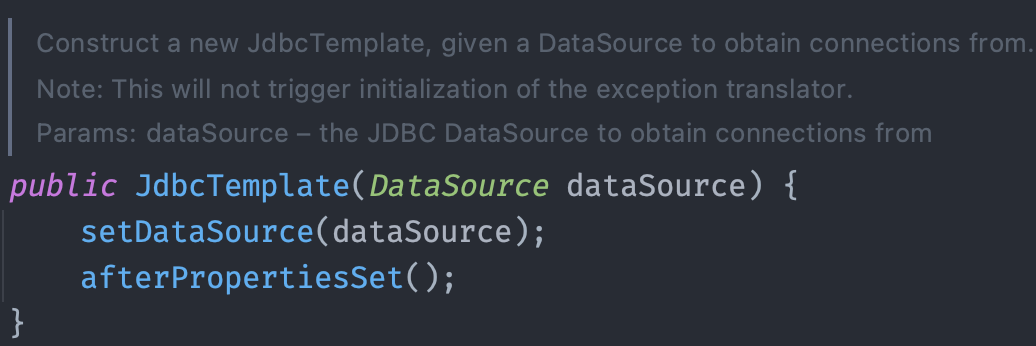
JdbcTemplate의 매개변수인 DataSource가 Connection을 관리해주기 때문입니다.
DataSoure란?
DataSource의 api를 보면 아래와 같은 설명이 있습니다.
A factory for connections to the physical data source that this DataSource object represents. An alternative to the DriverManager facility, a DataSource object is the preferred means of getting a connection. An object that implements the DataSource interface will typically be registered with a naming service based on the Java™ Naming and Directory (JNDI) API.
- DataSource가 나타내는 물리적인 데이터와의
Connection을 위한Factory이다. - DriverManager의 대안이다.
- Connection을 얻기 위한 수단 중 선호되는 것이다.
- DataSource interface를 구현하는 객체는
JNDI라는 기술을 통해서 등록된다.
DataSource.class에의 설명을 간단히 요악하자면
- Basic implementation -- produces a standard Connection object
커넥션을 맺어줍니다.- Connection pooling implementation -- produces a Connection object that will automatically participate in connection pooling. This implementation works with a middle-tier connection pooling manager.
커넥션 풀링을 지원합니다.- Distributed transaction implementation -- produces a Connection object that may be used for distributed transactions and almost always participates in connection pooling. This implementation works with a middle-tier transaction manager and almost always with a connection pooling manager.
분산 트랜잭션에서 사용될 수 있는 커넥션을 생성합니다.
DataSource를 Bean으로 등록하는 방법
DataSource를 JdbcTemplate에서 사용하기 위해서는 Bean으로 등록해야겠죠.
DataSource는 어떻게 Bean으로 등록할까요?
JNDI라는 기술을 통해, 물리적인 DB를 찾을 수 있습니다.
Oracle의 문서를 보면 JNDI에 대해 아래와 같이 설명하고 있습니다.
JNDI는 Java Naming and Directory Interface API의 머리글자입니다. 응용 프로그램은 이 API를 호출하여 자원과 다른 프로그램 객체를 찾습니다. 자원은 데이터베이스 서버나 메시징 시스템 같은 시스템과의 연결을 제공하는 프로그램 객체입니다. (JDBC 자원을 데이터 소스라고도 합니다.) 모든 자원 객체는 고유하고 사용자에게 친숙한 JNDI 이름으로 식별됩니다. 자원 객체와 JNDI 이름은 Application Server에 포함된 이름 지정 및 디렉토리 서비스에 의해 함께 바인딩됩니다. 자원을 새로 만들려면 새로운 이름 객체 바인딩을 JNDI에 입력합니다.
이름 과 디렉토리를 통해 객체를 바인딩하는 기술입니다.
이를 통해 DataSource를 생성할 때, 서버에 있는 DB의 주소를 적어주면 DB와의 연결을 맺는 DataSource Bean을 등록할 수 있습니다. 물론 로컬에 존재하는 DB와도 연결할 수 있습니다.
xml을 통해 bean 등록
<bean id="dataSource" class="org.apache.commons.dbcp.BasicDataSource" destroy-method="close">
    <!-- results in a setDriverClassName(String) call -->
    <property name="driverClassName" value="com.mysql.jdbc.Driver"/>
    <property name="url" value="jdbc:mysql://localhost:3306/mydb"/>
    <property name="username" value="root"/>
    <property name="password" value="misterkaoli"/>
</bean>
xml에서 DataSource를 직접 Bean으로 등록해줄 수 있습니다. url에 DB 경로와 이름를 적어주고, 추가적인 db와 관련된 정보들도 같이 적어주면 됩니다.
작성 형식이 복잡하기 때문에 요즘은 많이 쓰지 않는 방식으로 알고 있습니다.
yml 혹은 properties
//yml
spring:
  datasource:
    driver-class-name: org.h2.Driver
    url: jdbc:h2:mem:testdb
    username: sa
    password:

//properties
app.datasource.url=jdbc:h2:mem:testdb
app.datasource.driver-class-name=sa
app.datasource.username=sa
위처럼 yml 혹은 properties 파일에 DataSource에 관한 정보를 적어주면 됩니다.
그렇다면, AutoConfiguration과정에서 DataSource를 Bean으로 등록할 때,
해당 정보를 토대로 DataSource의 구현체를 Bean으로 등록합니다.
AutoConfiguration에 대해서는 다음 포스팅에서 알아보도록 하겠습니다.
이렇게 JNDI 기술을 통해서 DB와의 관계를 맺을 수 있기 때문에, 실제 애플리케이션의 코드에서 DriverManager를 통해 직접 Connection을 맺지 않을 수 있습니다.
또한, DataSource 객체를 보면 아래와 같은 설명이 있습니다.
A DataSource object has properties that can be modified when necessary. For example, if the data source is moved to a different server, the property for the server can be changed. The benefit is that because the data source's properties can be changed, any code accessing that data source does not need to be changed.
DataSource는 필요에 따라, 변경될 수 있는 property들을 가지고 있습니다. 예를 들어, 데이터 자원이 다른 서버로 이동한다면, 서버에 대한 property가 바뀔 수 있습니다.(서버에 대한 property를 바꿔주면 됩니다.) 데이터 자원에 대한 속성이 바꾸고, 다른 데이터에 접근하는 코드를 바꿔줄 필요가 없다는 것이 장점입니다.
한 줄로 정보하자면, DB에 대한 것이 바뀌어도 실제 코드를 수정하는 것이 아닌, DataSource의 Property를 지정해주는 yml 혹은 properties 파일만 바꾸면 된다는 것입니다.
Connection Pool
@Repository
public class MyDao {

    private DataSource dataSource;

    public MyDao(final DataSource dataSource) {
        this.dataSource = dataSource;
    }

    public void findByName(String name) {
        String sql = "select * from station where name = ?";

        try (Connection connection = dataSource.getConnection();
             PreparedStatement statement = connection.prepareStatement(sql)) {
            statement.setString(1, name);
            ResultSet resultSet = statement.executeQuery();
        } catch (SQLException e) {
            e.printStackTrace();
        }
    }
위에서 DataSource가 getConnection을 요청을 받는다면, DataSource는 자신이 관리하는 Connection Pool에서 Connection을 하나 반환합니다. 그 후 try 문이 끝나고 Connection이 close가 될 때, 실제로 연결이 끊기는 것이 아니라 DataSource가 관리하는 Connection Pool에 Connection을 반환합니다.
매번 Connection을 맺는 비용이 없어지는 것이죠. Driver Manager를 사용한다면, 개발자가 직접 Connection Pool을 관리해주어야 합니다. 하지만 DataSource는 자체적으로 Connection Pool을 지원하기 때문에 개발자가 따로 관리할 필요가 없습니다.
끗.