0. 문제 상황
Dandi 를 개발하면서 마음에 걸렸던 코드가 있습니다. 아래 코드중 imageAccessUrl 필드 값과 관련이 있습니다. 1번 주석과 2번 주석을 참고하시면 좋을 것 같습니다.
@Service
public class PostQueryServiceAdapter implements PostQueryServicePort {

    private static final int TEMPERATURE_SEARCH_THRESHOLD = 3;

    private final PostPersistencePort postPersistencePort;
    private final PostLikePersistencePort postLikePersistencePort;
    private final String imageAccessUrl; // 1

    public PostQueryServiceAdapter(PostPersistencePort postPersistencePort,
                                   PostLikePersistencePort postLikePersistencePort,
                                   @Value("${cloud.aws.cloud-front.uri}") String imageAccessUrl) {
        this.postPersistencePort = postPersistencePort;
        this.postLikePersistencePort = postLikePersistencePort;
        this.imageAccessUrl = imageAccessUrl;
    }

    @Override
    public PostDetailResponse getPostDetails(Long memberId, Long postId) {
        Post post = postPersistencePort.findById(postId)
                .orElseThrow(NotFoundException::post);
        boolean mine = post.isWrittenBy(memberId);
        boolean liked = postLikePersistencePort.existsByPostIdAndMemberId(memberId, postId);
        return new PostDetailResponse(post, mine, liked, imageAccessUrl); // 2
    }

    // ...
}
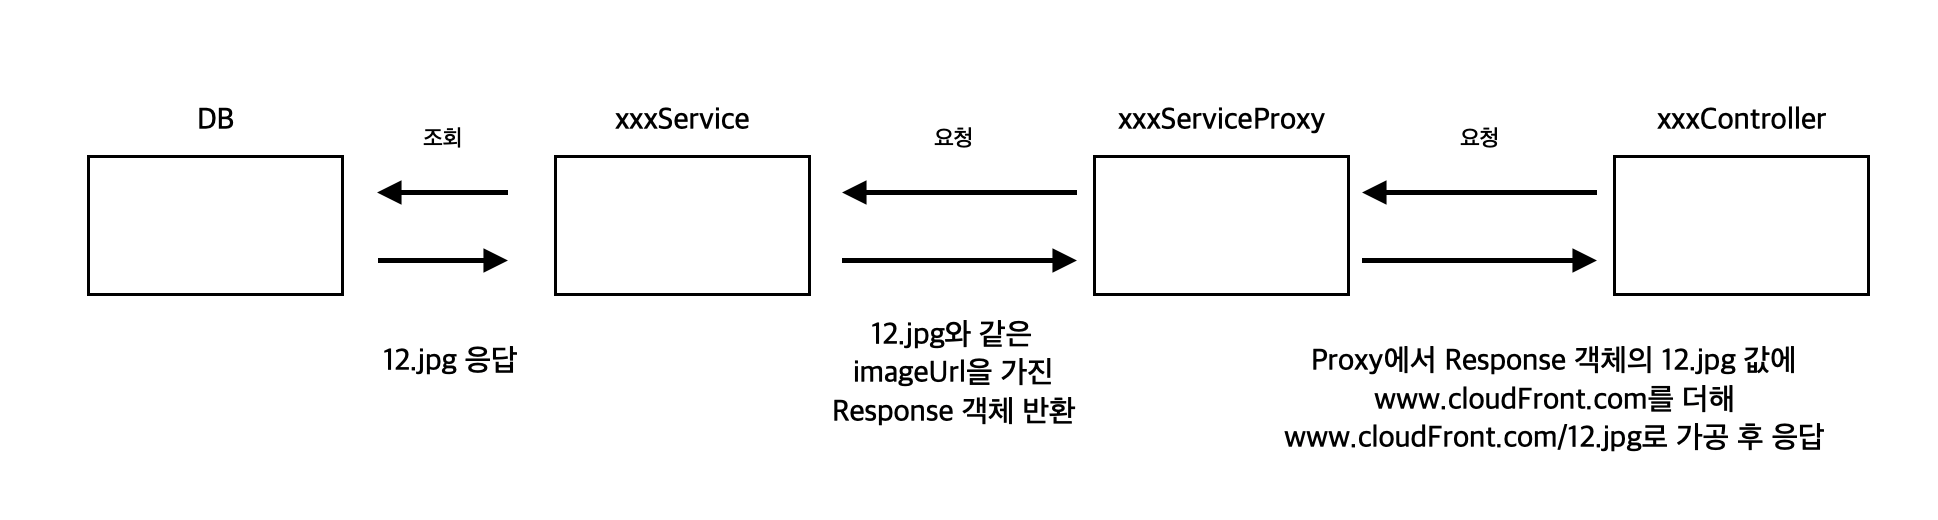
이미지에 대한 정보를 응답해줘야 하는 API에 해당하는 Service에서 imageAccessUrl를 가지고 있습니다.
그리고 imageAccessUrl을 응답 객체의 생성자로 넣어줍니다. 그리고 아래와 같이 응답 객체에서 imageUrl과 imageAccessUrl을 가공하여 클라이언트로 응답합니다.
public class PostDetailResponse {

    // ...
    private String postImageUrl;
    private LocalDate createdAt;

    public PostDetailResponse() {
    }

    public PostDetailResponse(Post post, boolean mine, boolean liked, String imageAccessUrl) {
        // ...
        this.postImageUrl = imageAccessUrl + post.getPostImageUrl();
        this.createdAt = post.getCreatedAt();
    }
    // ...
}
그렇다면, imageURL 정보를 응답하는 모든 API에 대한 Service 객체는 imageAccessUrl이라는 값을 가지고 있어야 합니다. 또한, 생성자에서 이를 DB에 저장된 imageUrl과 더하기 연산을 해줘야합니다. (Service에서 + 연산을 해서 응답 객체로 넣어도 무방합니다.)
거기에 더해, imageAccessUrl 가진 Service 객체는 9개나 됩니다. 또한, imageUrl을 응답하는 응답 객체는 14개나 되고요.
따라서, imageAccessUrl 값을 여러 객체에서 가지지 않고 응답 객체에서 반복되는 imageUrl + imageAccessUrl 코드를 제거하는 방법에 대해 고민했습니다.
ImageAccessUrl이란?
클라이언트에서 이미지에 접근하기 위해 http://www.cloudFront.com/12.jpg 와 같은 이미지 정보를 응답해줘야합니다.
이 값을 DB에 저장한다면 아래와 같이 테이블에 중복되는 www.cloudFront.com이라는 값이 존재합니다.
| pk | imageUrl |
|---|---|
| 1 | www.cloudFront.com/12.jpg |
| 2 | www.cloudFront.com/34.jpg |
| 3 | www.cloudFront.com/56.jpg |
| 4 | www.cloudFront.com/78.jpg |
| 5 | www.cloudFront.com/90.jpg |
따라서, 위와 같이 CloudFront URL을 제외한 값만 저장하고 Application Level에서 CloudFront 주소를 더해 클라이언트에게 전달하는 방식을 채택했습니다.
| pk | imageUrl |
|---|---|
| 1 | 12.jpg |
| 2 | 34.jpg |
| 3 | 56.jpg |
| 4 | 78.jpg |
| 5 | 90.jpg |
이런 중복까지 제거한다니, 과한거 아니야?
저도 조금은 과하게 중복을 제거하려고 하는 것이 아닌가 라는 생각이 들었습니다. DB의 볼륨이 충분하다면 www.cloudFront.com라는 문자열이 큰 문제가 되지 않을 것이라고 생각했기 때문입니다. 하지만, 중복은 제거하고 싶은 욕망이 있었습니다.
ImageAccessUrl 관리 방식
imageAccessUrl은 CloudFront의 주소기 때문에 prod, dev 등의 개발환경 마다 값이 다릅니다. 따라서, imageAccessUrl은 yaml에 있는 값을 @Value로 통해 받아오고 있습니다.
1. 해결방법(1) : AOP
이유는 모르겠으나, 가장 먼저 떠오른 방식은 AOP 였습니다. 이전부터 AOP를 통해 서비스를 개선해보고 싶은 마음이 있었으나, 마땅한 문제 상황이 없었기 때문에 경험해보지 못했습니다.
Concept
AOP는 Proxy 로 동작하기 때문에, 위와 같은 방식으로 해결하려 했습니다.
구현
package dandi.dandi.image.aspect;

import java.lang.annotation.ElementType;
import java.lang.annotation.Retention;
import java.lang.annotation.RetentionPolicy;
import java.lang.annotation.Target;

@Target({ElementType.METHOD})
@Retention(RetentionPolicy.RUNTIME)
public @interface ImageUrlInclusion {
    String name();
}
먼저, 위와 같은 같은 Annotation을 선언하고 아래처럼 imageUrl이 포함된 객체를 포함하는 Service의 메서드에 Annotation을 적용해줬습니다. ImageUrlInclusion의 name 속성은 Response 객체의 필드 중에 imageUrl에 해당하는 필드 값의 이름입니다.
@Service
public class PostQueryServiceAdapter implements PostQueryServicePort {

    // ...

		@Override
    @Transactional(readOnly = true)
		@ImageUrlInclusion(name = "postImageUrl")
		public PostDetailResponse getPostDetails(Long memberId, Long postId) {
		    Post post = postPersistencePort.findById(postId)
		            .orElseThrow(NotFoundException::post);
		    boolean mine = post.isWrittenBy(memberId);
		    boolean liked = postLikePersistencePort.existsByPostIdAndMemberId(memberId, postId);
		    return new PostDetailResponse(post, mine, liked);
		}

    // ...
}
그리고 아래처럼 imageAccessUrl을 imageUrl에 + 연산하지 않고 그냥 imageUrl만을 Response 객체에 할당합니다.
public class PostDetailResponse {

    // ...
    private String postImageUrl;
    private LocalDate createdAt;

    public PostDetailResponse() {
    }

    public PostDetailResponse(Post post, boolean mine, boolean liked) {
        // ...
        this.postImageUrl = post.getPostImageUrl();
        this.createdAt = post.getCreatedAt();
    }
그렇다면 AOP Proxy 객체에서 Target 객체에서 반환받은 Response 객체에 imageAccessUrl(www.cloudFront.com)을 더해줘야합니다.
1.1.1. AOP + Reflection
가장 먼저 든 방식은 Reflection 이었습니다. ImageUrlInclusion에 name 속성을 선언해둔 것도 Reflection을 사용하기 위함이었습니다.
@Aspect
@Component
public class ImageAccessUrlAspect {

    private final String imageAccessUrl;

    public ImageAccessUrlAspect(@Value("${cloud.aws.cloud-front.uri}") String imageAccessUrl) {
        this.imageAccessUrl = imageAccessUrl;
    }

    @Around(value = "@annotation(imageUrlInclusion)")
    public Object appendImageAccessUrl(ProceedingJoinPoint joinPoint, ImageUrlInclusion imageUrlInclusion) {
        String name = imageUrlInclusion.name(); // 1
        try {
            Object returnObj = joinPoint.proceed(); // 2
            Class<?> returnObjClass = returnObj.getClass(); // 3
            Field imageUrlField = returnObjClass.getDeclaredField(name); // 4
            imageUrlField.setAccessible(true);
            String imageUrl = (String) imageUrlField.get(returnObj); // 5
            imageUrlField.set(returnObj, this.imageAccessUrl + imageUrl); // 6
            imageUrlField.setAccessible(false);
            return returnObj;
        } catch (Throwable e) {
            throw new InternalServerException("AOP 에러");
        }
    }
}
구현 방식
1번 라인
imageUrlInclusion에서 name 속성, imageUrl에 해당하는 필드 이름을 가져옵니다.
2번 라인
ProceedingJoinPoint의 proceed 메서드를 통해 Target 객체(xxxService)에서 Response 객체를 반환받습니다.
3번 라인
Reflection을 위해 Response 객체의 타입을 얻어옵니다.
4번 라인
imageUrl에 해당하는 Field 객체를 찾습니다.
5번 라인
imageUrl에 해당하는 문자열을 얻어옵니다.
6번 라인
imageUrl에 imageAccessUrl을 더한 값을 Response 객체에 할당시킵니다.
위와 같이 Reflection을 통해 imageUrl에 imageAccessUrl 값을 더할 수 있습니다.
1.1.2. AOP + Reflection 방식의 문제
하지만, Reflection 방식에는 문제가 있습니다.
문제 1
먼저, Reflection의 오버헤드입니다. 컴파일 시점이 아니라, 런타임에 타입 정보를 가져오기 때문에 JVM을 최적화할 수 없습니다. 더욱이, Reflection이 이뤄지는 API들은 모두 조회 API일 뿐더러, 서비스에서 가장 많은 호출률을 가진 API들입니다.
문제 2
위의 방식은 모든 Response 객체에 적용하기가 쉽지 않습니다.
public class PostDetailResponse {

    // ...
    private String postImageUrl;
    private LocalDate createdAt;

    public PostDetailResponse() {
    }

    public PostDetailResponse(Post post, boolean mine, boolean liked, String imageAccessUrl) {
        // ...
        this.postImageUrl = imageAccessUrl + post.getPostImageUrl();
        this.createdAt = post.getCreatedAt();
    }
    // ...
}
위처럼 JoinPoint에서 반환하는 객체의 필드에는 직접적으로 접근할 수 있습니다.
하지만, 여러 JoinPoint 중에서 아래처럼 imageUrl이 JoinPoint가 응답하는 객체에 바로 존재하지 않고 해당 객체가 참조하는 객체의 내부에 있을 수도 있습니다.
public class FeedResponse {

    private List<PostResponse> posts;
    private boolean lastPage;

    //...

    public FeedResponse(List<PostResponse> posts, boolean lastPage) {
        this.posts = posts;
        this.lastPage = lastPage;
    }

    //...
}
public class PostResponse {
// ...
private String postImageUrl;
private LocalDate createdAt;
// ...
public PostResponse(Post post, boolean liked, String imageAccessUrl) {
// ...
this.postImageUrl = imageAccessUrl + post.getPostImageUrl();
this.createdAt = post.getCreatedAt();
}
// ...
}위와 같은 경우에는 아래처럼 해당하는 필드를 찾기위해 Response 객체의 참조 구조를 타고 들어가면서 imageUrl 명에 해당하는 Field 값을 찾아야합니다. 위 구조는 객체의 참조 구조가 2depth입니다. 하지만, imageUrl이 3depth, 4depth의 객체에 존재한다면 어떻게 될까요? reflection의 NoSuchFieldException를 계속 catch 하면서 재귀 혹은 반복문 방식으로 객체의 참조 구조를 계속 타고 들어가면서 깊이 있는 imageUrl을 찾아야합니다.
물론, Response 객체의 참조 depth를 2로 하는 등의 규칙을 세울 수 있습니다. 하지만, Service에서 응답하는 Response 객체는 대개 직렬화되는 Response Body에 대응되는 객체로 사용되기 때문에 이 같은 규칙을 적용하기 위해 API 형식에 제약이 생길 수 있습니다. (물론, 개인적인 생각으로는 대개 json body의 depth가 2를 넘어가지 않는다고 생각하여 가능성은 낮아보입니다.)
위의 문제들이 해결된다고 해도 결국 Reflection을 사용하는 것이기 때문에 오버헤드는 여전히 남아있습니다.
문제 3
위 방식은 ImageUrlInclusion의 name 속성 값을 통해 Response 객체의 필드 중 이름에 해당하는 값을 변경하는 방식입니다. 위에서도 말했듯이 Service의 반환 값은 직렬화되는 Response Body에 대응되는 객체로 사용되기 때문에 API 변경으로 인해 Response 객체의 필드명이 바뀔 때 마다 ImageUrlInclusion의 name 속성 값을 함께 바꿔줘야합니다. 물론, 이 역시도 개인적인 경험에 따르면 json의 key 값이 변경되는 경우는 거의 겪지 못한것으로 보아, 가능성이 낮아보입니다. 하지만, 가능성은 존재합니다.
1.2.1 AOP + 상위 인터페이스
AOP를 통해 값을 주입하는 방법 중, Reflection이 아닌 다른 방법을 고민하다가 고안해낸 방법입니다.
@Target({ElementType.METHOD})
@Retention(RetentionPolicy.RUNTIME)
public @interface ImageUrlInclusion {
}
Reflection 방식을 사용하지 않기 때문에 더 이상 name이라는 속성은 필요없습니다.
public interface ImageResponse {

    ImageResponse addImageAccessUrl(String imageAccessUrl);
}
위처럼 imageUrl을 가지는 Response 객체들의 상위 인터페이스를 정의합니다.
아래처럼 imageUrl을 가지는 Response 객체들은 addImageAccessUrl를 구현합니다.
public class PostDetailResponse implements ImageResponse {

    // ...
    private String postImageUrl;
    private LocalDate createdAt;

    private PostDetailResponse(PostWriterResponse writer, boolean mine, boolean liked, TemperatureResponse temperatures,
                               OutfitFeelingResponse outfitFeelings, String postImageUrl, LocalDate createdAt) {
        // ...
        this.postImageUrl = postImageUrl;
        this.createdAt = createdAt;
    }

    // ...

    @Override
    public ImageResponse addImageAccessUrl(String imageAccessUrl) {
        return new PostDetailResponse(
                writer.addImageAccessUrl(imageAccessUrl),
                mine,
                liked,
                temperatures,
                outfitFeelings,
                imageAccessUrl + postImageUrl,
                createdAt
        );
    }
}
그렇다면 아래처럼 Target 객체가 응답하는 모든 imageUrl을 포함한 Response 객체들을 ImageResponse 타입으로 캐스팅 가능합니다.
타입캐스팅 한 객체의 addImageAccessUrl 객체를 호출하면 imageAccessUrl이 포함된 객체로 가공할 수 있습니다.
@Aspect
@Component
public class ImageAccessUrlAspect {

    private final String imageAccessUrl;

    public ImageAccessUrlAspect(@Value("${cloud.aws.cloud-front.uri}") String imageAccessUrl) {
        this.imageAccessUrl = imageAccessUrl;
    }

    @Around(value = "@annotation(imageUrlInclusion)")
    public Object appendImageAccessUrl(ProceedingJoinPoint joinPoint, ImageUrlInclusion imageUrlInclusion) {
        try {
            Object returnObj = joinPoint.proceed();
            ImageResponse imageResponse = (ImageResponse) returnObj;
            return imageResponse.addImageAccessUrl(this.imageAccessUrl);
        } catch (Throwable e) {
            throw new InternalServerException("AOP 에러");
        }
    }
}
아래처럼 imageUrl을 포함한 Response 객체를 응답하는 Service의 메서드에서는 @ImageUrlInclusion 어노테이션을 사용합니다.
@Service
public class PostQueryServiceAdapter implements PostQueryServicePort {

    // ...

		@Override
    @Transactional(readOnly = true)
		@ImageUrlInclusion
		public PostDetailResponse getPostDetails(Long memberId, Long postId) {
		    Post post = postPersistencePort.findById(postId)
		            .orElseThrow(NotFoundException::post);
		    boolean mine = post.isWrittenBy(memberId);
		    boolean liked = postLikePersistencePort.existsByPostIdAndMemberId(memberId, postId);
		    return new PostDetailResponse(post, mine, liked);
		}

    // ...
}
1.2.2 AOP + 응답 객체들의 상위 인터페이스 방식의 문제
개발 복잡성
결론적으로, 여러 Service 객체에서의 imageAccessUrl에 대한 의존성은 줄였습니다. 하지만, 개발 복잡도는 올라간 것으로 생각합니다. imageAccessUrl을 포함한 값을 응답하기 위해서는 @ImageUrlInclusion 을 반드시 붙혀줘야 한다는 것을 모든 개발자가 공유하고 항상 생각해야합니다. 또한, ImageUrl을 포함한 Response 객체는 반드시 ImageResponse라는 인터페이스를 구현해야 한다는 의무도 생깁니다. 그렇지 않다면 Client에게 잘못된 값으로 응답을 할 수 밖에 없습니다.
테스트
E2E 테스트에서 모든 응답 값을 검증해야한다고 생각한다면 문제가 되지 않습니다. 그렇지 않다면, 반드시 imageAccessUrl이 포함된 것을 @SpringBootTest를 통해 검증해야 합니다.
현재 Service 계층은 @SpringBootTest Slice 테스트를 진행하고 있습니다. 따라서, Service에 대한 Test로 AOP가 잘 동작하는지 테스트할 수 없습니다. 따라서, @SpringBootTest를 통해 검증해야합니다. 현재 @SpringBootTest는 DB 테스트와 E2E로 이뤄지는 인수테스트에 대해 진행하고 있습니다. 따라서, 제 프로젝트의 경우에는 E2E 테스트에서 반드시 아래처럼 imageAccessUrl을 포함한 응답 값을 내려주는지 테스트해야합니다.
class PostAcceptanceTest extends AcceptanceTest {

    @DisplayName("게시글 상세 조회 요청에 성공하면 200과 게시글 상세 정보를 반환한다.")
    @Test
    void getPostDetails() {
        String token = getToken();
        Long postId = registerPost(token);

        ExtractableResponse<Response> response =
                httpGetWithAuthorization(POST_DETAILS_REQUEST_URI + "/" + postId, token);

        PostDetailResponse postDetailResponse = response.jsonPath()
                .getObject(".", PostDetailResponse.class);
        PostWriterResponse postWriterResponse = postDetailResponse.getWriter();
        assertAll(
                // ...
                () -> assertThat(postWriterResponse.getProfileImageUrl())
                        .isEqualTo(IMAGE_ACCESS_URL + MEMBER_DEFAULT_PROFILE_IMAGE),
                // ...
        );
    }
}
2. 해결방법(2) : Json 값 조작
따라서, Service에 특정 Annotation을 선언하지 않는 방식에 대해 고민해보았습니다. Json 값 자체를 조작하는 방법입니다. 아래와 같은 방식은 어노테이션이나 Aspect 없이 순수하게 Json 값만을 통해 수행할 수 있습니다.
{
    "writer": {
        "id": 1,
        "nickname": "blue_gloves_raccoon",
        "profileImageUrl": "profile/default.jpg"
    },
    "mine": true,
    "liked": false,
    "temperatures": {
        "min": 20.0,
        "max": 30.0
    },
    "outfitFeelings": {
        "feelingIndex": 1,
        "additionalFeelingIndices": [
            1,
            2
        ]
    },
    "postImageUrl": "post/postImageUrl",
    "createdAt": "2023-07-04"
}
Interceptor나 Filter에서 위와 같이 응답되는 Json 값에 ImageUrl이 포함된 key 값이 있다면 해당 key의 value에 imageAccessUrl을 더해 아래와 같이 만드는 형태입니다.
{
    "writer": {
        "id": 1,
        "nickname": "blue_gloves_raccoon",
        "profileImageUrl": "https://www.cloud-front.com/profile/default.jpg"
    },
    "mine": true,
    "liked": false,
    "temperatures": {
        "min": 20.0,
        "max": 30.0
    },
    "outfitFeelings": {
        "feelingIndex": 1,
        "additionalFeelingIndices": [
            1,
            2
        ]
    },
    "postImageUrl": "https://www.cloud-front.com/post/postImageUrl",
    "createdAt": "2023-07-04"
}
구체적으로 구현은 해보지 않았지만, 아래들과 같은 방식으로 구현할 수 있을 것 같습니다.
2.1. HttpServletResponse를 통해 얻은 Json의 값을 조작
HttpServletReponse의 getOutputStream을 통해 Json 값을 얻으려 시도해봤지만, 꽤 복잡해보였습니다. 또한, 해당 방식은 단점이 있었기에 구체적으로 구현해보진 않았습니다.
단점
응답하는 모든 Response 값의 json 값에 imageUrl을 포함하는 Key 값을 확인해야합니다.
2.2. Response 객체에 커스텀 직렬화 방식을 적용
아래와 같이 JsonSerializer 과 같은 객체를 Response가 상속하도록 하는 것입니다.
public class PostDetailResponse implements JsonSerializer<PostDetailResponse> {

    private Long id;
    private CommentWriterResponse writer;
    private boolean postWriter;
    private boolean mine;
    private LocalDate createdAt;
    private String content;

    public CommentResponse() {
    }

    @Override
    public void serialize(PostDetailResponse value, JsonGenerator gen, SerializerProvider serializers) throws IOException {

    }
}
단점
그렇다면 응답 객체에서 imageAccessUrl을 관리해야합니다. imageAccessUrl에 대한 의존성을 줄이기 위함이었는데, imageAccessUrl에 대한 의존이 Service에서 Response 객체로 이동한 격이 됩니다.
또한, 현재 imageAccessUrl은 yaml에 있는 값을 @Value로 통해 받아오고 있습니다. 따라서, 응답 객체에서 imageAccessUrl을 Bean으로 등록해야합니다. 응답객체는 요청마다 1개씩 생성되기 때문에 Scope를 request로 변경하는 등의 작업이 필요한데, 너무 과하다는 생각이 들었습니다.
3. 해결방법(3) : System properties를 통한 접근
위에서 설명한 것처럼, 현재 imageAccessUrl은 yaml에 있는 값을 @Value로 통해 받아오고 있습니다. 따라서, 이 값을 Bean 객체에서만 받을 수 없다는 제약이 있습니다.
기존의 방식이었던 Service에서 받아서, Response 객체의 생성자로 넘겨주는 방식도 위의 제약때문입니다.
그렇다면, Response 객체의 생성자에서 Direct하게 접근하는 방식은 없을까? 라는 생각을 했습니다.
3.1. imageAccessUrl을 java 상수로 관리
아래처럼 java 상수로 관리하는 방식이 가장 먼저 떠올랐습니다.
public static final String imageAccessUrl = "www.cloudFront.com"위 방식은 prod, dev 등의 개발환경에 따라 imageAccessUrl의 값을 다르게 가져가는 것이 불가능합니다.
3.2. System properties를 통한 접근
java -DimageAccessUrl=www.cloudFront.com배포시에 java 실행 명령어에 위와 같이 Property를 설정하고 아래처럼 응답 객체에서 직접 접근하는 방식입니다.
public class PostDetailResponse {

    // ...
    private String postImageUrl;
    private LocalDate createdAt;

    // ...

    private PostDetailResponse(PostWriterResponse writer, boolean mine, boolean liked, TemperatureResponse temperatures,
                               OutfitFeelingResponse outfitFeelings, String postImageUrl, LocalDate createdAt) {
        // ...
        this.postImageUrl = System.getProperty("imageAccessUrl") + postImageUrl;
        this.createdAt = createdAt;
    }
이 방식으로는 위에서 살펴보았던 모든 방식의 단점을 다 커버할 수 있습니다.
AOP 방식의 개발복잡성
Service에 AOP 어노테이션을 붙히지 않아도 되고 Response 객체들의 상속 구조도 사라집니다.
AOP 방식의 E2E 테스트에서 강제되었던 imageAccessUrl에 대한 검증
Service Layer에서 Response 객체의 로직까지 테스트할 수 있기 때문에 E2E 테스트에서 imageAccessUrl에 대한 테스트를 강제할 필요가 없습니다.
Json 조작 방식의 응답 값에 대한 모든 체크
Json의 key 값을 보고 imageUrl이 있다면 imageAccessUrl을 더해주는 방식에 비해, 로직이 훨씬 간단하고 응답 값에 대한 체크를 할 필요가 없어서 성능적으로도 좋습니다.
개발 환경에 따라 달라지는 imageAccessUrl 값
//개발 환경
java -DimageAccessUrl=www.devCloudFront.com
//운영 환경
java -DimageAccessUrl=www.prodCloudFront.com
위처럼 개발환경에 따라 imageAccessUrl 값을 다르게 설정하면 해결할 수 있습니다.
원래의 목표
여러 Service에서 지니고 있던 imageAccessUrl에 대한 의존을 제거할 수 있습니다.
참고자료
Effective Java 3/E
