1) 오늘 복습한 핵심 개념 요약
(1) == vs ===, != vs !==
== : 값만 비교(필요하면 타입 변환까지 해버림)
=== : 값 + 타입까지 비교(엄격 비교)
!= : ==의 반대
!== : ===의 반대
-> 실무에선 타입 변환으로 버그가 잘 나서 ==는 웬만하면 쓰지 말고 ===를 사용하는 게 안전하다.
(2) 타입 확인: typeof
typeof 변수 로 타입을 확인할 수 있음.
ex
typeof 1 → "number", typeof "a" → "string"(3) 배열
배열 리터럴: []
값 추가: push()
JS 배열은 크기 고정이 아니라 유동적이라 자바의 배열이라기보단 ArrayList에 가까움.
(4) 출력
console.log()는 자바의 System.out.println() 같은 출력 역할.
(5) splice() vs slice()
splice(start, deleteCount, item1, item2, ...)-
원본 배열을 직접 변경(mutate)
-
삭제/추가/교체가 가능
-
삭제된 요소들을 “배열”로 반환
slice()-
원본 유지
-
잘라낸 “새 배열” 반환
(6) if / for 문
기본 문법은 자바와 크게 동일.
(7) 함수 / 화살표 함수 / 1급 시민
함수 선언식:
function add(a, b) {
  return a + b;
}
화살표 함수(람다 같은 느낌):
const addTwoNumber = (one, two) => {
  return one + two;
}
함수를 매개변수로 전달 가능:
const wrapperFunction = (func) => {
  const result = func(10, 20);
  console.log(result);
}

wrapperFunction(addTwoNumber);
-> JS는 함수를 1급 시민(값처럼 변수에 담고 전달 가능)으로 취급한다.
(8) JSON / 직렬화 / 역직렬화
JSON(JavaScript Object Notation)
{
  "name": "obt",
  "age": 27,
  "address": "서울시"
}-
키는 문자열만 가능
-
값은 문자열/숫자/boolean/object/array/null 등 가능
JS 객체 → JSON(직렬화): JSON.stringify(obj)
JSON → JS 객체(역직렬화): JSON.parse(jsonString)
(9) DOM 선택
document.querySelector() : HTML 문서에서 특정 요소를 CSS 선택자 문법으로 찾는다.
ex
document.querySelector('#bookmark-list')
document.querySelector('input[name=name]')
(10) 리스트 태그
ul : 순서 없는 목록(점)
ol : 순서 있는 목록(번호)
li : 목록의 항목 (ul/ol 안에 들어감)
2) 실습 1: XHR(XMLHttpRequest)로 즐겨찾기 등록/조회
2-1. 전체 화면 구조(HTML)
-
입력 폼(form)에서 “즐겨찾기 이름/URL”을 입력하고 submit
-
“즐겨찾기 목록 가져오기” 버튼 클릭 시 서버에서 목록을 받아와
<ol>에 렌더링
코드
<form onsubmit="return addBookmarkRequest();">
            <label>즐겨찾기 이름 : </label><input type="text" name="name"><br>
            <label>즐겨찾기 URL : </label><input type="text" name="url"><br>
            <input type="submit"><br>
        </form>
        <button onclick="getBookmarkListRequest();">즐겨찾기 목록 가져오기</button>
        <ol id="bookmark-list">
            <!-- 여기에 즐겨찾기 목록이 나옵니다. -->
        </ol>
핵심 요소:
<form onsubmit="return addBookmarkRequest();">-
submit될 때 JS 함수 실행
-
return false를 해주면 페이지 새로고침(폼 기본 동작)을 막을 수 있음
<ol id="bookmark-list">- 목록을 렌더링할 컨테이너
2-2. 등록(POST /bookmark) 로직 상세 설명
function addBookmarkRequest() {
  const name = document.querySelector('input[name=name]').value;
  const url = document.querySelector('input[name=url]').value;

  const requestObject = {name: name, url: url};
  const requestJson = JSON.stringify(requestObject);

  function onReadyStateChange(event) {
    const currentAjaxRequest = event.currentTarget;

    if (currentAjaxRequest.readyState === XMLHttpRequest.DONE) {
      if (currentAjaxRequest.status === 200) {
        alert("즐겨찾기가 등록되었습니다.");
      } else {
        console.error('request failed');
      }
    }
  }

  const ajaxRequest = new XMLHttpRequest();
  ajaxRequest.onreadystatechange = onReadyStateChange;
  ajaxRequest.open('POST', '/bookmark');
  ajaxRequest.setRequestHeader('Content-Type', 'application/json');
  ajaxRequest.send(requestJson);

  return false;
}
포인트를 흐름대로 풀면:
1. input 값 읽기
- querySelector('input[name=name]') 로 name 입력칸을 잡고 .value로 값 가져옴
2. 요청 바디 만들기
- {name, url} 형태의 객체 생성 → JSON.stringify()로 문자열로 직렬화
(서버에 JSON으로 보내려면 문자열 형태가 필요)
3. XHR 상태 변화 콜백
-
onreadystatechange는 요청 상태가 변할 때마다 호출됨
-
그래서 “완료(DONE)”인지 확인해야 함
- readyState === XMLHttpRequest.DONE (완료 상태)
-
완료 후 성공 여부는 HTTP 상태코드로 판단
- status === 200이면 성공으로 처리
4. 요청 전송
-
open('POST', '/bookmark') : 메서드/URL 지정
-
setRequestHeader('Content-Type','application/json') : JSON 보낸다고 명시
-
send(requestJson) : 실제 전송
5. return false;
- 폼 submit 기본 동작(새로고침)을 막는다.
2-3. 목록 조회(GET /bookmarks) 로직 상세 설명
function getBookmarkListRequest() {
  function onReadyStateChange(event) {
    const currentAjaxRequest = event.currentTarget;

    if (currentAjaxRequest.readyState === XMLHttpRequest.DONE) {
      if (currentAjaxRequest.status === 200) {
        const bookmarkListDom = document.querySelector('#bookmark-list');
        bookmarkListDom.innerHTML = '';

        const bookmarks = JSON.parse(currentAjaxRequest.responseText);
        bookmarks.forEach(bookmark => {
          const liNode = document.createElement('li');
          const textNode = document.createTextNode(bookmark.name + ' - ' + bookmark.url);
          liNode.appendChild(textNode);
          bookmarkListDom.appendChild(liNode);
        });
      } else {
        console.error('request failed');
      }
    }
  }

  const ajaxRequest = new XMLHttpRequest();
  ajaxRequest.onreadystatechange = onReadyStateChange;
  ajaxRequest.open('GET', '/bookmarks');
  ajaxRequest.send();
}
포인트:
-
성공 시 #bookmark-list를 비우고(innerHTML = '') 새로 렌더링
-> “목록 다시 불러오기”를 눌렀을 때 중복으로 쌓이는 걸 방지 -
서버 응답 문자열(responseText)을 JSON.parse()로 배열로 변환
예상 응답 형태 예:
[
  {"name":"구글","url":"https://google.com"},
  {"name":"네이버","url":"https://naver.com"}
]- 배열을 forEach로 돌면서
<li>를 만들어<ol>에 append
3) 실습 2: Fetch API로 동일 기능 구현
XHR은 “상태 변화 이벤트/readyState”를 직접 다뤄야 해서 코드가 길어지는 편인데,
fetch는 Promise 기반이라 흐름이 깔끔해진다.
3-1. 등록(POST /bookmark) - fetch 버전
function addBookmarkRequest() {
  const name = document.querySelector('input[name=name]').value;
  const url = document.querySelector('input[name=url]').value;

  const requestObject = { name: name, url: url };

  fetch('/bookmark', {
    method: 'POST',
    headers: {
      'Content-Type': 'application/json'
    },
    body: JSON.stringify(requestObject)
  })
  .then(response => {
    if (response.status === 200) {
      alert("즐겨찾기가 등록되었습니다.");
    } else {
      console.error('request failed');
    }
  })
  .catch(error => {
    console.error('request failed', error);
  });

  return false;
 }
포인트:
-
fetch(url, options) 형태
-
JSON 전송 시:
-
headers: {'Content-Type':'application/json'}
-
body: JSON.stringify(obj)
-
-
성공/실패는 .then()에서 status로 판단
-
네트워크 오류 같은 예외는 .catch()로 처리
3-2. 목록 조회(GET /bookmarks) - fetch 버전
function getBookmarkListRequest() {
  fetch('/bookmarks')
  .then(response => {
    if (response.status === 200) {
      return response.json();
    } else {
      console.error('request failed');
      throw new Error('request failed');
    }
  })
  .then(bookmarks => {
    const bookmarkListDom = document.querySelector('#bookmark-list');
    bookmarkListDom.innerHTML = '';

    bookmarks.forEach(bookmark => {
      const liNode = document.createElement('li');
      const textNode = document.createTextNode(bookmark.name + ' - ' + bookmark.url);
      liNode.appendChild(textNode);
      bookmarkListDom.appendChild(liNode);
    });
  })
  .catch(error => {
    console.error('request failed', error);
  });
}
포인트:
-
response.json()은 응답 바디를 JSON으로 파싱한 결과(Promise)를 반환
-
그래서 다음 .then(bookmarks => ...)에서 실제 배열을 받게 된다.
제대로 이해가 안돼서 다시 물어본 부분
1) response.json()이 정확히 뭐야?
response.json()
응답 body를 읽어서 JSON 형식이면 자바스크립트 객체/배열로 변환해서 그 결과를 Promise로 돌려주는 함수
즉,
const dataPromise = response.json();여기서 dataPromise는 “데이터 그 자체”가 아니라
“데이터를 준비해서 나중에 주겠다”는 약속(Promise)
2) 왜 Promise를 반환해?
-
응답 바디를 읽는 건 시간이 걸릴 수 있음 (네트워크, 데이터 크기 등)
-
그래서 response.json()은 “즉시 결과”가 아니라, 바디를 다 읽고
파싱까지 끝나면 그때 결과를 전달하는 구조
3) 그래서 .then(bookmarks => ...)에서 실제 배열을 받는 이유
이 코드 흐름을 단계로 보면:
fetch('/bookmarks')
  .then(response => {
    return response.json(); //  Promise를 반환
  })
  .then(bookmarks => {
    //  위 Promise가 해결(resolve)되면 여기로 실제 데이터가 들어옴
    console.log(bookmarks);
});-
첫 번째 then에서 return response.json()을 하면, 다음 then은 json 파싱이 끝난 뒤에 실행
-
그리고 그 파싱 결과(객체/배열)가 다음 then의 매개변수(bookmarks) 로 들어감
4) 직관적으로 이해하는 비유
-
response = 택배 상자(상태코드/헤더/내용물 포함)
-
response.json() = 상자를 열고, 내용물을 꺼내서 “사용하기 좋은 형태로 정리”하는 작업
근데 상자 여는 데 시간이 걸리니까 -
Promise = “정리 끝나면 알려줄게”라는 약속
5) return을 안 하면 무슨 일이 생겨?
아래처럼 return을 빼면:
fetch('/bookmarks')
  .then(response => {
    response.json(); //  return 안 함
  })
  .then(bookmarks => {
    console.log(bookmarks); // undefined 나올 가능성이 큼
});- 첫 번째 then이 아무것도 반환하지 않아서 다음 then의 bookmarks가 비게 돼.
4) XHR vs Fetch 한눈에 비교
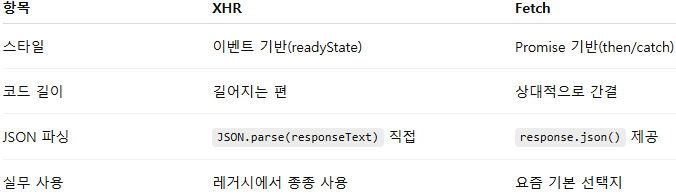
-> 결론: 신규 코드는 fetch가 더 많이 쓰이고 읽기 쉬움.
(추가로 실무에선 axios 같은 라이브러리를 많이 쓰기도 함)
5) Spring Boot 설정 정리: application.yml + application-dev.yml (MySQL + JPA)
1) application.yml (공통 설정)
spring:
  application:
    name: DeliveryPlatform

  profiles:
    default: dev

  datasource:
    driver-class-name: com.mysql.cj.jdbc.Driver

  jpa:
    hibernate:
      naming:
        physical-strategy: org.hibernate.boot.model.naming.CamelCaseToUnderscoresNamingStrategy
    properties:
      hibernate:
        dialect: org.hibernate.dialect.MySQLDialect
✅ 설정 의미
(1) spring.application.name
-
애플리케이션 이름.
-
로그/모니터링/분산 추적(Spring Cloud 등)에서 서비스 식별자로 활용될 수 있음.
(2) spring.profiles.default: dev
-
실행 시 별도 프로파일을 지정하지 않으면 기본으로 dev 프로파일을 사용한다는 의미.
-
즉, 기본 실행은 application-dev.yml 설정이 함께 적용됨.
ex) 아무 옵션 없이 실행하면 사실상 dev로 뜸
(3) datasource.driver-class-name
-
MySQL JDBC 드라이버 클래스 지정.
-
DB URL이 무엇이든 MySQL 드라이버로 접속하겠다는 뜻.
(4) hibernate.naming.physical-strategy
- 엔티티 필드명을 DB 컬럼명으로 변환하는 전략.
CamelCaseToUnderscoresNamingStrategy는 예를 들어:
createdAt → created_at

orderId → order_id- 자바 필드명은 카멜케이스로 쓰고, DB는 스네이크 케이스로 통일할 수 있어서 관리가 편해짐.
(5) hibernate.dialect: MySQLDialect
-
Hibernate가 “이 DB는 MySQL이다”라고 인식하도록 하는 설정.
-
Hibernate가 SQL을 생성할 때 DB 방언(dialect)에 맞게 문법/함수를 선택함.
2) application-dev.yml (개발 환경 설정)
spring:
  application:
    name: DeliveryPlatform
  datasource:
    url: ${DB_URL}
    username: ${DB_USERNAME}
    password: ${DB_PASSWORD}

  jpa:
    hibernate:
      ddl-auto: update
    properties:
      hibernate:
        show_sql: true
        format_sql: true
        use_sql_comments: true
✅ 설정 의미
(1) datasource.url / username / password
-
${DB_URL}, ${DB_USERNAME}, ${DB_PASSWORD} 형태로 환경변수 값을 읽어온다.
-
소스코드나 yml에 DB 비밀번호를 직접 적지 않아서 보안상 안전하고,
-
로컬/EC2/컨테이너 환경별로 값만 바꿔 주면 되어 배포가 편함.
(2) ddl-auto: update
-
애플리케이션 실행 시 엔티티 변경사항을 DB에 반영하는 전략.
-
update는 개발 단계에서 편하지만, 컬럼 삭제/데이터 손실 관련 이슈가 생길 수 있고,
운영에서는 의도치 않은 스키마 변경 위험이 있어 보통 피함(운영은 validate나 마이그레이션 도구 사용).
(3) SQL 로그 관련 옵션 3종 세트
show_sql: true- 실행되는 SQL을 콘솔에 출력
format_sql: true- SQL을 보기 좋게 줄맞춤/포맷팅
use_sql_comments: true-
SQL에 주석이 붙어서 “이 SQL이 어떤 엔티티/쿼리에서 나왔는지” 힌트를 얻을 수 있음
-
디버깅할 때 체감이 꽤 큼
3) 왜 공통/환경 설정을 분리하나?
✅ 장점
-
공통 설정(application.yml): 드라이버/네이밍 전략/기본 프로파일 같은 “프로젝트의 기본 규칙”을 한 곳에서 관리
-
환경별 설정(application-dev.yml): DB 접속 정보, 개발 편의 옵션(SQL 로그, ddl-auto 등)처럼 환경마다 달라지는 설정을 분리
-
민감한 값(DB 비밀번호)을 환경변수로 관리해서 GitHub에 올라갈 위험 감소
6) 마무리: 오늘 실습에서 얻은 감각
-
DOM에서 입력값을 읽고 → JSON으로 직렬화 → 서버로 비동기 요청 → 응답(JSON)을 파싱 → 화면에 렌더링
이 흐름이 웹의 기본 -
XHR은 “원리” 이해에 좋고, fetch는 “실무 감각”에 좋다.