Ansible 설치 및 환경 구성
Ansible 설치
# 파이썬 버전 확인
python3 --version
##실행 결과
Python 3.12.3

# Ansible 설치
apt install software-properties-common -y
add-apt-repository --yes --update ppa:ansible/ansible
apt install ansible -y


# 버전 확인
ansible --version
##실행 결과
..
ansible [core 2.19.5]
  config file = /etc/ansible/ansible.cfg
  configured module search path = ['/root/.ansible/plugins/modules', '/usr/share/ansible/plugins/modules']
  ansible python module location = /usr/lib/python3/dist-packages/ansible
  ansible collection location = /root/.ansible/collections:/usr/share/ansible/collections
  executable location = /usr/bin/ansible
  python version = 3.12.3 (main, Aug 14 2025, 17:47:21) [GCC 13.3.0] (/usr/bin/python3)
  jinja version = 3.1.2
  pyyaml version = 6.0.1 (with libyaml v0.2.5)
root@server:~#
설치 후 확인되는 주요 정보:
- ansible core 버전: 2.19.5
- 설정 파일:
/etc/ansible/ansible.cfg - python 버전: 3.12.3
- jinja 버전: 3.1.2
작업 디렉터리 생성:
mkdir my-ansible
cd my-ansible
SSH 인증 구성
Ansible은 SSH를 통해 관리 노드에 접근한다. 에이전트 없이 SSH만 사용하는 것이 핵심이다.
# SSH 키 생성
ssh-keygen -t rsa -N "" -f /root/.ssh/id_rsa

# 관리 노드에 공개키 복사
for i in {1..3}; do sshpass -p 'qwe123' ssh-copy-id -o StrictHostKeyChecking=no root@tnode$i; done

# 복사 확인
for i in {1..3}; do echo ">> tnode$i <<"; ssh tnode$i cat ~/.ssh/authorized_keys; echo; done
##실행 결과
..
>> tnode1 <<
ssh-rsa AAAAB3NzaC1yc2EAAAADAQABAAABgQCiCpS0ayE9kRt6QRQaLE8wekw1siv2WzX2COd8hoglpxGnOUm0thLVQO1pha6BZVluSuavxTOvkjq15ldNsPD5I88MxOPD/MDOHj/YO6O08jCtb9m7TvWPaex5p/xcOi3wK7zW4WbTklgtp5gMGTqHHk9fWdbd0KpXP0FF5ZFKvKyLj/JpjtgIdSezBm1ldjw35JMV4urahGJ6k4cr0wNid6VgO7mNqILRPqwkuDyTEbKUjgCwz0zMb81KHkYSYrJ1rhlYGF+3bWlV8o5mYcDtqwGS6UvnBACP95sQglGyv8znQEI71DPMLLtB3WVDcB4BzCxFCsmfFYET5K+UdXSA0R7TeZZZf5MRs6JS0pmswDosRBCT7y0tPYVP1q44IMPagffB2yTzTmPunXq1NX/8AblH3ZlGjb/zQxsu78xWpzrhQALo3RuecMwIplUImWk3jGLvmnzyIZk63smpVDGuIb+k8IVXisyY7QlNScOX+l1RioryXzVAHmus6PnzHx0= root@server

>> tnode2 <<
ssh-rsa AAAAB3NzaC1yc2EAAAADAQABAAABgQCiCpS0ayE9kRt6QRQaLE8wekw1siv2WzX2COd8hoglpxGnOUm0thLVQO1pha6BZVluSuavxTOvkjq15ldNsPD5I88MxOPD/MDOHj/YO6O08jCtb9m7TvWPaex5p/xcOi3wK7zW4WbTklgtp5gMGTqHHk9fWdbd0KpXP0FF5ZFKvKyLj/JpjtgIdSezBm1ldjw35JMV4urahGJ6k4cr0wNid6VgO7mNqILRPqwkuDyTEbKUjgCwz0zMb81KHkYSYrJ1rhlYGF+3bWlV8o5mYcDtqwGS6UvnBACP95sQglGyv8znQEI71DPMLLtB3WVDcB4BzCxFCsmfFYET5K+UdXSA0R7TeZZZf5MRs6JS0pmswDosRBCT7y0tPYVP1q44IMPagffB2yTzTmPunXq1NX/8AblH3ZlGjb/zQxsu78xWpzrhQALo3RuecMwIplUImWk3jGLvmnzyIZk63smpVDGuIb+k8IVXisyY7QlNScOX+l1RioryXzVAHmus6PnzHx0= root@server

>> tnode3 <<
ssh-rsa AAAAB3NzaC1yc2EAAAADAQABAAABgQCiCpS0ayE9kRt6QRQaLE8wekw1siv2WzX2COd8hoglpxGnOUm0thLVQO1pha6BZVluSuavxTOvkjq15ldNsPD5I88MxOPD/MDOHj/YO6O08jCtb9m7TvWPaex5p/xcOi3wK7zW4WbTklgtp5gMGTqHHk9fWdbd0KpXP0FF5ZFKvKyLj/JpjtgIdSezBm1ldjw35JMV4urahGJ6k4cr0wNid6VgO7mNqILRPqwkuDyTEbKUjgCwz0zMb81KHkYSYrJ1rhlYGF+3bWlV8o5mYcDtqwGS6UvnBACP95sQglGyv8znQEI71DPMLLtB3WVDcB4BzCxFCsmfFYET5K+UdXSA0R7TeZZZf5MRs6JS0pmswDosRBCT7y0tPYVP1q44IMPagffB2yTzTmPunXq1NX/8AblH3ZlGjb/zQxsu78xWpzrhQALo3RuecMwIplUImWk3jGLvmnzyIZk63smpVDGuIb+k8IVXisyY7QlNScOX+l1RioryXzVAHmus6PnzHx0= root@server

# SSH 접속 테스트
for i in {1..3}; do echo ">> tnode$i <<"; ssh tnode$i hostname; echo; done
##실행 결과

>> tnode1 <<
tnode1

>> tnode2 <<
tnode2

>> tnode3 <<
tnode3
# Python 확인
for i in {1..3}; do echo ">> tnode$i <<"; ssh tnode$i python3 -V; echo; done

##실행 결과

>> tnode1 <<
Python 3.12.3

>> tnode2 <<
Python 3.12.3

>> tnode3 <<
Python 3.9.21
VSCode Remote-SSH 개발 환경 구성
로컬 IDE에서 원격 서버로 접속하여 편리하게 개발 작업을 수행한다. VSCode의 Remote-SSH 익스텐션을 활용하면 로컬처럼 원격 서버의 파일을 편집하고 터미널을 사용할 수 있다.
Remote-SSH 설정 개요
이 작업은 로컬 개발 환경(VSCode)과 원격 Ansible Server를 SSH로 연결하여, 마치 로컬에서 작업하는 것처럼 원격 서버의 파일을 편집하고 명령을 실행할 수 있게 해준다. 특히 실습 환경에서는 root 계정으로 작업하므로 권한 문제 없이 모든 설정을 자유롭게 수정할 수 있다.
익스텐션 설치 및 SSH 설정
1. Remote Development 익스텐션 설치
VSCode에서 Extensions 검색창에 "remote development"를 입력하고 Remote-SSH 익스텐션을 설치한다.
2. SSH Config 파일 설정
Ctrl(mac은 cmd) + Shift + P를 눌러 명령 팔레트를 열고 "Remote-SSH: Open Config..."를 선택한다. 자신의 SSH Config 파일 경로를 선택한다. 일반적으로 ~/.ssh/config 경로다.
다음 내용을 추가한다:
# Read more about SSH config files: https://linux.die.net/man/5/ssh_config
Host ansible-server
    HostName 10.10.1.10
    User root
이 설정은 다음을 의미한다:
Host ansible-server: VSCode에서 표시될 연결 이름HostName 10.10.1.10: 실제 접속할 서버 IP 주소User root: 접속에 사용할 계정 (보안상 권장하지 않지만 실습 환경에서는 편의를 위해 root 사용)
3. 원격 서버 연결
Ctrl + Shift + P를 눌러 "Remote-SSH: Connect..." 명령을 실행하고 ansible-server를 선택한다. 암호는 qwe123을 입력한다.
4. 작업 폴더 열기
신규 창에서 최초 Open Folder 버튼을 누르고 /root/my-ansible 폴더에서 OK를 눌러준다. 이 폴더가 앞으로 Ansible 실습을 진행할 작업 디렉토리가 된다.
5. 터미널 및 파일 작업
터미널에서 신규 터미널을 클릭해서 하단 부에 터미널 창을 연다. 이제 VSCode 내에서 직접 서버의 터미널을 사용할 수 있다.
VSCode 터미널에서 기본 정보를 확인한다:
# 계정 정보 등 확인
whoami
id
pwd
tree
VSCode 자동 저장 설정
파일 수정 시마다 수동으로 저장하는 번거로움을 없애기 위해 자동 저장 기능을 활성화한다.
6. Auto Save 설정
VSCode에서 자동 저장 설정을 변경한다: ( cmd + , )
- 설정 → 'auto save' 검색 →
afterDelay선택 - Auto Save Delay:
1000ms(1초)로 설정
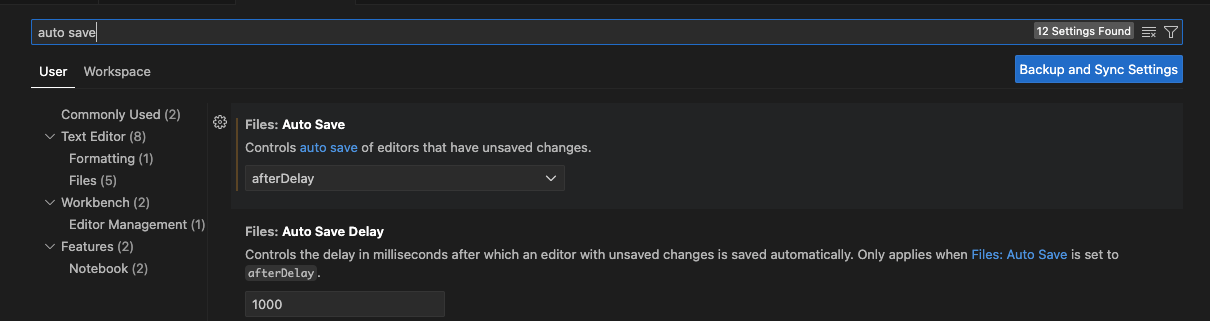
이렇게 설정하면 파일 수정 후 1초가 지나면 자동으로 저장된다. 실습 중 저장을 깜빡해서 발생하는 실수를 방지할 수 있다.
Remote-SSH 작업 흐름 요약
로컬 VSCode
    ↓ (SSH 연결)
Ansible Server (10.10.1.10)
    ↓ (작업 디렉토리)
/root/my-ansible
    ↓ (파일 편집 & 터미널 명령)
실시간 동기화 및 실행
이제 로컬 IDE의 편리함을 그대로 유지하면서 원격 서버에서 작업할 수 있다. 파일 탐색, 편집, 터미널 명령 실행이 모두 하나의 통합 환경에서 가능하다.
주의사항
- 실습 환경에서는 편의를 위해 root 계정을 사용하지만, 실제 운영 환경에서는 일반 계정 사용 후 sudo 권한을 부여하는 것이 보안상 권장된다.
- SSH Config 파일의 암호는 평문으로 저장되지 않는다. 연결 시마다 입력하거나 SSH 키 기반 인증을 설정할 수 있다.
- Auto Save 기능은 편리하지만, 중요한 설정 파일 수정 시에는 변경 내용을 신중하게 확인한 후 저장되도록 주의한다.
호스트 선정
- ansible이 수행할 때 동작대상 서버(호스트)를 지정하는 방식이 많다.
- 이를 인벤토리라고하는 방식으로 구성한다.
- Ansible로 인프라를 관리할 때 가장 먼저 작성하는 파일이 인벤토리다.
- 인벤토리는 Ansible이 자동화 작업을 수행할 대상 호스트 목록을 정의하는 텍스트 파일이다.
- 인벤토리는 Ansible이 동작 수행 서버 대상들과 규칙(범위 지정)들의 모음이라고도 볼 수 있다.
기본 인벤토리 작성법
IP 주소 방식
가장 단순한 형태다. 관리 대상 호스트의 IP를 나열하면 된다.
# inventory 파일 생성
cat <<EOT > inventory
10.10.1.11
10.10.1.12
10.10.1.13
EOT

# inventory 검증
ansible-inventory -i ./inventory --list | jq

##실행 결과
{
  "_meta": {
    "hostvars": {},
    "profile": "inventory_legacy"
  },
  "all": {
    "children": [
      "ungrouped"
    ]
  },
  "ungrouped": {
    "hosts": [
      "10.10.1.11",
      "10.10.1.12",
      "10.10.1.13"
    ]
  }
}
호스트명 방식
DNS나 /etc/hosts에 등록된 호스트명을 사용할 수 있다.
# /etc/hosts 파일 확인
cat /etc/hosts

# inventory 파일 생성
cat <<EOT > inventory
tnode1
tnode2
tnode3
EOT

# inventory 검증
ansible-inventory -i ./inventory --list | jq
그룹 기반 인벤토리 구성
기본 그룹 설정
호스트를 역할별로 그룹화하면 플레이북 실행 시 특정 그룹만 선택해서 작업할 수 있다.
[webservers]
web1.example.com
web2.example.com

[db-servers]
db01.example.com
db02.example.com
그룹명은 대괄호 [] 안에 작성하고, 해당 그룹에 속하는 호스트를 한 줄씩 나열한다.
다중 그룹 소속
하나의 호스트가 여러 그룹에 속할 수 있다. 이렇게 하면 역할, 위치, 환경(개발/운영) 등 다양한 기준으로 호스트를 분류할 수 있다.
[webservers]
web1.example.com
web2.example.com
192.0.2.42

[db-servers]
db01.example.com
db02.example.com

[east-datacenter]
web1.example.com
db01.example.com

[west-datacenter]
web2.example.com
db02.example.com

[production]
web1.example.com
web2.example.com
db01.example.com
db02.example.com

[development]
192.0.2.42
중첩 그룹 정의
기존 그룹을 묶어서 상위 그룹을 만들 수 있다. 그룹명 뒤에 :children 접미사를 붙이면 된다.
[webservers]
web1.example.com
web2.example.com

[db-servers]
db01.example.com
db02.example.com

[datacenter:children]
webservers
db-servers
이렇게 하면 datacenter 그룹으로 플레이북을 실행하면 webservers와 db-servers의 모든 호스트가 대상이 된다.
범위 지정으로 간소화
반복되는 패턴의 호스트는 범위 [start:end] 문법으로 간단히 표현한다.
숫자 범위
[webservers]
web[1:2].example.com

[db-servers]
db[01:02].example.comweb[1:2].example.com→ web1.example.com, web2.example.comdb[01:02].example.com→ db01.example.com, db02.example.com
다양한 범위 활용
# IP 범위: 192.168.4.0 ~ 192.168.4.255
[defaults]
192.168.4.[0:255]

# 호스트명 범위: com01.example.com ~ com20.example.com
[compute]
com[01:20].example.com

# 영문 범위: a.dns.example.com, b.dns.example.com, c.dns.example.com
[dns]
[a:c].dns.example.com

# IPv6 범위: 2001:db8::a ~ 2001:db8::f
[ipv6]
2001:db8::[a:f]
Kubespray 인벤토리 실전 예시
Kubespray는 Ansible 기반 Kubernetes 배포 도구다. 실무에서 사용하는 인벤토리 구성 예시를 살펴본다.
실제 구성 예시
[all]
master01 ansible_host=192.168.10.10 ip=192.168.10.10 ansible_user=root
worker01 ansible_host=192.168.10.11 ip=192.168.10.11 ansible_user=root
worker02 ansible_host=192.168.10.12 ip=192.168.10.12 ansible_user=root

[kube_control_plane]
master01

[etcd]
master01

[kube_node]
worker01
worker02

[k8s_cluster:children]
kube_control_plane
kube_node
주요 변수 설명:
ansible_host: Ansible이 SSH 접속할 실제 IP 주소ip: Kubernetes 내부 통신에 사용할 IP 주소 (CNI 구성용)ansible_user: SSH 접속 계정
관리 네트워크와 서비스 네트워크를 분리할 때 ansible_host와 ip를 다르게 설정한다.
템플릿 형태
Kubespray 공식 샘플은 주석 처리된 템플릿 형태로 제공된다.
[kube_control_plane]
# node1 ansible_host=95.54.0.12  # ip=10.3.0.1 etcd_member_name=etcd1
# node2 ansible_host=95.54.0.13  # ip=10.3.0.2 etcd_member_name=etcd2
# node3 ansible_host=95.54.0.14  # ip=10.3.0.3 etcd_member_name=etcd3

[etcd:children]
kube_control_plane

[kube_node]
# node4 ansible_host=95.54.0.15  # ip=10.3.0.4
# node5 ansible_host=95.54.0.16  # ip=10.3.0.5
# node6 ansible_host=95.54.0.17  # ip=10.3.0.6
실제 사용 시 주석을 제거하고 환경에 맞게 수정한다.
실습용 인벤토리 구성
그룹 구조 만들기
# inventory 그룹 구성
cat <<EOT > inventory
[web]
tnode1
tnode2

[db]
tnode3

[all:children]
web
db
EOT

# inventory 검증
ansible-inventory -i ./inventory --list | jq

##t

{
  "_meta": {
    "hostvars": {},
    "profile": "inventory_legacy"
  },
  "all": {
    "children": [
      "ungrouped",
      "web",
      "db"
    ]
  },
  "db": {
    "hosts": [
      "tnode3"
    ]
  },
  "web": {
    "hosts": [
      "tnode1",
      "tnode2"
    ]
  }
}


ansible-inventory -i ./inventory --graph
##
@all:
  |--@ungrouped:
  |--@web:
  |  |--tnode1
  |  |--tnode2
  |--@db:
  |  |--tnode3
--list 옵션은 JSON 형태로 전체 호스트 정보를 보여주고, --graph 옵션은 트리 구조로 그룹 계층을 시각화한다.
Ansible Config 설정
ansible.cfg 파일 생성
프로젝트 디렉터리에 ansible.cfg 파일을 만들면 -i 옵션 없이 인벤토리를 자동 인식한다.
# ansible.cfg 파일 생성
cat <<EOT > ansible.cfg
[defaults]
inventory = ./inventory
EOT

# inventory 목록 확인 (-i 옵션 불필요)
ansible-inventory --list | jq
Config 적용 우선순위
Ansible은 다음 순서로 설정 파일을 찾는다. 먼저 발견된 파일이 적용된다.
ANSIBLE_CONFIG환경변수./ansible.cfg(현재 디렉터리)~/.ansible.cfg(홈 디렉터리)/etc/ansible/ansible.cfg(시스템 전역)
# 설정 우선순위 확인
echo $ANSIBLE_CONFIG
cat $PWD/ansible.cfg    # Kubespray 실행 시 디렉터리 위치가 중요한 이유
ls ~/.ansible.cfg
tree ~/.ansible
cat /etc/ansible/ansible.cfg

# 현재 적용된 설정 확인
ansible-config dump     # 모든 설정값 출력
ansible-config list     # 설정 가능한 모든 옵션 나열
Kubespray 실행 시 주의사항:
Kubespray는 ./ansible.cfg를 사용한다. 따라서 Kubespray 디렉터리에서 명령을 실행해야 올바른 인벤토리가 인식된다.
실무 팁
환경별 인벤토리 분리
inventory/
├── dev/
│   └── hosts.ini
├── staging/
│   └── hosts.ini
└── production/
    └── hosts.ini
각 환경마다 ansible.cfg에서 다른 인벤토리 경로를 지정하거나, 실행 시 -i 옵션으로 명시한다.
인벤토리 검증 습관화
# 그래프로 구조 확인
ansible-inventory --graph

# 특정 그룹만 확인
ansible-inventory --graph web

# JSON으로 상세 정보 확인
ansible-inventory --list | jq
플레이북 기본
첫 번째 플레이북
first-playbook.yml:
---
- hosts: all
  tasks:
    - name: Print message
      debug:
        msg: Hello CloudNet@ Ansible Study
문법 체크
ansible-playbook --syntax-check first-playbook.yml실행
ansible-playbook first-playbook.yml서비스 재시작 플레이북
restart-service.yml:
---
- hosts: all
  tasks:
    - name: Restart sshd service
      ansible.builtin.service:
        name: ssh  # Debian/Ubuntu
        state: restarted
실행:
# 미리보기 (실제 실행 안 함)
ansible-playbook --check restart-service.yml

# 실제 실행
ansible-playbook restart-service.yml
OS별 조건 분리
---
- hosts: all
  tasks:
    - name: Restart SSH on Debian
      ansible.builtin.service:
        name: ssh
        state: restarted
      when: ansible_facts['os_family'] == 'Debian'

    - name: Restart SSH on RedHat
      ansible.builtin.service:
        name: sshd
        state: restarted
      when: ansible_facts['os_family'] == 'RedHat'
변수
그룹 변수 (inventory 파일)
[all:vars]
user=ansible
호스트 변수 (inventory 파일)
[db]
tnode3 ansible_python_interpreter=/usr/bin/python3 user=ansible1
플레이 변수 (playbook)
create-user2.yml:
---
- hosts: all
  vars:
    user: ansible2

  tasks:
    - name: Create User {{ user }}
      ansible.builtin.user:
        name: "{{ user }}"
        state: present
별도 파일로 분리
vars/users.yml:
user: ansible3create-user3.yml:
---
- hosts: all
  vars_files:
    - vars/users.yml

  tasks:
    - name: Create User {{ user }}
      ansible.builtin.user:
        name: "{{ user }}"
        state: present
추가 변수 (실행 시)
ansible-playbook -e user=ansible4 create-user3.yml변수 우선순위 (낮음 → 높음)
1. 그룹 변수
2. 호스트 변수
3. 플레이 변수
4. 추가 변수 ← 가장 높음
작업 변수 (register)
create-user4.yml:
---
- hosts: db
  tasks:
    - name: Create User {{ user }}
      ansible.builtin.user:
        name: "{{ user }}"
        state: present
      register: result

    - ansible.builtin.debug:
        var: result
Facts
관리 노드에서 자동으로 수집되는 시스템 정보다.
전체 Facts 확인
facts.yml:
---
- hosts: db

  tasks:
    - name: Print all facts
      ansible.builtin.debug:
        var: ansible_facts
특정 Facts 사용
facts1.yml:
---
- hosts: db

  tasks:
    - name: Print all facts
      ansible.builtin.debug:
        msg: >
          The default IPv4 address of {{ ansible_facts.hostname }}
          is {{ ansible_facts.default_ipv4.address }}
주요 Facts
| Facts | 설명 |
|---|---|
| ansible_facts.hostname | 호스트명 |
| ansible_facts.fqdn | 도메인 포함 호스트명 |
| ansible_facts.default_ipv4.address | 기본 IPv4 주소 |
| ansible_facts.interfaces | 네트워크 인터페이스 목록 |
| ansible_facts.kernel | 커널 버전 |
| ansible_facts.distribution | OS 종류 |
| ansible_facts.os_family | OS 계열 (Debian, RedHat 등) |
구 표기법 (비권장)
# 새 표기법 (권장)
{{ ansible_facts.hostname }}

# 구 표기법 (비권장, 변수 충돌 위험)
{{ ansible_hostname }}
Facts 수집 비활성화
---
- hosts: db
  gather_facts: no

  tasks:
    - name: Print message
      debug:
        msg: Hello Ansible World
수동 Facts 수집
---
- hosts: db
  gather_facts: no

  tasks:
    - name: Manually gather facts
      ansible.builtin.setup:

    - name: Print all facts
      ansible.builtin.debug:
        msg: >
          The default IPv4 address of {{ ansible_facts.hostname }}
          is {{ ansible_facts.default_ipv4.address }}
Facts 캐싱
ansible.cfg:
[defaults]
inventory = ./inventory
remote_user = root
ask_pass = false
gathering = smart
fact_caching = jsonfile
fact_caching_connection = myfacts
반복문
단순 loop
check-services1.yml:
---
- hosts: all
  tasks:
    - name: Check services
      ansible.builtin.service:
        name: "{{ item }}"
        state: started
      loop:
        - ssh
        - rsyslog
변수로 loop
check-services2.yml:
---
- hosts: all
  vars:
    services:
      - ssh
      - rsyslog

  tasks:
    - name: Check services
      ansible.builtin.service:
        name: "{{ item }}"
        state: started
      loop: "{{ services }}"
사전 목록 loop
make-file.yml:
---
- hosts: all

  tasks:
    - name: Create files
      ansible.builtin.file:
        path: "{{ item['log-path'] }}"
        mode: "{{ item['log-mode'] }}"
        state: touch
      loop:
        - log-path: /var/log/test1.log
          log-mode: '0644'
        - log-path: /var/log/test2.log
          log-mode: '0600'
loop과 register
loop_register.yml:
---
- hosts: localhost
  tasks:
    - name: Loop echo test
      ansible.builtin.shell: "echo 'I can speak {{ item }}'"
      loop:
        - Korean
        - English
      register: result

    - name: Show result
      ansible.builtin.debug:
var: resultloop_register1.yml:
---
- hosts: localhost
  tasks:
    - name: Loop echo test
      ansible.builtin.shell: "echo 'I can speak {{ item }}'"
      loop:
        - Korean
        - English
      register: result

    - name: Show result
      ansible.builtin.debug:
        msg: "Stdout: {{ item.stdout }}"
      loop: "{{ result.results }}"
조건문
기본 when
when_task.yml:
---
- hosts: localhost
  vars:
    run_my_task: true

  tasks:
    - name: echo message
      ansible.builtin.shell: "echo test"
      when: run_my_task
      register: result

    - name: Show result
      ansible.builtin.debug:
        var: result
조건 연산자
| 연산자 | 설명 |
|---|---|
| == | 같음 |
| != | 같지 않음 |
| >, >=, <, <= | 크다, 이상, 작다, 이하 |
| in | 포함됨 |
| is defined | 변수가 정의됨 |
| is not defined | 변수가 정의되지 않음 |
| not | 부정 |
| and, or | 그리고, 또는 |
OS 종류로 조건 분기
check-os.yml:
---
- hosts: all
  vars:
    supported_distros:
      - Ubuntu
      - CentOS

  tasks:
    - name: Print supported os
      ansible.builtin.debug:
        msg: "This {{ ansible_facts['distribution'] }} need to use apt"
      when: ansible_facts['distribution'] in supported_distros
or 조건
check-os1.yml:
---
- hosts: all

  tasks:
    - name: Print os type
      ansible.builtin.debug:
        msg: "OS Type {{ ansible_facts['distribution'] }}"
      when: ansible_facts['distribution'] == "CentOS" or ansible_facts['distribution'] == "Ubuntu"
and 조건 (방법1)
check-os2.yml:
---
- hosts: all

  tasks:
    - name: Print os type
      ansible.builtin.debug:
        msg: >-
             OS Type: {{ ansible_facts['distribution'] }}
             OS Version: {{ ansible_facts['distribution_version'] }}
      when: ansible_facts['distribution'] == "Ubuntu" and ansible_facts['distribution_version'] == "24.04"
and 조건 (방법2 - 리스트)
check-os3.yml:
---
- hosts: all

  tasks:
    - name: Print os type
      ansible.builtin.debug:
        msg: >-
             OS Type: {{ ansible_facts['distribution'] }}
             OS Version: {{ ansible_facts['distribution_version'] }}
      when:
        - ansible_facts['distribution'] == "Ubuntu"
        - ansible_facts['distribution_version'] == "24.04"
and + or 조합
check-os4.yml:
---
- hosts: all

  tasks:
    - name: Print os type
      ansible.builtin.debug:
        msg: >-
             OS Type: {{ ansible_facts['distribution'] }}
             OS Version: {{ ansible_facts['distribution_version'] }}
      when: >
          ( ansible_facts['distribution'] == "Rocky" and
            ansible_facts['distribution_version'] == "9.6" )
          or
          ( ansible_facts['distribution'] == "Ubuntu" and
            ansible_facts['distribution_version'] == "24.04" )
loop + when
check-mount.yml:
---
- hosts: db
  tasks:
    - name: Print Root Directory Size
      ansible.builtin.debug:
        msg: "Directory {{ item.mount }} size is {{ item.size_available }}"
      loop: "{{ ansible_facts['mounts'] }}"
      when: item['mount'] == "/" and item['size_available'] > 300000000
register + when
register-when.yml:
---
- hosts: all

  tasks:
    - name: Get rsyslog service status
      ansible.builtin.command: systemctl is-active rsyslog
      register: result

    - name: Print rsyslog status
      ansible.builtin.debug:
        msg: "Rsyslog status is {{ result.stdout }}"
      when: result.stdout == "active"
핸들러
변경이 발생했을 때만 실행되는 특별한 작업이다.
기본 핸들러
handler-sample.yml:
---
- hosts: tnode2
  tasks:
    - name: restart rsyslog
      ansible.builtin.service:
        name: "rsyslog"
        state: restarted
      notify:
        - print msg

  handlers:
    - name: print msg
      ansible.builtin.debug:
        msg: "rsyslog is restarted"
핸들러는 다음 경우에만 실행된다:
- notify로 호출되었을 때
- 해당 작업이 changed 상태일 때
같은 플레이북을 두 번 실행하면:
- 첫 번째: 서비스 재시작 → changed → 핸들러 실행
- 두 번째: 이미 재시작됨 → ok → 핸들러 실행 안 됨 (멱등성)
오류 처리
실패 무시
ignore-example-2.yml:
---
- hosts: tnode1

  tasks:
    - name: Install apache3
      ansible.builtin.apt:
        name: apache3
        state: latest
      ignore_errors: yes

    - name: Print msg
      ansible.builtin.debug:
        msg: "Before task is ignored"
실패 후 핸들러 강제 실행
force-handler-2.yml:
---
- hosts: tnode2
  force_handlers: yes

  tasks:
    - name: restart rsyslog
      ansible.builtin.service:
        name: "rsyslog"
        state: restarted
      notify:
        - print msg

    - name: install apache3
      ansible.builtin.apt:
        name: "apache3"
        state: latest

  handlers:
    - name: print msg
      ansible.builtin.debug:
        msg: "rsyslog is restarted"
failed_when으로 실패 조건 지정
failed-when-2.yml:
---
- hosts: tnode1

  tasks:
    - name: Run user add script
      ansible.builtin.shell: /root/adduser-script.sh
      register: command_result
      failed_when: "'Please input user id and password' in command_result.stdout"

    - name: Print msg
      ansible.builtin.debug:
        msg: "{{ command_result.stdout }}"
Block으로 오류 처리
block-example.yml:
---
- hosts: tnode2
  vars:
    logdir: /var/log/daily_log
    logfile: todays.log

  tasks:
    - name: Configure Log Env
      block:
        - name: Find Directory
          ansible.builtin.find:
            paths: "{{ logdir }}"
          register: result
          failed_when: "'Not all paths' in result.msg"

      rescue:
        - name: Make Directory when Not found Directory
          ansible.builtin.file:
            path: "{{ logdir }}"
            state: directory
            mode: '0755'

      always:
        - name: Create File
          ansible.builtin.file:
            path: "{{ logdir }}/{{ logfile }}"
            state: touch
mode: '0644'- block: 기본 작업
- rescue: block 실패 시 실행
- always: 성공/실패 관계없이 항상 실행
롤 구조
롤은 플레이북을 기능 단위로 나누어 재사용하는 구조다.
롤 생성
ansible-galaxy role init my-role디렉터리 구조
my-role/
├── defaults/       # 기본 변수 (덮어쓰기 가능, 우선순위 낮음)
│   └── main.yml
├── vars/           # 변수 (덮어쓰기 불가, 우선순위 높음)
│   └── main.yml
├── tasks/          # 메인 작업
│   └── main.yml
├── handlers/       # 핸들러
│   └── main.yml
├── files/          # 정적 파일
├── templates/      # Jinja2 템플릿
├── meta/           # 롤 메타데이터
│   └── main.yml
└── tests/          # 테스트
    ├── inventory
    └── test.yml
롤 작성 예시
my-role/tasks/main.yml:
---
- name: install service {{ service_title }}
  ansible.builtin.apt:
    name: "{{ item }}"
    state: latest
  loop: "{{ httpd_packages }}"
  when: ansible_facts.distribution in supported_distros

- name: copy conf file
  ansible.builtin.copy:
    src: "{{ src_file_path }}"
    dest: "{{ dest_file_path }}"
  notify:
- restart servicemy-role/handlers/main.yml:
---
- name: restart service
  ansible.builtin.service:
    name: "{{ service_name }}"
state: restartedmy-role/defaults/main.yml:
service_title: "Apache Web Server"my-role/vars/main.yml:
---
service_name: apache2
src_file_path: ../files/index.html
dest_file_path: /var/www/html
httpd_packages:
  - apache2
  - apache2-doc

supported_distros:
- Ubuntumy-role/files/index.html:
Hello! Ansible플레이북에서 롤 사용
방법1 - import_role:
---
- hosts: tnode1

  tasks:
    - name: Print start play
      ansible.builtin.debug:
        msg: "Let's start role play"

    - name: Install Service by role
      ansible.builtin.import_role:
        name: my-role
방법2 - roles 섹션:
---
- hosts: tnode1

  roles:
    - my-role
방법3 - 변수와 함께:
---
- hosts: tnode1

  roles:
    - role: my-role
      service_title: "Httpd Web"
특수 작업 섹션
---
- hosts: tnode1

  pre_tasks:
    - name: Print Start role
      ansible.builtin.debug:
        msg: "Let's start role play"

  roles:
    - role: my-role

  tasks:
    - name: Curl test
      ansible.builtin.uri:
        url: http://tnode1
        return_content: true
      register: curl_result
      notify: Print result
      changed_when: true

  post_tasks:
    - name: Print Finish role
      ansible.builtin.debug:
        msg: "Finish role play"

  handlers:
    - name: Print result
      ansible.builtin.debug:
        msg: "{{ curl_result.content }}"
실행 순서:
1. pre_tasks
2. roles
3. tasks
4. handlers (notify된 경우)
5. post_tasks
Tags
특정 작업만 선택적으로 실행한다.
기본 사용
tags1.yml:
---
- hosts: web
  tasks:
    - name: Install the servers
      ansible.builtin.apt:
       name:
         - htop
       state: present
      tags:
        - packages

    - name: Restart the service
      ansible.builtin.service:
        name: rsyslog
        state: restarted
      tags:
        - service
실행 방법
# 태그 목록 확인
ansible-playbook tags1.yml --list-tags

# 특정 태그만 실행
ansible-playbook tags1.yml --tags "packages"

# 특정 태그 제외
ansible-playbook tags1.yml --skip-tags "packages"

# 태그가 있는 작업만 실행
ansible-playbook tags1.yml --tags tagged

# 태그가 없는 작업만 실행
ansible-playbook tags1.yml --tags untagged

# 작업 목록 미리보기
ansible-playbook tags1.yml --tags "packages" --list-tasks
특수 태그
always: 항상 실행 (--skip-tags always로 제외 가능)never: 명시적으로 지정하지 않으면 실행 안 됨tagged: 태그가 하나 이상 있는 작업untagged: 태그가 없는 작업all: 모든 작업
Block에 태그
---
- hosts: all
  tasks:
    - name: ntp tasks
      tags: ntp
      block:
        - name: Install ntp
          ansible.builtin.yum:
            name: ntp
            state: present

        - name: Configure ntp
          ansible.builtin.template:
            src: ntp.conf.j2
            dest: /etc/ntp.conf
Role에 태그
---
- hosts: webservers
  roles:
    - role: foo
      tags:
        - bar
        - baz
Ansible Galaxy
공개 롤 저장소다.
롤 검색
ansible-galaxy role search postgresql --platforms Ubuntu롤 정보 확인
ansible-galaxy role info geerlingguy.postgresql롤 설치
# roles 디렉터리에 설치
ansible-galaxy role install -p roles geerlingguy.postgresql

# 설치 확인
ansible-galaxy role list -p roles
tree roles
ansible.cfg에 롤 경로 설정
[defaults]
inventory = ./inventory
remote_user = root
ask_pass = false
roles_path = ./roles
설치한 롤 사용
role-galaxy.yml:
---
- hosts: tnode1

  roles:
    - geerlingguy.postgresql
ansible-playbook role-galaxy.yml롤 삭제
ansible-galaxy role remove geerlingguy.postgresql