Kubernetes 교육 2일차 - Pod 및 워크로드
📋 교육 목표
- Pod의 개념과 생명주기 이해
- YAML 구조 및 작성법 학습
- 단일/멀티 컨테이너 Pod 배포 실습
- 워크로드 리소스의 이해와 활용
🎯 1. Pod 개념 및 특징
1.1 Pod란?
- Kubernetes의 최소 배포 단위
- 하나 이상의 컨테이너를 포함하는 논리적 그룹
- 같은 Pod 내 컨테이너들은 네트워크와 스토리지를 공유
1.2 Pod의 주요 특징
┌─────────────────────────────┐
│           Pod               │
│  ┌─────────┐ ┌─────────┐   │
│  │Container│ │Container│   │
│  │    A    │ │    B    │   │
│  └─────────┘ └─────────┘   │
│                             │
│  공유: IP, Volume, Namespace │
└─────────────────────────────┘
핵심 특징:
- Ephemeral(임시성): Pod는 일시적이며 언제든 삭제/재생성 가능
- Unique IP: 각 Pod는 고유한 IP 주소를 가짐
- Shared Storage: 같은 Pod 내 컨테이너는 볼륨 공유
- Shared Network: localhost로 서로 통신 가능
1.3 Pod 사용 시나리오
- 단일 컨테이너 Pod (가장 일반적)
- 멀티 컨테이너 Pod
- Sidecar 패턴: 로그 수집, 프록시
- Ambassador 패턴: 외부 서비스 연결
- Adapter 패턴: 데이터 변환
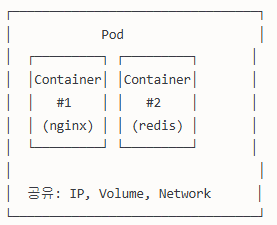
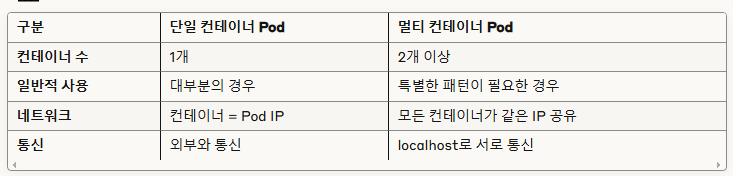
🔍 멀티 컨테이너 Pod의 개념
📊 단일 vs 멀티 컨테이너 비교
⏰ 2. Pod 생명주기 (Life Cycle)
2.1 Pod Phase (단계)
Pending → Running → Succeeded/Failed| Phase | 설명 |
|---|---|
| Pending | Pod가 생성되었지만 아직 스케줄링되지 않음 |
| Running | Pod가 노드에 스케줄되고 최소 1개 컨테이너가 실행 중 |
| Succeeded | 모든 컨테이너가 성공적으로 종료 |
| Failed | 모든 컨테이너가 종료되었고, 최소 1개가 실패 |
| Unknown | Pod 상태를 확인할 수 없음 |
2.2 Container States (컨테이너 상태)
# 컨테이너 상태 확인
kubectl describe pod <pod-name>
3가지 상태:
- Waiting: 시작 대기 중 (이미지 다운로드, 시크릿 대기 등)
- Running: 정상 실행 중
- Terminated: 실행 완료 또는 실패로 종료
2.3 Pod 조건 (Conditions)
- PodScheduled: Pod가 노드에 스케줄됨
- ContainersReady: 모든 컨테이너가 Ready 상태
- Initialized: 모든 Init Container가 완료
- Ready: Pod가 트래픽을 받을 준비 완료
2.4 실습: Pod 생명주기 관찰
# Pod 생성 및 상태 관찰
kubectl run lifecycle-demo --image=nginx:1.20
kubectl get pods -w lifecycle-demo

# 상세 정보 확인
kubectl describe pod lifecycle-demo

# 로그 확인
kubectl logs lifecycle-demo

# Pod 삭제
kubectl delete pod lifecycle-demo
📝 3. YAML 구조 및 작성법 (60분)
3.1 Kubernetes YAML 기본 구조
apiVersion: v1        # API 버전
kind: Pod            # 리소스 종류
metadata:            # 메타데이터
  name: my-pod
  labels:
    app: web
spec:                # 스펙 정의
  containers:
  - name: nginx
    image: nginx:1.20
status:              # 상태 (시스템이 관리)
3.2 필수 필드 설명
apiVersion
# 각 리소스별 API 버전
Pod: v1
Deployment: apps/v1
Service: v1
ConfigMap: v1
metadata
metadata:
  name: my-pod              # 필수: 리소스 이름
  namespace: default        # 네임스페이스
  labels:                   # 라벨 (key-value)
    app: web
    version: "1.0"
  annotations:              # 주석
    description: "My web server"
spec (Pod 기준)
spec:
  containers:               # 컨테이너 목록
  - name: web              # 컨테이너 이름
    image: nginx:1.20      # 이미지
    ports:                 # 포트 설정
    - containerPort: 80
    env:                   # 환경변수
    - name: ENV_VAR
      value: "production"
    resources:             # 리소스 제한
      requests:
        memory: "64Mi"
        cpu: "250m"
      limits:
        memory: "128Mi"
        cpu: "500m"
3.3 YAML 작성 Best Practices
- 들여쓰기: 2칸 공백 사용 (탭 사용 금지)
- 명명규칙: 소문자, 하이픈(-) 사용
- 라벨 활용: 리소스 관리를 위한 의미있는 라벨
- 리소스 제한: requests와 limits 설정
- 주석 활용: 복잡한 설정에 설명 추가
3.4 실습: YAML 파일 작성 및 검증
# YAML 파일 문법 검증
kubectl apply --dry-run=client -f pod.yaml

# 실제 적용 전 서버 검증
kubectl apply --dry-run=server -f pod.yaml

# YAML 파일 설명
kubectl explain pod.spec.containers
🚀 4. 단일 컨테이너 Pod 배포 실습 (45분)
4.1 명령형 방식으로 Pod 생성
# 기본 Pod 생성
kubectl run simple-pod --image=nginx:1.20

# 환경변수와 함께 생성
kubectl run env-pod --image=nginx:1.20 --env="ENV=production"

# 포트 노출과 함께 생성
kubectl run web-pod --image=nginx:1.20 --port=80

# 라벨과 함께 생성
kubectl run labeled-pod --image=nginx:1.20 --labels="app=web,tier=frontend"
4.2 선언형 방식으로 Pod 생성
simple-pod.yaml
apiVersion: v1
kind: Pod
metadata:
  name: simple-nginx
  labels:
    app: web
    environment: dev
spec:
  containers:
  - name: nginx
    image: nginx:1.20
    ports:
    - containerPort: 80
      name: http
    env:
    - name: NGINX_PORT
      value: "80"
    resources:
      requests:
        memory: "64Mi"
        cpu: "100m"
      limits:
        memory: "128Mi"
        cpu: "200m"
# Pod 생성
kubectl apply -f simple-pod.yaml
# Pod 상태 확인
kubectl get pods
kubectl get pod simple-nginx -o wide
# Pod 상세 정보
kubectl describe pod simple-nginx4.3 고급 단일 컨테이너 Pod
advanced-pod.yaml
apiVersion: v1
kind: Pod
metadata:
  name: advanced-nginx
  labels:
    app: nginx
    version: v1.20
  annotations:
    description: "Advanced nginx pod with health checks"
spec:
  containers:
  - name: nginx
    image: nginx:1.20
    ports:
    - containerPort: 80
      name: http
    # 환경변수 설정
    env:
    - name: NGINX_HOST
      value: "0.0.0.0"
    - name: NGINX_PORT
      value: "80"
    # 헬스체크 설정
    livenessProbe:
      httpGet:
        path: /
        port: 80
      initialDelaySeconds: 30
      periodSeconds: 10
    readinessProbe:
      httpGet:
        path: /
        port: 80
      initialDelaySeconds: 5
      periodSeconds: 5
    # 리소스 제한
    resources:
      requests:
        memory: "64Mi"
        cpu: "100m"
      limits:
        memory: "128Mi"
        cpu: "200m"
    # 볼륨 마운트
    volumeMounts:
    - name: html-volume
      mountPath: /usr/share/nginx/html
  # 볼륨 정의
  volumes:
  - name: html-volume
    emptyDir: {}
  # 재시작 정책
  restartPolicy: Always
4.4 실습 과제
# 1. Pod 생성 및 확인
kubectl apply -f advanced-pod.yaml
kubectl get pods -l app=nginx

# 2. Pod 내부 접근
kubectl exec -it advanced-nginx -- /bin/bash
# 컨테이너 내에서 nginx 설정 확인
cat /etc/nginx/nginx.conf
exit

# 3. 로그 확인
kubectl logs advanced-nginx

# 4. 포트 포워딩으로 테스트
kubectl port-forward advanced-nginx 8080:80
# 브라우저에서 localhost:8080 접근 (새 터미널에서)
curl http://localhost:8080
🔄 5. 멀티 컨테이너 Pod 배포 실습 (60분)
5.1 Sidecar 패턴 예제
sidecar-pod.yaml
apiVersion: v1
kind: Pod
metadata:
  name: sidecar-pod
  labels:
    app: web-with-sidecar
spec:
  containers:
  # 메인 웹 서버 컨테이너
  - name: web-server
    image: nginx:1.20
    ports:
    - containerPort: 80
    volumeMounts:
    - name: shared-logs
      mountPath: /var/log/nginx

  # 로그 수집 사이드카 컨테이너
  - name: log-collector
    image: fluent/fluent-bit:1.8
    volumeMounts:
    - name: shared-logs
      mountPath: /var/log/nginx
    - name: fluent-bit-config
      mountPath: /fluent-bit/etc

  volumes:
  # 로그 공유 볼륨
  - name: shared-logs
    emptyDir: {}
  # Fluent Bit 설정
  - name: fluent-bit-config
    configMap:
      name: fluent-bit-config
5.2 Ambassador 패턴 예제
ambassador-pod.yaml
apiVersion: v1
kind: Pod
metadata:
  name: ambassador-pod
  labels:
    app: web-with-ambassador
spec:
  containers:
  # 메인 애플리케이션
  - name: web-app
    image: nginx:1.20
    ports:
    - containerPort: 80

  # Ambassador 프록시
  - name: ambassador
    image: envoyproxy/envoy:v1.18-latest
    ports:
    - containerPort: 8080
    volumeMounts:
    - name: envoy-config
      mountPath: /etc/envoy

  volumes:
  - name: envoy-config
    configMap:
      name: envoy-config
5.3 실용적인 멀티 컨테이너 예제
multi-container-pod.yaml
apiVersion: v1
kind: Pod
metadata:
  name: multi-container-app
  labels:
    app: webapp
    tier: frontend
spec:
  containers:
  # 메인 웹 애플리케이션
  - name: webapp
    image: nginx:1.20
    ports:
    - containerPort: 80
      name: web
    volumeMounts:
    - name: shared-data
      mountPath: /usr/share/nginx/html
    - name: config-volume
      mountPath: /etc/nginx/conf.d
    env:
    - name: APP_ENV
      value: "production"

  # Redis 캐시 (사이드카)
  - name: redis
    image: redis:6.2-alpine
    ports:
    - containerPort: 6379
      name: redis
    volumeMounts:
    - name: redis-data
      mountPath: /data
    command: ["redis-server"]
    args: ["--appendonly", "yes"]

  # 로그 수집기
  - name: logger
    image: busybox:1.35
    command: ["/bin/sh"]
    args:
    - -c
    - |
      while true; do
        echo "$(date): Checking application logs..." >> /var/log/app.log
        sleep 60
      done
    volumeMounts:
    - name: shared-data
      mountPath: /var/log

  volumes:
  - name: shared-data
    emptyDir: {}
  - name: redis-data
    emptyDir: {}
  - name: config-volume
    configMap:
      name: nginx-config
      optional: true

  restartPolicy: Always
5.4 Init Container 예제
init-container-pod.yaml
apiVersion: v1
kind: Pod
metadata:
  name: init-container-pod
  labels:
    app: webapp-with-init
spec:
  # Init Containers (메인 컨테이너 실행 전 실행)
  initContainers:
  - name: init-db
    image: busybox:1.35
    command: ['sh', '-c']
    args:
    - |
      echo "Initializing database..."
      sleep 10
      echo "Database initialized" > /shared/db-ready
    volumeMounts:
    - name: shared-data
      mountPath: /shared

  - name: init-config
    image: busybox:1.35
    command: ['sh', '-c']
    args:
    - |
      echo "Setting up configuration..."
      echo "server_name=webapp" > /shared/config.txt
      echo "port=8080" >> /shared/config.txt
    volumeMounts:
    - name: shared-data
      mountPath: /shared

  # 메인 컨테이너
  containers:
  - name: webapp
    image: nginx:1.20
    ports:
    - containerPort: 80
    volumeMounts:
    - name: shared-data
      mountPath: /usr/share/nginx/html
    command: ["/bin/sh"]
    args:
    - -c
    - |
      echo "<h1>WebApp Started</h1>" > /usr/share/nginx/html/index.html
      echo "<p>DB Status: $(cat /usr/share/nginx/html/db-ready)</p>" >> /usr/share/nginx/html/index.html
      echo "<p>Config: $(cat /usr/share/nginx/html/config.txt)</p>" >> /usr/share/nginx/html/index.html
      nginx -g 'daemon off;'

  volumes:
  - name: shared-data
    emptyDir: {}
5.5 멀티 컨테이너 실습
# 1. ConfigMap 생성 (nginx 설정용)
kubectl create configmap nginx-config --from-literal=default.conf="
server {
    listen 80;
    location / {
        root /usr/share/nginx/html;
        index index.html;
    }
    location /health {
        return 200 'healthy';
    }
}"

# 2. 멀티 컨테이너 Pod 생성
kubectl apply -f multi-container-pod.yaml

# 3. Pod 상태 확인
kubectl get pods multi-container-app
kubectl describe pod multi-container-app

# 4. 각 컨테이너 로그 확인
kubectl logs multi-container-app -c webapp
kubectl logs multi-container-app -c redis
kubectl logs multi-container-app -c logger

# 5. 컨테이너별 접근
kubectl exec -it multi-container-app -c webapp -- /bin/bash
kubectl exec -it multi-container-app -c redis -- redis-cli ping

# 6. Init Container 예제 실행
kubectl apply -f init-container-pod.yaml
kubectl get pods init-container-pod -w
kubectl logs init-container-pod -c init-db
kubectl logs init-container-pod -c init-config
🏭 6. 워크로드 리소스 개요 (30분)
6.1 워크로드 리소스 종류
Pod (기본) → Deployment → ReplicaSet
           → DaemonSet
           → StatefulSet
           → Job/CronJob
6.2 각 워크로드 특징
| 리소스 | 용도 | 특징 |
|---|---|---|
| Pod | 기본 단위 | 단일 인스턴스, 수동 관리 |
| Deployment | 무상태 앱 | 롤링 업데이트, 확장성 |
| ReplicaSet | Pod 복제 | 지정된 수의 Pod 유지 |
| DaemonSet | 노드별 배포 | 모든 노드에 Pod 배포 |
| StatefulSet | 상태 유지 앱 | 순서, 안정적 네트워크 ID |
| Job | 일회성 작업 | 완료까지 실행 |
| CronJob | 스케줄 작업 | 주기적 실행 |
6.3 Deployment 기본 예제
apiVersion: apps/v1
kind: Deployment
metadata:
  name: nginx-deployment
spec:
  replicas: 3
  selector:
    matchLabels:
      app: nginx
  template:
    metadata:
      labels:
        app: nginx
    spec:
      containers:
      - name: nginx
        image: nginx:1.20
        ports:
        - containerPort: 80
🛠️ 7. 실습 종합 과제 (45분)
과제 1: 웹 애플리케이션 Pod 생성
요구사항:
- nginx 웹서버 사용
- 환경변수 설정 (APP_NAME=MyApp)
- 헬스체크 설정
- 리소스 제한 설정
과제 2: 멀티 컨테이너 로깅 시스템
요구사항:
- 메인 웹서버 컨테이너
- 로그 수집 사이드카 컨테이너
- 공유 볼륨 사용
과제 3: Init Container를 활용한 애플리케이션
요구사항:
- 데이터베이스 초기화 Init Container
- 설정 파일 생성 Init Container
- 메인 애플리케이션 컨테이너
실습 해답 예시:
과제1-webapp.yaml
apiVersion: v1
kind: Pod
metadata:
  name: webapp-pod
  labels:
    app: webapp
    version: "1.0"
spec:
  containers:
  - name: webapp
    image: nginx:1.20
    ports:
    - containerPort: 80
      name: http
    env:
    - name: APP_NAME
      value: "MyApp"
    livenessProbe:
      httpGet:
        path: /
        port: 80
      initialDelaySeconds: 10
      periodSeconds: 30
    readinessProbe:
      httpGet:
        path: /
        port: 80
      initialDelaySeconds: 5
      periodSeconds: 10
    resources:
      requests:
        memory: "64Mi"
        cpu: "100m"
      limits:
        memory: "128Mi"
        cpu: "200m"
📚 8. 중요 명령어 정리
Pod 관리 명령어
# Pod 생성
kubectl run <pod-name> --image=<image>
kubectl apply -f <pod.yaml>

# Pod 조회
kubectl get pods
kubectl get pod <pod-name> -o wide
kubectl get pods -l app=web

# Pod 상세 정보
kubectl describe pod <pod-name>

# Pod 로그
kubectl logs <pod-name>
kubectl logs <pod-name> -c <container-name>  # 멀티컨테이너

# Pod 접근
kubectl exec -it <pod-name> -- /bin/bash
kubectl exec -it <pod-name> -c <container> -- /bin/bash

# 포트 포워딩
kubectl port-forward <pod-name> <local-port>:<pod-port>

# Pod 삭제
kubectl delete pod <pod-name>
kubectl delete -f <pod.yaml>
디버깅 명령어
# 이벤트 확인
kubectl get events --sort-by=.metadata.creationTimestamp

# 노드 리소스 확인
kubectl top nodes
kubectl top pods

# YAML 출력
kubectl get pod <pod-name> -o yaml
kubectl get pod <pod-name> -o json
📝 오늘의 핵심 정리
- Pod는 Kubernetes의 최소 실행 단위
- YAML 구조 이해가 Kubernetes 활용의 기본
- 멀티 컨테이너 패턴으로 복잡한 애플리케이션 구성 가능
- 워크로드 리소스로 Pod를 효율적으로 관리
- 실습을 통한 실제 경험이 중요
📖 추가 학습 자료

bytebliss