03 - Provisioning Compute Resources
- 목표 : SSH 접속 환경 설정
### 먼저 점프박스에 접속하자.
```bash
vagrant ssh jumpbox
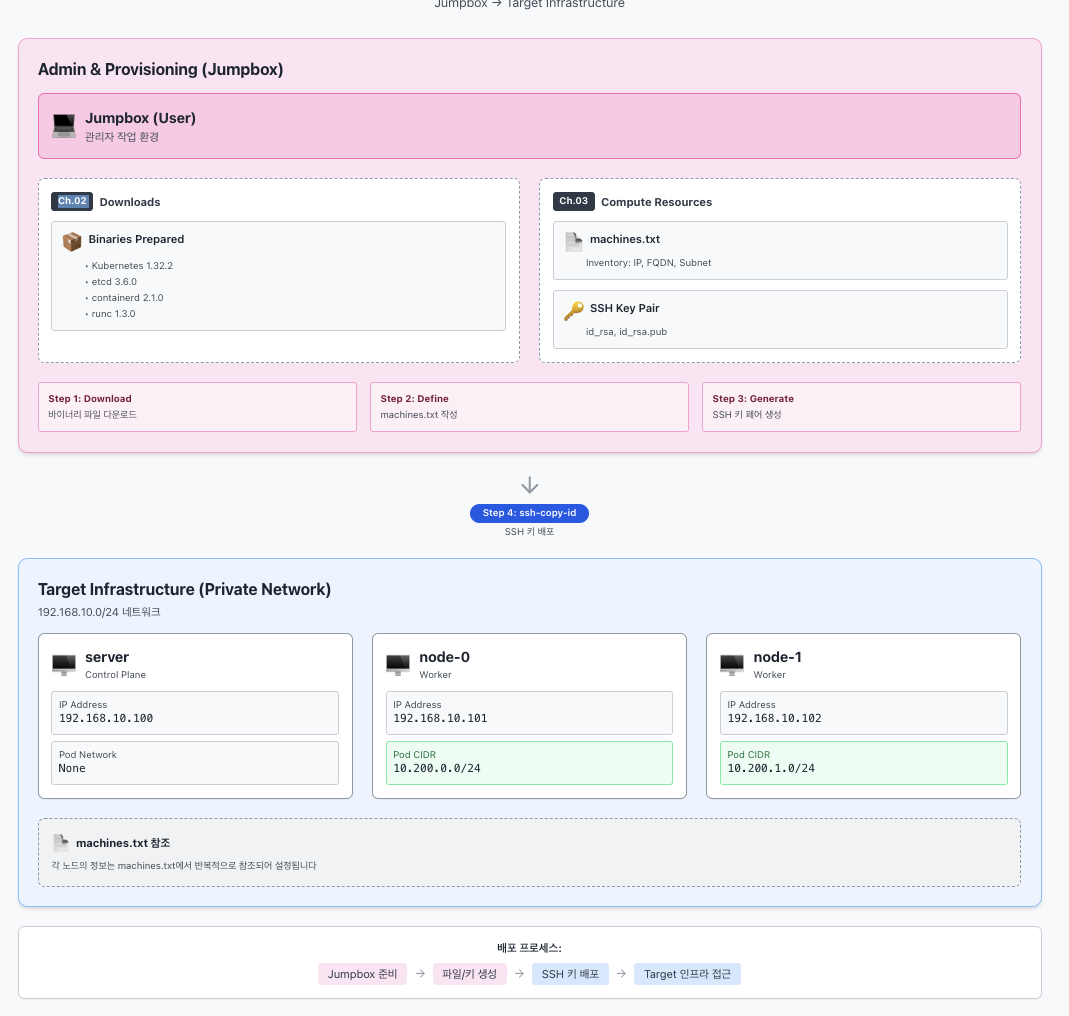
1. Machine Database (서버 속성 저장 파일)
형식: IPV4_ADDRESS FQDN HOSTNAME POD_SUBNET
참고) server(controlplane)는 kubelet이 동작하지 않아서, 파드 네트워크 대역 설정이 필요 없음.
machines.txt 파일을 생성하고 내용을 확인해보자.
cat <<EOF > machines.txt
192.168.10.100 server.kubernetes.local server
192.168.10.101 node-0.kubernetes.local node-0 10.200.0.0/24
192.168.10.102 node-1.kubernetes.local node-1 10.200.1.0/24
EOF

cat machines.txt
잘 들어갔는지 루프 돌려서 확인.
while read IP FQDN HOST SUBNET; do
  echo "${IP} ${FQDN} ${HOST} ${SUBNET}"
done < machines.txt

#
192.168.10.100 server.kubernetes.local server
192.168.10.101 node-0.kubernetes.local node-0 10.200.0.0/24
192.168.10.102 node-1.kubernetes.local node-1 10.200.1.0/24
2. Configuring SSH Access 설정
먼저 sshd_config 설정 확인 (이미 암호 기반 인증 PasswordAuthentication yes로 되어 있는지 체크).
grep "^[^#]" /etc/ssh/sshd_config
(출력 예시: PasswordAuthentication yes, PermitRootLogin yes 등이 보여야 함)
새로운 SSH 키 생성.
ssh-keygen -t rsa -N "" -f /root/.ssh/id_rsa # RSA 방식의 SSH 키를 비밀번호 없이(-N "") 생성해서 /root/.ssh/id_rsa 파일로 저장
ls -l /root/.ssh

#
#
Generating public/private rsa key pair.
Your identification has been saved in /root/.ssh/id_rsa
Your public key has been saved in /root/.ssh/id_rsa.pub
The key fingerprint is:
SHA256:+jr0cnRqVgvh1HCb4LdkYPXEKq2FCpXt+fl0mRVrU5Y root@jumpbox
The key's randomart image is:
+---[RSA 3072]----+
|       o ....   .|
|      o * .o.  Eo|
|     . + X +.  .+|
|    .   O @    +.|
|     . +SX o  .+.|
|      o.= * . +  |
|     ..o = + .   |
|      o.* . .    |
|      .B.        |
+----[SHA256]-----+
생성한 공개키(Public Key)를 각 머신에 배포하자. (sshpass 사용)
while read IP FQDN HOST SUBNET; do
  sshpass -p 'qwe123' ssh-copy-id -o StrictHostKeyChecking=no root@${IP} # 비밀번호(qwe123)를 자동으로 입력해 호스트 키 확인 없이 원격 서버(root@${IP})에 SSH 공개키를 복사,호스트 키 = 서버가 진짜인지 확인하는 신분증
done < machines.txt

#
#
/usr/bin/ssh-copy-id: INFO: Source of key(s) to be installed: "/root/.ssh/id_rsa.pub"
/usr/bin/ssh-copy-id: INFO: attempting to log in with the new key(s), to filter out any that are already installed
/usr/bin/ssh-copy-id: INFO: 1 key(s) remain to be installed -- if you are prompted now it is to install the new keys

Number of key(s) added: 1

Now try logging into the machine, with:   "ssh -o 'StrictHostKeyChecking=no' 'root@192.168.10.100'"
and check to make sure that only the key(s) you wanted were added.

/usr/bin/ssh-copy-id: INFO: Source of key(s) to be installed: "/root/.ssh/id_rsa.pub"
/usr/bin/ssh-copy-id: INFO: attempting to log in with the new key(s), to filter out any that are already installed
/usr/bin/ssh-copy-id: INFO: 1 key(s) remain to be installed -- if you are prompted now it is to install the new keys

Number of key(s) added: 1

Now try logging into the machine, with:   "ssh -o 'StrictHostKeyChecking=no' 'root@192.168.10.101'"
and check to make sure that only the key(s) you wanted were added.

/usr/bin/ssh-copy-id: INFO: Source of key(s) to be installed: "/root/.ssh/id_rsa.pub"
/usr/bin/ssh-copy-id: INFO: attempting to log in with the new key(s), to filter out any that are already installed
/usr/bin/ssh-copy-id: INFO: 1 key(s) remain to be installed -- if you are prompted now it is to install the new keys

Number of key(s) added: 1

Now try logging into the machine, with:   "ssh -o 'StrictHostKeyChecking=no' 'root@192.168.10.102'"
and check to make sure that only the key(s) you wanted were added.
키가 잘 들어갔는지 확인 (authorized_keys 내용 캣).
while read IP FQDN HOST SUBNET; do
  ssh -n root@${IP} cat /root/.ssh/authorized_keys
done < machines.txt

#
ssh-rsa AAAAB3NzaC1yc2EAAAADAQABAAABgQDD8rPSIyw7Dx1LItdzoqDpsemPv4LL+K755ac0UkjuxEPZj5aM49aXLhX7we3FXKdRb9PbPXb/Siq7bc9jMUlyIcNuRb1mcRvxJ6zlQ0D98HY8YatvO+2aaP7RXpNRj3fi1/Fi0caoiYEGNJEjoqfXx/eYD4kMUpdm5i86W+yTm3MhaqvXj3rfh2CUigCuqPWRWwxUjx/0HHpVqmcnssM1K+1tGPT2ovhmeFrI1F4I2FryagfQefkr/KM5U8balM0BQFbl07ViD9FUXZynDDY9aXKJXGef3wwXVg/CVR9ljP7RnfRkemd9YyAJ+LxEJUmsLygwWszmEoMu91Y96DipQs6XUY0G6mZncy337oixktBFWyKkzhVWsWgRd66BsvAt4wnnW33k+xO9SVQ1wwZfXJFG8fSh+2SX9ZYUzLhasUqwN3P+KPIxl35I5Bzj4wKH8LVOun116gStJIFcR1pMSCtRsu1gJxmXNu295+C35A58LcSK5nP47uCKBb9PfrM= root@jumpbox
ssh-rsa AAAAB3NzaC1yc2EAAAADAQABAAABgQDD8rPSIyw7Dx1LItdzoqDpsemPv4LL+K755ac0UkjuxEPZj5aM49aXLhX7we3FXKdRb9PbPXb/Siq7bc9jMUlyIcNuRb1mcRvxJ6zlQ0D98HY8YatvO+2aaP7RXpNRj3fi1/Fi0caoiYEGNJEjoqfXx/eYD4kMUpdm5i86W+yTm3MhaqvXj3rfh2CUigCuqPWRWwxUjx/0HHpVqmcnssM1K+1tGPT2ovhmeFrI1F4I2FryagfQefkr/KM5U8balM0BQFbl07ViD9FUXZynDDY9aXKJXGef3wwXVg/CVR9ljP7RnfRkemd9YyAJ+LxEJUmsLygwWszmEoMu91Y96DipQs6XUY0G6mZncy337oixktBFWyKkzhVWsWgRd66BsvAt4wnnW33k+xO9SVQ1wwZfXJFG8fSh+2SX9ZYUzLhasUqwN3P+KPIxl35I5Bzj4wKH8LVOun116gStJIFcR1pMSCtRsu1gJxmXNu295+C35A58LcSK5nP47uCKBb9PfrM= root@jumpbox
ssh-rsa AAAAB3NzaC1yc2EAAAADAQABAAABgQDD8rPSIyw7Dx1LItdzoqDpsemPv4LL+K755ac0UkjuxEPZj5aM49aXLhX7we3FXKdRb9PbPXb/Siq7bc9jMUlyIcNuRb1mcRvxJ6zlQ0D98HY8YatvO+2aaP7RXpNRj3fi1/Fi0caoiYEGNJEjoqfXx/eYD4kMUpdm5i86W+yTm3MhaqvXj3rfh2CUigCuqPWRWwxUjx/0HHpVqmcnssM1K+1tGPT2ovhmeFrI1F4I2FryagfQefkr/KM5U8balM0BQFbl07ViD9FUXZynDDY9aXKJXGef3wwXVg/CVR9ljP7RnfRkemd9YyAJ+LxEJUmsLygwWszmEoMu91Y96DipQs6XUY0G6mZncy337oixktBFWyKkzhVWsWgRd66BsvAt4wnnW33k+xO9SVQ1wwZfXJFG8fSh+2SX9ZYUzLhasUqwN3P+KPIxl35I5Bzj4wKH8LVOun116gStJIFcR1pMSCtRsu1gJxmXNu295+C35A58LcSK5nP47uCKBb9PfrM= root@jumpbox
이제 IP 기반으로 비밀번호 없이 접속되는지 최종 확인.
while read IP FQDN HOST SUBNET; do
  ssh -n root@${IP} hostname
done < machines.txt

#
server
node-0
node-1
3. Hostnames 설정
init_cfg.sh로 이미 설정되어 있을 텐데, /etc/hosts 파일 확인해보자.
while read IP FQDN HOST SUBNET; do
  ssh -n root@${IP} cat /etc/hosts
done < machines.txt

#
127.0.0.1       localhost

# The following lines are desirable for IPv6 capable hosts
::1     localhost ip6-localhost ip6-loopback
ff02::1 ip6-allnodes
ff02::2 ip6-allrouters
192.168.10.10  jumpbox
192.168.10.100 server.kubernetes.local server
192.168.10.101 node-0.kubernetes.local node-0
192.168.10.102 node-1.kubernetes.local node-1
127.0.0.1       localhost

# The following lines are desirable for IPv6 capable hosts
::1     localhost ip6-localhost ip6-loopback
ff02::1 ip6-allnodes
ff02::2 ip6-allrouters
192.168.10.10  jumpbox
192.168.10.100 server.kubernetes.local server
192.168.10.101 node-0.kubernetes.local node-0
FQDN 설정 확인.
while read IP FQDN HOST SUBNET; do
  ssh -n root@${IP} hostname --fqdn
done < machines.txt

#
server.kubernetes.local
node-0.kubernetes.local
node-1.kubernetes.local
마지막으로 Hostname 기반으로 SSH 접속 확인.
cat /etc/hosts

# 호스트네임으로 접속 테스트
while read IP FQDN HOST SUBNET; do
  sshpass -p 'qwe123' ssh -n -o StrictHostKeyChecking=no root@${HOST} hostname
done < machines.txt

#
Warning: Permanently added 'server' (ED25519) to the list of known hosts.
server
Warning: Permanently added 'node-0' (ED25519) to the list of known hosts.
node-0
Warning: Permanently added 'node-1' (ED25519) to the list of known hosts.
node-1


# 상세 정보 확인
while read IP FQDN HOST SUBNET; do
  sshpass -p 'qwe123' ssh -n root@${HOST} uname -o -m -n
done < machines.txt

#
server aarch64 GNU/Linux
node-0 aarch64 GNU/Linux
node-1 aarch64 GNU/Linux
bytebliss