
⚡ REST API
📌 REST(Representational State Transfer) API
🔷 REST는 Representational State Transfer의 약어로 하나의 URI는 하나의 고유한 리소스(Resource)를 대표하도록 설계된다는 개념에 전송방식을 결합해서 원하는 작업을 지정한다.
- 2000년도 로이 필딩(Roy Fielding)의 박사학위 논문에 최초로 소개
- 웹의 장점을 최대한 활용할 수 있는 아키텍처(설계구조)로써 REST를 발표하였다.
- HTTP URI를 통해 제어할 자원(Resource)를 명시하고, HTTP Method(GET, POST, PUT, DELETE)을 통해 해당 자원(Resource)를 제어하는 명령을 내리는 방식의 아키텍처
🔷 REST 구성
- 자원 (Resource) : URI
- 행위 ( Verb ) : HTTP Method
- 표현 (Representations)
🔷 잘 표현된 HTTP URI로 리소스를 정의하고 HTTP method로 리소스에 대한 행위를 정의한다. 리소스는 JSON, XML과 같은 여러가지 언어로 표현 할 수 있다
🔷 기존의 웹 접근 방식과 REST API 방식의 차이점
| 작업 | 기존 방식 | REST 방식 | 비고 |
|---|---|---|---|
Create(Insert) | POST (/board/write) | POST (/board) | 글쓰기 |
Read(Select) | GET (/board/detail?id=2) | GET (/board/2) | 글읽기 |
Update(Update) | POST (/board/update) | PUT (/board) | 글수정 |
Delete(Delete) | GET (/board/delete?id=2) | DELETE (/board/2) | 글삭제 |
- 기존의 접근 방식은 GET과 POST 만으로 자원에 대한 CRUD를 처리하며, URI는 액션을 나타냄.
- REST로 변경할 경우 4가지 method를 모두 사용하여 CRUD를 처리하며, URI는 제어하려는 자원을 나타냄.
🔷 API (Application Programming Interface)
- 두 소프트웨어 요소들이 서로 통신 할 수 있게 하는 방식 (예 : 미세먼지 정보 제공 시스템, 핸드폰 정보 미세먼지 앱)
- Application 은 고유한 기능을 가진 모든 소프트웨어
- Interface 는 두 애플리케이션 간의 요청과 응답에 의한 통신하는 방법
🔷 API 유형
1) 프라이빗 API
‐ 기업 내부에 있으며 비즈니스 내에서 시스템과 데이터를 연결하는데 사용
2) 퍼블릭 API
‐ 일반에게 공개되며 누구나 사용할 수 있다.
‐ 단, 사용에 대한 권한 설정과 비용이 있을 수도 있다.
‐ 공공데이터 포털, 기상청, Naver, Kakao, Youtube 등
‐ 대부분이 REST 방식으로 작성
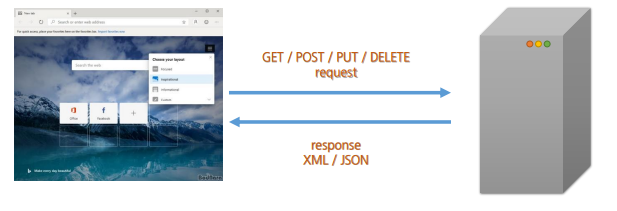
🔷 REST API (REST + API)
- 기존의 전송방식과는 달리 서버는 요청으로 받은 리소스에 대해 순수한 데이터를 전송한다.
- 기존의
GET/POST외에PUT,DELETE방식을 사용하여 리소스에 대한CRUD처리를 할 수 있다. - HTTP URI을 통해 제어할 자원(Resource)을 명시하고,
HTTP METHOD(GET/POST/PUT/DELETE)를 통해 해당 자원(Resource)를 제어하는 명령을 내리는 방식의Architecture이다. - 가장 큰 단점은 딱 정해진 표준이 없어 ‘다들 이렇게 쓰더라~!’ 정도의 암묵적인 표준만 정해져 있다. (...)
- 하이픈(-)은 사용 가능하지만 언더바(_)는 사용하지 않는다.
- 특별한 경우를 제외하고 대문자 사용은 하지 않는다.(대소문자 구분을 하기 때문)
- URI 마지막에 슬래시(/)를 사용하지 않는다.
- 슬래시(/)로 계층 관계를 나타낸다.
- 확장자가 포함된 파일 이름을 직접 포함시키지 않는다.
- URI는 명사를 사용한다.
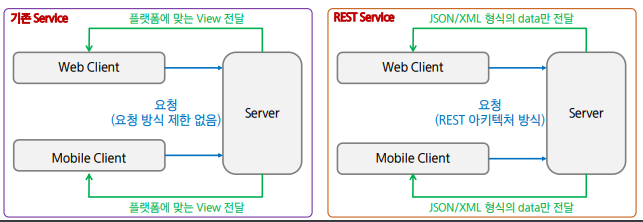
🔷 기존 Service와 REST API Service
- 기존 Service : 요청에 대한 처리를 한 후 가공된 data를 이용하여 특정 플랫폼에 적합한 형태의 View로 만들어서 반환.
- REST Service : data 처리만 한다 거나, 처리 후 반환될 data가 있다면 JSON이나 XML 형식으로 전달.
💡 View에 대해서는 신경 쓸 필요가 없다.
이러한 이유로 Open API에서 많이 사용한다.
💡 REST API로 구축된 웹서비스를
RESTful하다고 한다.
📌 Spring REST API
🔷 Spring REST 관련 Annotation 및 클래스
| Annotation | Class Description |
|---|---|
@GetMapping, @PostMapping, @PutMapping, @DeleteMapping | 요청 방식 |
@RestController | Controller 가 REST 방식을 처리하기 위한 것임을 명시. |
@ResponseBody | JSP 같은 뷰로 전달되는 것이 아니라 데이터 자체를 전달. |
@PathVariable | URL 경로에 있는 값을 파라미터로 추출. |
@CrossOrigin | Ajax의 크로스 도메인 문제를 해결. |
@RequestBody | JSON 데이터를 원하는 타입으로 바인딩. |
ResponseEntity | 데이터 응답시 [상태코드, 헤더, 데이터] 설정이 가능 |
🔷 구글 크롬 확장프로그램인 Talend API를 사용하여 실습한다.
🖥 TestController
package com.bzeromo.rest.controller;

import java.util.ArrayList;
import java.util.HashMap;
import java.util.List;
import java.util.Map;

import org.springframework.stereotype.Controller;
import org.springframework.web.bind.annotation.GetMapping;
import org.springframework.web.bind.annotation.ResponseBody;

import com.bzeromo.rest.model.dto.User;

@Controller
public class TestController {
	//http://localhost:8080//mvc/rest1/test1 : 404 Error, 뷰리졸버가 반환된 문자열을 가지고 View를 찾으려고 하니...
	@GetMapping("/rest1/test1")
	public String test1() {
		return "hi rest";
	}

	//http://localhost:8080//mvc/rest1/test2 : @ResponseBody를 붙여서 JSP 화면으로 반환하는게 아니라 데이터 그 자체를 반환
	@ResponseBody
	@GetMapping("/rest1/test2")
	public String test2() {
		return "hi rest";
	}

	//http://localhost:8080//mvc/rest1/test3 : Map을 JSON으로 바꿔주지 않으면 406 Error가 발생한다.
	@ResponseBody
	@GetMapping("/rest1/test3")
	public Map<String, String> test3() {
		//키 밸류 형태를 가지고 있는 맵을 반환
		Map<String, String> data = new HashMap<String, String>();

		data.put("id", "bzeromo");
		data.put("password", "1234");
		data.put("name", "박영규");
		data.put("age", "25");

		return data; //jackson-databind를 추가하면 Map을 알아서 JSON으로 바꿔서 전달한다!
	}

	//http://localhost:8080//mvc/rest1/test4: jackson이 DTO도 알아서 JSON으로 변환해준다!
	@ResponseBody
	@GetMapping("/rest1/test4")
	public User test4() {
		User user = new User("bzeromo", "1234", "박영규");
		return user;
	}

	//http://localhost:8080//mvc/rest1/test5: jackson이 List마저 JSON으로 변환해준다!
	@ResponseBody
	@GetMapping("/rest1/test5")
	public List<User> test5() {
		List<User> list = new ArrayList<User>();
		User user = new User("bzeromo", "1234", "박영규");

		list.add(user);
		list.add(new User("Czeromo", "123456", "차영규"));
		list.add(new User("Dzeromo", "12345678", "대영규"));
		list.add(new User("Ezeromo", "54321", "이영규"));

		return list;
	}
}
🔷 test1
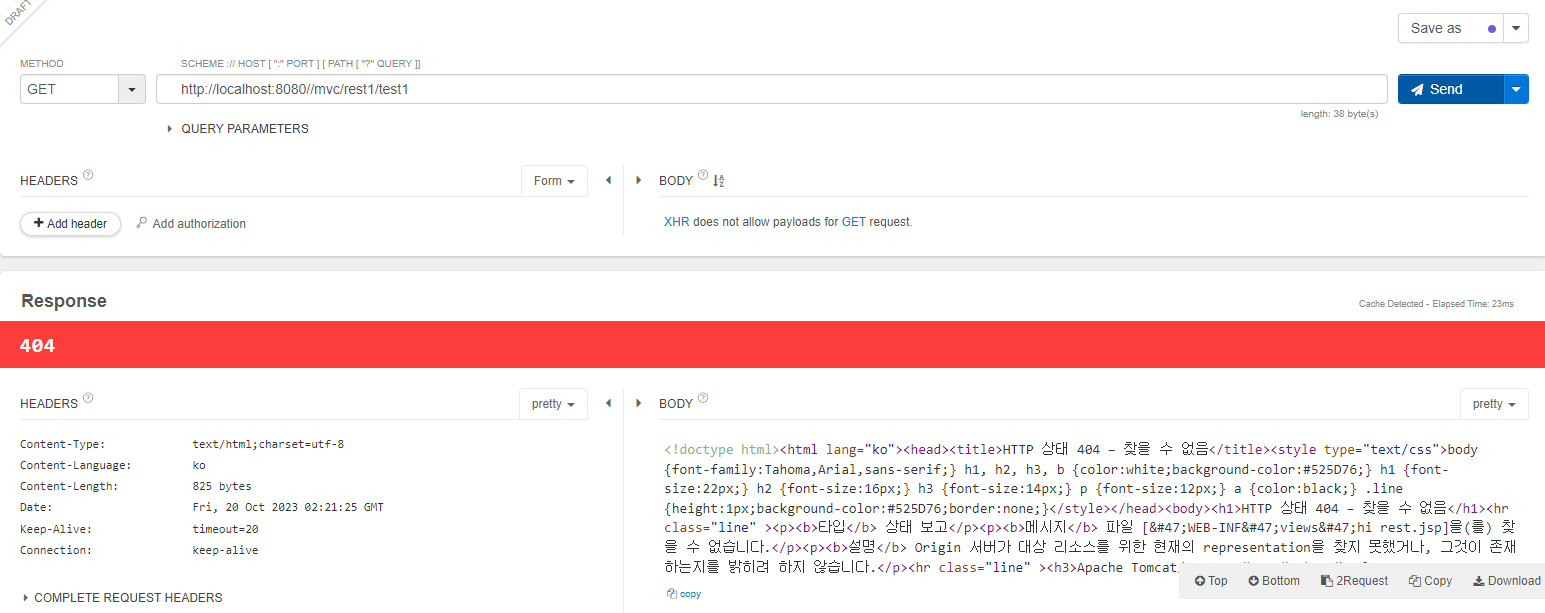
@ResponseBody 처리가 없으면 데이터를 넘기는 것이 아니라 뷰를 찾아 넘기려 하기 때문에 오류가 발생한다.
🔷 test2
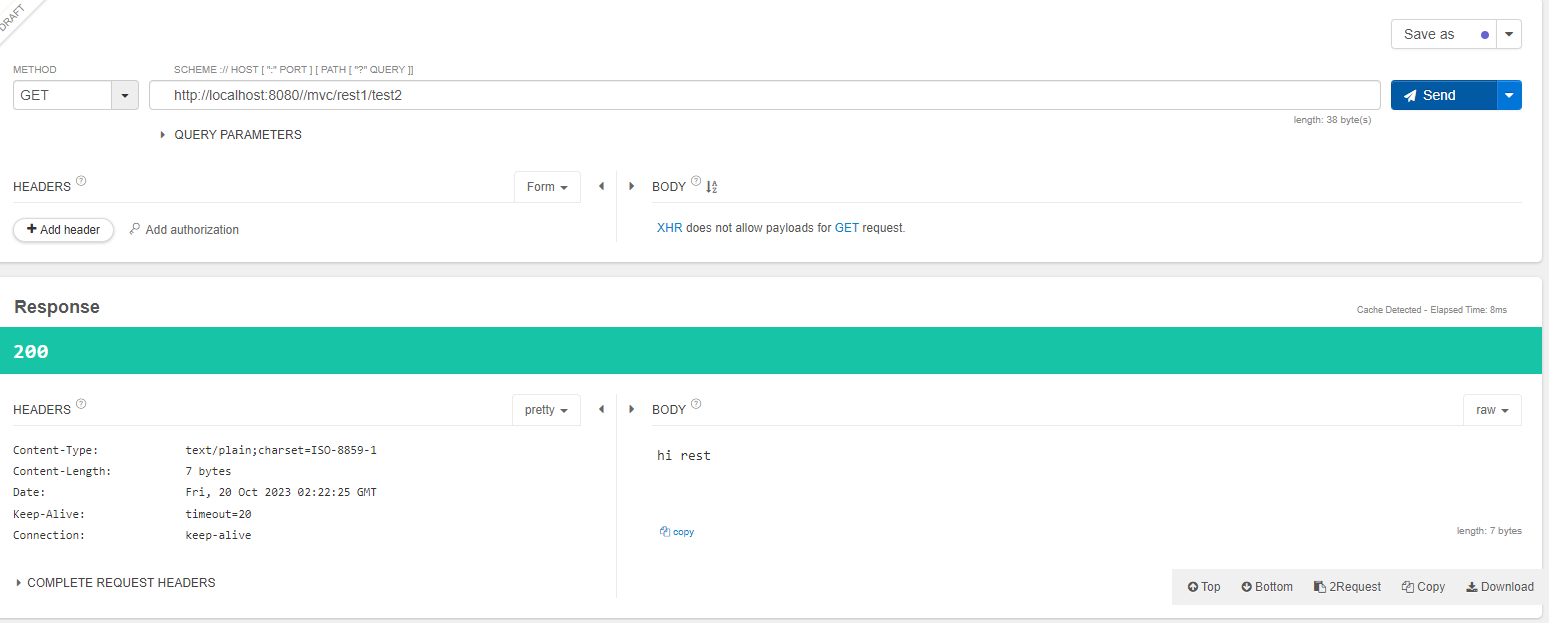
데이터가 잘 넘어온다!
🔷 test3
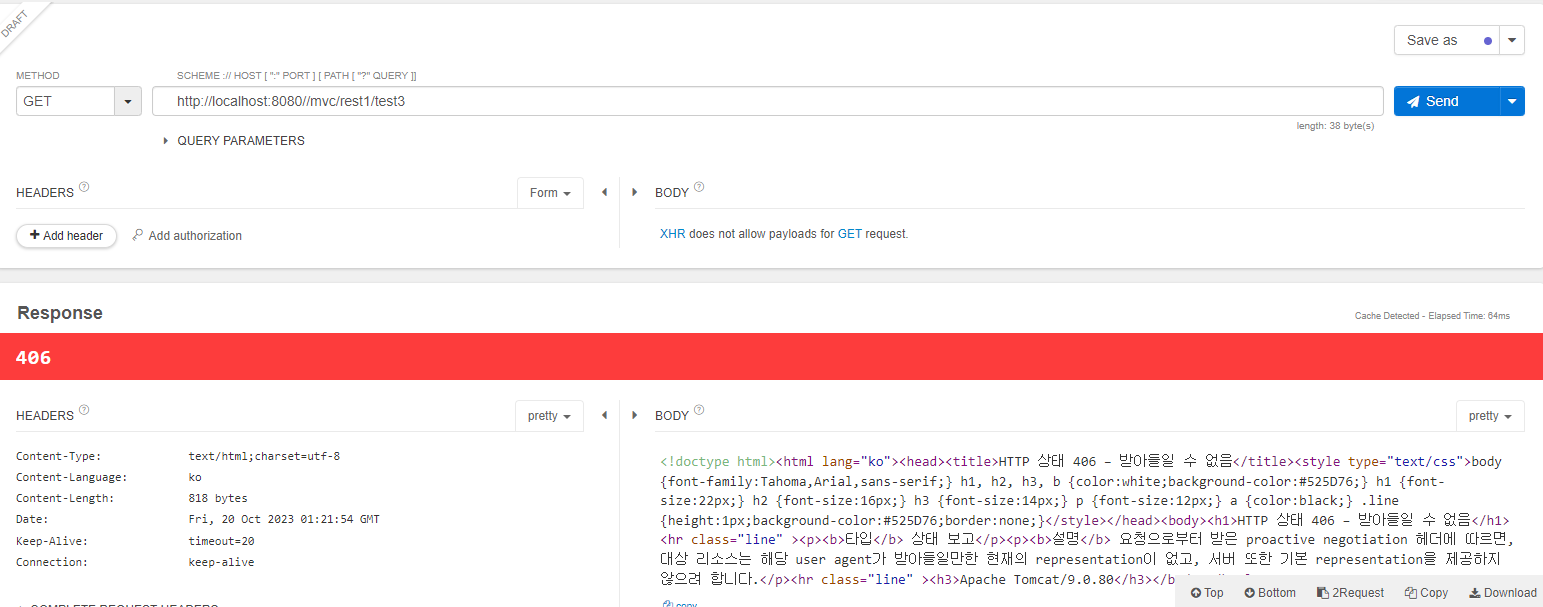
Map 형태로 데이터를 넘기려했으나 406 에러가 발생한다.
이 때, Jackson Databind를 통해 Map을 자동으로 JSON 형태로 바꿔 데이터를 넘기게 만들 수 있다.
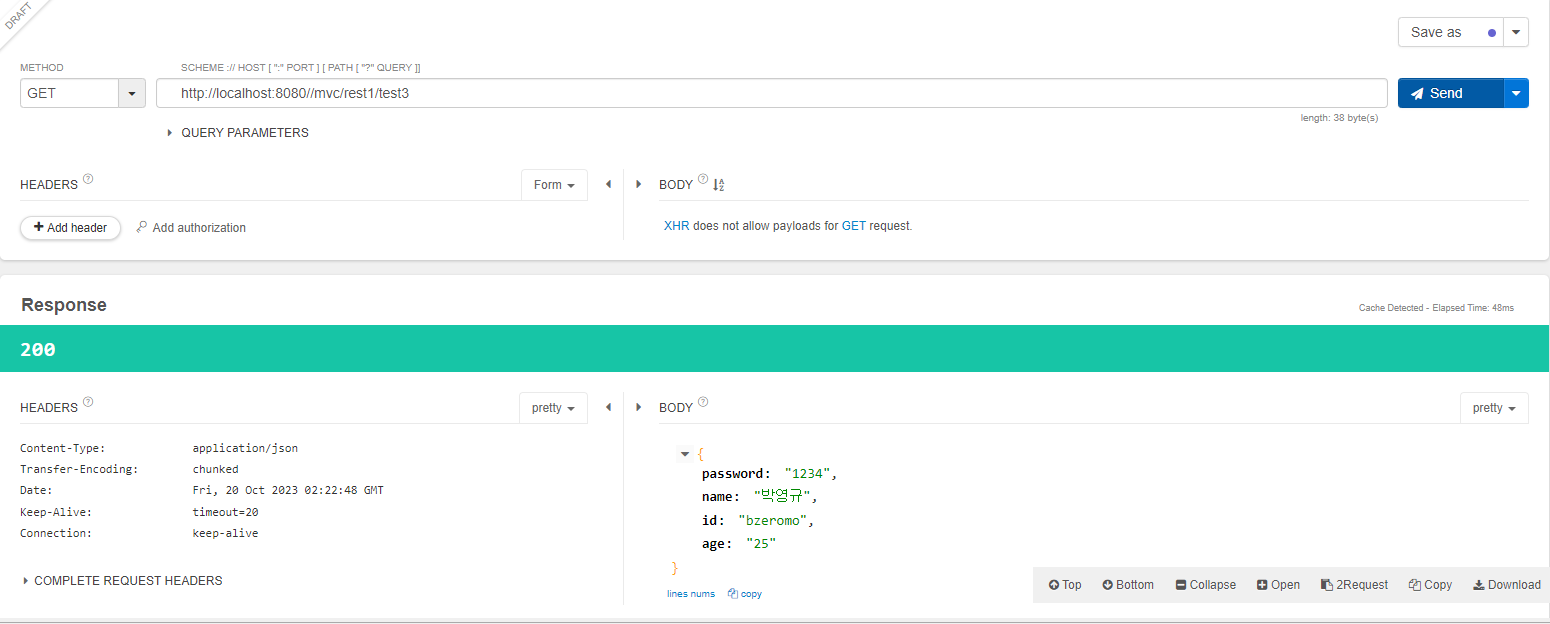
적용하면 Map이 JSON으로 변환되어 들어왔음을 확인할 수 있다.
🔷 test4
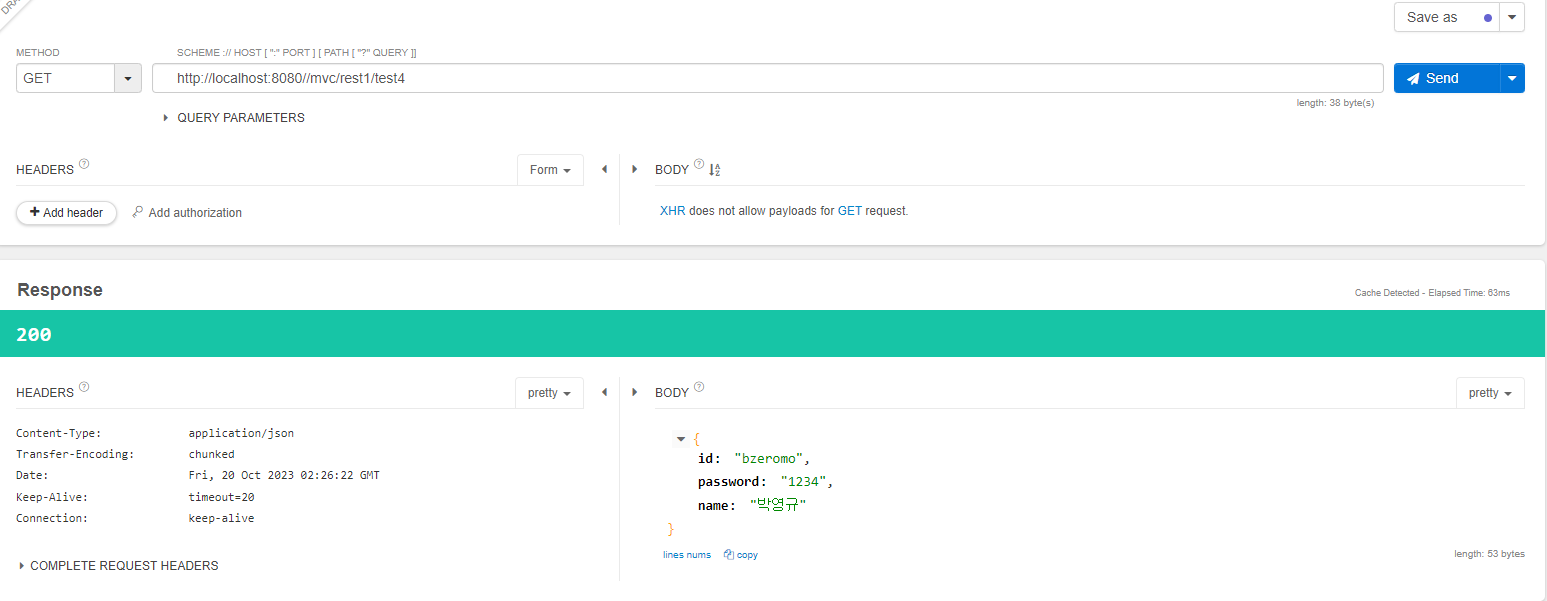
잭슨은 DTO(객체)는 물론이고
🔷 test5
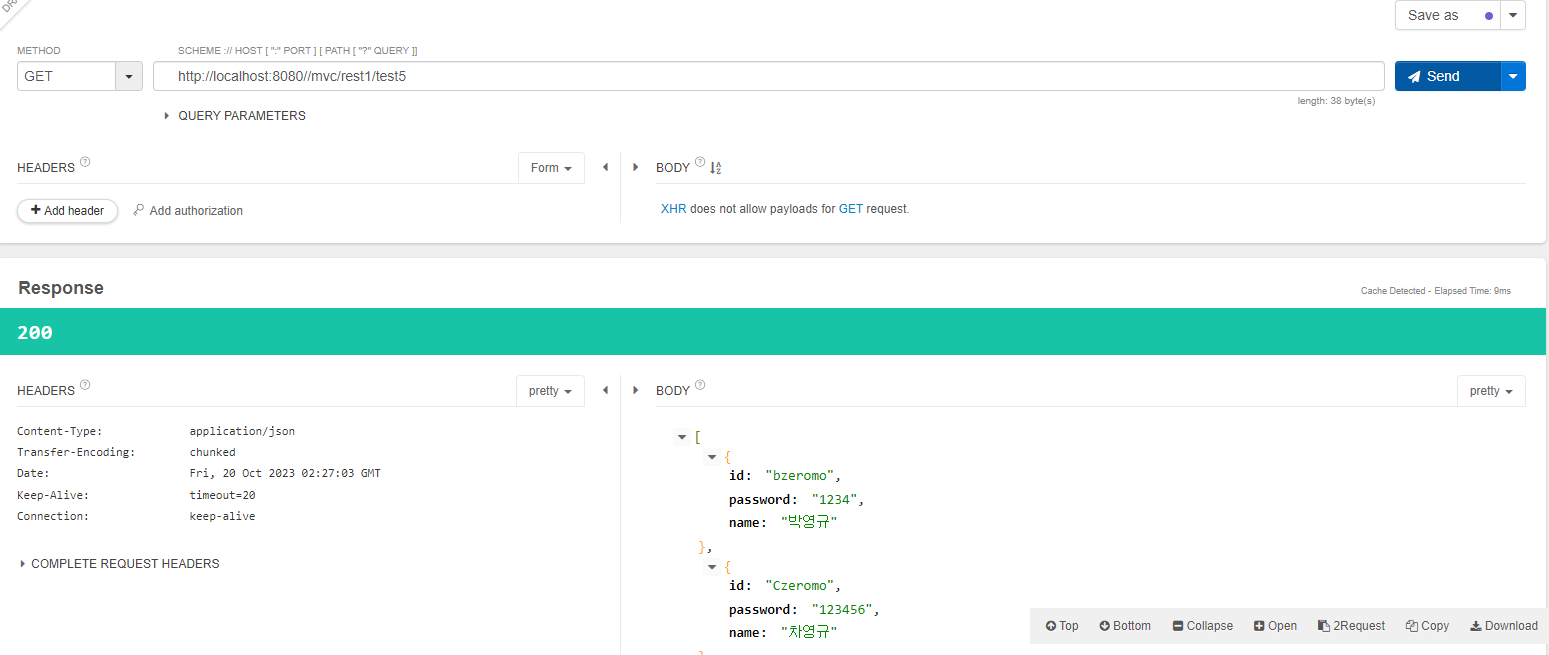
리스트도 JSON으로 변환시킨다.
🖥 TestController2
package com.bzeromo.rest.controller;

import java.util.ArrayList;
import java.util.HashMap;
import java.util.List;
import java.util.Map;

import org.springframework.web.bind.annotation.GetMapping;
import org.springframework.web.bind.annotation.RequestMapping;
import org.springframework.web.bind.annotation.RestController;

import com.bzeromo.rest.model.dto.User;

@RestController
@RequestMapping("/rest2")
public class TestController2 {
	//http://localhost:8080//mvc/rest2/test1 : 이제는 된다
	@GetMapping("/test1")
	public String test1() {
		return "hi rest";
	}

	//http://localhost:8080//mvc/rest1/test2 : @ResponseBody를 붙여서 JSP 화면으로 반환하는게 아니라 데이터 그 자체를 반환
	@GetMapping("/test2")
	public String test2() {
		return "hi rest";
	}

	//http://localhost:8080//mvc/rest1/test3 : Map을 JSON으로 바꿔주지 않으면 406 Error가 발생한다.
	@GetMapping("/test3")
	public Map<String, String> test3() {
		//키 밸류 형태를 가지고 있는 맵을 반환
		Map<String, String> data = new HashMap<String, String>();

		data.put("id", "bzeromo");
		data.put("password", "1234");
		data.put("name", "박영규");
		data.put("age", "25");

		return data; //jackson-databind를 추가하면 Map을 알아서 JSON으로 바꿔서 전달한다!
	}

	//http://localhost:8080//mvc/rest1/test4: jackson이 DTO도 알아서 JSON으로 변환해준다!
	@GetMapping("/test4")
	public User test4() {
		User user = new User("bzeromo", "1234", "박영규");
		return user;
	}

	//http://localhost:8080//mvc/rest1/test5: jackson이 List마저 JSON으로 변환해준다!
	@GetMapping("/test5")
	public List<User> test5() {
		List<User> list = new ArrayList<User>();
		User user = new User("bzeromo", "1234", "박영규");

		list.add(user);
		list.add(new User("Czeromo", "123456", "차영규"));
		list.add(new User("Dzeromo", "12345678", "대영규"));
		list.add(new User("Ezeromo", "54321", "이영규"));

		return list;
	}
}
메서드마다 @ResponseBody를 붙여줄 필요 없이, 컨트롤러에 @RestController 설정을 해주기만 해도 똑같이 작동한다.
💡 이건 REST와 별개긴 하지만, 컨트롤러에 RequestMapping을 통해 url을 넣어주면 해당 부분을 메서드에서 애너테이션을 작성할 때 마다 해당 url을 모두 작성할 필요를 줄인다. 물론 모든 메서드가 그 url이 포함됨을 가정.
🖥 TestController3
package com.bzeromo.rest.controller;
import org.springframework.web.bind.annotation.DeleteMapping;
import org.springframework.web.bind.annotation.GetMapping;
import org.springframework.web.bind.annotation.PostMapping;
import org.springframework.web.bind.annotation.PutMapping;
import org.springframework.web.bind.annotation.RequestMapping;
import org.springframework.web.bind.annotation.RestController;
@RestController
@RequestMapping("/rest3")
public class TestController3 {
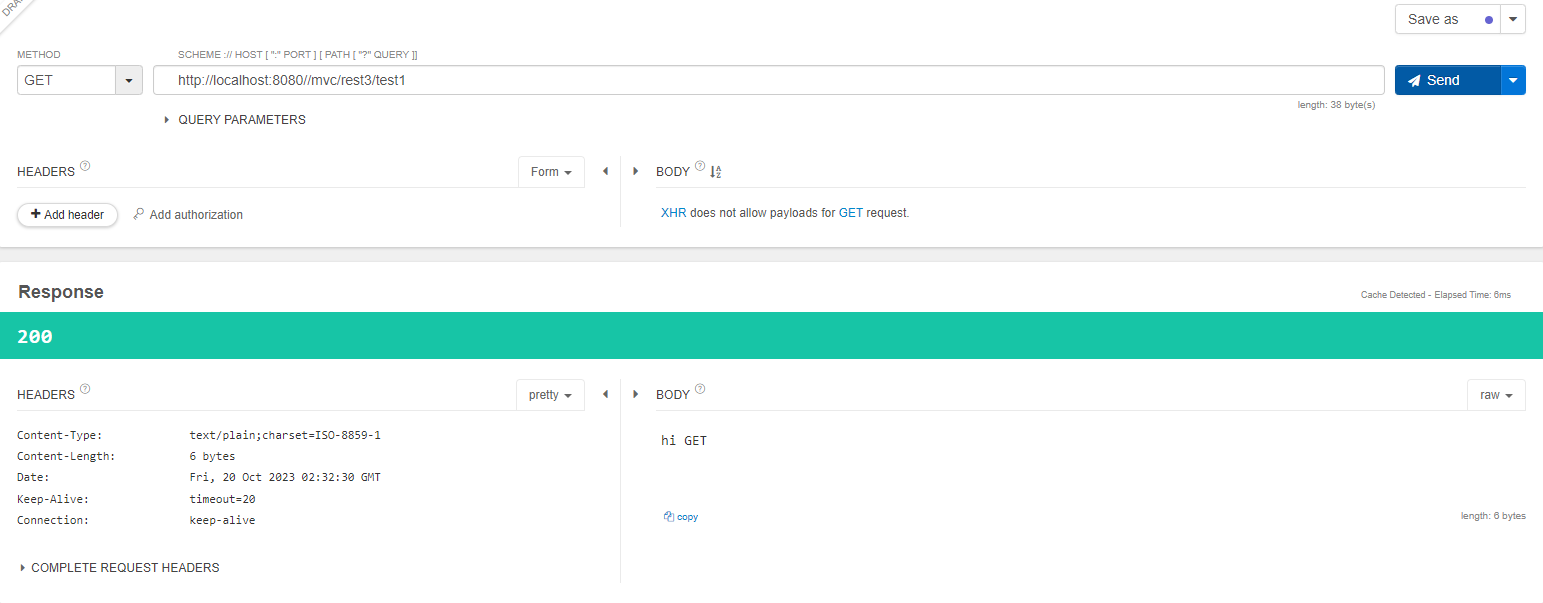
//http://localhost:8080//mvc/rest3/test1
@GetMapping("/test1")
public String test1() {
return "hi GET";
}
//http://localhost:8080//mvc/rest3/test2
@PostMapping("/test2")
public String test2() {
return "hi POST";
}
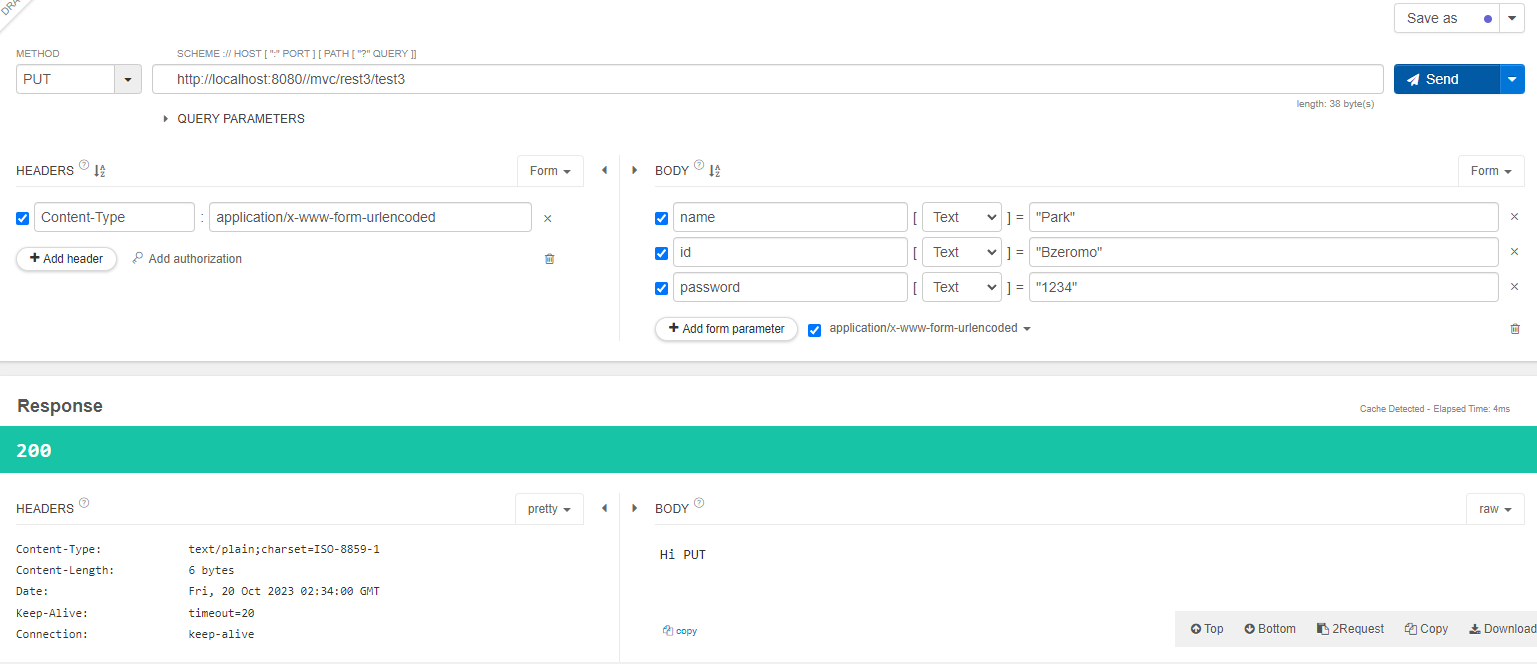
//http://localhost:8080//mvc/rest3/test3
@PutMapping("/test3")
public String test3() {
return "Hi PUT";
}
//http://localhost:8080//mvc/rest3/test4
@DeleteMapping("/test4")
public String test4() {
return "Hi DELETE";
}
}1. GET
2. POST
- method를 POST로 바꿔놓고 send해야 정상적인 응답이 돌아온다. 다른 모든 메서드 사용 시에도 method 유형을 계속 맞춰주어야한다.

3. PUT
4. DELETE

🖥 TestController4
package com.bzeromo.rest.controller;
import org.springframework.http.HttpHeaders;
import org.springframework.http.HttpStatus;
import org.springframework.http.ResponseEntity;
import org.springframework.web.bind.annotation.GetMapping;
import org.springframework.web.bind.annotation.PathVariable;
import org.springframework.web.bind.annotation.PostMapping;
import org.springframework.web.bind.annotation.RequestBody;
import org.springframework.web.bind.annotation.RequestMapping;
import org.springframework.web.bind.annotation.RestController;
import com.bzeromo.rest.model.dto.User;
@RestController
@RequestMapping("/rest4")
public class TestController4 {
//http://localhost:8080//mvc/rest4/test1
//REST API에서 Detail 같은 페이지에 들어가고 싶다면?
//http://localhost:8080//mvc/rest4/board/1
//http://localhost:8080//mvc/rest4/board/2
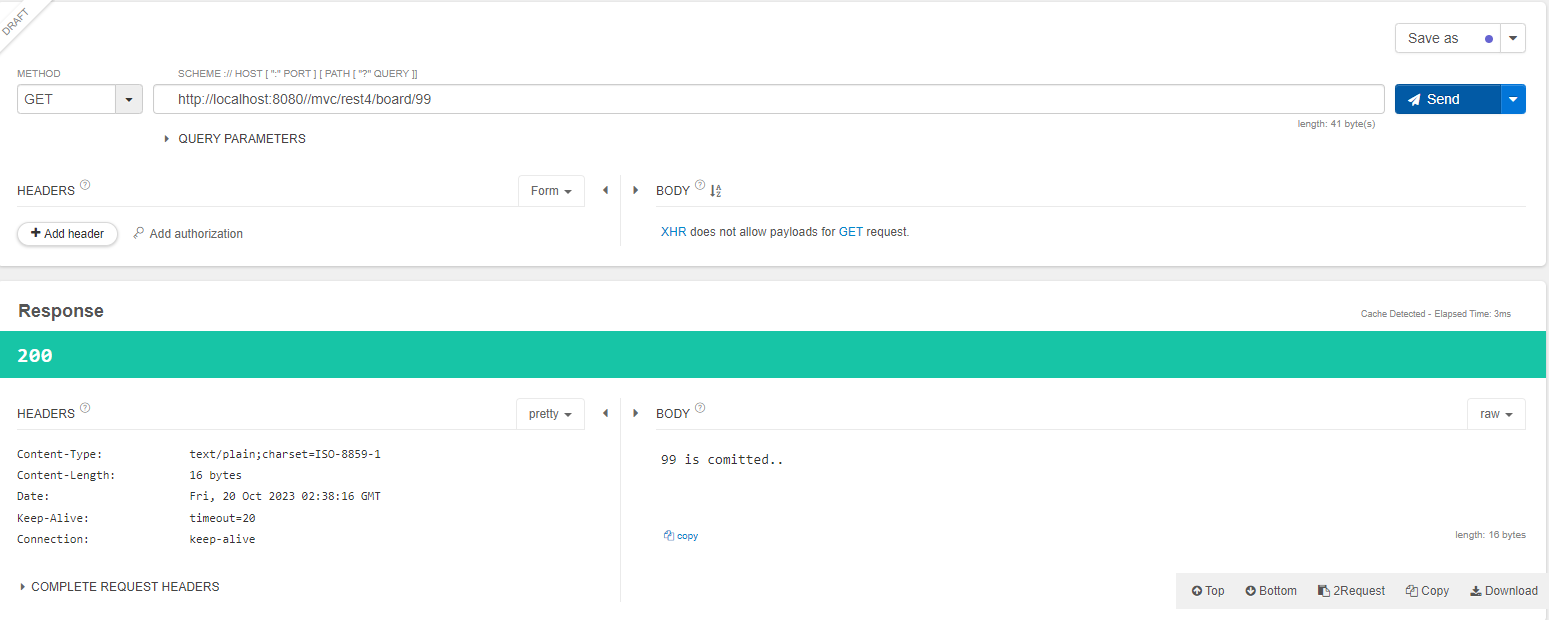
//http://localhost:8080//mvc/rest4/board/99
//매개변수와 URL 경로에 있는 값의 이름을 일치시키지 않으면 오류가 뜬다.
@GetMapping("/board/{id}")
public String test1(@PathVariable int id) {
return id+" is comitted..";
}
//게시글 등록
//application/x-www-form-urlencoded: 폼으로 보내면 등록이 잘 된다!
// @PostMapping("/board")
// public String test2(User user) {
// return user.toString();
// }
//아예 JSON 형태로 데이터를 보낼 때도 있다.
// {
// "name": "Park",
// "id": "Bzeromo",
// "password": "1234"
// }
//게시글 등록
@PostMapping("/board")
public String test3(@RequestBody User user) {
return user.toString();
}
@GetMapping("/test4")
public ResponseEntity<String> test4() {
HttpHeaders headers = new HttpHeaders();
headers.add("auth", "admin");
//응답하려고 하는 데이터, 응답 상태코드, 응답 헤더 등
return new ResponseEntity<String>("OK Data", headers, HttpStatus.OK);
}
}
🔷 test1
- 만약 매개변수명과 URL 경로에 있는 값이 다르다면 맞춰주거나
@PathVariable("경로명")을 이용한다.
🔷 test2
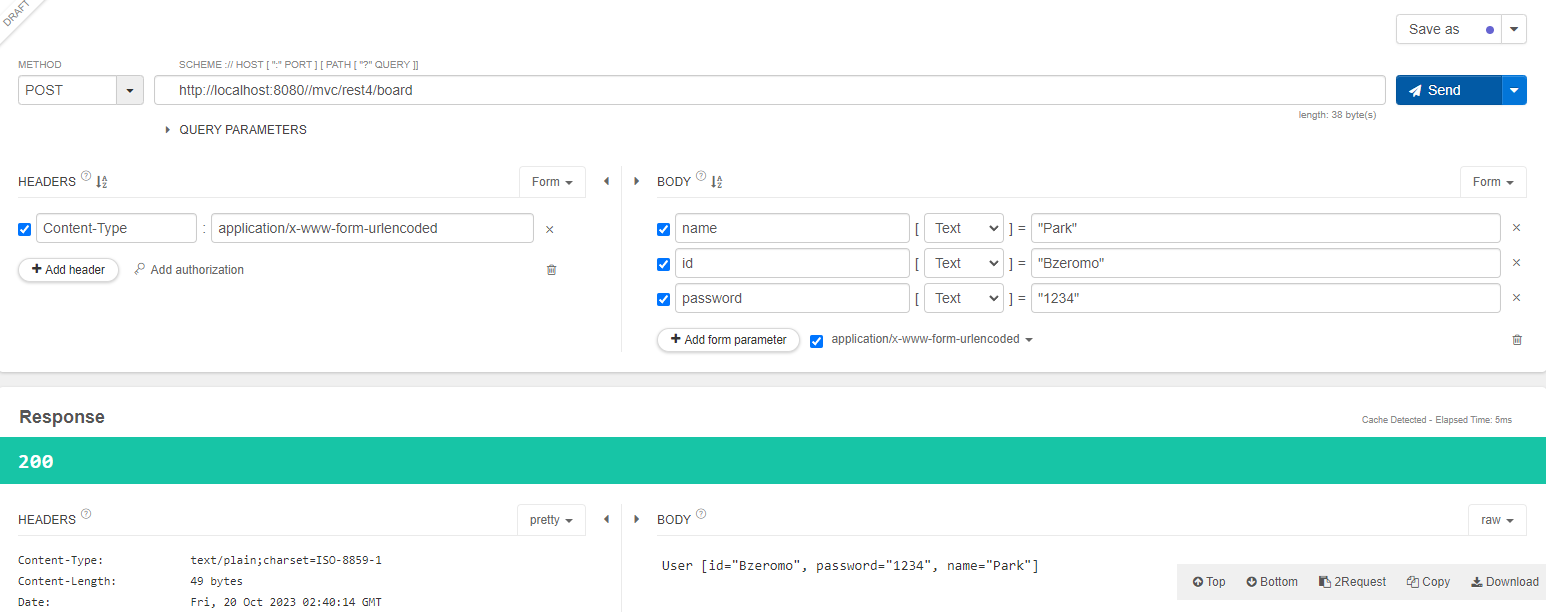
🔷 test3
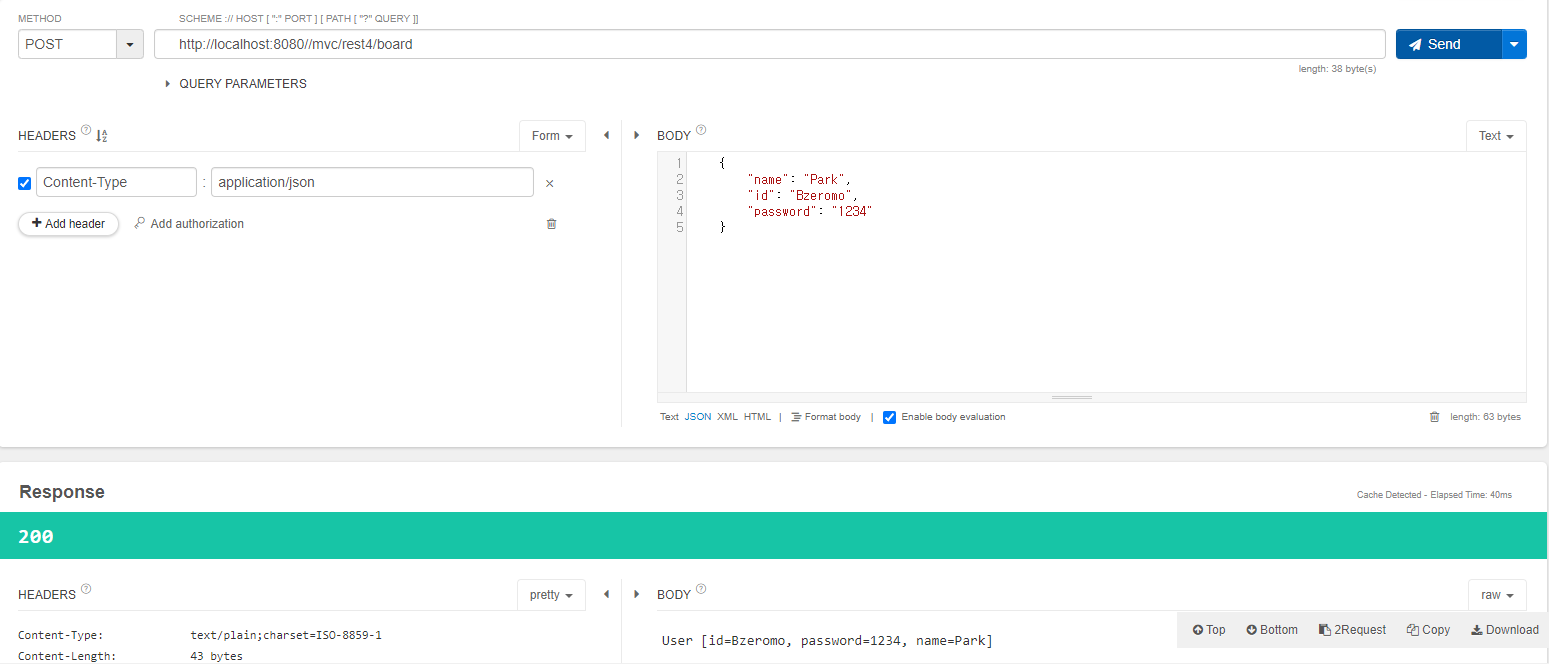
form 형태가 아니라 text의 형태로 JSON 양식을 그대로 보낼 수도 있다.
🔷 test4
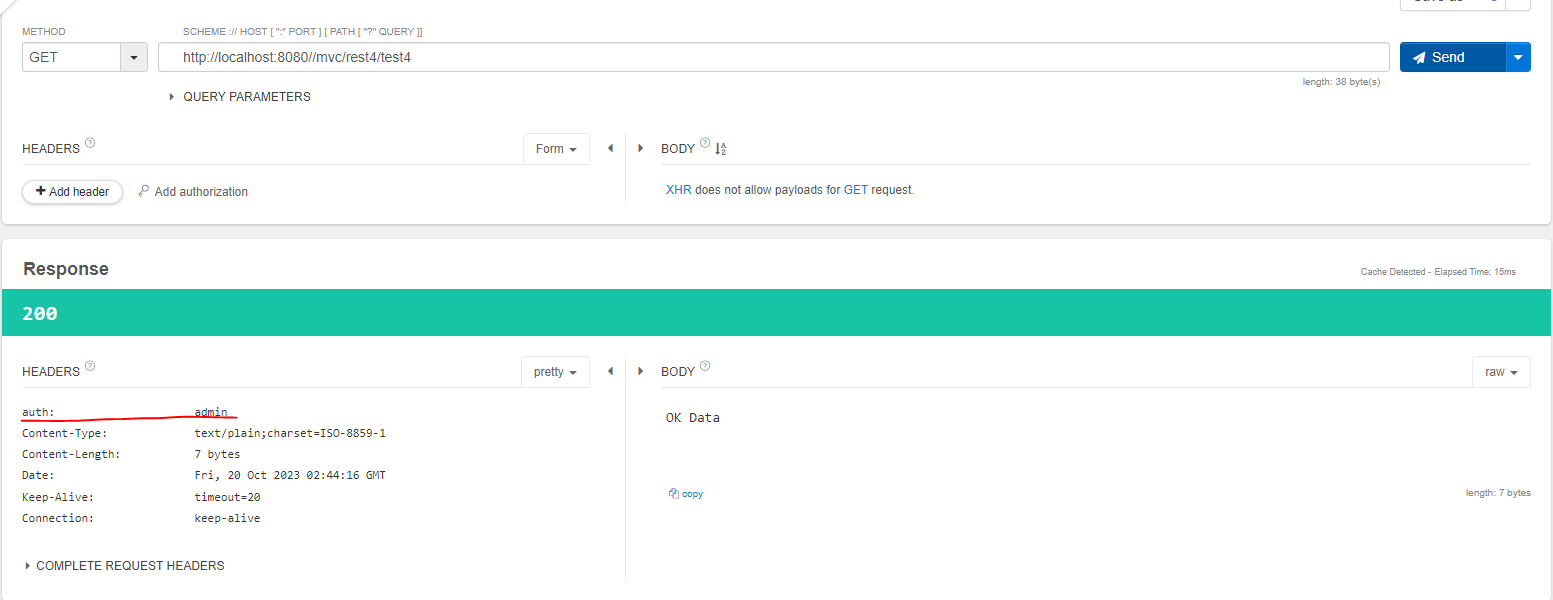
OK data가 그대로 넘어오면서 헤더에 auth: admin 까지 추가로 붙는 것을 확인할 수 있다.
스프링이 익숙해지면서 점점 많은 것을 할 수 있게 된다는 자신감이 붙기 시작했다.