
⚡ 자바스크립트로 보는 자료구조 Ⅱ
📌 연결 리스트
- 각 요소를 포인터로 연결하여 관리하는 선형 자료구조
- 각 요소는 노드라고 부르며 데이터 영역과 포인터 영역으로 구성된다.
- 특징
① 메모리가 허용하는 한 요소를 제한없이 추가할 수 있다.
② 탐색에는 O(n)만큼 소요된다.
③ 요소를 추가하거나 제거할 때는 O(1)만큼 소요된다.
④ 연결 리스트는 배열과 다르게 요소들이 붙어있지 않고 흩어져있다.
연결 리스트는 단일 연결 리스트, 이중 연결 리스트, 원형 연결 리스트로 나뉜다.
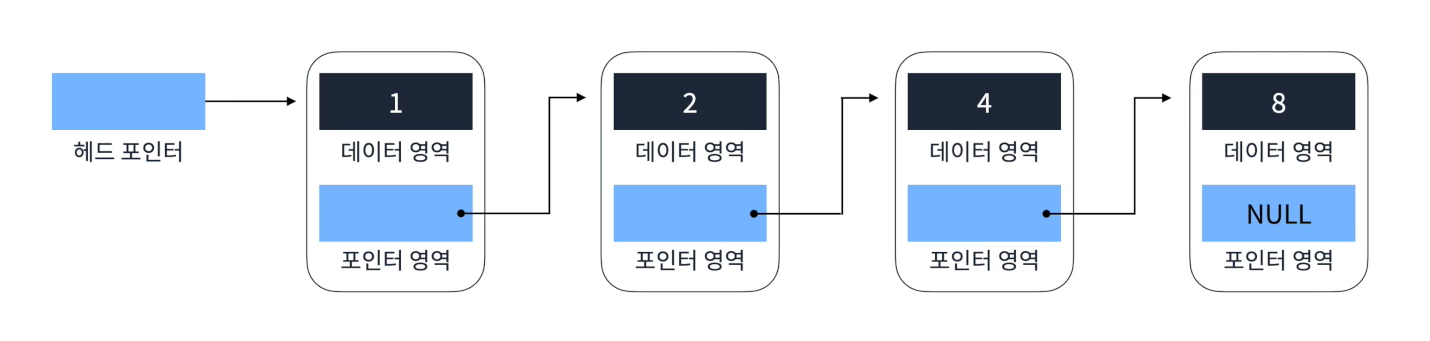
📌 단일 연결 리스트 (Singly Linked List)
- Head에서 Tail까지 단방향으로 이어지는 연결 리스트
- 가장 단순한 형태의 연결 리스트이다.
-
핵심 로직
① 요소 찾기- 헤드 포인터에서부터 포인터가 가리키는 데이터가 찾던 값인지 확인하면서 아니라면 포인터를 통해 다음 데이터로 넘어가는 방식이다. 시간 복잡도는 O(n).
② 요소 추가
- 새로운 요소를 추가할 때 추가할 요소의 포인터를 다음 요소의 데이터를 가리키게 하고 이전 요소의 포인터가 추가할 요소의 데이터를 가리키게 한다. 시간 복잡도는 O(1).
③ 요소 삭제
- 삭제할 요소 이전 요소의 포인터가 삭제할 요소 다음 요소의 데이터를 가리키게 한다. 시간 복잡도는 O(1).
❗ 요소 추가나 삭제를 위해 리스트를 탐색하게 하면 복잡도가 늘어나므로 주의
다음은 단일 연결 리스트를 자바스크립트를 통해 구현한 예시이다.
// 요소(노드) 생성자가 담긴 클래스
class Node {
    constructor(value) {
        this.value = value;
        this.next = null;
    }
}

// 단일 연결 리스트를 구현한 클래스
class SinglyLinkedList {
    // 생성자
    constructor() {
        this.head = null;
        this.tail = null;
        this.length = 0;
    }

    // 요소 탐색 로직
    find(value) {
        let currNode = this.head;
        while(currNode.value !== value) {
            currNode = currNode.next;
        }
        return currNode;
    }

    //첫 부분 요소 추가 로직
    unshift(newValue) {
        const newNode = new Node(newValue);
        if(this.head === null) {
            this.head = newNode;
            this.tail = newNode;
        }

        newNode.next = this.head;
        this.head = newNode;
        this.length++;
        return this;
    }

    // 끝 부분 요소 추가 로직
    append(newValue) {
        const newNode = new Node(newValue);
        if(this.head === null) {
            this.head = newNode;
            this.tail = newNode;
        } else {
            this.tail.next = newNode;
            this.tail = newNode;
        }
        this.length++;
    }

    // 중간 요소 추가 로직
    insert(node, newValue) {
        const newNode = new Node(newValue);
        newNode.next = node.next;
        node.next = newNode;
        this.length++;
    }

    // 요소 삭제 로직
    remove(value) {
        let prevNode = this.head;
        while(prevNode.next.value !== value) {
            prevNode = prevNode.next;
        }

        if(prevNode.next !== null) {
            prevNode.next = prevNode.next.next;
        }
        this.length--;
    }

    //첫 부분 요소 제거 로직
    shift() {
        if(this.head===null) return undefined;
        const currNode = this.head;
        this.head = currNode.next;
        this.length--;
        if(this.length===0) {
            this.tail = null;
        }
        return currNode;
    }

    // 리스트 출력 로직
    display() {
        let currNode = this.head;
        let displayString = "[";
        while(currNode !== null) {
            displayString += `${currNode.value}, `;
            currNode = currNode.next;
        }
        displayString = displayString.substr(0, displayString.length-2);
        displayString += "]";
        console.log(displayString);
    }

    // 리스트 길이 출력 로직
    size() {
        console.log(this.length);
    }
}
해당 코드에 대한 테스트 코드는 다음과 같다.
const linkedList = new SinglyLinkedList();
linkedList.append(1);
linkedList.append(3);
linkedList.append(8);
linkedList.unshift(192);
linkedList.append(23);
linkedList.display();
console.log(linkedList.find(3));
linkedList.remove(8);
linkedList.shift();
linkedList.display();
linkedList.size();
linkedList.insert(linkedList.find(23), 55);
linkedList.display();
linkedList.size();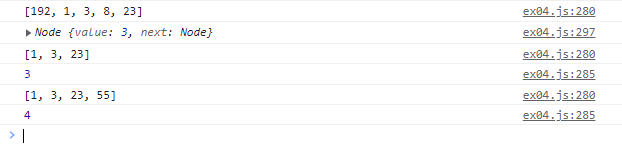
테스트 출력 결과
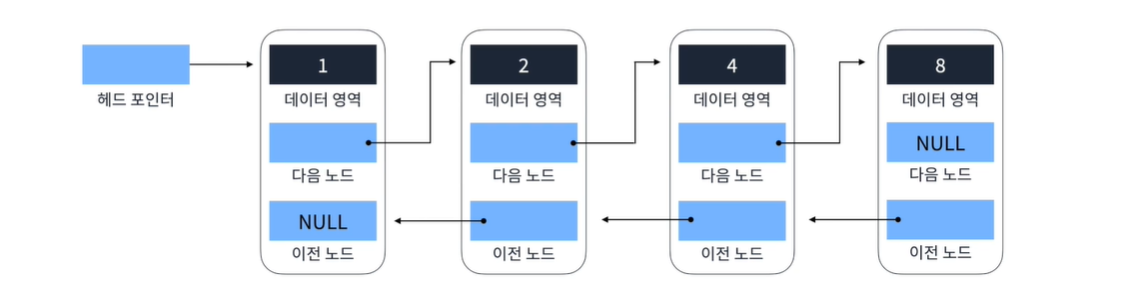
📌 이중 연결 리스트 (Doubly Linked List)
- 양방향으로 이어지는 연결 리스트
- 단일 연결 리스트보다 자료구조의 크기가 더 크다.
-
핵심 로직
① 요소 찾기
- 헤드 포인터에서부터 포인터가 가리키는 데이터가 찾던 값인지 확인하면서 아니라면 다음 포인터를 통해 다음 데이터로 넘어가는 방식이다. 시간 복잡도는 O(n).
② 요소 추가
- 새로운 요소를 추가할 때 추가할 요소의 다음 포인터를 다음 요소의 데이터를 가리키게 하고 다음 요소의 이전 포인터가 새로운 요소를 가리키게 한다. 그리고 이전 요소의 다음 포인터가 추가할 요소의 데이터를 가리키게 하고 추가할 요소의 이전 포인터가 이전 요소의 데이터를 가리키게 한다. 시간 복잡도는 O(1).
③ 요소 삭제
- 삭제할 요소 이전 요소의 다음 포인터가 삭제할 요소 다음 요소의 데이터를 가리키게 한다. 그리고 삭제할 요소 다음 요소의 이전 포인터가 삭제할 요소 이전 요소를 가리키게 한다. 시간 복잡도는 O(1).
다음은 이중 연결 리스트를 자바스크립트를 통해 구현한 예시이다.
class Node {
    constructor(value) {
        this.value = value;
        this.next = null;
        this.prev = null;
    }
}
// 이중 연결 리스트를 구현한 클래스
class DoublyLinkedList {
    // 생성자
    constructor() {
        this.head = null;
        this.tail = null;
        this.length = 0;
    }

    // 요소 탐색 로직
    find(index) {
        if (index < 0 || index >= this.length) return null;
        let count;
        let currNode;
        if (index <= this.length / 2) {
            count = 0;
            currNode = this.head;
        while (count !== index) {
            currNode = currNode.next;
            count++;
            }
        } else {
            count = this.length - 1;
            currNode = this.tail;
            while (count !== index) {
            currNode = currNode.prev;
            count--;
            }
        }
        return currNode;
    }

    //첫 부분 요소 추가 로직
    unshift(newValue) {
        const newNode = new Node(newValue);
        if(this.head === null) {
            this.head = newNode;
            this.tail = newNode;
        } else {
            this.head.prev = newNode;
            newNode.next = this.head;
            this.head = newNode;
        }
        this.length++;
        return this;
    }

    // 끝 부분 요소 추가 로직
    append(newValue) {
        const newNode = new Node(newValue);
        if(this.head === null) {
            this.head = newNode;
            this.tail = newNode;
        } else {
            this.tail.next = newNode;
            newNode.prev = this.tail;
            this.tail = newNode;
        }
        this.length++;
    }

    // 중간 요소 추가 로직
    insert(index, newValue) {
        if (index < 0 || index > this.length) return false;
        if (index === this.length) return !!this.append(newValue);
        if (index === 0) return !!this.unshift(newValue);

        const newNode = new Node(newValue);
        const beforeNode = this.find(index - 1);
        const afterNode = beforeNode.next;

        (beforeNode.next = newNode), (newNode.prev = beforeNode);
        (newNode.next = afterNode), (afterNode.prev = newNode);
        this.length++;
        return true;
    }

    // 요소 삭제 로직
    remove(index) {
        if (index < 0 || index > this.length) return undefined;
        if (index === 0) return this.shift();

        const removedNode = this.find(index);
        removedNode.prev.next = removedNode.next;
        removedNode.next.prev = removedNode.prev;

        removedNode.next = null;
        removedNode.prev = null;
        this.length--;
        return removedNode;
    }

    //첫 부분 요소 제거 로직
    shift() {
        if(this.head===null) return undefined;
        const currNode = this.head;
        if (this.length === 1) {
            this.head = null;
            this.tail = null;
        } else {
            this.head = currNode.next;
            this.head.prev = null;
            currNode.next = null;
        }
        this.length--;
        return currNode;
    }

    // 리스트 출력 로직
    display() {
        let currNode = this.head;
        let displayString = "[";
        while(currNode !== null) {
            displayString += `${currNode.value}, `;
            currNode = currNode.next;
        }
        displayString = displayString.substr(0, displayString.length-2);
        displayString += "]";
        console.log(displayString);
    }

    // 리스트 길이 출력 로직
    size() {
        console.log(this.length);
    }
}
해당 코드에 대한 테스트 코드는 다음과 같다.
const linkedList2 = new DoublyLinkedList();
linkedList2.append(1);
linkedList2.append(3);
linkedList2.append(8);
linkedList2.unshift(192);
linkedList2.append(23);
linkedList2.display();
console.log(linkedList2.find(3));
linkedList2.remove(2);
linkedList2.shift();
linkedList2.display();
linkedList2.size();
linkedList2.insert(2, 55);
linkedList2.display();
linkedList2.size();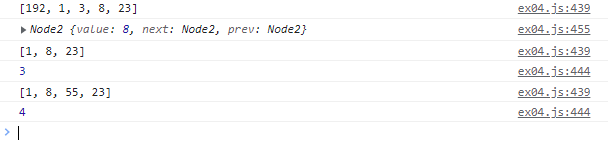
테스트 출력 결과
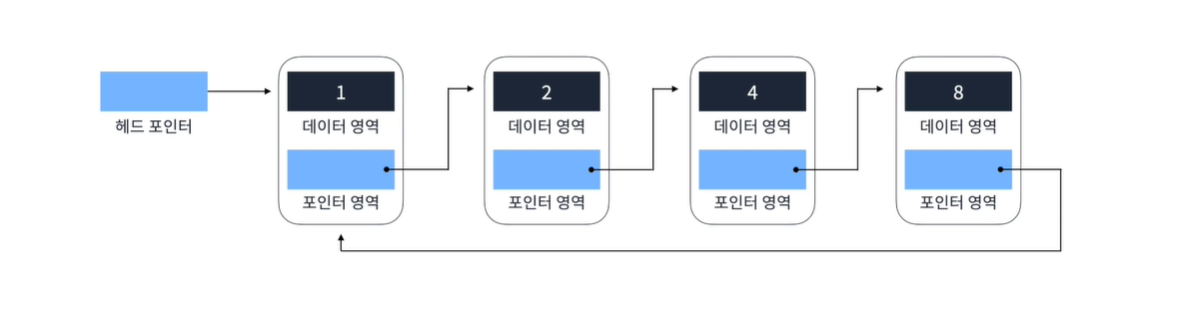
📌 환형 연결 리스트 (Circular Linked List)
-
단일 혹은 이중 연결 리스트에서 Tail이 Head로 연결되는 연결 리스트
-
메모리를 아껴쓸 수 있다.
-
환형 큐 등을 만들 때도 사용된다.
-
맨 마지막 요소의 포인터가 맨 처음 요소를 가리키게 만드는 식으로 간단하게 수정하면 된다.
자세한 코드는 다음에 기회가 된다면 다루도록 한다.
그림 제공: https://programmers.co.kr/

Hodie mihi, Cras tibi