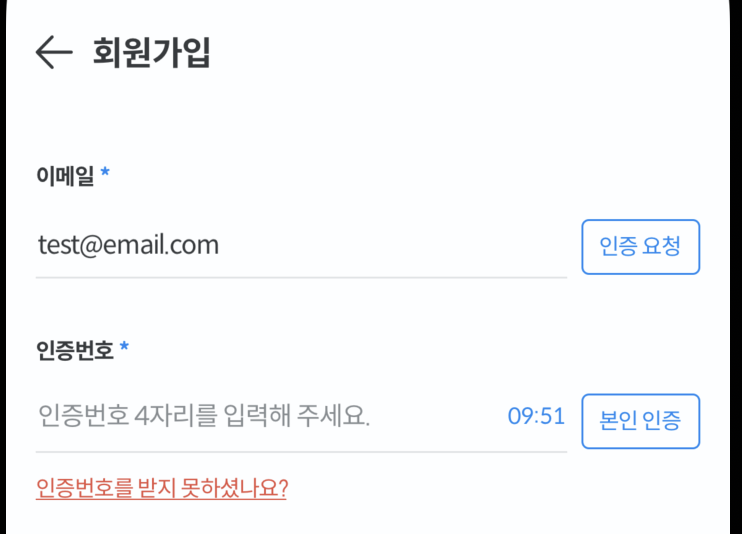
회원가입이나 비밀번호 찾기를 진행할 때 반드시 필요한 것이 인증번호이다.
이메일을 입력하고 인증요청을 누르면 해당 이메일로 인증번호가 가는데 유효시간 안에 인증번호를 입력해서 본인인증을 하면 되는 로직으로 구현하였다.
-
이메일
1) 가입된 이메일이 없을 때
2) 올바른 이메일 형식이 아닐 때
3) 이메일이 중복되었을 때 -
인증번호
1) 인증 되었을 때
2) 인증번호가 일치하지 않을 때
이메일 인증
회원가입 폼은 디자인도 똑같고 같은 기능을 반복하고 있어서 InputText라는 별도 컴포넌트를 만들어서 사용하였다.
<View style={{ flexDirection: "row", justifyContent: "space-between", alignItems: 'center' }}>
    <InputText
        name={AccountType.RegisterProfileType.email}
        label="이메일"
        keyboardTypeOption={'email-address'}
        placeholder={'이메일을 입력해주세요.'}
        rules={{
            required: true,
            pattern: /^(?=.*[a-zA-Z])(?=.*[!@#$%^*+=-])(?=.*[0-9]).{8,25}$/
        }}
        onChangeText={(e) => { setEmail(e) }}
        autoFocus={true}
        disabled={certificationEmail}
        labelRequire={true}
    />
    <TouchableOpacity
        activeOpacity={0.7}
        disabled={certificationEmail || email === ''}
        onPress={() => {
            Alert.alert(
                `인증번호를 발송하시겠습니까?\n유효시간(10분)이내에 입력해주세요.`,
                '',
                [
                    {
                        text: '취소',
                        style: 'cancel',
                    },
                    {
                        text: '확인',
                        onPress: () => { emailVerification(email) }
                    }
                ]
            );
        }}
        style={[{
            borderWidth: 1, borderRadius: 4, width: 64, height: 30, alignItems: 'center', justifyContent: 'center', position: "absolute", top: 62, right: 0,
        }, { borderColor: certificationEmail ? Color.Gray40 : email === '' ? Color.Gray40 : Color.Blue50 },
        { backgroundColor: certificationEmail ? Color.Gray40 : email === '' ? Color.Gray40 : Color.Gray10 }
        ]}>
        {certificationEmail ?
            <Title font={FontStyle.regular.font12} color={Color.Gray10} text={`인증 완료`} />
            :
            <>
                {email === '' ?
                    <Title font={FontStyle.regular.font12} color={Color.Gray10} text={`인증 요청`} />
                    : <Title font={FontStyle.regular.font12} color={Color.Blue50} text={`인증 요청`} />
                }
            </>
        }
    </TouchableOpacity>
</View>
이메일 중복체크
api통신을 하여 이메일 중복체크를 확인한다.
status가 201이라면(사용 가능한 이메일 주소)
verificationCode를 true로 변경, 상태메세지는 빈값으로, 시간은 초기값으로 세팅해주고
그 외에는 Toast를 이용하여 올바른 이메일 형식이 아니라는 메세지를 띄워준다.
const [verificationCode, setVerificationCode] = useState<boolean>(false);
const [minutes, setMinutes] = useState<number>(10);
const [seconds, setSeconds] = useState<number>(0);
//이메일 중복체크
const emailVerification = async (email: string) => {
const { status, data } = await AccountService.Account.emailVerification(email);
if (status === 201) {
if (data.status === true) {
setEmailMessage('');
setVerificationCode(true);
setMinutes(10);
setSeconds(0);
}
} else {
Toast.show({
type: ConfigType.Toast.ErrorToast,
text1: `올바른 이메일 형식이 아닙니다.`,
})
}
}minutes, seconds의 값이 변경될때마다 useEffect가 실행되는데
이렇게 되면 처음 회원가입 화면을 키자마자 타이머가 실행되게 된다.
이메일 인증요청 확인을 눌러야지만 verificationCode가 true로 변경되면서 그때서야 파란색 인증번호가 보이는데 이미 회원가입 화면을 키자마자 카운트 다운이 되어 있어서 타이밍이 맞지 않는다.
(원래는 인증요청 후에 10분부터 카운트 다운되어야 함)
    useEffect(() => {
        const countDown = setInterval(() => {
            setSeconds(seconds);
            if (seconds > 0) {
                setSeconds(seconds - 1);
            }
            if (seconds === 0) {
                if (minutes === 0) {
                    clearInterval(countDown);
                } else {
                    setMinutes(minutes - 1);
                    setSeconds(59);
                }
            }
        }, 1000);
        return () => clearInterval(countDown);
    }, [seconds, minutes]);
그래서 인증요청을 눌러 이메일 중복체크 api통신을 할 때
status가 201이라면 시간을 초기값으로 세팅해주는 작업을 해주었다.
setMinutes(10); setSeconds(0);
이렇게 해줘야 인증번호 요청을 클릭했을 때 렌더링 되어 10분부터 다시 카운트 다운되는 것을 볼 수 있다.
{emailMessage === '' && verificationCode && !certificationEmail &&
    <View style={{ position: "absolute", right: 72, paddingTop: 55, flexDirection: 'row' }}>
        <Title font={FontNumberStyle.regular.font12} color={Color.Blue50}
            text={`${minutes < 10 ? `0${minutes}` : minutes}:${seconds < 10 ? `0${seconds}` : seconds}`}
        />
    </View>
}
다음으로는 이메일로 전송된 인증번호를 인증번호 input에 입력해서 일치할 때, 일치하지 않았을 때 상황에 맞는 예외처리를 해주었다.

안녕하세요. 프론트앤드 개발자 홍다영입니다.