[사이드프로젝트] 그저 그런 REST API로 괜찮은가? - 진정한 REST API 구현해보기 - Spring Security & Oauth2 설정
Spring Security
Spring Security는 인증과 보안 관련 Spring Framework로 필터 & 인터셉터 기반으로 구현된다.
공식 홈페이지에서는 다음과 같이 정의하고 있다.
Spring Security is a powerful and highly customizable authentication and access-control framework. It is the de-facto standard for securing Spring-based applications.
Spring Security 구조
Spring Security는 크게 두 개의 구조로 구분된다.
하나는 Web Security이고 하나는 Methode Security다.
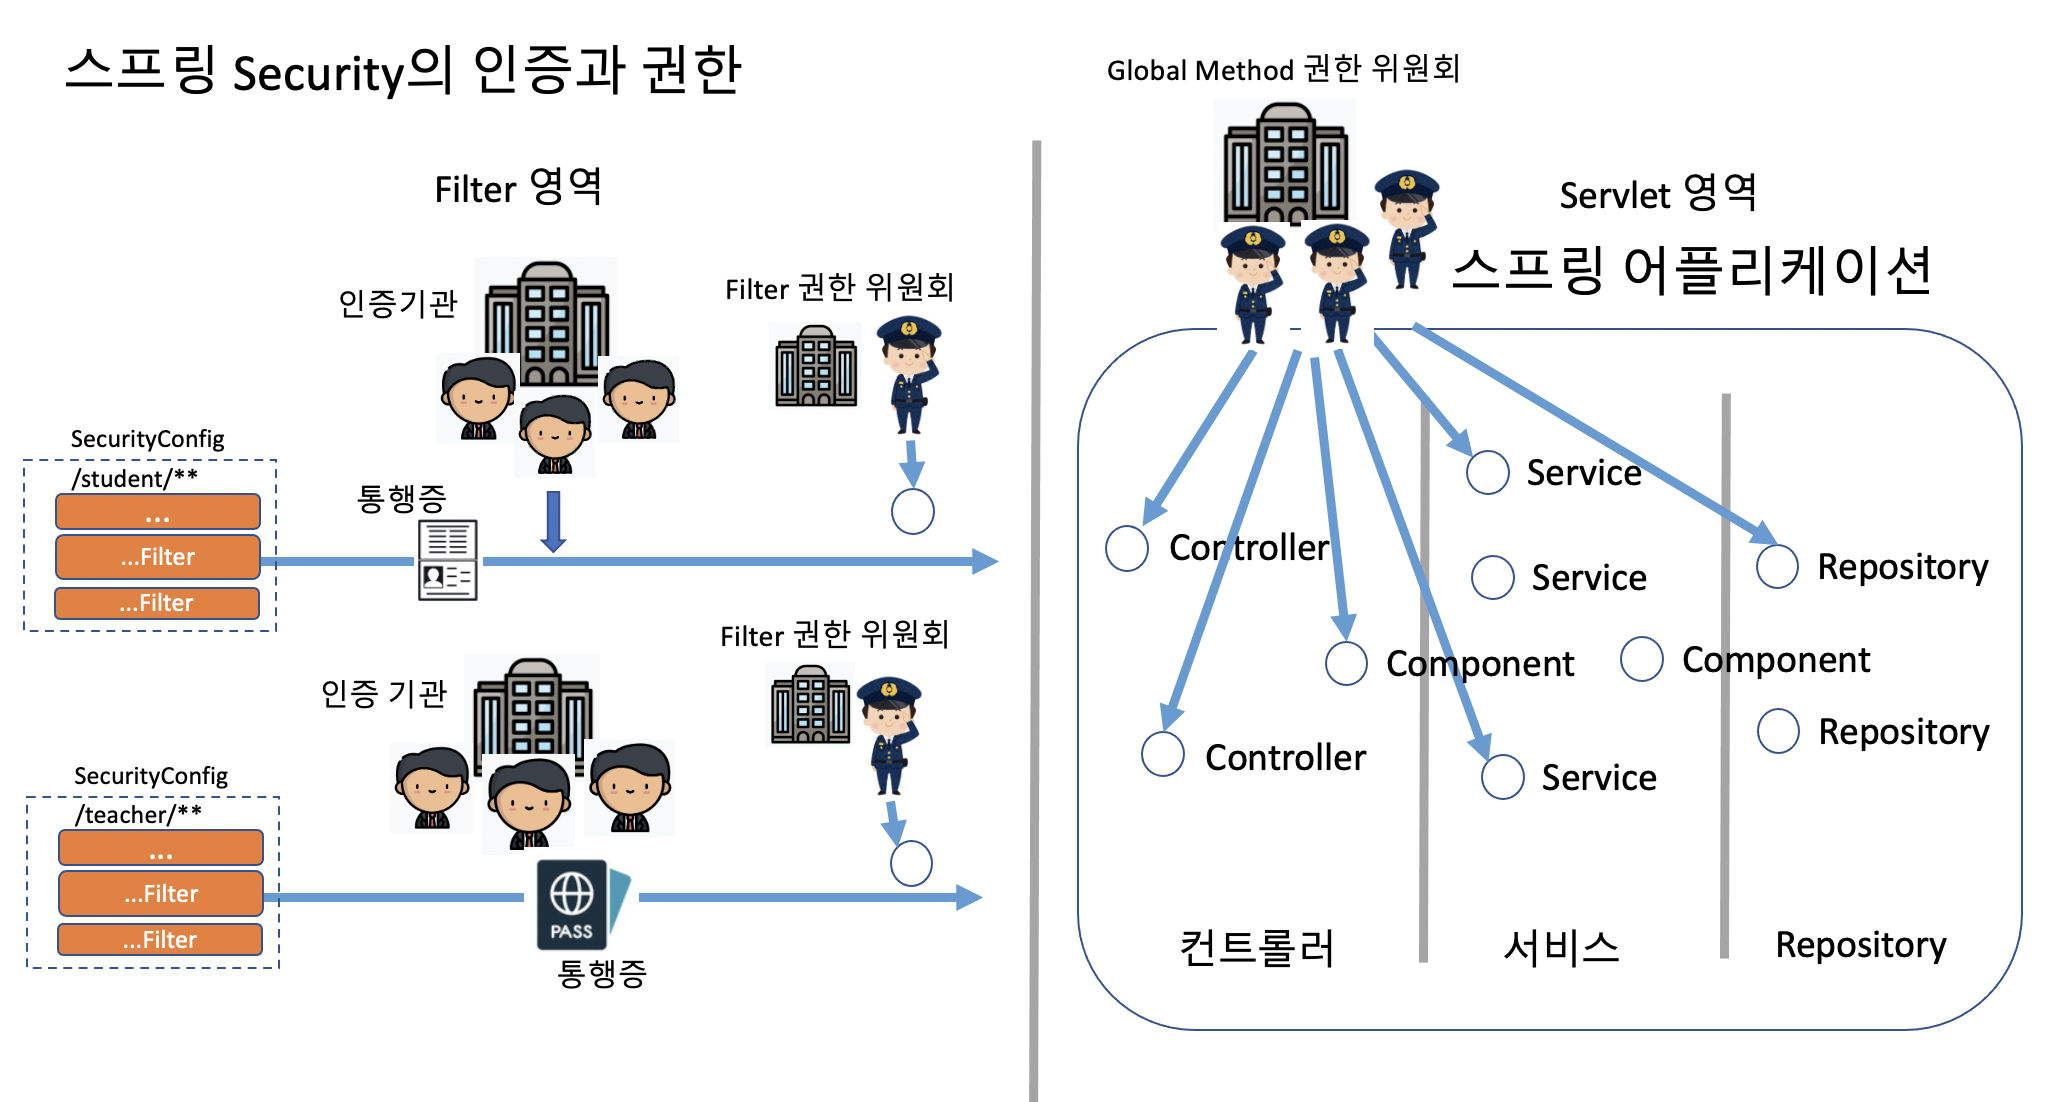
Web Security
Web Security는 위 그림에서 보이는 Filter 영역에서 동작한다.
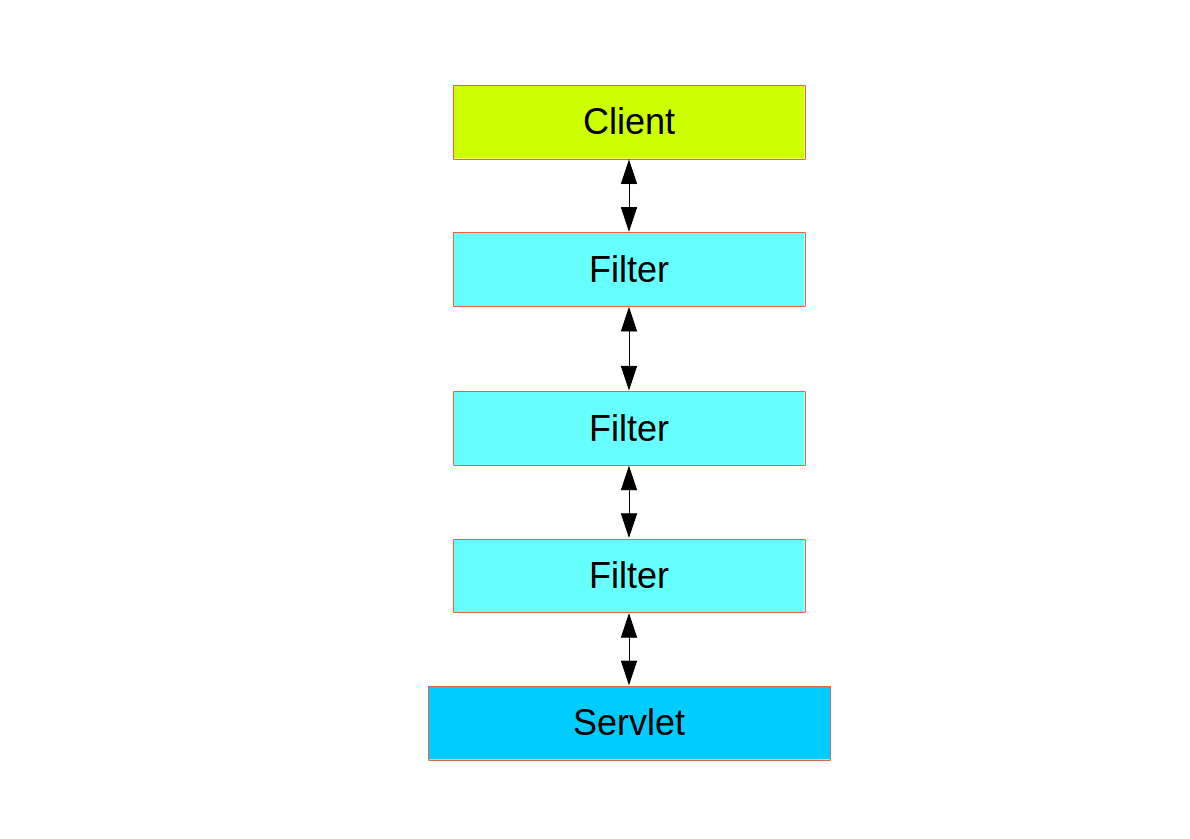
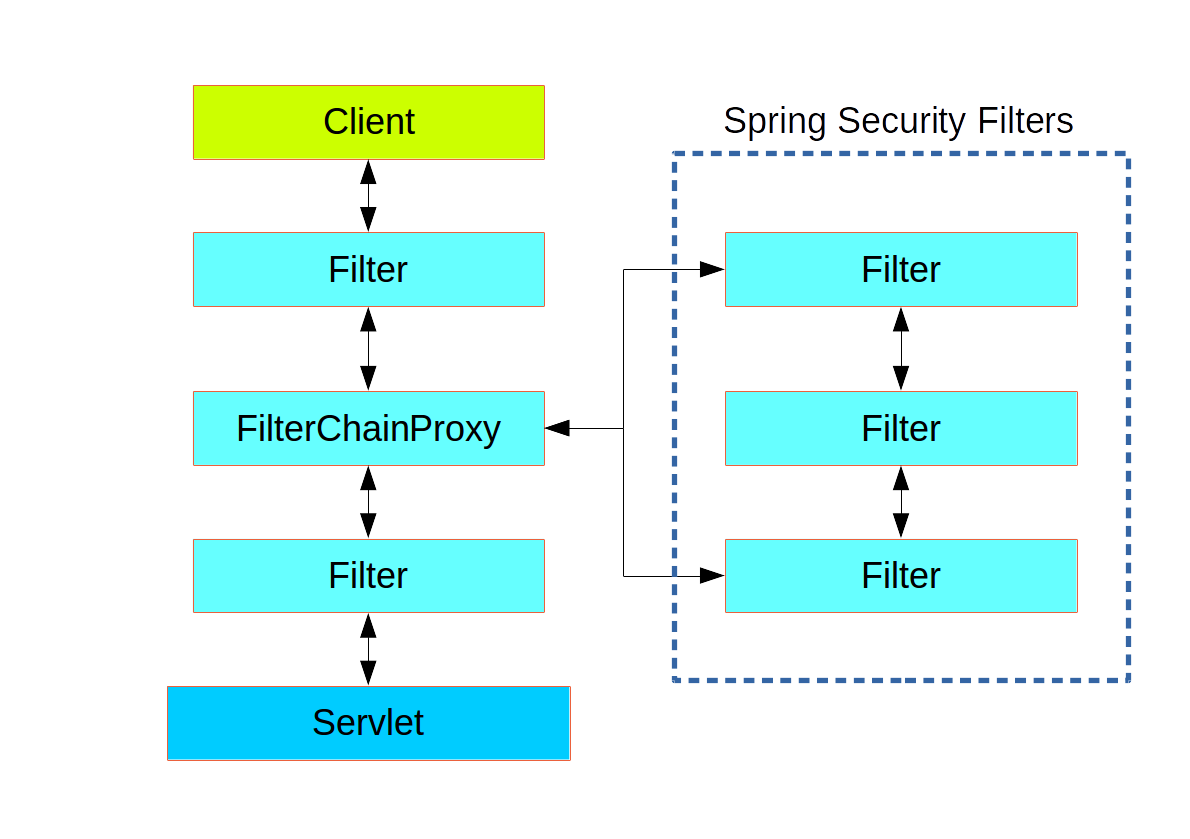
Filter는 Client와 Servlet 사이에 동작하는 것으로 Request가 Servlet으로 들어오기 전에 인증, 로깅, 형변환 등 다양한 기능을 한다.
이때 Spring Security는 Filter 사이에 FilterChainProxy라는 프록시 Filter를 추가하여 개발자가 필요에 따라 인증 관련 Filter를 추가, 제거할 수 있다.
기본적으로 Spring Security에서 다양한 인증 Filter를 제공하고 있으며(EX RememberMeFilter) 개발자가 직접 구현해서 추가할 수 있다.
Web Security에서 접근 권한 관리도 가능하다. Filter를 지나갈 때, 특정 권한을 가진 경우에만 통과시켜 Servlet에 들어가기 전에 UNAUTHORIZED 예외 처리가 가능하다.
// Example
@Configuration
@Order(SecurityProperties.BASIC_AUTH_ORDER - 10)
public class ApplicationConfigurerAdapter extends WebSecurityConfigurerAdapter {
  @Override
  protected void configure(HttpSecurity http) throws Exception {
    http.antMatcher("/match1/**")
      .authorizeRequests()
        .antMatchers("/match1/user").hasRole("USER")
        .antMatchers("/match1/spam").hasRole("SPAM")
        .anyRequest().isAuthenticated();
  }
}
Method Security
Method Security는 인터셉터 기반의 구조로 권한 관리가 필요한 메소드마다 관련 설정을 해줄 수 있다.
각 메소드별로 필요에 따라 설정이 가능하므로 Web Security와 비교해서 보다 세밀하게 권한 관리가 가능해진다.
사용방법은 간단하다. 우선 @SpringBootApplication에서 @EnableGlobalMethodSecurity(securedEnabled = true) 어노테이션을 사용해 Method Security를 사용하겠다 선언해주고 관리가 필요한 메소드 위에 어노테이션을 붙여주면 된다.
(@Secured 어노테이션 외에도 @PreAuthorize, @PostAuthorize 등이 있다.)
@SpringBootApplication
@EnableGlobalMethodSecurity(securedEnabled = true)
public class SampleSecureApplication {
}
@Service
public class MyService {
@Secured("ROLE_USER")
public String secure() {
return "Hello Security";
}
}Web Security & Method Security
Spring Security 공식 홈페이지에서는 Web Security와 Method Security를 함께 사용하기를 권장하고 있다.
Tip!!
It is not uncommon to combine Web security and method security. The filter chain provides the user experience features, such as authentication and redirect to login pages and so on, and the method security provides protection at a more granular level.
간단하게 해석하면 Web Security와 Method Security를 조합하여 Web Security에서는 사용자 인증 로직을, Method Security에서는 권한 관리 로직을 구현하여 조합하라는 내용이다.
Web Security에서도 권한 관리가 가능한데 왜 Methode Security에서 별도로 관리해야 하는가????
참고 : 스텍오버플로우에서 얘기하기를 Spring Security에서는 Method Security 방식의 권한 관리를 권장한다고 한다.
왜냐하면 Web Security 기반에서 권한 관리를 하게 되면 URL에 의존성을 가지게 되고(수정하기가 어렵다.) 이는 MVC 패턴 기준, Controller와 View에 의존성을 가지게 되는 것이다.
Controller와 View는 Service 로직에서 만든 DTO를 특정 형태로 형변환 해주거나 UI를 통해 보여주는 역할만 하기 때문에 권한 관리의 핵심이 아니며 이를 우회하여 Service 계층에서 바로 데이터를 가져올수도 있기 때문이다.
반면 Method Security를 사용하여 Service 레이어에서 권한 관리를 하면 실제 데이터를 처리하는 부분에 권한을 매핑하기 때문에 우회의 위험성이 줄고 URL 수정 및 서버 아키텍처(REST or Server-Side)의 변경 및 확장이 더 용이해진다.
따라서 Web Security에서 인증 관련 Filter를 설정하고 세부 권한 관리는 Methode Security를 활용하는 방식이 권장된다.
SecurityConfig 작성
우선 Web Security 설정을 추가해준다.
Swagger UI를 사용하기 위해서 관련 URL과 정적 리소스 부분은 Filter에서 제외해줘야 한다.
그리고 Oauth2 설정에서 사용할 PasswordEncoder, TokenStore, AuthenticationManager를 빈으로 등록해준다.
(이때 AuthenticationManager는 Resource Server와 Authorization Server를 연결해주기 위해 사용된다.)
마지막으로 유저 정보를 관리할 AccountService(다음 챕터에서 구현)를 UserDetailService로 등록해준다.
@Configuration
@EnableWebSecurity
@EnableGlobalMethodSecurity(securedEnabled = true)
public class SecurityConfig extends WebSecurityConfigurerAdapter {

    @Autowired
    private AccountService accountService;

	// Oauth2에서 사용할 설정을 Bean으로 등록해준다.
    @Bean
    public PasswordEncoder passwordEncoder() {
        return PasswordEncoderFactories.createDelegatingPasswordEncoder();
    }

    @Bean
    public TokenStore tokenStore() {
        return new InMemoryTokenStore();
    }

    @Bean
    public AuthenticationManager authenticationManagerBean() throws Exception {
        return super.authenticationManagerBean();
    }

    // Security에서 유저 정보를 다루기 위한 Service와 PasswordEncoder를 등록해준다.
    @Override
    protected void configure(AuthenticationManagerBuilder auth) throws Exception {
        auth.userDetailsService(accountService)
                .passwordEncoder(passwordEncoder());
    }

    // Swagger & 정적 리소스 허용
    @Override
    public void configure(WebSecurity web) throws Exception {
        web.ignoring()
                .requestMatchers(PathRequest
                        .toStaticResources().atCommonLocations());
        web.ignoring().mvcMatchers("/swagger-ui/*", "/swagger-resources/**", "/swagger-ui.html", "/webjars/**", "/v3/api-docs");
    }

}
Spring Security Oauth2
강의에서 사용한 Spring Security Oauth2 내용은 Spring Security 5.x.x 대로 Migration해서 제대로 된 내용을 찾기가 어려웠다.
따라서 강의에서 사용한 구조를 분석해보도록 하겠다.
Oauth2 구조는 크게 4가지가 있고 세부 내용은 내가 정리한 아래 블로그 글을 참고하면 된다.
강의에서 사용한 구조는 Resource Owner Password Credentials Grant Type 타입이다.
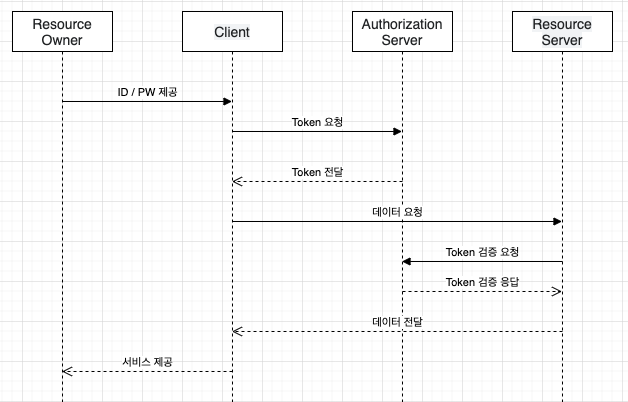
Resource Owner Password Credentials Grant Type은 Resource Owner(사용자)가 Authorization Server에 등록된 Client에 아이디와 비밀번호를 제공하면 Client는 Client id와 secret 키와 함께 Authorization 서버에 Token 요청을 보냅니다.
발급받은 Token을 헤더에 담아 Resource 서버에 데이터를 요청하면 Resource 서버는 Authorization 서버에 Token 검증을 요청한다.
이 구조는 타 구조에 비해 비교적 구현이 쉽다.(별도의 로그인 페이지를 구현하지 않아도 된다.) 다만 아이디와 패스워드를 Client에 직접적으로 제공하기 때문에 신뢰할 수 있는 Client가 아니면 보안상 매우 위험하다.
따라서 우선 강의에서 제공하는 Oauth2 방식으로 구현하고 차후 JWT Filter를 추가하여 JWT 기반의 보안 방식으로 수정하고자 한다.
Authorization Server Setting & Create Client
우선 Authorization Server를 사용하기 위해서 Config 파일을 작성하고 테스트에서 사용할 Client를 Inmemory 방식으로 추가해줍니다.
그리고 SecurityConfig에서 Bean으로 등록한 객체들을 필요에 맞게 가져와서 배치합니다.
@Configuration
@EnableAuthorizationServer
public class AuthConfig extends AuthorizationServerConfigurerAdapter {
    @Autowired
    PasswordEncoder passwordEncoder;

    @Autowired
    AuthenticationManager authenticationManager;

    @Autowired
    AccountService accountService;

    @Autowired
    TokenStore tokenStore;

    public void configure(AuthorizationServerSecurityConfigurer security) throws Exception {
        security.passwordEncoder(passwordEncoder);
    }

	// 테스트에 사용할 Client를 등록해줍니다.
    public void configure(ClientDetailsServiceConfigurer clients) throws Exception {
        clients.inMemory()
                .withClient("myapp")
                .authorizedGrantTypes("password","refresh_token")
                .scopes("read","write")
                .secret(this.passwordEncoder.encode("pass"))
                .accessTokenValiditySeconds(10 * 60)
                .refreshTokenValiditySeconds(6 * 10 * 60);
    }

	// 권한 관리를 위한 authenticationManager와 유저 정보를 관리하는 AccountService,
    // Token 정보를 저장하기 위한 tokenStore를 등록합니다.
    public void configure(AuthorizationServerEndpointsConfigurer endpoints) throws Exception {
        endpoints.authenticationManager(authenticationManager)
                .userDetailsService(accountService)
                .tokenStore(tokenStore);
    }

}
Resource Server Setting
Resource Server 세팅은 비교적 간단하다.
우선 어떤 Resource를 관리하는 지 Id 값을 설정해주고 인증이 필요한 부분과 필요하지 않은 부분을 나눠서 설정해준다.
@Configuration
@EnableResourceServer
public class ResourceConfig extends ResourceServerConfigurerAdapter {
    public void configure(ResourceServerSecurityConfigurer resources) throws Exception {
    	// Resource Id 등록
        resources.resourceId("event");
    }

	// 인증 설정, GET Method는 전부 허용, 그 외 요청은 인증 필요!
    public void configure(HttpSecurity http) throws Exception {
        http
                .anonymous()
                    .and()
                .authorizeRequests()
                  .mvcMatchers(HttpMethod.GET, "/api/**")
                     .permitAll()
                  .anyRequest()
                      .authenticated()
                  .and()
                .exceptionHandling()
                    .accessDeniedHandler(new OAuth2AccessDeniedHandler());
    }
}