2. 타임리프 - 스프링 통합과 폼
프로젝트 설정 :
Spring MVC1 의 상품 관리 프로젝트를 이어서 한다.
타임리프 스프링 통합
- 스프링 통합 메뉴얼 : https://www.thymeleaf.org/doc/tutorials/3.0/thymeleafspring.html
- 기본 메뉴얼 : https://www.thymeleaf.org/doc/tutorials/3.0/usingthymeleaf.html
→ 스프링 통합? : 타임리프는 스프링 없이도 동작하지만, 스프링과 통합을 위한 다양한 기능을 편리하게 제공한다.
스프링 통합으로 추가되는 기능들
- 스프링의 SpringEL 문법 통합.
${@myBean.doSomething()}처럼 스프링 빈 호출을 지원한다.- 편리한 폼 관리를 위한 추가 속성
th:objectth:field, th:errors, th:errorclass
- 폼 컴포넌트 기능
- checkbox, radio button, List 등을 편리하게 사용할 수 있는 기능을 지원 한다.
- 스프링의 메시지, 국제화 기능의 편리한 통합
- 스프링의 검증, 오류 처리를 통합
- 스프링의 변환 서비스를 통합 (ConversionService)
build.gradle 로 타임리프 템플릿 엔진을 스프링 빈에 등록하고, 타임리프용 뷰 리졸버를 스프링 빈에 등록하기
build.gradle
implementation 'org.springframework.boot:spring-boot-starter-thymeleaf'입력 폼 처리
- 타임리프가 지원하는 폼 기능을 쓰기위해서는, Model을 넘겨야 한다.
- 입력은 타임리프가 받는데, 그러면 어디에 담아야 하는가? → 따라서 빈 객체 (해당 프로젝트에서는 “new Item()” 으로 빈 Item 객체를 생성하여 model에 담아 타임리프로 넘긴다.
등록 폼 (add)
FormItemController - addForm method → addForm.html -
model.addAttribute("item", new Item()); -> th:object="${item}"- 어디가 일치하는지 어떻게 가져오는지 생각해보자.
<input type="text" id="itemName" th:field="*{itemName}" class="form-control" placeholder="이름을 입력하세요">
<input type="text" id="price" th:field="*{price}" class="form-control" placeholder="가격을 입력하세요">
<input type="text" id="quantity" th:field="*{quantity}" class="form-control" placeholder="수량을 입력하세요">
name 대신, object 에서 불러온 객체의 attribute 들을과 같은 이름의 값을 읽을 수 있다.
- 이것을
th:field="*{itemName}"로 표현한다.
실행 화면
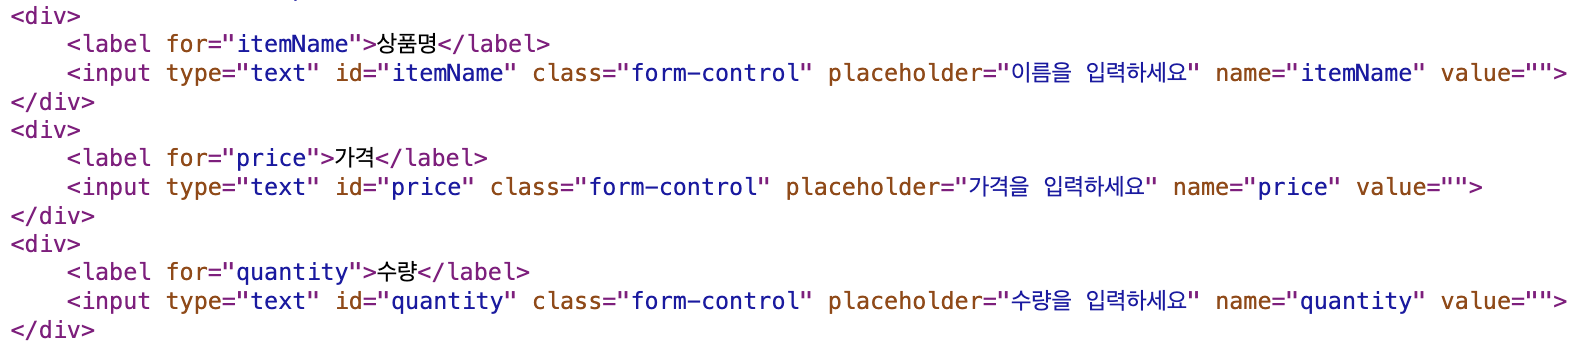
- 입력 전이라 value 의 값이 빈 문자열임을 확인할 수 있다.
- name 필드도 자동 생성되어 들어감을 알 수 있다.
→ th:field = “*{itemName}” 을 사용하면 3개의 속성을 자동으로 만들어주긴 함.
- id : th:field 에서 지정한 변수 이름과 동일함 (id = “itemName”)
- name : th:field 에서 지정한 변수 이름과 같다 (name = “itemName”)
- value : th:field 에서 지정한 변수의 값을 사용한다 (value = “”)
- 즉, id 속성을 제거해도 가능함. 가독성을 위해 살려놓음.
해당 Add 화면에서 “상품 등록” 버튼 클릭 시, form/items/add URL로 post 방식으로 전송된다.
그렇다면, 어떻게 어떤 URL 경로를 알 수 있을까?
th:action에서 명시적으로 URL을 지정하지 않으면, 해당 폼이 제출될 때 현재 페이지의 URL로 요청이 전송됩니다. 즉, 요청이 발생한 URL이 자동으로 사용됩니다.
동작방식
action="item.html"이 명시되지 않은 경우:- Thymeleaf가
th:action속성을 처리할 때action속성의 값이 비어 있으면, 폼이 현재 요청된 URL로 데이터를 전송합니다. - 이 동작은 브라우저의 기본 동작과 유사합니다.
action속성이 지정되지 않으면, 폼은 기본적으로 현재 페이지의 URL로 데이터를 제출하게 됩니다.
- Thymeleaf가
th:action과th:object가 결합된 경우:th:action이 명시되지 않거나, 구체적인 URL 경로가 제공되지 않은 경우, Thymeleaf는th:object를 통해 컨트롤러에서 제공된 객체(여기서는${item})의 정보와 결합하여 현재 URL 또는 그와 관련된 경로로 데이터를 보냅니다.- 이때, 현재 페이지의 URL을 그대로 사용하거나 URL의 일부만 변환할 수 있습니다.
수정 폼(edit)
<form action="item.html" th:action th:object="${item}" method="post">

<div>
	<label for="id">상품 ID</label>
	<input type="text" id="id" th:field="*{id}" class="form-control" readonly>
</div>
<div>
	<label for="itemName">상품명</label>
	<input type="text" id="itemName" th:field="*{itemName}" class="form-control">
</div>- 상품 id - readonly
- 상품명 : itemName, 가격 : price, 수량 : quantity → 입력을 받고, 수정 된 object 를 post 방식으로 form/items/edit URL 에 Post 요청을 보낸다.
- 이후 FormItemController - edit (PostMapping) 메서드에서 해당 객체를 받아 업데이트 비즈니스 로직을 실행한다.
@PostMapping("/{itemId}/edit")
    public String edit(@PathVariable Long itemId, @ModelAttribute Item item) {
        itemRepository.update(itemId, item);
        return "redirect:/form/items/{itemId}";
    }
요구 사항 추가
체크박스, 라디오버튼, 셀렉트 박스 추가하기.
요구 사항
- 판매 여부
- 판매 오픈 여부
- 체크 박스 사용
- 등록 지역
- 서울, 부산, 제주
- 체크 박스로 다중 선택할 수 있다
- 상품 종류
- 도서, 식품, 기타
- 라디오 버튼으로 하나만 선택할 수 있다
- 배송 방식
- 빠른 배송
- 일반 배송
- 느린 배송
- 셀렉트 박스로 하나만 선택할 수 있다
→ 판매 여부 : open - Boolean type
→ 등록 지역 : regions - List type
→ 상품 종류 : itemType - Enum type - ItemType
→ 배송 방식 : deliveryCode - String type
Item.class 추가 내용
    private Boolean open; //판매 여부
    private List<String> regions; // 등록 지역
    private ItemType itemType; //상품 종류

    private String deliveryCode; // 배송 방식
ItemType.enum
public enum ItemType {
    BOOK("도서"), FOOD("음식"), ETC("기타");
    private final String description;

    ItemType(String description) {
        this.description = description;
    }
    public String getDescription() {
	      return description;
    }
}
체크 박스 - 단일 1
- 판매 여부를 체크할 수 있는 체크박스를 추가한다. → HTML 에서 체크박스를 만들고, 만약 선택하지 않고 submit 하면, open 이라는 값이 들어가지 않는다, 즉 NULL 값을 서버는 받는다. false 도 아니고, null 이다!
이 문제를 해결하기 위해 스프링MVC 가 false 로 인식하도록 하는 방법이 있다.
name 과 같은 이름 앞에 _name 을 히든 필드로 만들고, 해당 값을 전송하면, 만약 name 값이 안들어왔을 경우, name 값을 false 로 설정해준다.
<!-- single checkbox -->
<div>판매 여부</div> <div>
<div class="form-check">
<input type="checkbox" id="open" name="open" class="form-check-input"> <input type="hidden" name="_open" value="on"/> <!-- 히든 필드 추가 --> <label for="open" class="form-check-label">판매 오픈</label></div>
 </div>
하지만, 번거롭다.
체크 박스 - 단일2
우선, 추가된 attribute 들을 update 할 수 있도록 update 를 수정.
ItemRepository.class - update method
public void update(Long itemId, Item updateParam) {
  Item findItem = findById(itemId);
  findItem.setItemName(updateParam.getItemName());
  findItem.setPrice(updateParam.getPrice());
  findItem.setQuantity(updateParam.getQuantity());
  findItem.setOpen(updateParam.getOpen());
  findItem.setRegions(updateParam.getRegions());
  findItem.setItemType(updateParam.getItemType());
  findItem.setDeliveryCode(updateParam.getDeliveryCode());
}
addForm.html
<!-- single checkbox -->
<div>판매 여부</div>
<div>
	<div class="form-check">
		<input type="checkbox" id="open" th:field="*{open}" class="form-check-input">
		<label for="open" class="form-check-label">판매 오픈</label>
	</div>
</div>
editForm.html
<!-- single checkbox -->
<div>판매 여부</div>
<div>
    <div class="form-check">
        <input type="checkbox" id="open" th:field="*{open}" class="form-check-input">
        <label for="open" class="form-check-label">판매 오픈</label>
    </div>
</div>
item.html
<!-- single checkbox -->
<div>판매 여부</div>
<div>
    <div class="form-check">
        <input type="checkbox" id="open" th:field="${item.open}" class="form-check-input" disabled>
        <label for="open" class="form-check-label">판매 오픈</label>
    </div>
</div>- add, edit은 값을 받아 수정하는 것이 필요함. 하지만 item.html 은 현재의 값을 단순 랜더링 하기에,
th:object="*${*item*}*" 사용하지 않았다. 따라서 th:”*{…}” 형식을 사용할 수 없다.
체크 박스 - 멀티
- 등록 지역에 대한 값을 하나 이상 추가할 수 있도록 한다.
FormItemController - 추가
Map<String, String> regions = new LinkedHashMap<>();
regions.put("SEOUL", "서울");
regions.put("BUSAN", "부산");
regions.put("JEJU", "제주");
model.addAttribute("regions", regions);
해당 부분은, addForm 화면에서도 보여져야 하고, editForm 화면에서도 보여져야 하고, item 화면에서도 보여져야 한다.
해당 부분은 Model 에 담아 보내는 값을 처리하기 위한 로직인데, 이것이 3군데에서나 중복이 발생한다!
해결 방법
@ModelAttribute 애노테이션
FormItemController.class 추가
    @ModelAttribute("regions")
    public Map<String, String> regions() {
        Map<String, String> regions = new LinkedHashMap<>();
        regions.put("SEOUL", "서울");
        regions.put("BUSAN", "부산");
        regions.put("JEJU", "제주");
        return regions;
    }
→ 클래스 안에 애노테이션 ModelAttribute 를 작성하여 메서드를 만들면, 해당 메서드는 자신의 컨트롤러가 호출되어 실행 될 때 무조건 Model에 addAttribute 하여 return 값을 model에 담는다. 이 실행은 컨트롤러의 어떤 것이 호출 되던 실행된다.
즉, 컨트롤러가 호출될 때는 해당 컨트롤러에서 사용되는 모든 모델에 항상 regions 가 담겨있는 것이 보장된다.
addForm.html, editForm.html
<!-- multi checkbox -->
<div>
    <div>등록 지역</div>
    <div th:each="region : ${regions}" class="form-check form-check-inline">
        <input type="checkbox" th:field="*{regions}" th:value="${region.key}" class="form-check-input">
        <label th:for="${#ids.prev('regions')}"
               th:text="${region.value}" class="form-check-label">서울</label>
    </div>
</div>
th:field 에 의해 id가 자동으로 생성되는데, each를 통해 반복문이 실행 될 때 각각의 id는 달라야 한다. 따라서 name + 숫자 인덱스를 붙여 id를 만든다. 즉 id는 regions1, regions2, regions3 가 된다.
item.html
<!-- multi checkbox -->
<div>
    <div>등록 지역</div>
    <div th:each="region : ${regions}" class="form-check form-check-inline">
        <input type="checkbox" th:field="${item.regions}" th:value="${region.key}" class="form-check-input" disabled>
        <label th:for="${#ids.prev('regions')}"
               th:text="${region.value}" class="form-check-label">서울</label>
    </div>
</div>
th:object 를 사용하지 않았다. 따라서 th:field 부분에 직접 값을 받아오도록 ${item.regions} 사용해야 한다.
라디오 버튼
- 여러 선택지 중 하나를 반드시 선택해야 하는 상황에서 사용한다.
- JAVA ENUM 을 사용해보자.
FormItemController.class 추가
@ModelAttribute("itemType")
public ItemType[] itemTypes() {
    return ItemType.values();
}- Enum 으로 만든 itemType에 들어있는 값을 전부 넘기기 위해 .values() 를 사용하여 ItemType : Enum List 를 반환하고, 이는 컨트롤러가 실행되면 모델에 담기도록 보장된다.
- Property 접근법으로 사용해야 하기 때문에, Enum 에 getDescription() 을 빼먹지 않도록 하자.
addForm.html, editForm.html
<!-- radio button -->
<div>
    <div>상품 종류</div>
    <div th:each="type : ${itemTypes}" class="form-check form-check-inline">
        <input type="radio" th:field="*{itemType}" th:value="${type.name()}" class="form-check-input">
        <label th:for="${#ids.prev('itemType')}" th:text="${type.description}" class="form-check-label">
            BOOK
        </label>
    </div>
</div>
item.html
<!-- radio button -->
<div>
    <div>상품 종류</div>
    <div th:each="type : ${itemTypes}" class="form-check form-check-inline">
        <input type="radio" th:field="${item.itemType}" th:value="${type.name()}" class="form-check-input" disabled>
        <label th:for="${#ids.prev('itemType')}" th:text="${type.description}" class="form-check-label">
            BOOK
        </label>
    </div>
</div>
추가 : Enum을 모델에 담아서 전달하지 않고, 타임리프에서 바로 Enum을 직접 접근하여 값을 사용할 수 있다.
<div th:each="type : ${T(hello.itemservice.domain.item.ItemType).values()}">${T(hello.itemservice.domain.item.ItemType).values()} : 스프링EL 문법으로 사용가능하다. 하지만 추천은 하지 않음. 왜? 패키지 정보나 위치, 파일명등이 바뀔 수 있기 때문에.
셀렉트 박스
- 여러 선택지 중 하나를 선택할 때 사용할 수 있다.
FormItemController.class 추가
@ModelAttribute("deliveryCodes")
public List<DeliveryCode> deliveryCodes() {
    List<DeliveryCode> deliveryCodes = new ArrayList<>(); deliveryCodes.add(new DeliveryCode("FAST", "빠른 배송")); deliveryCodes.add(new DeliveryCode("NORMAL", "일반 배송")); deliveryCodes.add(new DeliveryCode("SLOW", "느린 배송")); return deliveryCodes;
}
addForm.html, editForm.html
<!-- SELECT -->
<div>
    <div>배송 방식</div>
    <select th:field="*{deliveryCode}" class="form-select">
        <option value="">==배송 방식 선택==</option>
        <option th:each="deliveryCode : ${deliveryCodes}" th:value="${deliveryCode.code}"
                th:text="${deliveryCode.displayName}">FAST</option>
    </select>
</div>
item.form
<!-- SELECT -->
<div>
  <div>배송 방식</div>
  <select th:field="${item.deliveryCode}" class="form-select" disabled>
      <option value="">==배송 방식 선택==</option>
      <option th:each="deliveryCode : ${deliveryCodes}" th:value="${deliveryCode.code}"
              th:text="${deliveryCode.displayName}">FAST</option>
  </select>
</div>
정리
- MVC1 에서 구현한 프로젝트에 4가지 추가함.
- 타임 리프 기능 추가
- 입력 폼 처리를 위해
th:field를 추가하고, 이것이 무엇을 자동으로 어떻게 추가해 주는가? - 애트리뷰트
@ModelAttribute의 역할과 어떻게 동작하는가? - html 코드로 체크박스를 만들때, 체크가 되지 않으면 어떻게 null 이 아닌 false로 인식할 수 있게 하는가?