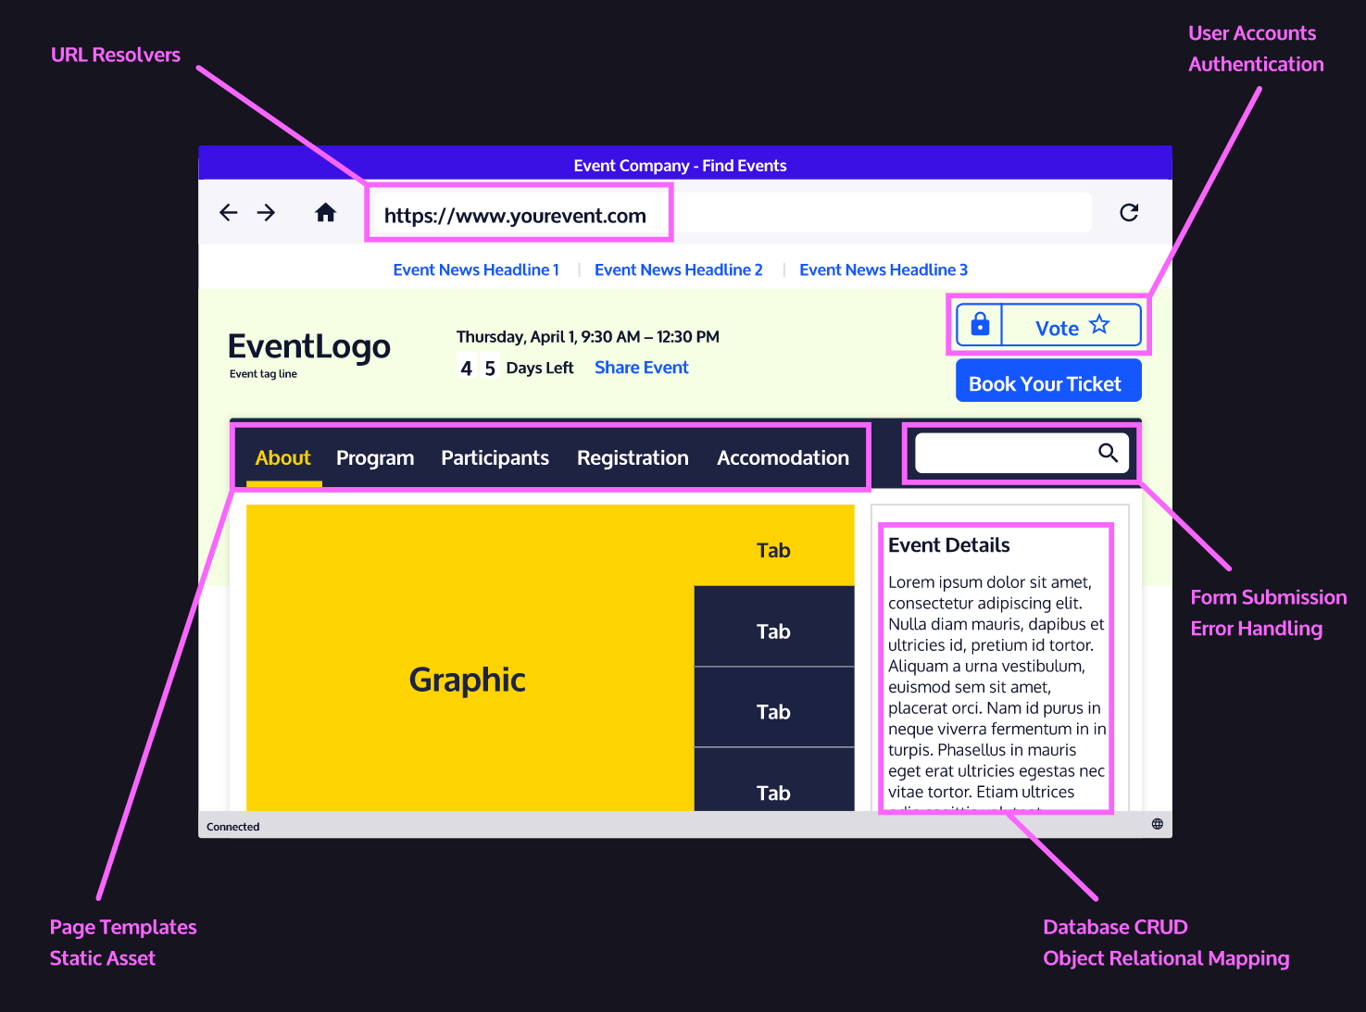
How does Django work?
- Model : deals with data and databases. It can retrieve, store, and change data in a database
- Template : determines how the data looks on a web page
- View : describes the data to be presented, & passes this information to the template
Request comes to web server ➜ passed onto Django for analysis
client requests a URL (ex. codecademy.com) ➜ Django takes URL and pass it to its urlresolver ➜ try to match the URL to a list of patterns & if there is a match ➜ pass request to the associated view function
lands on the right page ➜ Django uses data from model ➜ feedts it into the view function to determine what data is shown ➜ data is then given to the template ➜ presented to the client via web page
Starting Django
Starting a Django Project
django-admin <command> [options]
- command-line utility that helps us with administrative tasks
django-admin help= provide a list of possible commandsdjango-admin startproject projectname= will create a project.- optional : projectdirectory
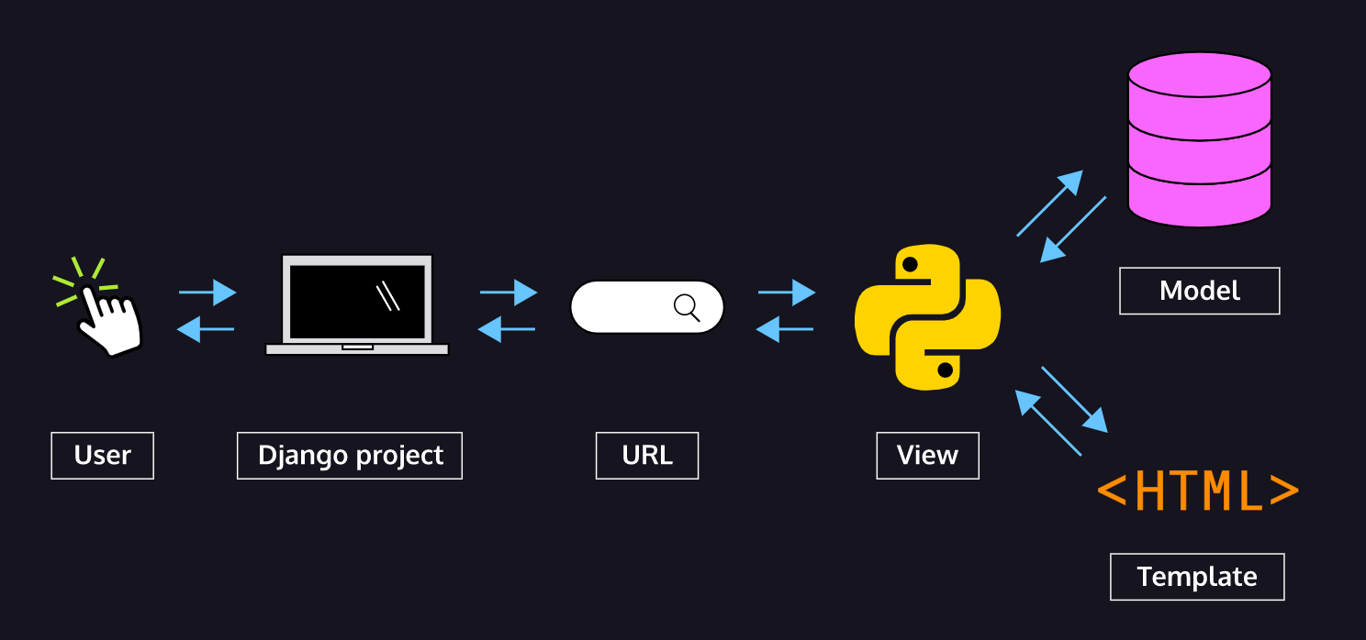
- It will then create a directionry for the project (project root folder)
⚡️ Inside, we find manage.py = collection of useful functions to administer the project
- same function as
django-adminbut specifically for the project
⚡️ We also find my_project, a directory with the same name as the project
- this is created b/c of
__init__.py - this folder is the Python package
- 이렇게 따로 생기는게 싫으면
.사용? 
Confituring Django Settings
💡 settings.py
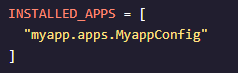
INSTALLED_APPS: contains the apps that make up the Django project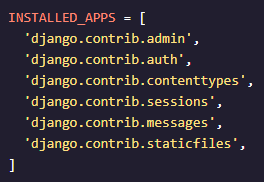
- Django pre-installs some common apps for us, such as admin, authentication, sessions, and an app to help manage static files
- when we create new applications for the project, we have to include them here so that Django will know about them!
DATABASES: shows the database connection details in a dictionary form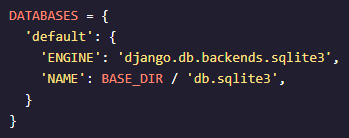
- Django by default will set up an SQLite database for us
💡 urls.py
Inside are the URL declarations for this Django project, or a “table of contents” for the Django project.
Remember earlier when we said that Django goes down a list of patterns to match a URL? This is that list!
- initially, urls.py looks like:
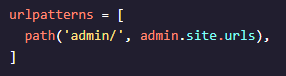
- This means that the admin app already has a route
Testing server to see if project works
python3 manage.py runserver <port number>
- This command must be run in the root directory, the same directory where
manage.pyis located. - By default, Django will start a development server with port 8000, but an alternate port can be provided as an option. (if the port number not stated, default port 8000 will run)
- 파일 업데이트 시 서버 새로고침 필요 없음. The Django development server will hot-reload as changes are made to the project, so we don’t have to keep restarting the server as we develop.
- The server will keep running until we stop it with the
ctrl + c.
- The server will keep running until we stop it with the
Migrating the Database

Understanding migration
migration=models.py에서 바꾼 내용을 (예를 들면 field를 추가하거나, model을 삭제하는 것 등)데이터베이스 스키마에 전파시키는장고의 방법이다- 'schema'란, DB 내에서 데이터가 저장되는 구조와 제약 조건을 정의한 것이다.
- "The database schema of a database is its structure described in a formal language supported by the database management system (DBMS)."
- 공식 문서에서는 migrations를 데이터베이스 스키마의 버전 컨트롤 시스템으로 생각하라고 말한다. (You should think of migrations as a version control system for your database schema.)
- 내 모델에 적용된 변화를 모아서 각 migrations files에 적용시켜주는 것이기 때문이다. git commit과 유사하다.
- 'schema'란, DB 내에서 데이터가 저장되는 구조와 제약 조건을 정의한 것이다.
Applying migration
settings.py에서 봤듯이, Django는 이미 설치된 app 들이 있다.- 하지만 admin interface같은 몇개의 app 들은 use the database and the migrations must be applied to the SQLite database.
Whenever we make changes to the model of the database, we must apply the changes by running
python3 manage.py migrate.The migrate command will update database models for projects installed in
INSTALLED_APPS.
After applying the migration:
- when we run the server, our errors are gone
- we have access to the admin app!
- can visit
localhost/adminto see the successful admin login page 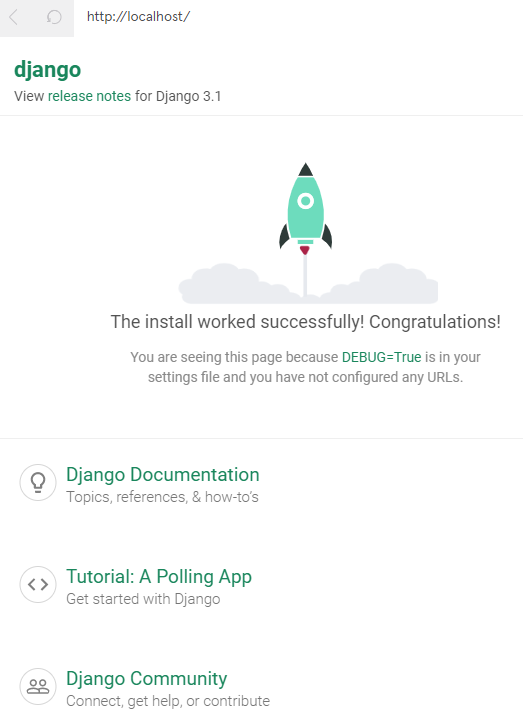
- can visit
Django apps
❓ What are Django apps? Difference between app and project?
- 하나의 Project 안에 여러가지 app 들이 존재한다.
- Project 안에는
manage.py가 들어있고,settings.py가 들어있는 파일도 있다. 반면에, app에는models.py와test.py다 들어있다. - An app contains the code for a specific feature. 특정 기능을 구현한다.
- 이상적으로는, app 자체는 다른 프로젝트로 옮겨도 작동해야 한다. (self-sufficient)
예시)
Project : website for a vet office
Apps : an appointment calendar, patient profiles, a testimonial section
Creating an app
python3 manage.py startapp myapp
- project의 root directory에서 실행 (
manage.py가 있는 곳) 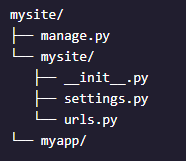
- app 폴더 안에는
models.py나test.py같은 각각의 app만을 위한 파일들이 들어있다. - 새로 만들어진 app을 Django가 인식하게 만들기 위해서는, it needs to be added to the list of
INSTALLED_APPSin thesettings.pyfile
Creating a View for an App (Raw text)
views.py : a class or function that processes a request and sends a response back - decides what data gets delivered to a template and displayed
Example)
In our veterinarian’s office example website, a customer might go to the /profile page of the website and their request gets passed to a view function to be processed. The view function may:
- Check to see if the customer is logged in
- Request their profile information from a database
- Format the information in a template
- Send back the profile page as an HTML file for the customer to view in their browser
➤ In Django, requests, and responses are handled as HttpRequest and HttpResponse objects from a module called django.http.
from django.http import HttpResponse불러와줘야 한다
When a page is requested,
- Django creates an
HttpRequestobject that contains information about the request - Django loads the appropriate view, passing the
HttpRequestas the first argument to the view function
➤ Each view function is responsible for returning an HttpResponse object. The HttpResponse response object can be the HTML contents of a web page, a redirect, an error, an XML document, an image, or just about anything that can display on a web page.
💡 정리하자면,
Django가 request 정보가 담긴HttpRequestobject를 만들어서 적절한 view를 불러오고, 그 view function에HttpRequest를 첫번째 인자로 통과시킨다.
그리고 나서, view는HttpResponseobject를 리턴한다. 리턴하는건 컨텐츠나 이미지 등 웹페이지에 보여질 수 있는 거의 모든것이다.
➤ view function은 이렇게 생겼다:
# In views.py
def index(request):
  return HttpResponse("This is the response!")
홈페이지를 방문하면, 이
index()view function이 string이 들어간HttpResponse를 리턴한다 (이 string이 웹페이지에 보여지게 된다)
Using a View to Send an HTML Page
위에서는 그냥 텍스트만 브라우저에게 보냈다.
하지만 웹사이트는 그렇게 단순하지 않다. HTML
view function을 부르게 되면, Django는 INSTALLED_APPS안에 있는 어플의 폴더들을 하나하나 흝으면서 templates라는 디렉토리를 찾는다. 하지만 그렇게되면 template라는 폴더가 여러개있어서 헷갈리기 때문에,
일반적으로, 우리는 URL Namespacing하는 convention을 통해 여러 앱들 사이에서 구분을 하게 한다.
- polls에서는
app_name = 'polls'라고 선지정을 해주고, - adding namespaces to URLconf - place our HTML pages inside a directory that has the same name as your app within the
templates/directory.
- HTML페이지를
templates/디렉토리 안에, app이랑 같은 디렉토리(폴더)안에다가 넣어준다. 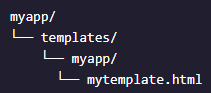
이렇게 되면 우리의 views.py는:
from django.template import loader
def home():
  template = loader.get_template("app/home.html")
return HttpResponse(template.render())django.template에서loader을 import 한다home()이라는 view function 안에get_template()을 통해 template을 로드한다HttpResponseobject 안에 있는 template object 에다가.render()메소드를 사용해서 클라이언트에게 HTML page를 보여준다.
Creating a Django Template
DTL
- Django employs a special syntax called Django Templating Language to distinguish itself from HTML, CSS, and JavaScript.
- That syntax in many template languages uses curly braces, sometimes referred to as handlebars, as a placeholder for data that is passed by Django.
- When we call the view to render the template, we can use something called a context to tell Django what to replace in the template. The relationships in the context are referred to as a
name/value pair.
views.py:
from django.http import HttpResponse
from django.template import loader
def home(request):
  context = {"name": "Junior"}
  template = loader.get_template("app/home.html")
return HttpResponse(template.render(context))render()사용:
from django.shortcuts import render

def home(request):
  context = {"name": "Junior"}
  return render(request, "app/home.html", context)
render()takes 3 arguments:
1. request object
2. path to the template
3. context (dictionary that passes the context variables to the template)
Wiring Up a View
URLConf = set of patterns that Django will try to match the requested URL to find the correct view
- URLConf is located in
urls.py
Import
- at the top, we import
pathobject fromdjango.urls - we also import the views functions from
views.py - add routes that direct to each of our view functions
urlpatterns
- contain the routes to each view function
- Each route is provided as a
path()object that has three arguments:
1) the URL route as a string
2) the name of the function of the view,
3) an optional name used to refer to the view. - when we navigate to the URL without any additional route,
'', thehome()view function will be called. Going to the URL ending with/profilewill call theprofile()view function.
from django.urls import path
from . import views
 >
urlpatterns = [
  path('', views.home),
  path('profile/', views.profile, name="profile")
]
default urls.py folder:
#default urls.py
from django.contrib import admin
from django.urls import path

urlpatterns = [
  path("admin/", admin.site.urls),
]

# app's URLconf added
from django.contrib import admin
from django.urls import include, path

urlpatterns = [
  path("admin/", admin.site.urls),
  path("", include("myapp.urls")),
]
- Django already includes some URLs for us in
urlpatterns. The admin page we visited earlier is already there:path('admin/', admin.site.urls) - To make Django aware of the app’s URLconf, it must be included in the project’s URLconf, also called
urls.py.- To include the app’s URLconf we import the include path from
django.urlsand add apath()to theurlpatterns.
- To include the app’s URLconf we import the include path from