Spring Framework Module
-
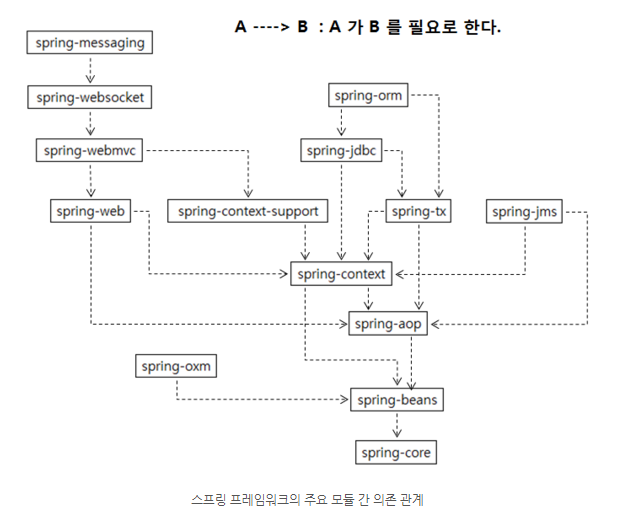
스프링 프레임워크는 제공하는 기능에 따라 별도의 모듈로 분리됩니다.
-
ex) 트랜잭션과 관련된 기능을 제공하는 모듈은
spring-tx, 웹 개발과 관련된 기능을 제공하는 모듈은spring-webmvc, jdbc와 관련한 기능을 제공하는 모듈은spring-jdbc -
어떠한 모듈을 사용할 때, 다른 모듈을 필요로 하는 경우도 있습니다.
-
spring-beans의 모듈을 사용하려면,spring-core모듈의 의존성을 받아야 하고,spring-webmvc모듈을 사용하려면,spring-context-support와spring-web, 이는 또다시spring-aop,spring-context의 의존성에 의존합니다. -
다수의 모듈이
spring-context모듈을 직/간접적으로 의존하고 있으므로, 스프링 프레임워클르 사용하여 웹 어플리케이션을 개발하거나 DB를 연동할 때는,spring-context,spring-aop,spring-beans,spring-core모듈이 항상 함께 사용됩니다.
Spring Framework의 주요 모듈이 제공하는 기능
1) spring-beans
- 스프링 컨테이너를 이용하여 객체를 생성하는 기본 기능을 제공함.
2) spring-context
- 객체 생성, 라이프 사이클 처리, 스키마 확장 등의 기능을 제공
3) spring-aop
- AOP 기능을 제공
4) spring-web
- REST 클라이언트, 데이터 변환 처리, 서블릿 필터, 파일 업로드 지원
- 웹 개발에 필요한 기반 기능을 제공
5) spring-webmvc
- 스프링 기반의 MVC 프레임워크
- 웹 어플리케이션을 개발하는데 필요한 컨트롤러, 뷰 구현을 제공함.
6) spring-websocket
- 스프링 MVC에서 웹 소켓 연동을 처리할 수 있도록 함.
7) spring-oxm
- XML과 Java 객체 간의 매핑을 처리하기 위한 API 제공
8) spring-tx
- 트랜잭션 처리를 위한 추상 레이어 제공
9) spring-jdbc
- JDBC 프로그래밍을 보다 쉽게 할 수 있는 템플릿 제공
10) spring-orm
- 하이버네이트, JPA, MyBatis 등과의 연동을 지원함.
11) spring-jms
- JMS 서버와 메시지를 쉽게 주고 받을 수 있도록 하기 위한 템플릿, 어노테이션 등을 제공
12) spring-context-support
- 스케쥴링, 메일 발송, 캐시 연동, 벨로시티 등 부가 기능 제공
출처 : https://m.blog.naver.com/seek316/222131370500
Tomcat ( WAS )와 server.xml, web.xml
server.xml
-
톰캣이 실행될 때 필요한 정보를 정의한 파일입니다.
-
server.xml 과 web.xml의 차이는 server.xml 은 톰캣 자체만의 실행 디스크립터이고, web.xml은 톰캣(웹 컨테이너)이 관리하는 웹 어플리케이션의 구동 시 설정을 정의한 디스크립터라는 점입니다.
-
포트 정보, DB 접속정보, 웹 리소스(jsp, image 파일)의 참조경로, 이벤트 리스너 등을 설정합니다.
-
server.xml 예시
<?xml version="1.0" encoding="UTF-8"?>
<!--
Licensed to the Apache Software Foundation (ASF) under one or more
contributor license agreements. See the NOTICE file distributed with
this work for additional information regarding copyright ownership.
The ASF licenses this file to You under the Apache License, Version 2.0
(the "License"); you may not use this file except in compliance with
the License. You may obtain a copy of the License at
http://www.apache.org/licenses/LICENSE-2.0
Unless required by applicable law or agreed to in writing, software
distributed under the License is distributed on an "AS IS" BASIS,
WITHOUT WARRANTIES OR CONDITIONS OF ANY KIND, either express or implied.
See the License for the specific language governing permissions and
limitations under the License.
--><!-- Note: A "Server" is not itself a "Container", so you may not
define subcomponents such as "Valves" at this level.
Documentation at /docs/config/server.html
--><Server port="8005" shutdown="SHUTDOWN">
<Listener className="org.apache.catalina.startup.VersionLoggerListener"/>
<!-- Security listener. Documentation at /docs/config/listeners.html
<Listener className="org.apache.catalina.security.SecurityListener" />
-->
<!-- APR library loader. Documentation at /docs/apr.html -->
<Listener SSLEngine="on" className="org.apache.catalina.core.AprLifecycleListener"/>
<!-- Prevent memory leaks due to use of particular java/javax APIs-->
<Listener className="org.apache.catalina.core.JreMemoryLeakPreventionListener"/>
<Listener className="org.apache.catalina.mbeans.GlobalResourcesLifecycleListener"/>
<Listener className="org.apache.catalina.core.ThreadLocalLeakPreventionListener"/>
<!-- Global JNDI resources
Documentation at /docs/jndi-resources-howto.html
-->
<GlobalNamingResources>
<!-- Editable user database that can also be used by
UserDatabaseRealm to authenticate users
-->
<Resource auth="Container" description="User database that can be updated and saved" factory="org.apache.catalina.users.MemoryUserDatabaseFactory" name="UserDatabase" pathname="conf/tomcat-users.xml" type="org.apache.catalina.UserDatabase"/>
</GlobalNamingResources>
<!-- A "Service" is a collection of one or more "Connectors" that share
a single "Container" Note: A "Service" is not itself a "Container",
so you may not define subcomponents such as "Valves" at this level.
Documentation at /docs/config/service.html
-->
<Service name="Catalina">
<!--The connectors can use a shared executor, you can define one or more named thread pools-->
<!--
<Executor name="tomcatThreadPool" namePrefix="catalina-exec-"
maxThreads="150" minSpareThreads="4"/>
-->
<!-- A "Connector" represents an endpoint by which requests are received
and responses are returned. Documentation at :
Java HTTP Connector: /docs/config/http.html
Java AJP Connector: /docs/config/ajp.html
APR (HTTP/AJP) Connector: /docs/apr.html
Define a non-SSL/TLS HTTP/1.1 Connector on port 8080
-->
<Connector connectionTimeout="20000" maxParameterCount="1000" port="8082" protocol="HTTP/1.1" redirectPort="8443"/>
<!-- A "Connector" using the shared thread pool-->
<!--
<Connector executor="tomcatThreadPool"
port="8080" protocol="HTTP/1.1"
connectionTimeout="20000"
redirectPort="8443"
maxParameterCount="1000"
/>
-->
<!-- Define an SSL/TLS HTTP/1.1 Connector on port 8443
This connector uses the NIO implementation. The default
SSLImplementation will depend on the presence of the APR/native
library and the useOpenSSL attribute of the AprLifecycleListener.
Either JSSE or OpenSSL style configuration may be used regardless of
the SSLImplementation selected. JSSE style configuration is used below.
-->
<!--
<Connector port="8443" protocol="org.apache.coyote.http11.Http11NioProtocol"
maxThreads="150" SSLEnabled="true"
maxParameterCount="1000"
>
<SSLHostConfig>
<Certificate certificateKeystoreFile="conf/localhost-rsa.jks"
type="RSA" />
</SSLHostConfig>
</Connector>
-->
<!-- Define an SSL/TLS HTTP/1.1 Connector on port 8443 with HTTP/2
This connector uses the APR/native implementation which always uses
OpenSSL for TLS.
Either JSSE or OpenSSL style configuration may be used. OpenSSL style
configuration is used below.
-->
<!--
<Connector port="8443" protocol="org.apache.coyote.http11.Http11AprProtocol"
maxThreads="150" SSLEnabled="true"
maxParameterCount="1000"
>
<UpgradeProtocol className="org.apache.coyote.http2.Http2Protocol" />
<SSLHostConfig>
<Certificate certificateKeyFile="conf/localhost-rsa-key.pem"
certificateFile="conf/localhost-rsa-cert.pem"
certificateChainFile="conf/localhost-rsa-chain.pem"
type="RSA" />
</SSLHostConfig>
</Connector>
-->
<!-- Define an AJP 1.3 Connector on port 8009 -->
<!--
<Connector protocol="AJP/1.3"
address="::1"
port="8009"
redirectPort="8443"
maxParameterCount="1000"
/>
-->
<!-- An Engine represents the entry point (within Catalina) that processes
every request. The Engine implementation for Tomcat stand alone
analyzes the HTTP headers included with the request, and passes them
on to the appropriate Host (virtual host).
Documentation at /docs/config/engine.html -->
<!-- You should set jvmRoute to support load-balancing via AJP ie :
<Engine name="Catalina" defaultHost="localhost" jvmRoute="jvm1">
-->
<Engine defaultHost="localhost" name="Catalina">
<!--For clustering, please take a look at documentation at:
/docs/cluster-howto.html (simple how to)
/docs/config/cluster.html (reference documentation) -->
<!--
<Cluster className="org.apache.catalina.ha.tcp.SimpleTcpCluster"/>
-->
<!-- Use the LockOutRealm to prevent attempts to guess user passwords
via a brute-force attack -->
<Realm className="org.apache.catalina.realm.LockOutRealm">
<!-- This Realm uses the UserDatabase configured in the global JNDI
resources under the key "UserDatabase". Any edits
that are performed against this UserDatabase are immediately
available for use by the Realm. -->
<Realm className="org.apache.catalina.realm.UserDatabaseRealm" resourceName="UserDatabase"/>
</Realm>
<Host appBase="webapps" autoDeploy="true" name="localhost" unpackWARs="true">
<!-- SingleSignOn valve, share authentication between web applications
Documentation at: /docs/config/valve.html -->
<!--
<Valve className="org.apache.catalina.authenticator.SingleSignOn" />
-->
<!-- Access log processes all example.
Documentation at: /docs/config/valve.html
Note: The pattern used is equivalent to using pattern="common" -->
<Valve className="org.apache.catalina.valves.AccessLogValve" directory="logs" pattern="%h %l %u %t "%r" %s %b" prefix="localhost_access_log" suffix=".txt"/>
<Context docBase="spring3_prj" path="/" reloadable="true" source="org.eclipse.jst.jee.server:spring3_prj"/></Host>
</Engine>
</Service>
</Server>server.xml의 주요구조
<Server>
	<Listener/>

	<GlobalNamingResources>
    		<Resource/>
	</GlobalNamingResources>

	<Service>
		<Connector/>
		<Engine>
			<Realm/>
			<Host/>
		</Engine>
	</Service>
</Server>-
<Server>는 server.xml 의 최상위 컴포넌트입니다. 이 아래 필요한 컴포넌트가 기술됩니다. -
<Listener>- 톰캣의 이벤트 리스너를 정의합니다. -
GlobalNamingResources: JNDI 정보, JDBC와 같은 java-DB 연결정보를 정의합니다. -
Service: 클라이언트의 요청을 어떻게 처리할지 정의합니다.
server.xml의 주요 내용 - <Server>
<Server port="8005" shutdown="SHUTDOWN">
- port : 톰캣 종료 전용 포트를 지정
- shutdown : 종료 명령
server.xml의 주요 내용 - <Context>
<Context docBase="spring3_prj" path="/" reloadable="true" source="org.eclipse.jst.jee.server:spring3_prj"/></Host>
- 연결될 웹 어플리케이션의 프로젝트 이름, 서블릿 컨텍스트로 설정될 경로(중요), 재구동 여부 등을 설정한다.
server.xml의 주요 내용 - <Listener>
 <Listener className="org.apache.catalina.startup.VersionLoggerListener"/>
  <Listener SSLEngine="on" className="org.apache.catalina.core.AprLifecycleListener"/>
  <Listener className="org.apache.catalina.core.JreMemoryLeakPreventionListener"/>
  <Listener className="org.apache.catalina.mbeans.GlobalResourcesLifecycleListener"/>
<Listener className="org.apache.catalina.core.ThreadLocalLeakPreventionListener"/>- 톰캣의 이벤트 리스너를 설정
server.xml의 주요 내용 - <GlobalNamingResources>
- JNDI (Java Naming and Directory Interfaces) 정보, 즉 JDBC와 같은 java-DB 연결정보를 정의합니다.
<GlobalNamingResources>
     <Resource auth="Container" description="User database that can be updated and saved"
          factory="org.apache.catalina.users.MemoryUserDatabaseFactory" name="UserDatabase"
          pathname="conf/tomcat-users.xml" type="org.apache.catalina.UserDatabase"/>
     <Resource
          defaultAutoCommit="false"
          driverClassName="oracle.jdbc.driver.OracleDriver"
          factory="org.apache.tomcat.jdbc.pool.DataSourceFactory"
          initialSize="2"
          maxActive="15"
          maxAge="99999999999"
          maxIdle="2"
          maxWait="5000"
          minIdle="2"
          name="jdbc/dsCapt"
          removeAbandoned="true"
          testWhileIdle="true"
          type="javax.sql.DataSource"
          url="jdbc:oracle:thin:@192.168.1.158:1521:orcl"
          username="codeCaptain"
          password="password123!@#"
          validationInterval="30000"
          validationQuery="SELECT 1 FROM DUAL"/>
</GlobalNamingResources>| 속성 | 내용 |
| auth | -로그인 방식 정의. Application/ container -application : 애플리케이션이 프로그래밍 방식으로 로그인 -container : 애플리케이션 대신 컨테이너가 로그인 |
| description | 리소스 설명 |
| factory | jdbc connection pool 설정 |
| name | 해당 Resource 에 붙인 이름 |
| pathname | 설정 파일 경로 |
| type | 리소스 검색시 사용되는 java 클래스 이름(전체 경로) |
| defaultAutoCommit | 자동커밋 여부 |
| driverClassName | DB vender에 따른 클래스명 |
| initialSize | 초기 DBCP 크기 |
| maxActive | 동시에 사용할 수 있는 커넥션 개수 |
| maxAge | 커넥션 생명시간 |
| maxWait | 커넥션을 기다리는 최대시간(밀리초) |
| maxIdle | 커넥션 반납시 유지할 커넥션 최대 개수 |
| minIdle | 커넥션 반납시 유지할 커넥션 최소 개수 |
| removeAbandoned | 사용하지 않는 커넥션의 반환여부. true/false |
| testWhileIdle | 커넥션 중이지 않을 때 테스트 여부. true/false |
| url | db 연결 IP |
| username | db 계정 id |
| password | db 계정 pw |
| validationInterval | 정상연결 여부 확인주기(밀리초) |
| validationQuery | 정상연결 되었는지 확인하는 쿼리 |
server.xml 주요 정보 - Service
-
클라이언트의 요청 처리 정보를 담음
-
Connector와Engine으로 구성됨. -
보통 Catalina라는 디폴트 값을 사용
<Service name="Catalina">
server.xml 주요 정보 - Service.Connector
- 클라이언트의 요청을 수신하고 응답을 전송할 인터페이스 정보
<Connector URIEncoding="UTF-8" acceptCount="100" connectionTimeout="20000"
     disableUploadTimeout="true" enableLookups="false" maxHttpHeaderSize="8192"
     maxThreads="1024" minSpareThreads="25" port="6001" redirectPort="6003"
     maxPostSize="-1" compression="on" compressionMinSize="2048"
     noCompressionUserAgents="gozilla, traviata" useSendfile="false">
     <UpgradeProtocol className="org.apache.coyote.http2.Http2Protocol" />
</Connector>| 속성 | 내용 |
| URIEncoding | 클라이언트 요청 인코딩방식 |
| acceptCount | 클라이언트 요청대기 최대 개수 |
| compression | gzip 압축여부. on/ off/ force on : 텍스트 데이터 압축 off : 압축하지 않음 force : 모든 데이터 압축 |
| compressionMinSize | 압축시 데이터 최소 크기 |
| connectionTimeout | TCP 연결 후 요청(URI) 수신까지 대기하는 시간(밀리초) |
| disableUploadTimeout | |
| enableLookups | 호스트 요청(ex. request.getRemoteHost())시 반환 방식. true/false true : 실제 호스트명 리턴 false : ip 리턴 |
| maxHttpHeaderSize | 톰캣이 수신하는 헤더 최대 크기 |
| maxPostSize | POST 방식 수신시 최대용량 |
| maxThreads | thread 최대 개수 |
| minSpareThreads | 최초로 생성하는 thread 개수 |
| noCompressionUserAgents | 문자열 압축을 사용하지 않을 브라우저 설정 설정된 브라우저는 압축전송을 하지 않는다 |
| port | 톰캣이 listen할 TCP 포트 |
| redirectPort | Connector 가 SSL 을 지원하지 않는경우 응답을 보낼 포트 |
| useSendfile | 파일 전송여부. true/ false |
server.xml 주요 정보 - Service.Engine
-
클라이언트가 서버에 요청을 보내면 엔진에서 확인함.
-
엔진은 request에 포함된 HTTP 헤더를 분석하여 적절한 Host로 전달해줌.
`
-
className속성
: org.apache.catalina.Eninge을 구현한 클래스 -
defaultHost속성
: 기본으로 설정할 host.<Host>의 name 속성과 일치해야 함.
server.xml 주요 정보 Service.Engine.Realm
- 일종의 DB 영역, DB 사용자들을 확인하고, 각 사용자의 역할과 권한에 맞는 정보를 포함
server.xml 주요 정보 Service.Engine.Host
- Engine이 전달해준 클라이언트 요청을 처리할 정보를 포함함.
`
server.xml 주요 정보 Service.Engine.Host.Valve
-
클라이언트의 요청을 처리하는 과정 중에 특정 기능을 수행하도록 하는 특정 요소
-
파이프라인 사이에 밸브를 끼울 수 있는 것ㄹ처럼, 특정 기능을 추가할 목적으로 사용됨.
-
로그 파일을 남길 목적으로 자주 사용됨.
<Valve className="org.apache.catalina.valves.AccessLogValve" directory="logs"
pattern="%h %l %u %t "%r" %s %b" prefix="localhost_access_log" suffix=".txt"/>| 속성 | 내용 |
| className | 디폴트 값. org.apache.catalina.valves.AccessLogValve |
| directory | 로그가 남겨질 디렉토리 |
| pattern | 로그를 남기기 위해 판별할 패턴 |
| prefix | 로그 파일에 추가할 접두사 |
| suffix | 로그 파일에 추가할 접미사 |
그 외 : Resource, Transaction
- DB 접속 정보가 필요한 경우 ( Resource )
<Resource
     auth="Container"
     driverClassName="oracle.jdbc.driver.OracleDriver"
     max="5" min="2"
     factory="org.objectweb.jotm.datasource.DataSourceFactory"
     maxWait="5000"
     maxIdle="2"
     maxActive="15"
     name="jdbc/dsBpm"
     type="javax.sql.DataSource"
     url="jdbc:oracle:thin:@192.168.1.158:1521:orcl"
     username="codeCaption"
     password="password123!@#"
testStmt="SELECT 1 FROM DUAL"/>- 트랜잭션
<Transaction
     name="UserTransaction"
     auth="Container"
     type="javax.transaction.UserTransaction"
     factory="org.objectweb.jotm.UserTransactionFactory"
     jotm.timeout="600"/>
web.xml - Tomcat
- Tomcat이 설정하는 web app 구동을 위한 배포 디스크립터
예시
<servlet>
        <servlet-name>jsp</servlet-name>
        <servlet-class>org.apache.jasper.servlet.JspServlet</servlet-class>
        <init-param>
            <param-name>fork</param-name>
            <param-value>false</param-value>
        </init-param>
        <init-param>
            <param-name>xpoweredBy</param-name>
            <param-value>false</param-value>
        </init-param>
        <load-on-startup>3</load-on-startup>
    </servlet>

...
<!-- The mapping for the default servlet -->
    <servlet-mapping>
        <servlet-name>default</servlet-name>
        <url-pattern>/</url-pattern>
    </servlet-mapping>

    <!-- The mappings for the JSP servlet -->
    <servlet-mapping>
        <servlet-name>jsp</servlet-name>
        <url-pattern>*.jsp</url-pattern>
        <url-pattern>*.jspx</url-pattern>
    </servlet-mapping>

  <!-- The mapping for the Set Character Encoding Filter -->
<!--
    <filter-mapping>
        <filter-name>setCharacterEncodingFilter</filter-name>
        <url-pattern>/*</url-pattern>
    </filter-mapping>
-->
...
  <!-- ==================== Default Session Configuration ================= -->
  <!-- You can set the default session timeout (in minutes) for all newly   -->
  <!-- created sessions by modifying the value below.                       -->

    <session-config>
        <session-timeout>30</session-timeout>
    </session-config>


<mime-mapping>
        <extension>adp</extension>
        <mime-type>audio/adpcm</mime-type>
    </mime-mapping>
    <mime-mapping>
        <extension>aep</extension>
        <mime-type>application/vnd.audiograph</mime-type>
    </mime-mapping>
    <mime-mapping>
        <extension>afm</extension>
        <mime-type>application/x-font-type1</mime-type>
    </mime-mapping>
    <mime-mapping>
        <extension>afp</extension>
        <mime-type>application/vnd.ibm.modcap</mime-type>
    </mime-mapping>
...
<welcome-file-list>
        <welcome-file>index.html</welcome-file>
        <welcome-file>index.htm</welcome-file>
        <welcome-file>index.jsp</welcome-file>
    </welcome-file-list>
web.xml - Java Web Application
-
Java Web Application을 위한 배포 디스크립터 ( Deployment Descriptor )
- WEB-INF 디렉토리 내부에 위치한다. ( 이건 웹 어플리케이션의 web.xml )
- 어플리케이션에 의해 사용되어 배포 도구에게 런타임에 정보를 제공한다.
- 어플리케이션의 Servlet, Filter들, 그리고 그 외 컴포넌트들을 구성하는 것을 도와준다.
- 쉽게 말해서 웹 컨테이너(Tomcat)에 구성 정보를 제공해준다.
web.xml을 통해 Tomcat / 배포 도구에게 제공할 수 있는 정보들- 서블릿 매핑 주소, 초기화 파라미터
- 보안 제약
- 에러 페이지
- 필터
- 세션 구성 ( 지속 시간 등 )
- 마임 타입 매핑
서블릿 매핑 ( Servlet Mappings )
-
요청 URL을 보고 어떠한 서블릿이 해당 요청을 처리할지 설정할 수 있다.
-
이러한 정보를 통해 웹 어플리케이션은 특정한 URL을 처리할 수 있다.
-
Servlet API 4버전 미만에서는 직접 web.xml을 수정하여 서블릿을 특정 URL에 명시적으로 매핑해주었어야 했다.
-
Servlet API 4버전 이상에서 @WebServlet 어노테이션 기반으로 URL과 서블릿 클래스의 매핑이 가능해졌다.
여담이지만, 어노테이션의 목적은 제 3의 프로그램에게 자신에 대한 제어 정보를 알려주는 것입니다.

Java 언어 API 자체에서 제공하는 `@Override`, `@SuppressWarning` 등의 어노테이션을 제외하고,
Java EE의 Servlet 자체의 어노테이션인 @WebServlet을 통해
제 3의 프로그램인 Tomcat에게 해당 클래스를
WAS에서 관리하는 서블릿으로 등록할 수 있도록 하는 효과를 낼 수 있습니다.

스프링 프레임워크에서는 @Controller, @Service, @Repository와 같은 어노테이션을,
JUnit 프레임워크에서는 @Test, @Before, @After 어노테이션을,
JPA ( Java Persistence API )에서는 @Entity, @Id, @GeneratedValue와 같은 어노테이션을 사용하여
컴파일/실행 시 설정 정보를 자바 코드 자체를 통해 얻어낼 수 있습니다.

참고하면 좋을 자료
: https://f-lab.kr/insight/understanding-and-utilizing-annotations-in-java
web.xml - 서블릿 매핑
-
요청 URL을 보고 어떠한 서블릿이 해당 요청을 처리할지 설정합니다.
-
이 정보를 통해 웹 어플리케이션은 특정한 URL을 처리할 수 있습니다.
<servlet>
    <description></description>
    <display-name>EmpServlet</display-name>
    <servlet-name>EmpServlet</servlet-name>
    <servlet-class>com.lec02.servlet.EmpServlet</servlet-class>
  </servlet>

  <servlet-mapping>
    <servlet-name>EmpServlet</servlet-name>
    <url-pattern>/EmpServlet</url-pattern>
</servlet-mapping>-
<servlet-name>태그를 통해EmpServlet이라는 서블릿을 명시합니다. -
<servlet-class>태그를 통해EmpServlet클래스의 패키지 위치를 지정합니다.
이를 통해Java Reflection API를 사용하여 런타임 때 해당 클래스의 인스턴스를 생성하여
관리할 수 있게 됩니다. -
<url-pattern>태그를 통해 어떤 URL로 요청이 들어왔을 때 해당 서블릿을 초기화/호출할 지 여부를 지정합니다.
web.xml - 보안 제약
-
특정한 리소스에 접근할 때, 인증 혹은 인가를 요구하도록 설정합니다.
-
사용자에 대한 역할 및 어떤 사용자를 허가할 것인지 포함할 수 있습니다.
<security-constraint>
    <web-resource-collection>
        <web-resource-name>Protected Resource</web-resource-name>
        <url-pattern>/protected/*</url-pattern>
        <http-method>GET</http-method>
        <http-method>POST</http-method>
    </web-resource-collection>
    <auth-constraint>
        <role-name>admin</role-name>
        <role-name>user</role-name>
    </auth-constraint>
</security-constraint>

<security-role>
    <role-name>admin</role-name>
</security-role>

<security-role>
    <role-name>user</role-name>
</security-role>

<login-config>
    <auth-method>BASIC</auth-method>
    <realm-name>MyRealm</realm-name>
</login-config>
web.xml - 에러 페이지
- 클라이언트 사이드 에러(HTTP 상태코드 400번대 에러)나, 서버 사이드 에러(HTTP 상태코드 500번대 에러) 응답 시 노출되는 에러 페이지를 설정할 수 있습니다.
web.xml - 초기화 파라미터
-
자바 웹 어플리케이션이 초기화될 때 전달할 정보를 정의할 수 있습니다.
-
cf. servlet의
<init-param>: 서블릿의init()메서드를 호출할 때, 전달할 파라미터 정의
web.xml - 필터
-
요청과 응답을 가로채서 공통 로직을 적용하는 필터를 정의함.
-
인증, 로깅, 입력값 검증 등에 사용
<filter>
    <filter-name>LoggingFilter</filter-name>
    <filter-class>com.example.LoggingFilter</filter-class>
</filter>

<filter-mapping>
    <filter-name>LoggingFilter</filter-name>
    <url-pattern>/*</url-pattern>
</filter-mapping>

<filter>
    <filter-name>AuthenticationFilter</filter-name>
    <filter-class>com.example.AuthenticationFilter</filter-class>
    <init-param>
        <param-name>loginPage</param-name>
        <param-value>/login.jsp</param-value>
    </init-param>
</filter>

<filter-mapping>
    <filter-name>AuthenticationFilter</filter-name>
    <url-pattern>/protected/*</url-pattern>
</filter-mapping>
web.xml - 세션 구성
-
HTTP Session에 대한 옵션을 구성합니다. -
세션 타임아웃이나 쿠키 타임아웃과 같은 것을 설정합니다.
<session-config>
    <session-timeout>30</session-timeout>
    <cookie-config>
        <name>MYSESSIONID</name>
        <http-only>true</http-only>
    </cookie-config>
</session-config>
마임 타입 매핑 ( MIME Type Mapping )
- 파일 확장자와 마임 타입 사이의 매핑을 구성합니다.
<mime-mapping>
    <extension>html</extension>
    <mime-type>text/html</mime-type>
</mime-mapping>

<mime-mapping>
    <extension>jpg</extension>
    <mime-type>image/jpeg</mime-type>
</mime-mapping>

<mime-mapping>
    <extension>pdf</extension>
    <mime-type>application/pdf</mime-type>
</mime-mapping>
Tomcat의 web.xml vs 웹 어플리케이션의 web.xml
-
하나의 Tomcat에는 여러 개의 자바 웹 어플리케이션을 띄울 수 있습니다.
-
해당 웹 어플리케이션마다 구동 환경이 다를 수 있습니다.
-
그러면서도, 공통적으로 관리해줘야하는 기능이 있을 수 있습니다.
-
이러한 요구사항을
Tomcat의web.xml을 통해 관리하는 웹 어플리케이션들에 공통적으로 적용할 설정을 적용하고. 각Web App의web.xml을 따로 적용할 수 있도록 하는 방식으로 해결하였습니다. -
적용 우선순위 : Web App의 web.xml > Tomcat의 web.xml
-
자바 웹 어플리케이션의 web.xml 예시
<?xml version="1.0" encoding="UTF-8"?>
<web-app xmlns:xsi="http://www.w3.org/2001/XMLSchema-instance" xmlns="http://java.sun.com/xml/ns/javaee" xsi:schemaLocation="http://java.sun.com/xml/ns/javaee https://java.sun.com/xml/ns/javaee/web-app_2_5.xsd" version="2.5">
  <context-param>
    <param-name>contextConfigLocation</param-name>
    <param-value>/WEB-INF/spring/root-context.xml</param-value>
  </context-param>
  <listener>
    <listener-class>org.springframework.web.context.ContextLoaderListener</listener-class>
  </listener>


  <!-- @WebServlet("/") -->
  <servlet>
    <servlet-name>SPRING_SERVLET</servlet-name>
    <servlet-class>org.springframework.web.servlet.DispatcherServlet</servlet-class>
    <init-param>
      <param-name>contextConfigLocation</param-name>
      <param-value>/WEB-INF/spring/lec03-servlet-context.xml</param-value>
    </init-param>
    <load-on-startup>1</load-on-startup>
  </servlet>

  <servlet-mapping>
    <servlet-name>SPRING_SERVLET</servlet-name>
    <url-pattern>/</url-pattern>
  </servlet-mapping>


  <!-- @WebServlet("/aaa") -->
  <servlet>
    <description></description>
    <display-name>EmpServlet</display-name>
    <servlet-name>EmpServlet</servlet-name>
    <servlet-class>com.lec02.servlet.EmpServlet</servlet-class>
  </servlet>

  <servlet-mapping>
    <servlet-name>EmpServlet</servlet-name>
    <url-pattern>/EmpServlet</url-pattern>
  </servlet-mapping>


</web-app>- 여기서 중요한 것, 우리 어플리케이션의 web.xml 에서
<servlet>
    <servlet-name>SPRING_SERVLET</servlet-name>
    <servlet-class>org.springframework.web.servlet.DispatcherServlet</servlet-class>
    <init-param>
      <param-name>contextConfigLocation</param-name>
      <param-value>/WEB-INF/spring/lec03-servlet-context.xml</param-value>
    </init-param>
    <load-on-startup>1</load-on-startup>
  </servlet>

  <servlet-mapping>
    <servlet-name>SPRING_SERVLET</servlet-name>
    <url-pattern>/</url-pattern>
  </servlet-mapping>
이와 같은 매핑이 일어나고, 이것이 스프링의 디스패처 서블릿을 깨우는 것이다.
- 이 때, 디스패처 서블릿에서 init-param으로 servlet-context.xml 을 사용하고
이는 아래의 모습과 같다.
<?xml version="1.0" encoding="UTF-8"?>
<beans:beans xmlns="http://www.springframework.org/schema/mvc"
	xmlns:xsi="http://www.w3.org/2001/XMLSchema-instance"
	xmlns:beans="http://www.springframework.org/schema/beans"
	xmlns:context="http://www.springframework.org/schema/context"
	xsi:schemaLocation="http://www.springframework.org/schema/mvc https://www.springframework.org/schema/mvc/spring-mvc.xsd
		http://www.springframework.org/schema/beans https://www.springframework.org/schema/beans/spring-beans.xsd
		http://www.springframework.org/schema/context https://www.springframework.org/schema/context/spring-context.xsd">

	<!-- DispatcherServlet Context: defines this servlet's request-processing infrastructure -->

	<!-- Enables the Spring MVC @Controller programming model -->
	<annotation-driven />
	<context:component-scan base-package="com.lec03.spring" />

	<!-- Handles HTTP GET requests for /resources/** by efficiently serving up static resources in the ${webappRoot}/resources directory -->
	<resources mapping="/resources/**" location="/resources/" />

	<!-- Resolves views selected for rendering by @Controllers to .jsp resources in the /WEB-INF/views directory -->
	<beans:bean class="org.springframework.web.servlet.view.InternalResourceViewResolver">
		<beans:property name="prefix" value="/" />
		<beans:property name="suffix" value=".jsp" />
	</beans:bean>
</beans:beans>servlet-context.xml이 하는 일 3가지 ( 디스패처 서블릿에게 일을 시키자! )
- component-scan을 통해 Controller를 찾는다!
( 스프링이 웹 관련 컴포넌트들을 스캔할 Base Package를 지정,
스프링은 이를 통해 컴포넌트 스캔을 하고 런타임에 중앙관리형으로 컨트롤러를 스프링 빈으로 등록하여 관리해준다! )
- 컨트롤러에 @RequestMapping 어노테이션에 매핑된 주소에 따른 처리를 하도록 지정해준다.
( 어떤 주소로 요청이 왔을 때, 어떤메서드가 호출될 지를 지정해줄 수 있다. )
-
논리 뷰를 물리 뷰로 매핑할 ViewResolver를 깨운다!
-
resources 들을 매핑해준다.
톰캣(서블릿 컨테이너)가 해야할 가장 큰 일?
- 초기화, 호출 매핑
- 단일 프로세스 및 멀티 쓰레드로 실행한다. ( 쓰레드 풀 )
- JSP → Java Class로 바꾼다. ( 인터프리터 방식이 아닌, 컴파일러 방식으로 처리한다 )
- ASP, PHP … 등을 따라가는게 아니라,
JSP 방식의 장점? ⇒ 인터프리터로 동작하는 게 아니라, 컴파일러 방식으로 동작하니까!
톰캣이 하는 일 순서
-
- 자기 자신의 web.xml을 조회하여 설정을 해주고
그 뒤로 웹 어플리케이션의 /WEB-INF 내에 존재하는 web.xml을 조회하여 그에 맞는 설정을 해준다.
- 자기 자신의 web.xml을 조회하여 설정을 해주고
-
- web.xml 내의 서블릿 매핑 설정을 보고,
일반 서블릿의 경우 URL과 서블릿을 매핑해주고,
스프링의 서블릿인 경우,<init-param>속성으로 전달된, DispatcherServlet의 설정 파일인<servlet-context>를 참조한다.
- web.xml 내의 서블릿 매핑 설정을 보고,
-
servlet-context.xml을 통해 디스패처 서블릿이 해야할 일들을 정의해준다.
!! 핵심 !! web.xml 이 서블릿을 매핑해주고, 서블릿의 init 처리 및 호출을 해준다. 즉, DispatcherServlet을 처음 매핑해주는 곳이 web.xml, init-param으로 해당 DispatcherServlet에 대해 설정 정보를 매핑해주는 곳도 web.xml. servlet-context.xml 을 통해 DispatcherServlet의 초기 설정 ( 디스패처 서블릿이 넘겨줄 주소와 메서드를 매핑해주는 컨트롤러를 찾을 스프링 컴포넌트 스캔 패키지 지정, 논리 뷰-> 물리 뷰로 매핑해줄 뷰 리졸버를 깨우기, 자원들을 지정해준다. )
어노테이션 장점 vs 단점
단점
-
코드 안에 설정이 들어있어 매우 직관적이고 이해하기 쉬움
-
간단하고 명료함
-
사전 컴파일 시 모든 것을 체크하기에, 실제 런타임 때 문제를 찾아내려면 매우 힘들다.
XML
-
설정이 어렵다.
-
문법 체계가 복잡.
-
런타임 때 나오는 문제를 빠르게 파악할 수 있다.