서블릿이 무엇인가요?
-
자바 기반의 웹 컴포넌트
-
웹에서 호출 가능한 자바 프로그램
Web Brower의 요청
-
HTML에서
POST요청을 보내기 위해서는<form>태그를 사용할 수 밖에 없다. (이외 다른 방법이 없다.) -
<a href>태그를 통해GET요청을 보낼 수 있다. -
JS Script를 통해API방식으로POST,PUT,PATCH등의 요청을 보낼 수 있다. -
Postman같은 경우, POST 요청을 지정해서 보내줄 수 있다.
실습을 위한 준비과정
- Bootstrap에서 다운로드 받은
.html파일의 확장자를.jsp로 수정해주었다.
-
WAS가 JSP를 인식하고 Servlet으로 변환해야함을 알려주기 위함이다. -
form,method부분을 퍼블리싱된 디폴트 값이 아닌, 우리 서블릿과 연동시키기 위해 수정했다.
[login.jsp 코드 일부]
<%@ page language="java" contentType="text/html; charset=UTF-8"
    pageEncoding="UTF-8"%>

...

<form method= "post" action="<%=request.getContextPath()%>/user_servlet">
    <div class="form-floating mb-3">
        <input class="form-control" id="inputEmail" type="email" placeholder="name@example.com" />
        <label for="inputEmail">Email address</label>
    </div>
    <div class="form-floating mb-3">
        <input class="form-control" id="inputPassword" type="password" placeholder="Password" />
        <label for="inputPassword">Password</label>
    </div>
    <div class="form-check mb-3">
        <input class="form-check-input" id="inputRememberPassword" type="checkbox" value="" />
        <label class="form-check-label" for="inputRememberPassword">Remember Password</label>
    </div>
    <div class="d-flex align-items-center justify-content-between mt-4 mb-0">
        <a class="small" href="password.html">Forgot Password?</a>
        <a class="btn btn-primary" href="index.html">Login</a>
    </div>
</form>-
<%@ page ...%>부분의 코드가 존재하면jsp파일로 인식된다. -
<%=request.getContetPath()%>부분은 WAS 의ServletContext를 참조한다.
- 외장 WAS를 사용하는 현재 상황에서는, 하나의 Tomcat WAS 서버에서 여러 개의 어플리케이션을 띄울 수 있다.- 각 어플리케이션마다 환경이 다를 것인데, Tomcat 내에서 해당 환경을 격리하여 관리하기 위해
ServletContext를 사용한다.
- 각 어플리케이션마다 환경이 다를 것인데, Tomcat 내에서 해당 환경을 격리하여 관리하기 위해
<%@ page language="java" contentType="text/html; charset=UTF-8"
    pageEncoding="UTF-8"%>

...

<form method="post" action="<%=request.getContextPath()%>/user_servlet">
    <div class="row mb-3">
        <div class="col-md-6">
            <div class="form-floating mb-3 mb-md-0">
                <input name="user_id" class="form-control" id="inputFirstName" type="text" placeholder="Enter your first name" />
                <label for="inputFirstName">ID</label>
            </div>
        </div>
        <div class="col-md-6">
            <div class="form-floating">
                <input name="lname" class="form-control" id="inputLastName" type="text" placeholder="Enter your last name" />
                <label for="inputLastName">Name</label>
            </div>
        </div>
    </div>
    <div class="form-floating mb-3">
        <input name="user_name" class="form-control" id="inputEmail" type="email" placeholder="name@example.com" />
        <label for="inputEmail">Email address</label>
    </div>
    <div class="row mb-3">
        <div class="col-md-6">
            <div class="form-floating mb-3 mb-md-0">
                <input name="passwd" class="form-control" id="inputPassword" type="password" placeholder="Create a password" />
                <label for="inputPassword">Password</label>
            </div>
        </div>
        <div class="col-md-6">
            <div class="form-floating mb-3 mb-md-0">
                <input name="passwd2" class="form-control" id="inputPasswordConfirm" type="password" placeholder="Confirm password" />
                <label for="inputPasswordConfirm">Confirm Password</label>
            </div>
        </div>
    </div>
    <div class="mt-4 mb-0">
        <div class="d-grid"><a class="btn btn-primary btn-block" href="login.jsp">Create Account</a></div>
    </div>
</form>-
<% out.println("aaa"); %>는
<%= aaa %>와 같다. -
**JSP**에서**out**을 워낙 많이 쓰다보니, 이에 대한 축약 버전 (**<%= %>**)을 만들어주었다.
서블릿의 단점 및 한계
- 기능 하나당 서블릿 클래스 하나를 놓아야합니다.
- 즉, URL 매핑 하나당 기능이 하나이기에, 개발자 입장에서 이름을 생성하기 번거롭습니다.- 또한 요청 종류가 달라도 동일하게 처리해줘야할 공통 기능을 매번 중복하여 작성해야하기에, 추후 요구사항 변경 발생 시 유지보수하기 어렵습니다.
- 이에 대한 해결책으로, 동일한 URL 매핑에 대해 다른 요청이 필요하면,
JSP 파일에서input type="hidden"의pagecode값을 넘겨주어 서블릿단에서 해당 코드값을 통핸 조건 분기를 통해 요청이 온 페이지를 구분할 수 있습니다.
[register.jsp - pagecode]
<form method="post" action="<%=request.getContextPath()%>/user_servlet">
    <input type="hidden" name="pagecode" value="P001">
        <div class="row mb-3">
            <div class="col-md-6">
                <div class="form-floating mb-3 mb-md-0">
                    <input name="user_id" class="form-control" id="inputFirstName" type="text" placeholder="Enter your ID" />
                    <label for="inputFirstName">ID</label>
                </div>
...- 회원가입은 첫번째로 실행될 페이지이기에,
pagecode값을P001로 주었습니다.
[login.jsp - pagecode]
 <form method= "post" action="<%=request.getContextPath()%>/user_servlet">
    <input type="hidden" name="pagecode" value="P002">
        <div class="form-floating mb-3">
            <input name="userId" class="form-control" id="inputFirstName" type="text" placeholder="Enter your ID" />
            <label for="inputFirstName">ID</label>
        </div>
...- 로그인은 회원가입 이후 두번째로 실행될 페이지이기에,
pagecode값을P002로 주었습니다.
실습 - JSP / Servlet / JDBC 연동 ( MVC Design Pattern )
register.jsp,login.jsp는 위와 같이 작성하고,
UserServlet,UserDAO,UserVO를 만든다.
[ UserServlet ]
import java.io.IOException;

import javax.servlet.ServletException;
import javax.servlet.annotation.WebServlet;
import javax.servlet.http.HttpServlet;
import javax.servlet.http.HttpServletRequest;
import javax.servlet.http.HttpServletResponse;

@WebServlet("/user_servlet")
public class UserServlet extends HttpServlet {

	@Override
	public void init() throws ServletException {
		super.init();
	}

	@Override
	protected void doPost(HttpServletRequest request, HttpServletResponse response) throws ServletException, IOException {
		// TODO : login, register
		String pagecode = request.getParameter("pagecode");

		UserDAO dao = new UserDAO();

		// --------------------register----------------//
		if(pagecode.equals("P001")) {

			String userId = request.getParameter("user_id");
			String passwd = request.getParameter("passwd");

			UserVO uvo = new UserVO();
			uvo.setUserId(userId);
			uvo.setPasswd(passwd);

			int insertRows = dao.userInsert(uvo);
			if(insertRows == 1) {
				response.sendRedirect("index.jsp");
			} else {
				response.sendRedirect("500.html");
			}
		// --------------------login-------------------//
		} else if(pagecode.equals("P002")) {
			String userId = request.getParameter("userId");
			String passwd = request.getParameter("passwd");

			boolean loginCheck = dao.userLogin(userId, passwd);
			if(loginCheck) {
				response.sendRedirect("index.jsp");
			} else {
				response.sendRedirect("500.html");
			}
		// --------------------other-------------------//
		} else {
			response.sendRedirect("500.html");
		}
	}

	@Override
	public void destroy() {
		// TODO Auto-generated method stub
		super.destroy();
	}
}doPost를 오버라이딩함으로써,POST요청으로 오는 두 요청( 회원가입 : register / 로그인 : login )을 처리했습니다.
- 이 때 두 요청을 구분하는pagecode에 대한 조건 분기를 했습니다.
- 상세한 로직을 작성하기 전,
prototype형식으로 간단하게 로직의 흐름을 작성했습니다.
[ UserVO ]
-
서블릿에서 받은 데이터들을 DB에 담기위해 캡슐화한
UserVO를 정의합니다. -
Service Layer를 두지 않았고, 서블릿 기술 자체에 의존하여 개발하기에 굳이 DTO를 만들어주지 않았습니다.
-DTO는Spring MVC Framework에서 컨트롤러로 데이터를 넘겨줄 때,
바인딩 받고싶은 데이터만 묶어 이를 특정해주는 용도로 사용하거나,Controller Layer에서Service Layer로 계층 간의 데이터를 이동시킬 때 캡슐화하는 용도로 사용해야한다 생각했습니다.
// Entity
public class UserVO {

	private String userId;
	private String uname;
	private String email;
	private String passwd;
	private String regDate;

	public UserVO() {

	}

	public UserVO(String userId, String uname, String email, String passwd, String regDate) {
		this.userId = userId;
		this.uname = uname;
		this.email = email;
		this.passwd = passwd;
		this.regDate = regDate;
	}

	public String getUserId() {
		return userId;
	}

	public void setUserId(String userId) {
		this.userId = userId;
	}

	public String getUname() {
		return uname;
	}

	public void setUname(String uname) {
		this.uname = uname;
	}

	public String getEmail() {
		return email;
	}

	public void setEmail(String email) {
		this.email = email;
	}

	public String getPasswd() {
		return passwd;
	}

	public void setPasswd(String passwd) {
		this.passwd = passwd;
	}

	public String getRegDate() {
		return regDate;
	}

	public void setRegDate(String regDate) {
		this.regDate = regDate;
	}

	@Override
	public String toString() {
		return "UserVO [userId=" + userId + ", uname=" + uname + ", email=" + email + ", passwd=" + passwd
				+ ", regDate=" + regDate + "]";
	}
}
UserDAO를 통해 데이터를 INSERT 하기 위해 Oracle에 USER Table을 하나 생성해주었습니다.
이를 위한 DDL문이 필요합니다.
[ CREATE USERS DDL ]
-- 제가 예전에 실습했던 USERS Table이 이미 존재했었습니다.
-- 이 데이터를 복제본을 뜨기 위해 다음과 같은 DDL로 새로운 테이블에 이동시켰습니ㅏㄷ.
CREAT TABLE USERS_COPY AS (
		SELECT * FROM USERS
);

-- SQLDeveloper 툴에서 USERS 테이블의 테이블 명을 바꾸었습니다.


-- USERS 테이블을 생성했습니다.
CREATE TABLE USERS(
    SEQ NUMBER PRIMARY KEY,
    USERID VARCHAR2(10),
    UNAME VARCHAR2(10),
    EMAIL VARCHAR2(20),
    PASSWD VARCHAR2(10),
    REGDATE DATE DEFAULT SYSDATE
);
[ CREATE SEQUENCE USERS_SEQ ]
USERS테이블에서 사용할Sequence를 생성했습니다.
CREATE SEQUENCE USERS_SEQ START WITH 1 INCREMENT BY 1 NOCACHE;[ UserDAO ]
import java.sql.Connection;
import java.sql.PreparedStatement;
import java.sql.ResultSet;
import java.sql.SQLException;

import com.kosta.sample.common.MyOracleConnection;

// Data Access Object ( DML )
public class UserDAO {

	private static final MyOracleConnection myOracleConn = new MyOracleConnection();

	public int userInsert(UserVO uvo) {
		Connection conn = null;
		PreparedStatement pstmt = null;

		String sql = "INSERT INTO USERSS(ID, PASSWORD) VALUES(?,?);";
		int row = 0;
		try {
			System.out.println(uvo.toString());
			conn = myOracleConn.getConnection();
			pstmt = conn.prepareStatement(sql);
			pstmt.setString(1, uvo.getUserId());
			pstmt.setString(2, uvo.getPasswd());
			row = pstmt.executeUpdate();
		} catch(SQLException e){
			e.printStackTrace();
		} finally {
			try {
				if(pstmt != null) {
					pstmt.close();
				}
				if(conn != null) {
					conn.close();
				}
			} catch(SQLException e) {
				e.printStackTrace();
			}
		}
		return row;
	}

	public boolean userLogin(String userId, String passwd) {
		boolean userCheck = true; // rs.next();
		return userCheck;
	}
}DataSource의DBCP를 활용하여 커넥션을 가져오는MyOracleConnection클래스를 재사용했습니다. ( 이전 주차에 구현했었습니다. )
public interface MyConnection {

	Connection getConnection();

	void close(Connection conn);
}

///////////////////////////////////////////////////////////////////////////////////
//

import java.sql.Connection;
import java.sql.SQLException;

import javax.sql.DataSource;

import oracle.jdbc.pool.OracleConnectionPoolDataSource;

public class MyOracleConnection implements MyConnection {

	private static DataSource ds;

	private static final String DB_URL = "jdbc:oracle:thin:@127.0.0.1:1521:XE";

	private static final String DB_USER = "it";

	private static final String DB_PASSWORD = "0000";

	static {
		try {
			OracleConnectionPoolDataSource ocds = new OracleConnectionPoolDataSource();
			ocds.setURL(DB_URL);
			ocds.setUser(DB_USER);
			ocds.setPassword(DB_PASSWORD);
			ds = ocds;
		} catch(SQLException e) {
			System.out.println("DataSource 연결 실패");
		}
	}

	@Override
	public Connection getConnection() {
		Connection conn = null;
		try {
			conn = ds.getConnection();
		} catch(SQLException e) {
			System.out.println("getConnection Exception");
			e.printStackTrace();
		}
		return conn;
	}

	@Override
	public void close(Connection conn) {
		if(conn != null) {
			try {
				conn.close();
			} catch(SQLException e) {
				System.out.println("conn.close() Exception");
				e.printStackTrace();
			}
		}
	}
}- 복습) DataSource를 사용하면
클래스 로딩 시 입력받은 DB_URL에 대해 커넥션들을 N개 가져와서 커넥션 풀을 관리합니다.
- 기본적으로 Oracle XE 는 15개의 커넥션을 제공합니다. - DataSource를 통해 getConnection()을 하면, IDLE 상태에 있는 커넥션을 하나 가져와 DB 연결을 합니다.
- Connection을 연결한 뒤에 PreparedStatement를 사용하여 INSERT 연산을 실행해주었습니다.
[ UserDAO - userInsert ]
private static final MyOracleConnection myOracleConn = new MyOracleConnection();

public int userInsert(UserVO uvo) {
	Connection conn = null;
	PreparedStatement pstmt = null;

	String sql = "INSERT INTO USERS VALUES(USERS_SEQ.NEXTVAL,?,?,?,?,SYSDATE)";
	int row = 0;
	try {
		System.out.println(uvo.toString());
		conn = myOracleConn.getConnection();
		pstmt = conn.prepareStatement(sql);
		pstmt.setString(1, uvo.getUserId());
		pstmt.setString(2, uvo.getUname());
		pstmt.setString(3, uvo.getEmail());
		pstmt.setString(4, uvo.getPasswd());
		row = pstmt.executeUpdate();
	} catch(SQLException e){
		e.printStackTrace();
	} finally {
		try {
			if(pstmt != null) {
				pstmt.close();
			}
			if(conn != null) {
				conn.close();
			}
		} catch(SQLException e) {
			e.printStackTrace();
		}
	}
	return row;
}- 여기서 주목해야할 부분은 sql 부분입니다.
- "INSERT INTO USERS VALUES(USERS_SEQ.NEXTVAL,?,?,?,?,SYSDATE)"
- 시퀀스를 추가해주기 위해, DB에서 생성한 Sequence 명을 하드코딩한 뒤, 이 시퀀스의
**NEXTVAL**을 호출해주었습니다. **USERS**테이블 DDL문에서
**REGDATE**컬럼의 기본값은**SYSDATE**로 설정되어 있지만,
좀 더 안전하게 쿼리를 실행하기 위해
INSERT문의**REGDATE**값에**SYSDATE**를 직접 넣어주었습니다.
- 시퀀스를 추가해주기 위해, DB에서 생성한 Sequence 명을 하드코딩한 뒤, 이 시퀀스의
- "INSERT INTO USERS VALUES(USERS_SEQ.NEXTVAL,?,?,?,?,SYSDATE)"
[ UserDAO - userLogin ]
public boolean userLogin(String userId, String passwd) {

		Connection conn = null;
		PreparedStatement pstmt = null;
		ResultSet rs = null;

		String sql = "SELECT USERID, UNAME, EMAIL FROM USERS WHERE USERID = ? AND PASSWD = ?";

		boolean loginSucceed = false;
		try {
			conn = myOracleConn.getConnection();
			pstmt = conn.prepareStatement(sql);
			pstmt.setString(1, userId);
			pstmt.setString(2, passwd);
			rs = pstmt.executeQuery();
			if(rs.next()) {
				loginSucceed = true;
			}
		} catch(SQLException e){
			e.printStackTrace();
		} finally {
			try {
				if(rs != null) {
					rs.close();
				}
				if(pstmt != null) {
					pstmt.close();
				}
				if(conn != null) {
					conn.close();
				}
			} catch(SQLException e) {
				e.printStackTrace();
			}
		}
		return loginSucceed;
}- ResultSet의 next 결과가 true 이면, 해당하는 유저가 존재한다는 의미입니다.
즉, 로그인이 성공했다는 의미입니다. - 지금 코드에서는 로그인 성공 여부만
**return**했지만,
필요시 지금 로그인한 유저의 정보에 대해 서버에서 저장하기 위해
유저 데이터의 일부 집합을**Session**화 하여 관리할 수도 있습니다.
- 이 때, 세션 DB로**Redis**를 사용할 수 있습니다.
JSP
JSP에서Servlet들어오는 방법
-<form>태그를 통해 들어올 수 있다. +<input type="submit"><a href>태그를 통해 들어올 수 있다.<script>태그 안의javascript를 통해API 호출 방식으로 Servlet을 호출할 수 있다.
form tag + 기억해둘 속성들
-
method="get/post"
- 폼 데이터(form data)가 서버로 제출될 때 사용되는 HTTP Method 명시 -
action="/servlet_url"
- 폼 데이터를 서버로 보낼 때, 해당 데이터가 도착할 URL을 명시함.
-
enctype속성은 폼 데이터(form data)가 서버로 제출(submit)될 때, 해당 데이터가 인코딩되는 방법을 명시함.
- 기본 속성 값 :application/x-www-form-urlencoded
모든 문자들이 서버로 보내기 전에 인코딩됨을 명시한다.-
파일, 이미지 포함시 :
multiplart/form-data -
text/plain: 공백 문자(space)는 "+" 기호로 변환, 나머지 문자는 모두 인코딩되지 않음.
-
-
a tag
-
href="/servlet_url" -
이 태그는 무조건
GET메서드로 서버에 접근한 것이다.
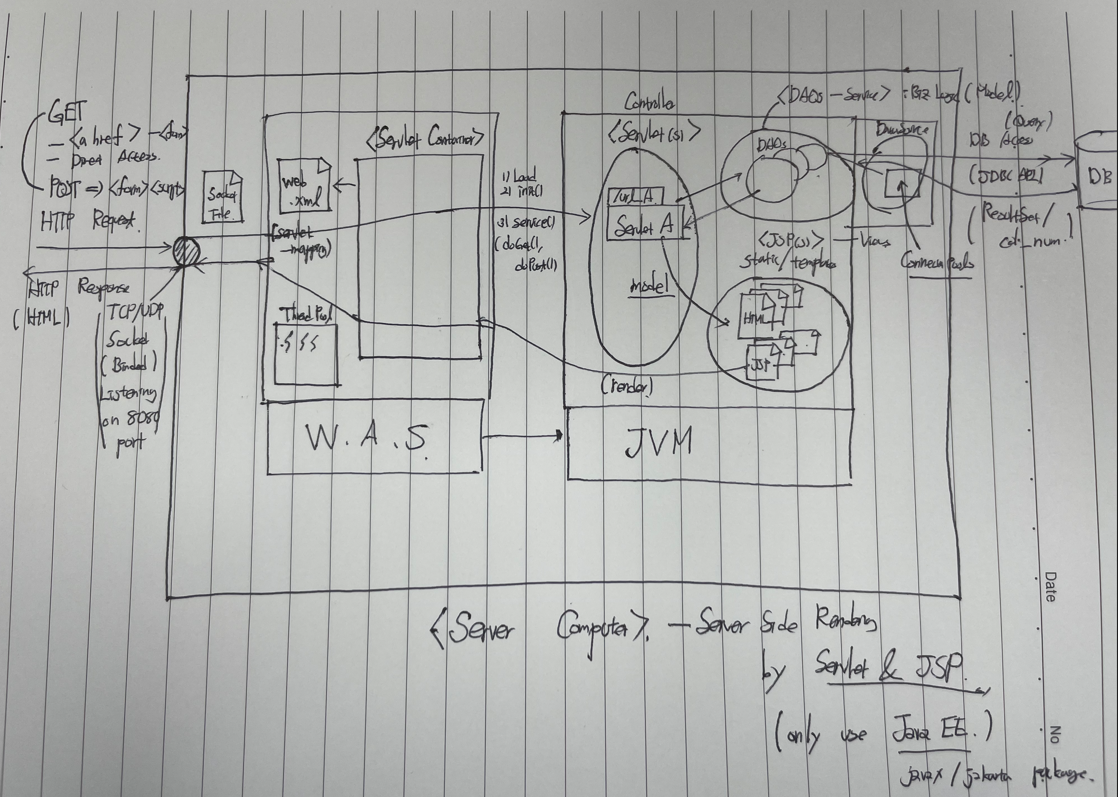
WAS와 JVM ( MVC Framework with Server 총정리 )
- 서블릿 / JDBC 기술에 대해 현재 이해하고 있는 내용으로 그림을 그려봤다.
프로젝트 설계 꿀팁)
-
DB의 컬럼 데이터를 처음부터 너무 크게 잡으면 안되겠습니다.
-
작은 사이즈에서 큰 사이즈로 제약을 바꾸는 것은 가능하지만, 큰 사이즈의 제약에서 작은 사이즈의 제약으로 변경하는 것은 어렵기 때문입니다.
-
기존의 데이터가 문제가 될 수 있기 때문입니다.