DI ( Dependency Injection )
-
객체의 의존성을 외부에서 주입해주는 디자인 패턴입니다.
-
SW 컴포넌트 간의
결합도를 낮추어 유연하고, 재사용성있는 코드를 만들기 위해 사용합니다.
Ex1. 리모컨 클래스와 여러 벤더 회사의 설정
public class Remocon{
	Remocon() {}
    int volume = 3;
    SamsungConfig sConfig;

    public void chmove ( Samsung s ) {
		sConfig = s.getConfig();
        chmove();
	}

    private void chmove(){
    	// TODO : channel move by SamsungConfig
    }
}-
Remocon Class에서 어떤 회사 설정(Config)에 의존하는 경우, "개발할 때는 편하지만" 사용하는 벤더 사가 바뀐다면, 모든 관련 의존성 조립을 개발자가 다시 해주어야 합니다.
-
야근 좀 더 하면 되지~ 하는 마음으로 바라볼 수 없는 것이,
이미 모든 jar 파일들이 서버에 배포되어 운영되는 환경에서, 코드 상의 의존성 조립을 새로 해서 ( 설정 파일 XML 을 사용하지 않는다고 전제하면 ) jar로 다시 만들어 배포하려면.. 매우 모험적인 작업일 것입니다. -
그러면, Config에 대해 공통적으로 필요한 부분을 뽑아내서, 하나의 인터페이스로 만들어 구현체를 갈아 끼워주는 식으로 접근하면 어떨까요? 수정 범위가 대폭 줄어들 것 같습니다.
Ex2. 직접 구현체를 의존하는 방향에서 개선된 버전 1 ( 다형성 및 인터페이스 사용 )
public class Remocon {
	Remocon() {}
    int volumn = 3;
    ComponyConfig companyConfig;
    void chmove( Company compnay ){
    	this.companyConfig = company.getConfig();
        chmove();
    }

    private void chmove(){
    	// TODO : channel move by given Company Config I/F
    }
}

public interface Company {
	CompanyConfig getConfig();
}

public class Samsung extends Company {
	@Override
    CompanyConfig getConfig(){};
}

public class LG extends TV {
	Override
    CompanyConfig getConfig(){};
}-
필요로 하는 공통 부분을 추상화하여 인터페이스로 만들었습니다.
-
결합도가 구체클래스를 의존할 때보다 낮아진 것은 사실이지만, 벤더 사의 변경이 있을 때 개발자가 직접 new 로 Company 종류 중 하나를 생성하여 chmove 의 파라미터로 넘겨줘야하는 과정은 직접 수정해줘야 합니다.
-
낮아진 결합도로 코드의 수정이 대폭 줄었지만, 아예 없애지는 못했다고 할 수 있습니다.
만약, 이러한 의존성 구조가 수십, 수백개의 클래스에 거쳐있다면 해당 부분을 수정해주는 것은 불가피 하고, 위의 Ex1 에서의 문제점이 여전히 있을 것입니다.
Ex2. 의존성을 외부에서 주입해준다면 어떨까?
public class Remocon{
	private CompanyConfig companyConfig;

    // setter 방식 ( 프로퍼티 방식 )
    public void setCompanayConfig(CompanyConfig companyConfig){};

    // constructor-args 방식 ( 생성자 방식 )
    public Remocon(CompanayConfig companyConfig){
    	rhis.companyConfig = companyConfig;
    }
}


// servlet-context.xml
<bean name="ssc" class="com.kosta.SamsungConfig"/>
<bean name="lgc" class="com.kosta.LGConfig"/>-
Spring은 XML에 선언해놓은 Bean을 생성하며, 이 빈 의존성을 필요로 하는 클래스들에 넣어줍니다.
-
이렇게 Java Class 들에서 이러한 의존성을 받는 방법은
Setter메서드를 사용하는 방식 ( = 프로퍼티 방식 ), 생성자 함수를 사용하는 방식이 있습니다. -
setter, 생성자 혹은 클래스가 올라올 때 필드에 바로 주입해주는 방식으로 의존성 주입이 일어납니다.
Servlet-Context.xml 을 통해 빈 생성 뿐이 아니라, 의존성 주입 설정까지 해줄 수 있습니다.
<bean name="rmc" class="com.kosta.Remocon">
	<property name="obj" ref="ssc"> // 이렇게 되면, Remocon의 클래스에 SamsungConfig이 주입.
</bean>

<bean name="ssc" class="com.kosta.SamsungConfig/>
<bean name="lgc" class="com.kosta.LGConfing/>-
property name=>setter에서의 프로퍼티 명입니다. -
setUser: 프로퍼티 명 -user/setObj: 프로퍼티 명 -obj
만약 이 상태에서 companyConfig 프로퍼티 필드에 LG 회사의 CompanyConfig를 주입해주도록 스프링 컨테이너에게 지시하고 싶다면?
// servlet-context.xml
<bean name="rmc" class="com.kosta.Remocon">
	<property name="companyConfig" ref="lgc">
</bean>
<bean name="ssc" class="com.kosta.SamsungConfig"/>
<bean name="lg" class="com.kosta.LGConfig"/>
생성자 주입 ( Construcotr Injection )의 servlet-context.xml 작성 방법
<bean name="rmc" class="com.kosta.Remocon">
  <constructor-arg ref="ssc"/>
</bean>
<bean name="ssc" class="com.kosta.SamsungConfig"/>
<bean name="lgc" class="com.kosta.LGConfig"/>- 이렇게,
<constructor-arg>를 통해 생성자 주입이 가능하다!
이러한 설정 파일 XML을 읽을 주체? = web.xml의 ContextLoaderListener ( DispatcherServlet 올릴 때 ), 그 이후ApplicationContext
-
Class Loader
- ApplicationContext- WebApplciationContext ( = Web Service )
- 자바로 웹 서비스를 개발하는 것이 아니라면, ApplicationContext만을 사용해도 된다.
- WebApplciationContext ( = Web Service )
-
얘들이 열심히 XML을 읽어서 리플랙션 API를 통해 런타임 때 의존 객체들을 생성한다.
이후 해당 의존성을 필요로 하는 Bean, 서블릿 등의 주체들에게 의존성을 제공해준다. -
기본적으로 싱글톤 scope으로 빈을 관리하며, 빈의 생명주기를 모두 관리한다.
-
web.xml => DispatcherServlet => Spring Container가 만들어지고, 초기화된다.
-
Spring Container가 올라올 때, XmlBeanFactory / ClassPathXmlApplicationContext / FileSystemXmlApplicationContext, XmlWebApplicationContext 등으로 스프링 컨테이너가 생성된다.
-
XmlWebApplicationContext 에서 XML 파일을 읽어 들여 스프링 빈을 등록 및 관리한다.

DI는 SW 품질의 판단요소인 결합도/응집도 중, 결합도를 낮추기 위해 사용합니다.
-
객체 서로 간의 new 를 하지 않고, 제 3자 (=외부)인 Spring Container에게 어떤 클래스를 만들어 의존성을 조립하게 함으로써, 결합도를 낮출 수 있습니다. => 느슨한 결합을 통해 재사용성 및 확장이 용이해집니다.
-
보통 의존성을 조립해줄 때, 타입을 부모 타입의 인터페이스로 사용합니다.
-
Spring Container는 의존성을 조립해주는 조립기 역할을 하고, 이 때 인스턴스를 만들어 필요한 클래스에 꽂아줄 때, 다형성을 위해 부모타입의 인터페이스를 사용하여 의존합니다.
root-context.xml
-
web.xml 파일에서 가장 먼저 읽어들이는 설정 파일입니다.
-
프로젝트 전반적으로 사용되는 자원을 생성하고 설정하는 파일입니다.
-
DB 연결 관련 정보, 트랜잭션 처리, 파일 업로드 등을 작성합니다.
-
전역적인 애플리케이션 설정 정보를 정의하고, 이 외 servlet-context.xml 파일은 각각 서블릿에 대한 설정 정보를 정의합니다 ( Spring의 경우, DispatcherServlet에 대한 설정을 정의해줍니다 )
-
Spring ApplicationContext를 설정하는데에 사용되는 파일 중 하나입니다.
root-context.xml servlet-context.xml, applicationContext.xml 등의 파일로 스프링의 컨테이너(ApplicationContext)를 설정할 수 있습니다.
root-context.xml의 예시
<?xml version="1.0" encoding="UTF-8"?>
<beans xmlns="http://www.springframework.org/schema/beans"
	xmlns:xsi="http://www.w3.org/2001/XMLSchema-instance"
	xmlns:tx="http://www.springframework.org/schema/tx"
	xsi:schemaLocation="http://www.springframework.org/schema/beans https://www.springframework.org/schema/beans/spring-beans.xsd
		http://www.springframework.org/schema/tx http://www.springframework.org/schema/tx/spring-tx-4.3.xsd">

	<!-- Root Context: defines shared resources visible to all other web components -->


	<!-- 1.DBCP 사용을 위한 DataSource를 bean 등록 -->

	<!-- DataSource: java에서 Connection pool을 지원하기 위한 인터페이스(커넥션의 상위버전) -->
	<!-- destroy-method="close" : 주어진 세션을 자동으로 반환하는 설정 -->
	<bean id="realDataSource" class="org.apache.commons.dbcp2.BasicDataSource" destroy-method="close">

	<property name="driverClassName" value="oracle.jdbc.driver.OracleDriver" />
		<property name="url" value="jdbc:oracle:thin:@localhost:1521:xe"/>
		<property name="username" value="community"/>
		<property name="password" value="1234"/>

		<!-- SQL이 수행된 후 자동으로 Commit 되는것을 지정 -->
		<property name="defaultAutoCommit" value="false"/>

		<!-- 커넥션 풀 설정 -->
		<property name="initialSize" value="10" /> <!-- 초기 커넥션 수, 기본 0 -->
		<property name="maxTotal" value="50" /> <!-- 최대 커넥션 수, 기본 8 -->
		<property name="maxIdle" value="20" /> <!-- 유휴 상태로 존재할 수 있는 커넥션 최대 수, 기본 8 -->
		<property name="minIdle" value="10" /> <!-- 유휴 상태로 존재할 수 있는 커넥션 최소 수, 기본 0 -->
		<property name="maxWaitMillis" value="-1" /> <!-- 예외 발생 전 커넥션이 반환 될 떄 까지 대기하는 최대 시간(ms), 기본 -1(무기한) -->


	</bean>

	<!--
		log4j를 이용한 SQL 로그 출력용 bean 생성

		* realDataSource를 이용해서 SQL 수행 내용, 결과를 출력하는 역할
		-> realDataSource를 대체하는 역할
	 -->
	 <bean id="dataSource" class="net.sf.log4jdbc.Log4jdbcProxyDataSource">
	 	<constructor-arg ref="realDataSource" />

	 	<property name="logFormatter">
	 		<bean class="net.sf.log4jdbc.tools.Log4JdbcCustomFormatter">
	 			<property name="loggingType" value="MULTI_LINE"/>
	 			<property name="sqlPrefix" value="[SQL]" />
	 		</bean>
	 	</property>
	 </bean>


		<!-- Mybatis 관련 Bean 생성 -->

		<!-- SqlSession : sql구문을 DB에 전달, 실행하는 객체
				SqlSessionFactory : SqlSession을 만드는 객체
				sqlSessionFactoryBean : mybatis 설정 파일(mybatis-config.xml)과 Connection Pool 정보를 이용하여 SqlSessionFactory를 만드는 객체
				sqlSessionTemplate : SqlSession 객체에 트랜잭션 처리 역할이 가능하도록 하는 객체 -->

		<!-- 마이바티스 SqlSession 등록하기 (xml 방식으로 bean 등록) -->
		<bean id="sqlSessionFactoryBean" class="org.mybatis.spring.SqlSessionFactoryBean">
			<!-- mybatis-config.xml 설정 불러오기 -->
			<property name="configLocation" value="classpath:mybatis-config.xml" />
			<property name="dataSource" ref="dataSource" />
		</bean>

		<!-- SqlSessionTemplate : 기본 SQL 실행 + 트랜잭션 관리 역할을 하는 SqlSession을 생성할 수 있게 하는 객체(Spring bean으로 등록해야함.) -->
		<bean id="sqlSessionTemplate" class="org.mybatis.spring.SqlSessionTemplate">
			<constructor-arg ref="sqlSessionFactoryBean" />
		</bean>

		<!-- 스프링에서 사용하는 proxy를 이용한 트랜잭션 제어가 안될 경우 추가적인 트랜잭션 매니저를 추가해서 문제 해결 -->
		<bean id="transactionManager" class="org.springframework.jdbc.datasource.DataSourceTransactionManager">
			<property name="dataSource" ref="dataSource" />
		</bean>


	<!-- 	<tx:annotation-driven proxy-target-class="true"/> -->
		<tx:annotation-driven transaction-manager="transactionManager"/>


		<!--
	파일 업로드를 위한 MutipartResolver 구현체 CommonsMultipartResolver  bean 등록
	-> CommonsMultipartResolver를 bean으로 등록하면
		multipart/form-data 형식으로 요청 시  input type="file" 태그를 자동적으로 인식하여 MultipartFile 객체로 반환하고
		파일 외의 데이터(정수, 문자열 등의 텍스트 데이터)는 기존처럼 사용 가능(MultipartRequest 필요 없음)
	-->
	<bean id="multipartResolver" class="org.springframework.web.multipart.commons.CommonsMultipartResolver">
		 <property name="maxUploadSize" value="104857600"/>
		 <property name="maxUploadSizePerFile" value="104857600"/>
		 <property name="maxInMemorySize" value="104857600"/>
	</bean>
	<!--
		104857600 byte == 100MB
		20971520 byte == 20MB

		maxUploadSize
			: 한 요청당 업로드가 허용되는 최대 용량을 바이트 단위로 설정.
			-1 은 제한이 없다는 뜻으로 이 프로퍼티를 지정하지 않을때 기본값.

		maxUploadSizePerFile
		 : 한 파일당 업로드가 허용되는 최대 용량을 바이트 단위로 설정.
			-1 은 제한이 없다는 뜻으로 이 프로퍼티를 지정하지 않을때 기본값.

		maxInMemorySize
			: 디스크에 저장하지 않고 메모리에 유지하도록
			허용하는 바이트 단위의 최대 용량을 설정.

	 		사이즈가 이보다 클 경우 이 사이즈 이상의 데이터는 파일에 저장됩니다.
			 기본값은 10240 바이트.
	 -->
</beans>
-
root-context.xml은 Spring Application에서 전역적으로 사용할 사용할 빈(bean) 객체를 정의합니다.
-
위의 예시는 DataSource, Log4J를 사용한 로그 출력 객체, SqlSessionTemplate 등을 빈으로 등록하고 있습니다.
1. root-context.xml - DBCP 사용을 위한 DataSource
-
DataSource : java에서 Connection Pool을 지원하기 위한 인터페이스 ( 커넥션의 상위버전 ), 데이터베이스와 연결된 커넥션 객체를 관리하고, 커넥션을 생성, 풀링, 해제 등을 수행.
-
destroy-method="close" : 주어진 세션을 자동으로 반환하는 설정
-
DBCP는 DB 연결에 대한 부하를 줄이기 위해 커넥션을 미리 만들어놓고 사용하는 기법, 이를 사용하기 위해 id=realDataSource를 설정하고 빈 객체로 등록.
-
이렇게 등록된 DataSource는 다른 Bean에서 DI를 통해 주입받아 사용할 수 있다.
2. log4j를 이용한 SQL 로그 출력용 빈 생성
-
SQL문의 로그 출력을 위한 설정을 함.
-
Log4jdbcProxyDataSource는 실제로 DB와 연결된 dataSource(realDataSource)를 대신하여 사용됨. 이를 통해 SQL문이 수행될 때 로그를 출력 -
Log4jdbcCustomFormatter를 통해 출력할 로그의 형식을 정의할 수 있으며, loggingType은 로그를 출력하는 방식을 설정할 수 있음. -
MULTI_LINE으로 설정하면 여러 줄로 나눠서 출력됨.
-
sqlPrefix는 로그 앞에 출력될 문자열을 정의함
DTD ( Document Type Definition )
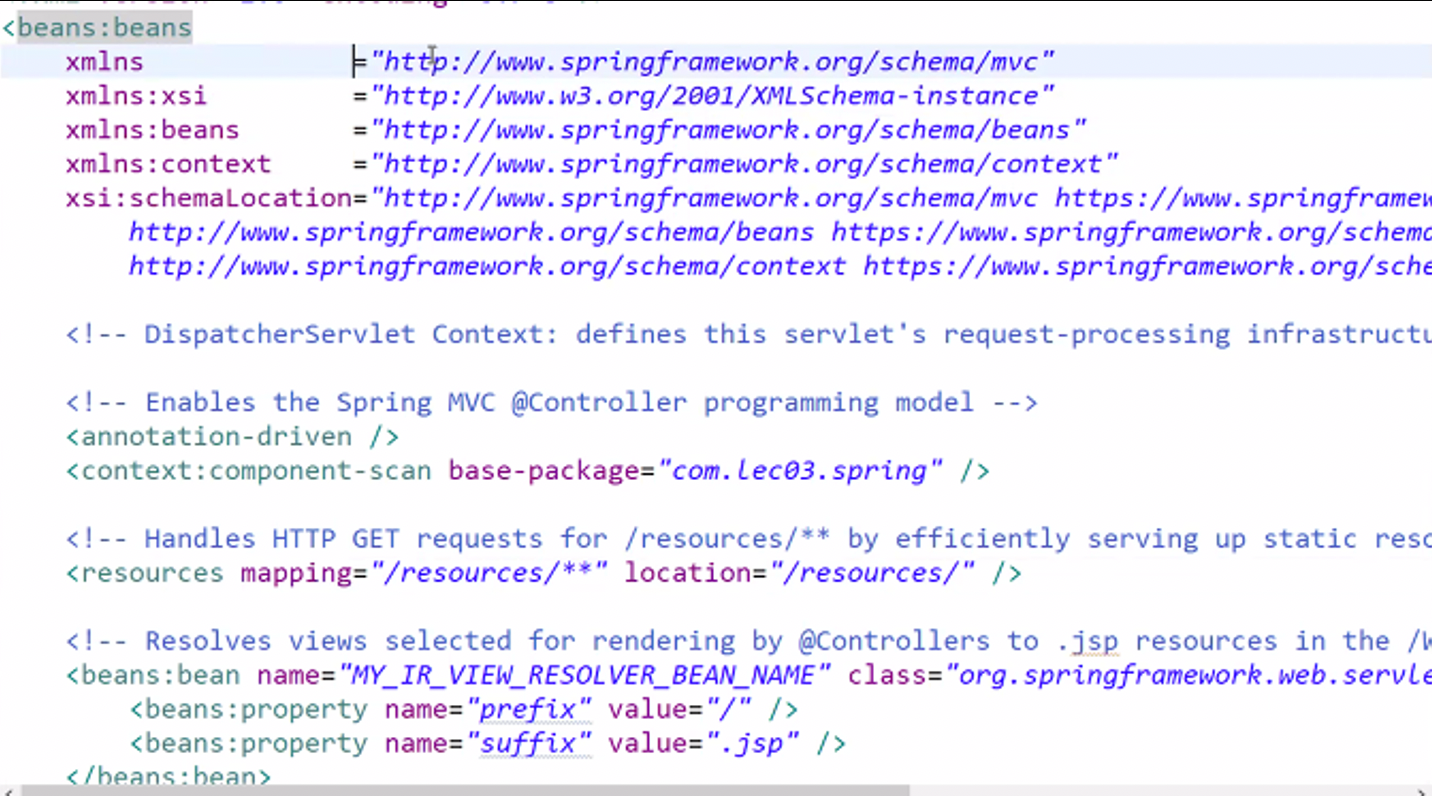
<beans:beans xmlns="http://www.springframework.org/schema/mvc"
	xmlns:xsi="http://www.w3.org/2001/XMLSchema-instance"
	xmlns:beans="http://www.springframework.org/schema/beans"
	xmlns:context="http://www.springframework.org/schema/context"
	xsi:schemaLocation="http://www.springframework.org/schema/mvc https://www.springframework.org/schema/mvc/spring-mvc.xsd
		http://www.springframework.org/schema/beans https://www.springframework.org/schema/beans/spring-beans.xsd
http://www.springframework.org/schema/context https://www.springframework.org/schema/context/spring-context.xsd">-
xmlns: 해당 문서에서 앞으로 쓸 XML 태그들은 어느 규칙에 속하는가를 명시해놓는다. -
xmlns:{aliasName}=URL: 해당 URL에서의 XML 태그들의 규칙을 어떠한 ALIAS를 붙여 네임스페이스를 분리해줄 것인지를 명시해준다. ( 마치 C의 namespace와 같은 느낌인것 같다. ) -
여러개의 xmlns 중 딱 하나만 Alias를 생략해서 명시할 수 있다. mvc 안에 있는
resources를
XSD ( XML Schema Definifion )
- XML Schema Definition
- XML 문서의 구조나 해당 문서가 가질 수 있는 스키마, 엘리먼트, 속성, 요소를 정의한 파일- namespace 에는 XSD 규격, 그리고 그 위치를 나타내서 버전을 명시해준다.

- context:component-scan, beans:bean 과 같이 namespace 가 다들 존재하는데,
annotation-driven, resources 와 같은 친구들은 그냥 쓸 수 있다. ( default로 네임스페이스 하나만 alias 생략 가능 )
Alias를 생략할 xml namespace를 따로 지정할 수도 있다.
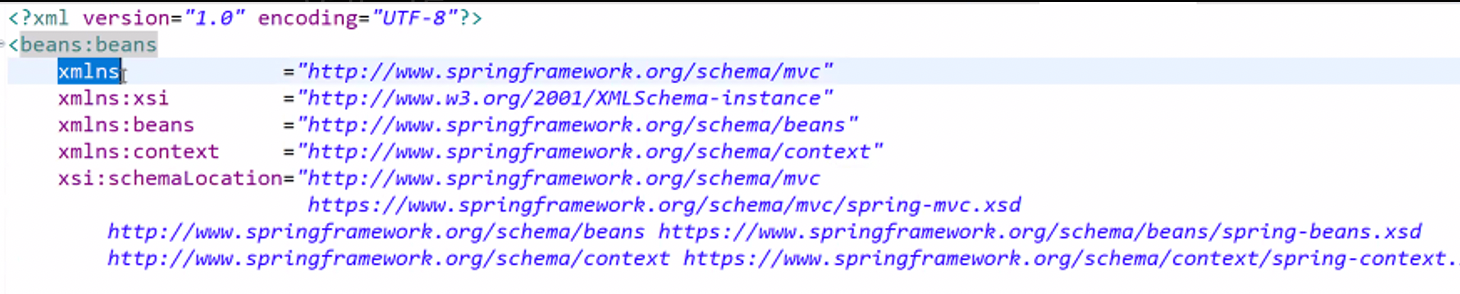
<?xml version="1.0" encoding="UTF-8"?>
<beans
	xmlns:xsi			="http://www.w3.org/2001/XMLSchema-instance"
  xmlns:mvc 			="http://www.springframework.org/schema/mvc"
	xmlns 				="http://www.springframework.org/schema/beans"
	xmlns:context		="http://www.springframework.org/schema/context"
	xsi:schemaLocation	="http://www.springframework.org/schema/mvc
						  https://www.springframework.org/schema/mvc/spring-mvc.xsd
						  http://www.springframework.org/schema/beans
						  https://www.springframework.org/schema/beans/spring-beans.xsd
						  http://www.springframework.org/schema/context
						  https://www.springframework.org/schema/context/spring-context.xsd">


	<mvc:annotation-driven />
	<context:component-scan base-package="com.lec04.di" />

	<bean name="MY_EMPDAO_BEAN_NAME" class="com.lec04.di.EmpDAO"></bean>

	<bean name="MY_EMP" class="com.lec04.di.EmpDAO"/>

	<!-- bean 선언 뒤에 속성 줄거 없으면 이렇게 해도 됨
	<bean name="MY_EMPDAO_BEAN_NAME" class="com.lec04.di.EmpDAO"/>
	!-->
</beans>-
<beans:bean>으로 쓰는게 불편하니, beans 의 XML namespace의 alias를 생략 가능하도록 수정했다. -
기존의
{~~~ schema/mvc}로 가져오던 URL에는mvc라는 네이밍을 붙여주었다.
Spring Bean 등록 기준
-
그냥 프로세스 처리 용으로 쓰이는 Java ArrayList와 같은 것까지 Spring Bean으로 등록하여 사용할 필요는 없다.
-
비즈니스 로직과 관련된 핵심 객체들만 Bean 으로 관리하면 된다.
-
예를 들어, DataSource 객체를 Spring JDBC의 DataSource를 사용하여 Bean으로 등록해줄 수 있다.
-
아래와 같은 형식으로, 우리 비즈니스 로직에 맞도록 빈을 명시하고 스프링 컨테이너에게 등록하라고 지시할 수 있다.
<bean name="MY_EMPCONTROLLER_BEAN_NAME" class="com.lec04.di.EmpController" scope="singleton">
	 		<constructor-arg ref="MY_EMPDAO_BEAN_NAME" />
	 </bean>

	 <bean name="MY_EMPDAO_BEAN_NAME" class="com.lec04.di.EmpDAO" scope="singleton">
	 	<constructor-arg ref="MY_EMPVO_BEAN_NAME"/>
</bean>-
이 때, scope를 singleton으로 만들 때 주의할 점은 여러 쓰레드가 동시 공유하여 해당 객체를 사용하므로 해당 객체 내부에 상태를 두면 안된다는 것이다. ( = 불변 객체로 만들어야 한다. )
-
Controller와 DAO의 경우에는 상태가 없고, 모든 요청 쓰레드가 공유해도 되는 코드 영역이기에 스프링 빈으로 등록 가능하다.
-
**싱글톤 vs 프로토타입 차이
-
인스턴스를 만들어서 공유할지, 안공유할지의 차이
-
상태값을 유지하냐, 아니면 그냥 처리부로 사용하냐의 차이**
Spring MVC - Controller
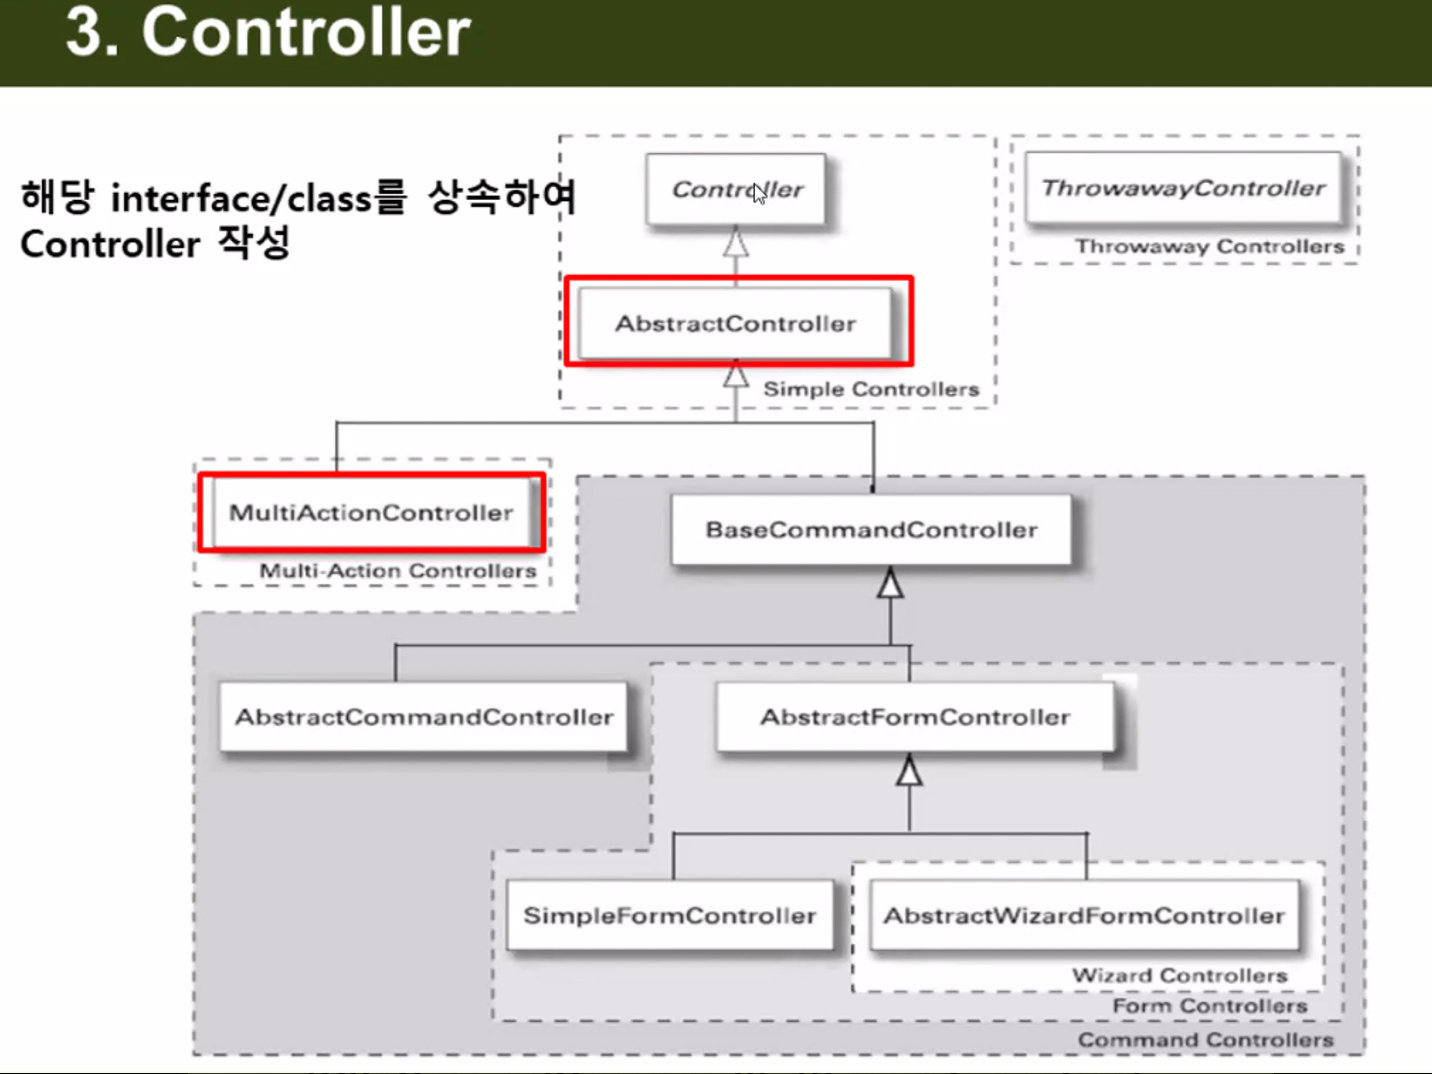
컨트롤러의 종류
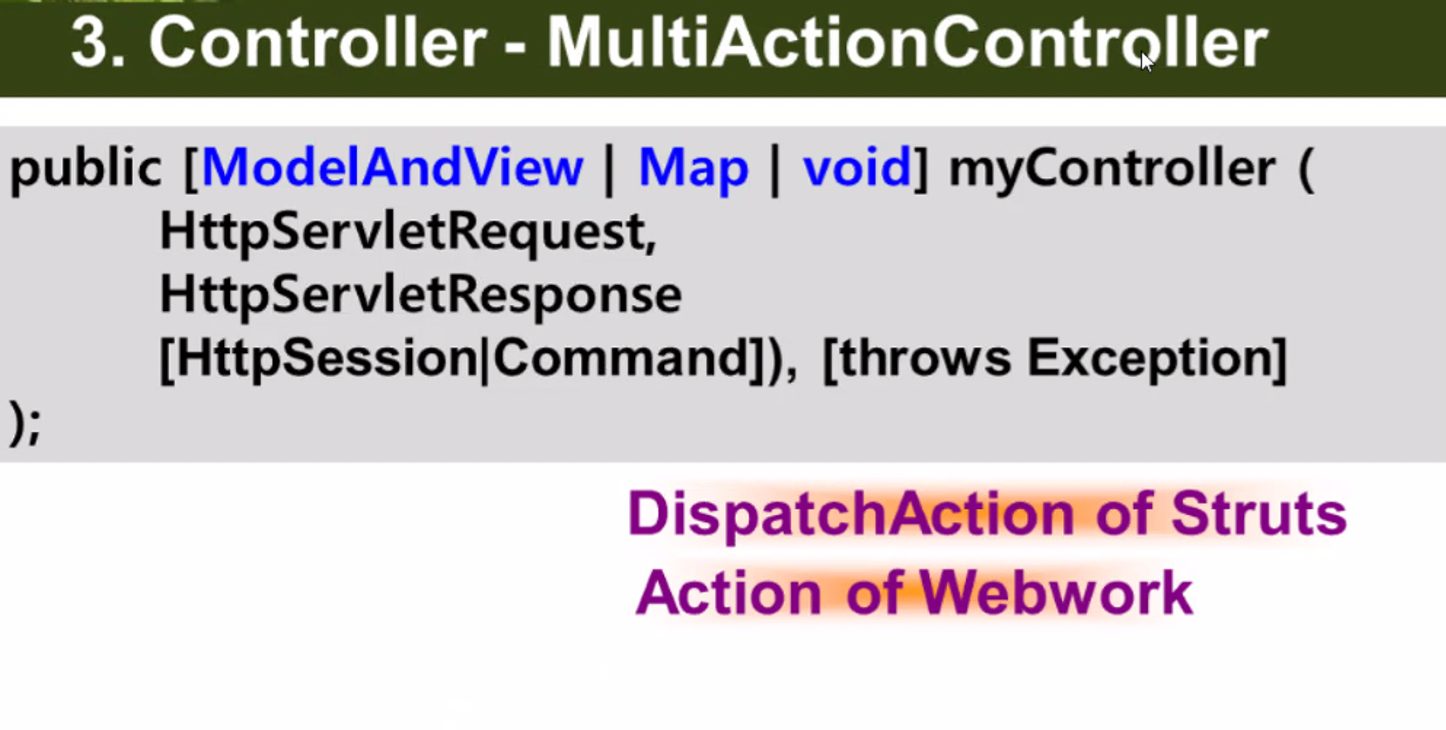
- Controller > AbstractController > MultiActionController 에서 각 HTTP 요청마다 이를 클래스가 아닌 메서드로 받아 처리하기 위해 의 규칙을 따라 메서드를 작성해주어야 한다.
- 컨트롤러를 만드는 방법은
1) extends Controller
- 핸들러 매핑으로
BeanNameUrlHandlerMapping을 사용함.
2) extends MultiActionController
- 핸들러 매핑으로
SimpleUrlHandlerMapping을 사용함.
3) servlet-context.xml 에 <mvc:annotation-driven/> 태그를 명시하고, 컨트롤러로 사용할 POJO 클래스 위에 @Controller 어노테이션을 붙여주면 된다.
Spring MVC - HandlerMapping
-
HandlerMapping은 클라이언트의 요청을 어떤 Commander가 수행할 지 여부를 결정해준다.
-
어떤 Handler ( Controller 혹은 Controller 의 method )를 사용할 지 지정.
-
BeanNameUrlHandlerMapping:<bean>의name속성과 동일한 URI로 요청이 올 경우, 해당 Controller Bean에 매핑한다.
=> 하나의 HTTP 요청에 하나의 컨트롤러 ( 클래스 ) 가 대응됨.
=> 기존의 JavaEE의 Servlet 과 별로 차이가 없는 방식
SimpleUrlHandlerMapping:Ant스타일의 경로 매핑 방식을 사용하여,URI와Controller빈을 매핑한다.

-
bean의name = "/emp_list"에 컨트롤러를 매핑해준다. -
/emp_list로 요청이 들어오면EmpController가 매핑됨. -
만약, 컨트롤러 내에 여러 개의 메서드가 있다면? 구분 X
-
여러 개의 URI를 하나의 컨트롤러의 메서드들로 매핑해주기 위해
MultiActionController와SimpleUrlHandlerMapping도입.

-
SimpleUrlHandlerMapping내에mappings라는property에value값을 넣어줌으로써 (setter 주입) 등록된 컨트롤러 빈 (MY_EMPCTL_BEAN_NAME) 과 매핑해줄 수 있다. 이 때, 마지막 부분 =empList는 해당 컨트롤러 빈의 메서드 이름으로 존재해야한다. -
property안에 여러 개의 값을 넣어줄 수도 있다. ( = 여러 개의 매핑 가능 )
Controller 하나에 여러 URL 매핑하는 예시 => 메서드 하나 당 URL 하나 매핑하기.
public class EmpController extends MultiActionController {   //extends HttpServlet {

	private EmpDAO dao;

	public void setDao(EmpDAO dao) {
		this.dao = dao;
	}

	private String str;
	public void setStringTest(String str) {
		this.str = str;
	}

	// 생성자
//	public EmpController(EmpDAO dao) {
//		this.dao = dao;
//	}

//	@RequestMapping(value = "/emp_list_servlet", method = RequestMethod.GET)
	public ModelAndView empList(HttpServletRequest request, HttpServletResponse response) {
//		EmpDAO dao = new EmpDAO();
		List<EmpVO> list = dao.empSelect();
		ModelAndView mv = new ModelAndView();

		mv.setViewName("lec02_servlet");
		mv.addObject("KEY_EMPLIST", list);
		mv.addObject("KEY_TESTSTR", this.str);

		System.out.println("DI로 주입받은 String 값 : " + this.str);
		return mv;
	}

	public ModelAndView empDummy(HttpServletRequest request, HttpServletResponse response) {

		ModelAndView mv = new ModelAndView();

		mv.setViewName("lec02_servlet");
		mv.addObject("KEY_EMPLIST", new ArrayList<EmpVO>());
		mv.addObject("KEY_TESTSTR", "empDummy = dummy");

		System.out.println("DI로 주입받은 String 값 : " + this.str);
		return mv;
	}
}EmpController를 다음과 같이 수정하고, method 명을empList,empDummy로 정해준 뒤,lec04-servlet-context.xml의 매핑을 다음과 같이 수정해주면, 한 컨트롤러 내에 2개의 URL이 매핑된다.
<!-- DI(프로퍼티) + SimpleUrlHandlerMapping -->
	<bean class="org.springframework.web.servlet.handler.SimpleUrlHandlerMapping">
		<property name="mappings">
			<value>
				/kosta/user/cwj/empList=MY_EMPCTL_BEAN_NAME
				/kosta/user/cwj/empDummy=MY_EMPCTL_BEAN_NAME
			</value>
		</property>
	</bean>

	<bean name="MY_EMPCTL_BEAN_NAME" class="com.lec04.di.EmpController" scope="singleton">
		<property name="dao" ref="MY_EMPDAO_BEAN_NAME" />
		<property name="stringTest" value="abc" />
</bean>-
사실 여담이지만 여기서 property 태그의 속성, ref와 value의 차이를 알 수 있다.
-
ref는 객체를 주입, value는 String이나 Primitive Type의 값들을 주입받을 수 있다.
-
각각 어노테이션 기반 설정 시,
@Autowired,@Value어노테이션으로 치환된다 볼 수 있다.
그런데, SimpleUrlHandlerMapping은 어떻게 생긴걸까?
/*
 * Copyright 2002-2010 the original author or authors.
 *
 * Licensed under the Apache License, Version 2.0 (the "License");
 * you may not use this file except in compliance with the License.
 * You may obtain a copy of the License at
 *
 *      http://www.apache.org/licenses/LICENSE-2.0
 *
 * Unless required by applicable law or agreed to in writing, software
 * distributed under the License is distributed on an "AS IS" BASIS,
 * WITHOUT WARRANTIES OR CONDITIONS OF ANY KIND, either express or implied.
 * See the License for the specific language governing permissions and
 * limitations under the License.
 */

package org.springframework.web.servlet.handler;

import java.util.HashMap;
import java.util.Map;
import java.util.Properties;

import org.springframework.beans.BeansException;
import org.springframework.util.CollectionUtils;

/**
 * Implementation of the {@link org.springframework.web.servlet.HandlerMapping}
 * interface to map from URLs to request handler beans. Supports both mapping to bean
 * instances and mapping to bean names; the latter is required for non-singleton handlers.
 *
 * <p>The "urlMap" property is suitable for populating the handler map with
 * bean references, e.g. via the map element in XML bean definitions.
 *
 * <p>Mappings to bean names can be set via the "mappings" property, in a form
 * accepted by the <code>java.util.Properties</code> class, like as follows:<br>
 * <code>
 * /welcome.html=ticketController
 * /show.html=ticketController
 * </code><br>
 * The syntax is <code>PATH=HANDLER_BEAN_NAME</code>.
 * If the path doesn't begin with a slash, one is prepended.
 *
 * <p>Supports direct matches (given "/test" -> registered "/test") and "*"
 * matches (given "/test" -> registered "/t*"). Note that the default is
 * to map within the current servlet mapping if applicable; see the
 * {@link #setAlwaysUseFullPath "alwaysUseFullPath"} property for details.
 * For details on the pattern options, see the
 * {@link org.springframework.util.AntPathMatcher} javadoc.

 * @author Rod Johnson
 * @author Juergen Hoeller
 * @see #setMappings
 * @see #setUrlMap
 * @see BeanNameUrlHandlerMapping
 */
public class SimpleUrlHandlerMapping extends AbstractUrlHandlerMapping {

	private final Map<String, Object> urlMap = new HashMap<String, Object>();


	/**
	 * Map URL paths to handler bean names.
	 * This is the typical way of configuring this HandlerMapping.
	 * <p>Supports direct URL matches and Ant-style pattern matches. For syntax
	 * details, see the {@link org.springframework.util.AntPathMatcher} javadoc.
	 * @param mappings properties with URLs as keys and bean names as values
	 * @see #setUrlMap
	 */
	public void setMappings(Properties mappings) {
		CollectionUtils.mergePropertiesIntoMap(mappings, this.urlMap);
	}

	/**
	 * Set a Map with URL paths as keys and handler beans (or handler bean names)
	 * as values. Convenient for population with bean references.
	 * <p>Supports direct URL matches and Ant-style pattern matches. For syntax
	 * details, see the {@link org.springframework.util.AntPathMatcher} javadoc.
	 * @param urlMap map with URLs as keys and beans as values
	 * @see #setMappings
	 */
	public void setUrlMap(Map<String, ?> urlMap) {
		this.urlMap.putAll(urlMap);
	}

	/**
	 * Allow Map access to the URL path mappings, with the option to add or
	 * override specific entries.
	 * <p>Useful for specifying entries directly, for example via "urlMap[myKey]".
	 * This is particularly useful for adding or overriding entries in child
	 * bean definitions.
	 */
	public Map<String, ?> getUrlMap() {
		return this.urlMap;
	}


	/**
	 * Calls the {@link #registerHandlers} method in addition to the
	 * superclass's initialization.
	 */
	@Override
	public void initApplicationContext() throws BeansException {
		super.initApplicationContext();
		registerHandlers(this.urlMap);
	}

	/**
	 * Register all handlers specified in the URL map for the corresponding paths.
	 * @param urlMap Map with URL paths as keys and handler beans or bean names as values
	 * @throws BeansException if a handler couldn't be registered
	 * @throws IllegalStateException if there is a conflicting handler registered
	 */
	protected void registerHandlers(Map<String, Object> urlMap) throws BeansException {
		if (urlMap.isEmpty()) {
			logger.warn("Neither 'urlMap' nor 'mappings' set on SimpleUrlHandlerMapping");
		}
		else {
			for (Map.Entry<String, Object> entry : urlMap.entrySet()) {
				String url = entry.getKey();
				Object handler = entry.getValue();
				// Prepend with slash if not already present.
				if (!url.startsWith("/")) {
					url = "/" + url;
				}
				// Remove whitespace from handler bean name.
				if (handler instanceof String) {
					handler = ((String) handler).trim();
				}
				registerHandler(url, handler);
			}
		}
	}

}-
setMappings(Properies mappings)라는 setter가 보인다. -
즉, servlet-context.xml 에서 property로 정해준 값들이 웹 어플리케이션 구동 시, Spring Container에 의해 SimpleUrlHandlerMapping 객체의 setter로 주입되는 것이다.
-
Properties자료형은 일종의 Map 이라 생각하면 된다. 즉, HandlerMapping은 Map으로 URL과 메서드 매핑을 관리하고 있다 생각할 수 있다.
XML 설정 기반의 Controller / DAO를 어노테이션 기반으로 바꾼 코드
@Controller
	// 1. 컨트롤러로 동작   :  extends **Controller
	// 2. 인스턴스 생성(new) : <bean name="MY_EMPCTL_BEAN_NAME" class="com.lec04.di.EmpController" scope="singleton">
public class EmpController2 {

	@Autowired
	// 1. <property name="dao" ref="MY_EMPDAO_BEAN_NAME" />
	// 2. 왜 생성자를 대신하는 어노테이션이 없을까? @ => 해당 Bean을 올려서 초기화시켜라..
	private EmpDAO dao;

	@Value("abcd")
	// Autowired?
	// <property name="stringTest" value="abcd" />
	private String str;

    @RequestMapping(value = "/emp_list", method = RequestMethod.GET)
	public String empList(Model model) {
		List<EmpVO> list = dao.empSelect();
		model.addAttribute("KEY_EMPLIST", list);
		model.addAttribute("KEY_TESTSTR", this.str);
		return "lec02_servlet";
	}

    @RequestMapping(value = "/emp_dummy", method = RequestMethod.GET)
	public String empDummy(Model model) {
    	model.addAttribute("KEY_EMPLIST", new ArrayList<EmpVO>());
    	model.addAttribute("KEY_TESTSTR", "empDummy : DummyTest");
		return "lec02_servlet";
	}
}-
컨트롤러 역할을 하는 EmpController에
@Controller어노테이션을 붙여주었다.- 더이상 Controller 혹은 MultiActionContrller I/F 혹은 추상클래스를 상속받지 않아도 된다.
-
<property name="dao" ref="MY_EMPDAO_BEAN_NAME" />- 이 친구와 @Autowired 는 동일한 역할을 한다.
-
<property name="stringTest" value="abcd" />- 이 친구와 @Value 는 동일한 역할을 한다.
EmpDAO ( @Repository )
@Repository
// 1. DAO로써 동작한다.
// 2. 인스턴스 생성(new) => 메모리에 올리기
public class EmpDAO {

	private MyConnection myConn;

	public EmpDAO() {
		myConn = new MyOracleConnection();
	}

	public List<EmpVO> empSelect(){
		Connection conn = myConn.getConnection();
		PreparedStatement pstmt = null;
		ResultSet rs = null;
		String sql = "S
...- DAO 역할을 하는 클래스에는
@Repository어노테이션을 붙여주면 된다.
request.getParameter, request.getAttribute를 대신하여, 파라미터 담는 방법
-
기존 Java EE 의 Servlet API 를 통해 HTTP 요청의 파라미터, Body를 뽑아내기 위해서는 HttpServletRequest 객체를 사용해주었어야 했다.
-
Spring MVC Framework에서는 ArgumentResolver를 통해 자동으로 데이터를 추출하고 형변환까지 해서 컨트롤러에 넘겨준다.
-
아래 4가지 방식으로 HTTP 요청의 데이터를 받아올 수 있다.
@RequestMapping(value = "/emp", method = {RequestMethod.GET, RequestMethod.POST} )
public ModelAndView empList2(@RequestParam("paramName") String paramName) {
	//<form>데이터  or   쿼리스트링(?empno=777&ename=홍길동)
}

@RequestMapping(value = "/emp/{empno}", method = RequestMethod.GET)
public  ModelAndView empList2(@PathVariable("empno") int vno) {
	//RESTful :   /emp/7733
}

@RequestMapping(value = "/emp", method = RequestMethod.POST)
    public ModelAndView addEmployee(@ModelAttribute EmpVO empVO) {
	//<form>데이터
}

@RequestMapping(value = "/emp", method = RequestMethod.POST)
public ModelAndView empList2(@RequestBody EmpVO evo) {
	//XML or JSON
}
Tomcat은 하나의 프로그램
-
Eclipse는 하나의 프로그램
-
내부 프로그램 사이에는 내부 호출
-
프로그램과 프로그램 사이에는 외부 호출
-
워드와 한글 사이에는 이미지 삽입 ( RPC 통신 )
-
한글은 워드에서 이미지 삽입 (IPC 통신)을 허용하지 않음.
-
Spring과 Tomcat은 IPC 통신을 하나요?
vs spring또한 jar, Tomcat 또한 jar ( Java Code ) -
Tomcat은 배치 스크립트를 둔다. ( Tomcat 클릭 시, Batch 프로그램을 통해 Java의 main을 시작 )
-
tomcat-start.sh => 배치 스크립트 ( => 자바가 실행된 것임 )
-
tomcat-lib /
-
Tomcat과 Spring은 어떤 관계?
=> VM에서 돌아가는 라이브러리 관계