여태까지 안드로이드 스튜디오를 사용하면서 막연히 이 기능 쓰려면 gradle 에 라이브러리 implement 해야지 .. 라는 생각만 했었는데 이번에 기초부터 다져야겠다는 생각에 이 gradle 이 무엇일까 ? 부터 공부해보기로 했다 .
build.gradle 이란 무엇일까 ?
Gradle 이란 Groovy , Kotlin 을 기반으로 한 빌드 배포 도구이다. 우리가 사용하는 안드로이드 스튜디오는 코드 편집만이 가능한 IDE(Integrated Development Environment) 환경이기때문에 Gradle 을 사용한다 .
gradle 파일은 원래 Groovy DSL을 주로 사용했지만 점점 Kotlin DSl 사용을 권장하는 추세이다.
gradle(Project) , gradle(Module) 의 차이점 ?
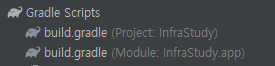 안드로이드 스튜디오에서 항상 우리를 반겨주던 Gradle 들이다 . 별다른 모듈 설정을 하지 않았다면 위의 그림같이 나타날 것이다 .
쉽게 생각해서 build.gradle(Project) 는 모든 프로젝트에 공통으로 적용되는 빌드의 구성을 정의하고 , build.gradle(Module) 은 각각의 개별 모듈에서 적용되는 빌드 구성을 정의한다 .
안드로이드 스튜디오에서 항상 우리를 반겨주던 Gradle 들이다 . 별다른 모듈 설정을 하지 않았다면 위의 그림같이 나타날 것이다 .
쉽게 생각해서 build.gradle(Project) 는 모든 프로젝트에 공통으로 적용되는 빌드의 구성을 정의하고 , build.gradle(Module) 은 각각의 개별 모듈에서 적용되는 빌드 구성을 정의한다 .
build.gradle(Project)
// Top-level build file where you can add configuration options common to all sub-projects/modules.
buildscript {
    repositories {
        google()
        mavenCentral()
    }
    dependencies {
        classpath "com.android.tools.build:gradle:7.0.4"
        classpath 'org.jetbrains.kotlin:kotlin-gradle-plugin:1.6.21'

        // NOTE: Do not place your application dependencies here; they belong
        // in the individual module build.gradle files
    }
}

task clean(type: Delete) {
    delete rootProject.buildDir
}
build.gradle(Module)
plugins {
    id 'com.android.application'
    id 'kotlin-android'
    id 'kotlin-android-extensions'
}

android {
    compileSdk 32

    buildFeatures{
        viewBinding true
    }


    defaultConfig {
        applicationId "com.example.infrastudy"
        minSdk 30
        targetSdk 32
        versionCode 1
        versionName "1.0"

        testInstrumentationRunner "androidx.test.runner.AndroidJUnitRunner"
    }

    buildTypes {
        release {
            minifyEnabled false
            proguardFiles getDefaultProguardFile('proguard-android-optimize.txt'), 'proguard-rules.pro'
        }
    }
    compileOptions {
        sourceCompatibility JavaVersion.VERSION_1_8
        targetCompatibility JavaVersion.VERSION_1_8
    }
    kotlinOptions {
        jvmTarget = '1.8'
    }
}

dependencies {
    implementation 'com.squareup.retrofit2:retrofit:2.5.0'
    implementation 'com.google.code.gson:gson:2.8.2'
    implementation 'com.squareup.retrofit2:converter-gson:2.4.0'
    implementation 'androidx.core:core-ktx:1.7.0'
    implementation 'androidx.appcompat:appcompat:1.4.1'
    implementation 'com.google.android.material:material:1.5.0'
    implementation 'androidx.constraintlayout:constraintlayout:2.1.3'

}
안의 세부 내역을 살펴보면 ,
plugins{} : 안드로이드 전용 빌드 옵션
android{} : 모든 안드로이드 관련 설정
compileSdk : Android API 레벨. (해달 레벨 이하 이용 가능)
minSdk : 최소 API 레벨.
targetSdk : 테스트에 사용하는 API 레벨
buildTypes{} : 빌드 타입 종류 지정 (release, develoption, staging.. 등등)
dependencies{} : 특정 버전을 선택해서 라이브러리 추가
의 의미를 가진다 .
위의 코드들은 모두 Groovy DSL 을 기준으로 하고 있는데 , 요즘은 Kotlin DSL 을 많이 사용하는 추세라고 한다 . Groovy 와 Kotlin DSL 에는 어떤 차이점이 있을까 ?
Groovy 에서 KTS(Kotlin 스크립트) 로의 빌드 구성 이전
위에서는 Kotlin DSL 이라고 했는데 왜 여기선 KTS 라고 썼을까 ? Android 개발자 문서에서 Groovy 에서 이전하는 맥락에서는 KTS로 변환하는것과 Kotlin DLS로 변환하는게 같은 의미라고 한다 .
아무튼 , 기존 Groovy 에서 KTS 로 변환하는 이유에 대해 간단하게 알아보자
1. "에러 확인"
이게 사실 상 가장 큰 메리트라고 할 수 있다 . 기존의 Groovy 방식에서는 빌드를 하기전엔 확인이 불가능 했는데 컴파일 타임에 에러확인이 가능해진다 .
2. 코드 탐색 및 자동 완성
3. 구문 강조
4. IDE 지원으로 향상된 편집환경
등등의 편의성이 생긴다 . 하지만 Java8 이상에서만 동작이 가능하고 , 빌드시의 속도가 Groovy 보다 느리다는 단점이 존재한다 .
Kotlin DSL 로 Migration 하기
직접 해본결과 비교적 간단하게(?) Migration이 가능했다 . 애초에 build.gradle 파일을 build.gradle.kts 파일로 바꾸고 문법들만 수정해주면 된다 .
1. setting.gradle 파일 바꾸기
파일 명을 setting.gradle.kts 로 수정하고 해당부분만 수정을 해주면된다 . Kotlin 으로 수정할때 기억해야 할 핵심은 ( ) 와 "" 이다 . Groovy 의 경우 '' 의사용이 많은데 kotlin 으로 Migration 할경우 이 작은 따옴표를 큰따옴표로 모두 바꿔줘야한다 .

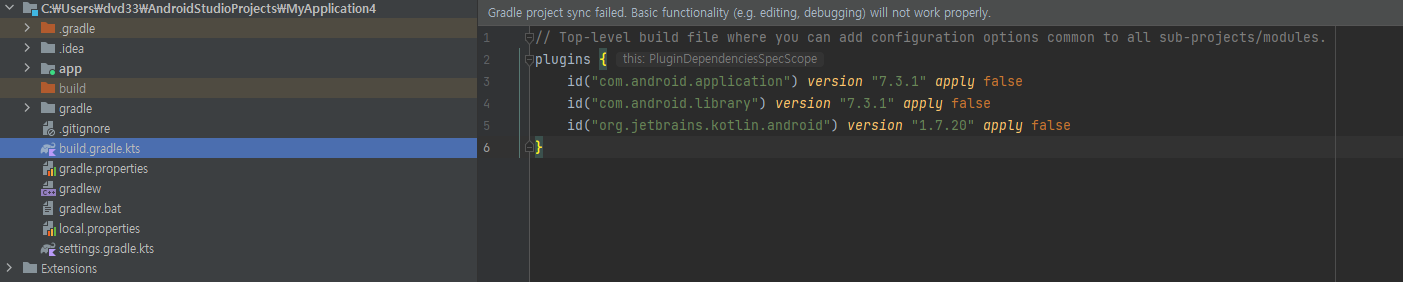
2. 프로젝트 build.gradle 파일 바꾸기
다음은 프로젝트의 build.gradle 파일을 build.gradle.kts 로 바꿔주고 내부 문법을 수정해준다 . 내 버전에 프로젝트 build.gradle 파일은 코드가 좀 달라서 다음과 같이 바꿔주었다 .
3. 모듈 build.gradle 파일 바꾸기
다음은 모듈의 build.gradle 파일을 build.gradle.kts 로 바꾸고 내부 문법을 수정해준다 . 이 부분이 고칠부분이 가장많아서 조금 까다롭다 . 기존의 groovy 문법으로 되어있는 파일을 kotlin 문법으로 수정해주면 된다 .
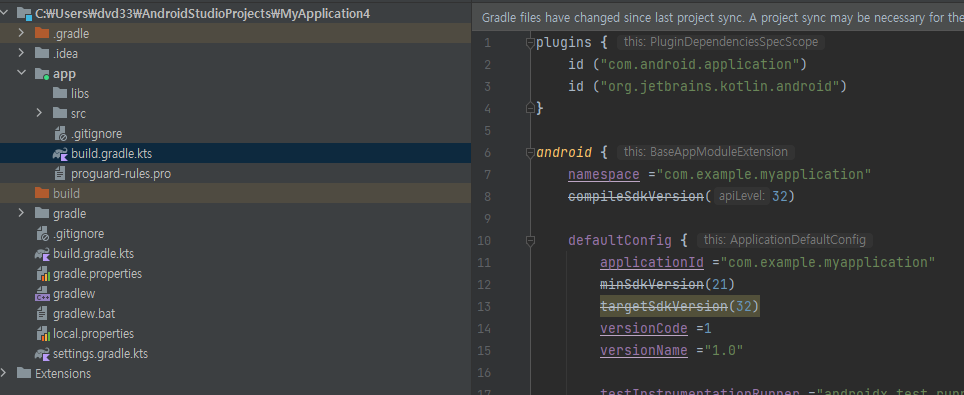
plugins {
    id ("com.android.application")
    id ("org.jetbrains.kotlin.android")
}

android {
    namespace ="com.example.myapplication"
    compileSdkVersion(32)

    defaultConfig {
        applicationId ="com.example.myapplication"
        minSdkVersion(21)
        targetSdkVersion(32)
        versionCode =1
        versionName ="1.0"

        testInstrumentationRunner ="androidx.test.runner.AndroidJUnitRunner"
    }

    buildTypes {
       getByName("release") {
            isMinifyEnabled = false // groovy 와 사용법이 좀 다르다
            proguardFiles(getDefaultProguardFile("proguard-android-optimize.txt"), "proguard-rules.pro")
        }
    }
    compileOptions {
        sourceCompatibility=JavaVersion.VERSION_1_8
        targetCompatibility=JavaVersion.VERSION_1_8
    }
    kotlinOptions {
        jvmTarget = "1.8"
    }
}

dependencies {

    implementation ("androidx.core:core-ktx:1.7.0")
    implementation ("androidx.appcompat:appcompat:1.6.1")
    implementation ("com.google.android.material:material:1.9.0")
    implementation ("androidx.constraintlayout:constraintlayout:2.1.4")
    testImplementation ("junit:junit:4.13.2")
    androidTestImplementation ("androidx.test.ext:junit:1.1.5")
    androidTestImplementation ("androidx.test.espresso:espresso-core:3.5.1")
}
이게 Kotlin 문법으로 수정한 build.gradle.kts 코드이다 . 중간에 isMinifyEnabled 이 변수명이 달라져서 해당부분을 수정해줘야한다 . 그리고 buildtypes 을 getByName 을 통해 가져온다는 점도 약간 다르다 . 나머지 부분은 위에서 설명했듯이 ( ) 와 "" 만 주의하면 크게 문제없이 바꿀 수 있다 .
이제 Sync 만 하면 끝 ! 비교적 간단하게 Kotlin 으로 바꿀수있어서 앞으론 겁내지않고 코틀린으로 바꾸고 프로젝트를 진행할 것 같다 .