참고
- <Android Studio를 활용한 안드로이드 프로그래밍> 7판
- 대학 강의 <모바일 프로그래밍>
- Android Studio Developer - Graphics
안드로이드에서 개인적으로 가장 어려운 파트가 파일 처리라고 했지만 이제는 그래픽과 이미지를 다루는 게 제일 까다로운 듯하다.
(사실 쉬운 부분이 없음)
그래서 이번에는 그래픽과 이미지 파트를 실습 예제와 같이 정리하고 활용에 익숙해지고자 한다.
그래픽
캔버스와 페인트 기본
안드로이드에서 그리기 작업은 두 영역으로 나눌 수 있다.
- 그리기 내용 (Canvas)
- 그리기 방법 (Paint)
Canvas는 선을 그릴 수 있는 메서드를 제공하고, Paint는 선의 굵기나 색상을 정의하는 메서드를 제공하는 식이다.
캔버스와 페인트
화면에 도형을 그릴 때 사용되는 Canvas와 Paint 클래스
Canvas 클래스
- 점, 선, 원 사각형 그리기
- 텍스트 쓰기
- 이미지 출력
Paint 클래스
- 색상 선택
- 스타일, 펜 두께, 글꼴 선택
그래픽을 포현할 때는 아래와 같이 View 클래스를 재정의하는 형태를 많이 사용한다.
public void onCreate(Bundle savedInstanceState){
	super.onCreate(savedInstanceState);
    setContentView(new 재정의한 클래스 이름(this));
}
private static class 재정의한 클래스 이름 extends View{
	public 재정의한 클래스 이름(Context context){
    	super(context);
    }
    @Override
    protected void onDraw(Canvs canvas){
    	super.onDraw(canvas);
        // 화면에 그려질 내용을 코딩
    }
}
굳이 클래스를 재정의하는 이유가 무엇일까?
: 단순히 레이아웃을 통해서 버튼 등의 위젯을 표시한다면 커스텀 뷰를 사용할 필요는 없다. 그러나 시각적으로 중요한 작업을 만들 거나(그래프 등), 부분화면 띄우기 및 중첩 레이아웃 등 레이아웃으로는 처리하기 무거운 작업을 하는 경우 커스텀 뷰를 만들면 성능 면에서 더 효율적이다.
[출처 | when use a Custom View? - Android]
그럼 다음 View.onDraw() 메소드를 정의한다. onDraw() 메서드를 재정의하는 것이 가장 중요한 단계이다.
onDraw()의 매개변수를 뷰에서 자기 자신을 그릴 때 사용할 수 있는 Canvas 객체이다. Canvas 클래스는 텍스트, 선, 비트맵 및 기타 여러 그래픽 프리미티브를 그리기 위한 메서드를 정의한다.
onDraw()에서 이러한 메서드를 사용하여 맞춤 사용자 인터페이스를 만들 수 있다.
또한 그리기 전 반드시 Paint 객체를 선언해야 한다.
실습 9-2
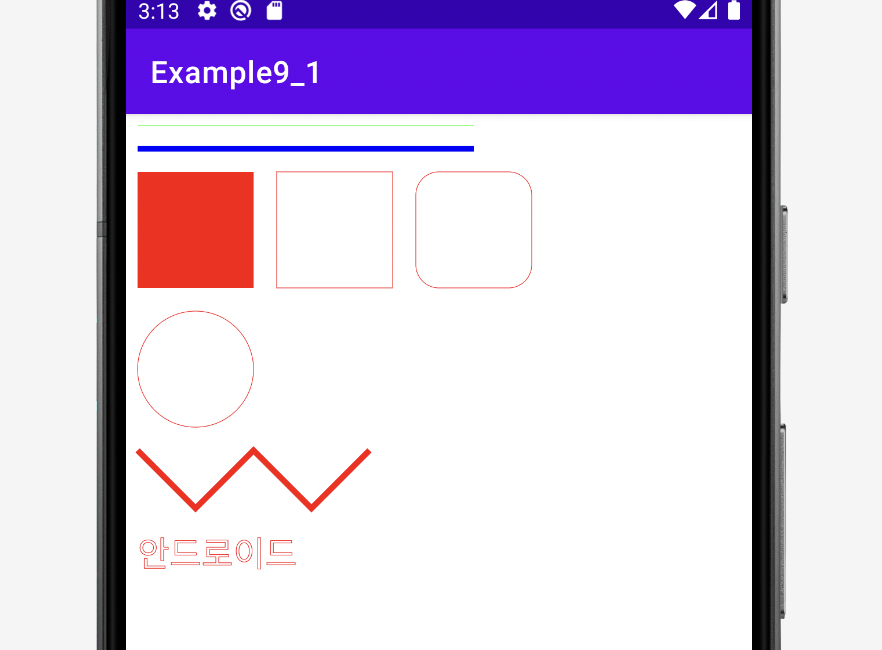
코드
package com.example.example9_1;

import androidx.appcompat.app.AppCompatActivity;

import android.content.Context;
import android.graphics.Canvas;
...

public class MainActivity extends AppCompatActivity {

    @Override
    protected void onCreate(Bundle savedInstanceState) {
        super.onCreate(savedInstanceState);
        setContentView(new MyGraphicView(this));
    }
	// 커스텀 뷰
    private static class MyGraphicView extends View {
        public MyGraphicView(Context context){
            super(context);
        }

        @Override
        protected void onDraw(Canvas canvas){
            super.onDraw(canvas);
            Paint paint = new Paint();
            // 그리기 전 반드시 Paint 객체 선언
            paint.setAntiAlias(true); // 선이나 도형의 경계선에 중간색을 설정하여 부드럽게 만드는 설정
            paint.setColor(Color.GREEN);
            canvas.drawLine(20, 20, 600, 20, paint); // 선을 그릴 수 있는 메서드를 제공하는 canvas

            paint.setColor(Color.BLUE);
            paint.setStrokeWidth(10);
            canvas.drawLine(20, 60, 600, 60, paint);

            paint.setColor(Color.RED);
            paint.setStrokeWidth(0);

            paint.setStyle(Paint.Style.FILL);
            Rect rect1 = new Rect(20, 100, 20+200, 100 + 200);
            canvas.drawRect(rect1, paint);

            paint.setStyle(Paint.Style.STROKE);
            Rect rect2 = new Rect(260, 100, 260+200, 100+200);
            canvas.drawRect(rect2, paint);

            RectF rect3 = new RectF(500, 100, 500+200, 100+200);
            canvas.drawRoundRect(rect3, 40, 40, paint);

            canvas.drawCircle(120, 440, 100, paint);

            paint.setStrokeWidth(10);

            Path path1 = new Path();
            path1.moveTo(20, 580);
            path1.lineTo(20+100, 580+100);
            path1.lineTo(20+200, 580);
            path1.lineTo(20+300, 580+100);
            path1.lineTo(20+400, 580);
            canvas.drawPath(path1, paint);

            paint.setStrokeWidth(0);
            paint.setTextSize(60);
            canvas.drawText("안드로이드", 20, 780, paint);
        }
    }
}
직접 풀어보기 9-1
문제
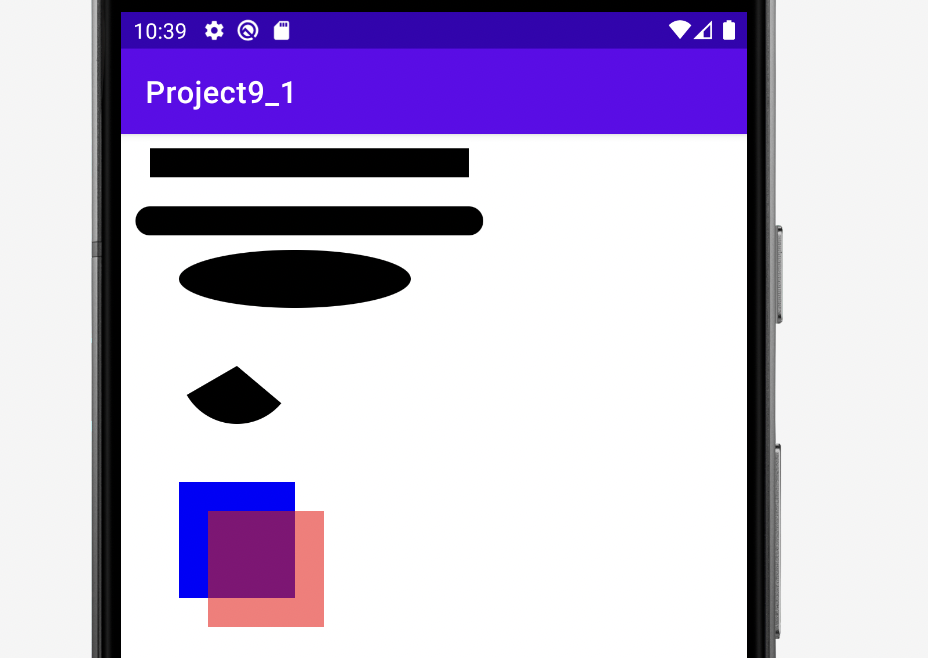
코드
package com.example.project9_1;

import androidx.appcompat.app.AppCompatActivity;

import android.content.Context;
import android.graphics.Canvas;
..

public class MainActivity extends AppCompatActivity {

    @Override
    protected void onCreate(Bundle savedInstanceState) {
        super.onCreate(savedInstanceState);
        setContentView(new MyGraphicView(this)); // setContentView(View view)
    }

    private static class MyGraphicView extends View {
        public MyGraphicView(Context context){
            super(context);
        }

        @Override
        protected void onDraw(Canvas canvas){ // onDraw() 메서드 정의
            super.onDraw(canvas);
            Paint paint = new Paint();
            paint.setAntiAlias(true);
            paint.setStrokeWidth(50);

            //drawLine(float startX, float startY, float stopX, float stopY, Paint paint)
            canvas.drawLine(50, 50, 600, 50, paint);

            paint.setStrokeCap(Paint.Cap.ROUND);
            canvas.drawLine(50, 150, 600, 150, paint);

            RectF rectF = new RectF();
            rectF.set(100, 200, 100 + 400, 100 + 200);
            canvas.drawOval(rectF, paint);

            rectF.set(100, 300, 100 + 200, 300 + 200);
            canvas.drawArc(rectF, 40, 110, true, paint);

            paint.setColor(Color.BLUE);
            rectF.set(100, 600, 100 + 200, 600 + 200);
            canvas.drawRect(rectF, paint);

            paint.setColor(Color.argb(0x88, 0xff, 0x00, 0x00));
            rectF.set(150, 650, 150 + 200, 650 + 200);
            canvas.drawRect(rectF, paint);

        }
    }
}