Scrapy로 무신사 크롤링해와서 mongodb에까지 저장하는 과제를 받았다. mongodb에 연결과 저장은 다음 포스트에서 할예정이다. 우선 Scrapy를 다운받아 프로젝트를 만들기 전에 Scrapy가 무엇인지에 대해 알아보자
Scrapy란?
scrapy는 웹사이트에서 필요한 데이터를 추출하는 오픈소스 프레임워크로 가볍고, 빠르고, 확장성이 좋다. 파이썬 기반으로 spider라고 하는 코드를 작성하여 크롤링을 실행한다.
- 비동기 네트워킹 라이브러리(asynchronous networking library)인 Twisted를 기반으로 하기 때문에 매우 우수한 성능을 발휘하며 셀레니움과 마찬가지로 XPath, CSS 표현식으로 HTML 소스에서 데이터 추출이 가능하다.
- scrapy는 지정된 url만 조회하기 때문에 scrapy가 셀레니움보다 가볍고 빠른 크롤링을 실행할 수 있다
Scrapy 프로젝트 생성
우선 Scrapy를 설치해준 후 프로젝트를 생성해준다.
# scrapy 설치
pip install scrapy

# scrapy 버전확인
scrapy version

# 프로젝트 생성
scrapy startproject test
기본적인 scrapy 프로젝트의 구조이다.
$ tree test
test
├── scrapy.cfg
└── test
    ├── __init__.py
    ├── items.py
    ├── middlewares.py
    ├── pipelines.py
    ├── settings.py
    └── spiders
        └── __init__.py
각각 파일의 용도는
- items.py: 크롤링해오는 데이터를 class로 받아옴
- middlewares.py: 미들웨어 설정용인데 검색해보니 셀레늄이랑 연동할 때 사용하는 것 같다. 이번 과제에서 사용하지 않을 예정이다.
- pipelines.py: 크롤링해 온 후 데이터를 처리
- settings.py: 말그대로 설정파일
- spiders: 크롤링할 데이터를 코딩
Items.py 작성
가지고 올 element를 작성한다. 아래 사진에 있는 상품들의 정보를 가지고 올 예정이다.

총 13가지 정보들을 가지고오기로 결정했다.
1. 제품명

2. 브랜드

3. 품번

4. 시즌

5. 성별

6. 좋아요

7. 출고 정보

8. 배송 정보

9. 무신사 판매가

10. 무신사 회원가

11. 무신사 적립금

12. 제품 이미지

13. 제품 설명
import scrapy
class MusinsaItem(scrapy.Item):
product_name = scrapy.Field() # 제품명
brand = scrapy.Field() # 브랜드
product_id = scrapy.Field() # 품번
season = scrapy.Field() # 시즌
sex = scrapy.Field() # 성별
like = scrapy.Field() # 좋아요
release_info = scrapy.Field() # 출고 정보
shipping_info = scrapy.Field() # 배송정보
price = scrapy.Field() # 무신사 판매가
member_price = scrapy.Field() # 무신사 회원가
point = scrapy.Field() # 무신사 적립금
product_img = scrapy.Field() # 제품 이미지
product_info = scrapy.Field() # 제품 설명Spider 작성
items.py를 다 작성했으면 드디어 크롤링을 해주는 Spider를 작성헤주면 된다.
스크랩할 웹사이트에서 개발자도구를 키고 해당 엘리먼트를 클릭하면 Copy xPath를 할 수 있다.
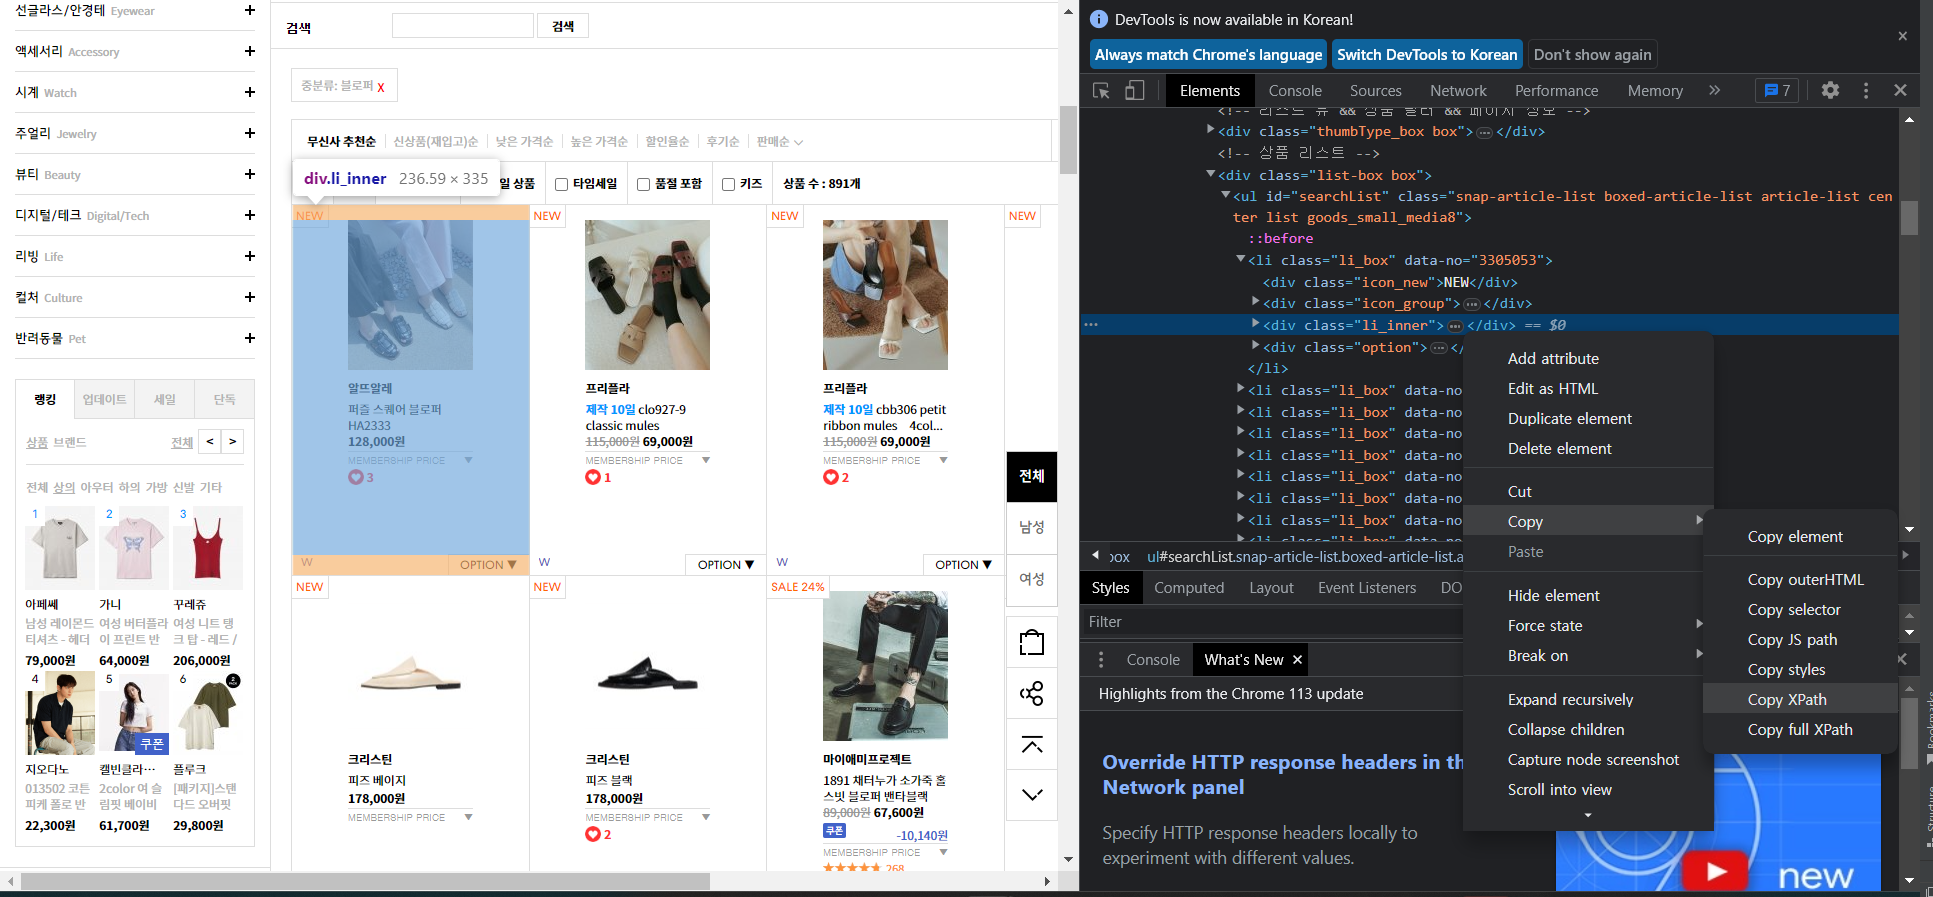
나는 아래 상품리스트에서 각각의 상품상세페이지로 이동해서 크롤링해주는 작업을 위해 크롤링을 두번 할 예정이다.

import scrapy
from scrapy import Spider

from .. import items


class MusinsaSpider(Spider):
	# 스파이더 이름(실행)
    name = "test"

    def start_requests(self):
        url = "https://www.musinsa.com/categories/item/005019"
        yield scrapy.Request(url, self.parse_start)

    # 상품 상세 페이지 url로 request
    def parse_start(self, response):
        product_url = "https://www.musinsa.com/app/goods/"
        data_no = response.xpath('//li[@class="li_box"]/@data-no').getall()
        for d in data_no:
            url = product_url + d
            yield scrapy.Request(url, self.parse_items)

    # 상품 상세 페이지에 있는 정보 크롤링
    def parse_items(self, response):
        item = items.MusinsaItem()
        item['product_name'] = response.xpath('//span[@class="product_title"]/em/text()').get().strip()
        item['brand'] = response.xpath('//*[@id="product_order_info"]/div[1]/ul/li[1]/p[2]/strong/a/text()').get()
        item['product_id'] = response.xpath('//*[@id="product_order_info"]/div[1]/ul/li[1]/p[2]/strong/text()')[
            1].get().strip()
        item['season'] = response.xpath(
            '//*[@id="product_order_info"]/div[1]/ul/li[2]/p[2]/strong/text()').get().strip().replace(" ", "")
        item['sex'] = response.xpath('//*[@id="product_order_info"]/div[1]/ul/li[2]/p[2]/span[2]/span/text()').get()
        item['like'] = response.xpath('//*[@id="product-top-like"]/p[2]/span/text()').get()
        item['release_info'] = response.xpath('//*[@id="product_order_info"]/div[2]/ul/li[1]/p[2]/text()').get().strip()
        item['shipping_info'] = response.xpath('//*[@id="product_order_info"]/div[2]/ul/li[2]/p[2]/text()').getall()
        item['price'] = response.xpath('//*[@id="goods_price"]/del/text()').get()
        item['member_price'] = response.xpath('//span[@class="txt_price_member"]/text()').get().strip()
        item['point'] = response.xpath('//*[@id="product_order_info"]/div[3]/ul/li[4]/p[2]/span/text()').get()
        item['product_img'] = response.xpath('//*[@id="bigimg"]/@src').get()
        item['product_info'] = response.xpath('//*[@id="detail_view"]/div[1]/div/img/@src').getall()

        yield item
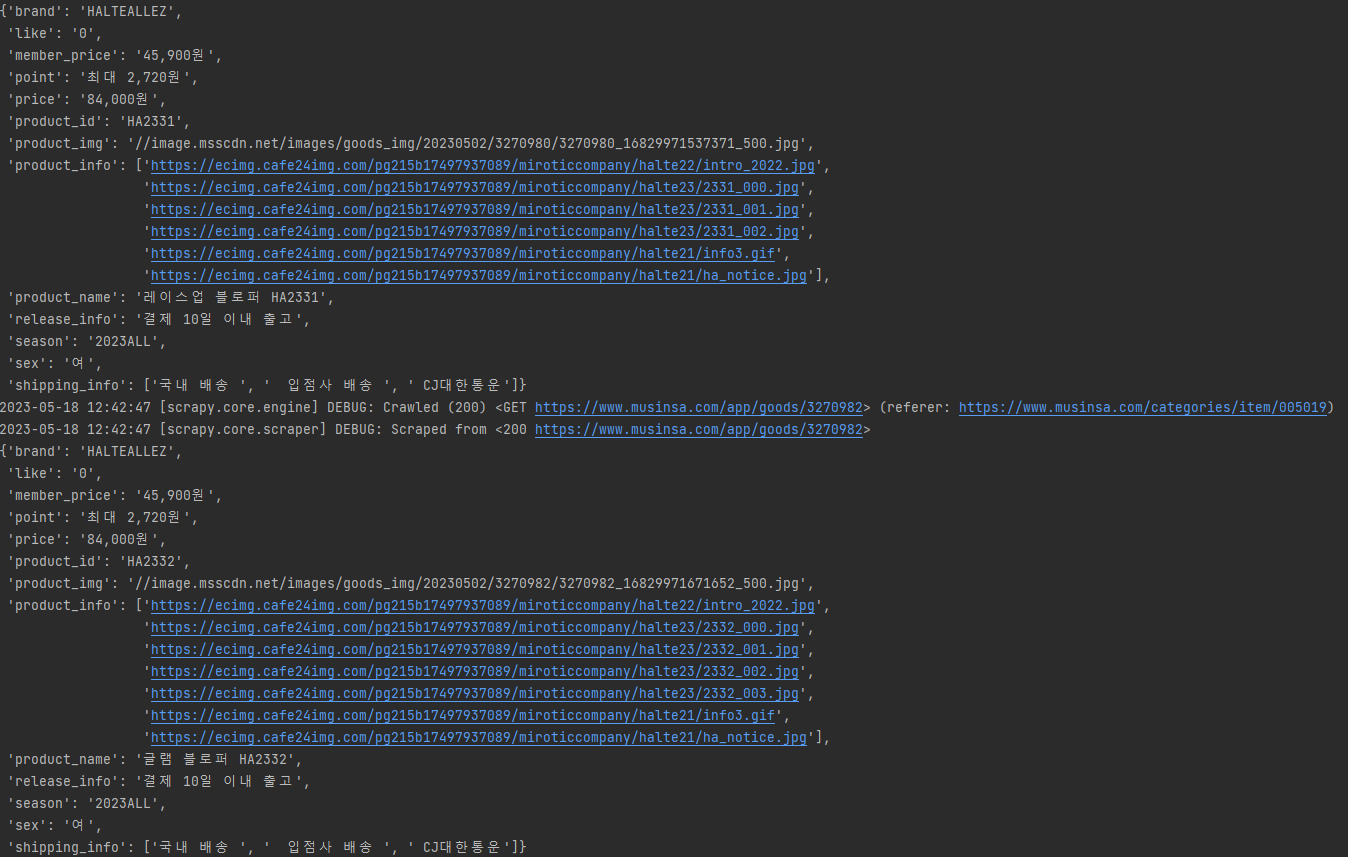
이렇게 다 작성해준후 실행해주면 된다
크롤링 실행
실행하기 전에 명령어에는 Runspider 와 Crawl 두가지 있다.
scrapy crawl [스파이더 name]
scrapy runspider [스파이더]
runspider는 spiders폴더에서 실행할 수 있고, crawl은 scrapy.cfg 파일이 존재하는 폴더에서 실행해야 한다.
runspider은 spider bot을 실행시키는 것은 단위 테스트 방식을 할 때 유용하고 crawl은 구조를 다 만들어 놓은 후 테스트를 할 때나 실제로 크롤링을 할 경우 사용하는 것이 유용하다.
# runspider : spiders 폴더에서 실행
scrapy runspider testspider.py

# crawl : scrapy.cfg파일이 존재하는 path에서 실행
scrapy crawl test
실행하면 아래와 같이 나온다.