Managing State
1. Reacting to Input with State
React는 UI를 조작하는 선언적(declarative)인 방법을 제공. UI의 개별 부분을 직접 조작하는 대신 컴포넌트의 다양한 상태를 설명하고 사용자 입력에 반응하여 상태를 전환. 이는 디자이너가 UI에 대해 생각하는 방식과 유사.
How declarative UI compares to imperative
사용자 행동에 따라 UI는 변화함.
Ex. 사용자가 답변을 제출할 수 있는 form:
- 사용자가 양식에 무언가를 입력하면 'Submit' 버튼이 활성화됨.
- 'Submit' 버튼을 누르면 form과 버튼이 모두 비활성화되고 스피너가 나타남.
- 네트워크 요청이 성공하면 form이 숨겨지고 "Thank you" 메시지가 표시됨.
- 네트워크 요청이 실패하면 오류 메시지가 표시되고 form이 다시 활성화됨.
명령형(imperative) 프로그래밍에서 위의 내용은 인터랙션을 직접적으로 구현하는 방법에 해당. 방금 일어난 일에 따라 UI를 조작하는 정확한 지침을 작성해야 함.
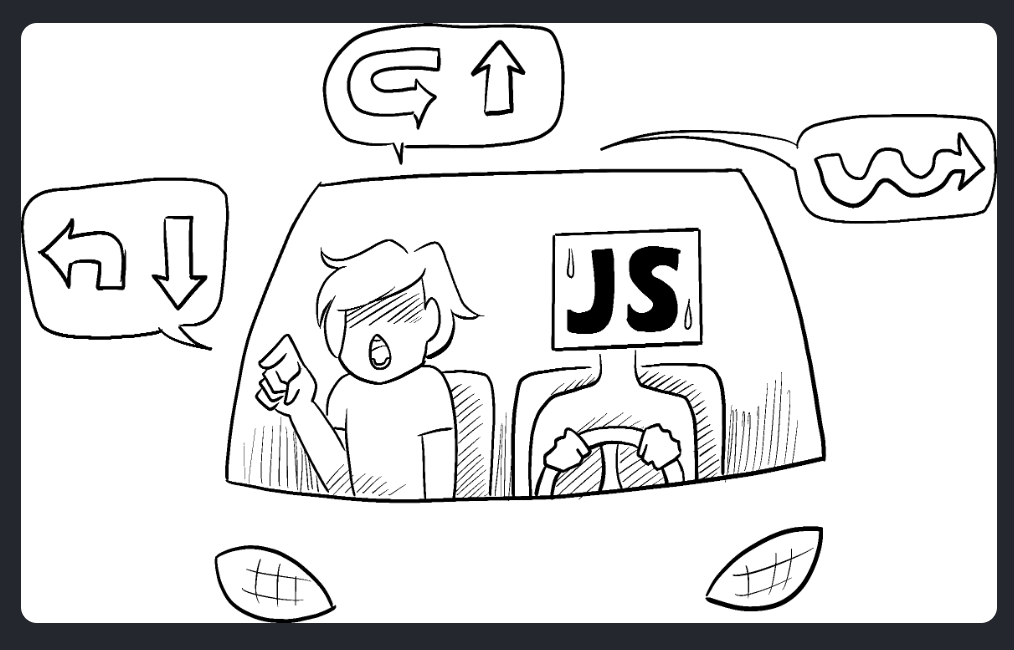
이는 자동차를 타고 가는 사람 옆에서 차례대로 어디로 가야 하는지 알려주는 것과 같음. 컴퓨터는 사용자가 어디로 가고 싶은지 알지 못하고 명령만 따름. (지시를 잘못 내리면 엉뚱한 곳으로 가게 됨!) 스피너부터 버튼까지 각 요소에 "명령"을 내려 컴퓨터에 UI를 업데이트하는 방법을 알려줘야 하므로 "명령형(imperative)"이라고 함.
async function handleFormSubmit(e) {
  e.preventDefault();
  disable(textarea);
  disable(button);
  show(loadingMessage);
  hide(errorMessage);
  try {
    await submitForm(textarea.value);
    show(successMessage);
    hide(form);
  } catch (err) {
    show(errorMessage);
    errorMessage.textContent = err.message;
  } finally {
    hide(loadingMessage);
    enable(textarea);
    enable(button);
  }
}

function handleTextareaChange() {
  if (textarea.value.length === 0) {
    disable(button);
  } else {
    enable(button);
  }
}

function hide(el) {
  el.style.display = 'none';
}

function show(el) {
  el.style.display = '';
}

function enable(el) {
  el.disabled = false;
}

function disable(el) {
  el.disabled = true;
}

function submitForm(answer) {
  // Pretend it's hitting the network.
  return new Promise((resolve, reject) => {
    setTimeout(() => {
      if (answer.toLowerCase() === 'istanbul') {
        resolve();
      } else {
        reject(new Error('Good guess but a wrong answer. Try again!'));
      }
    }, 1500);
  });
}

let form = document.getElementById('form');
let textarea = document.getElementById('textarea');
let button = document.getElementById('button');
let loadingMessage = document.getElementById('loading');
let errorMessage = document.getElementById('error');
let successMessage = document.getElementById('success');
form.onsubmit = handleFormSubmit;
textarea.oninput = handleTextareaChange;
이 명령형 UI 프로그래밍 예시에서 form은 React 없이 빌드되고, 브라우저 DOM만 사용함.
UI를 조작하는 것은 고립된 예제에서는 충분히 잘 작동하지만, 더 복잡한 시스템에서는 관리하기가 기하급수적으로 어려워짐. 다양한 form으로 가득 찬 페이지를 업데이트한다면, 새로운 UI 요소나 새로운 인터랙션을 추가하기 위해서 기존의 모든 코드를 주의 깊게 확인하여 버그가 발생하지 않았는지(예: 무언가를 표시하거나 숨기는 것을 잊어버리는 등) 확인해야 함.
React는 이 문제를 해결하기 위해 만들어짐.
React에서는 UI를 직접 조작하지 않음. 즉, 컴포넌트를 직접 활성화, 비활성화, 표시 또는 숨기지 않음. 대신 표시할 내용을 선언하면 React가 UI를 업데이트하는 방법을 알아냄.

이는 택시를 타고 기사에게 정확히 어떻게 갈지 말하지 않고 어디로 가고 싶은지 목적지를 말하는 것과 같음. 목적지까지 데려다주는 것은 운전기사의 몫이며, 운전기사는 우리가 미처 생각하지 못한 지름길을 알고 있을 수도 있음!
Thinking about UI declaratively
React에서 사고하는 방법을 더 잘 이해하기 위해 위에서 명령적으로 구현했던 form을 다음 과정을 통해 React로 다시 구현해볼 것:
- 컴포넌트의 다양한 시각적 상태 식별
- 이러한 상태 변화를 트리거하는 요소 결정
useState를 사용해 기억해야할 상태 표현- 필수적이지 않은 상태 변수 제거
- 이벤트 핸들러를 연결해 상태 설정
Step 1: Identify your component’s different visual states
컴퓨터 과학에서 여러 '상태' 중 하나에 있는 'state machine'이라는 모델이 있음. 디자이너는 다양한 "시각적 상태"에 대한 목업을 만듦. React는 디자인과 컴퓨터 과학의 교차점에 서 있기 때문에 이 두 가지 아이디어 모두 영감의 원천이 됨.
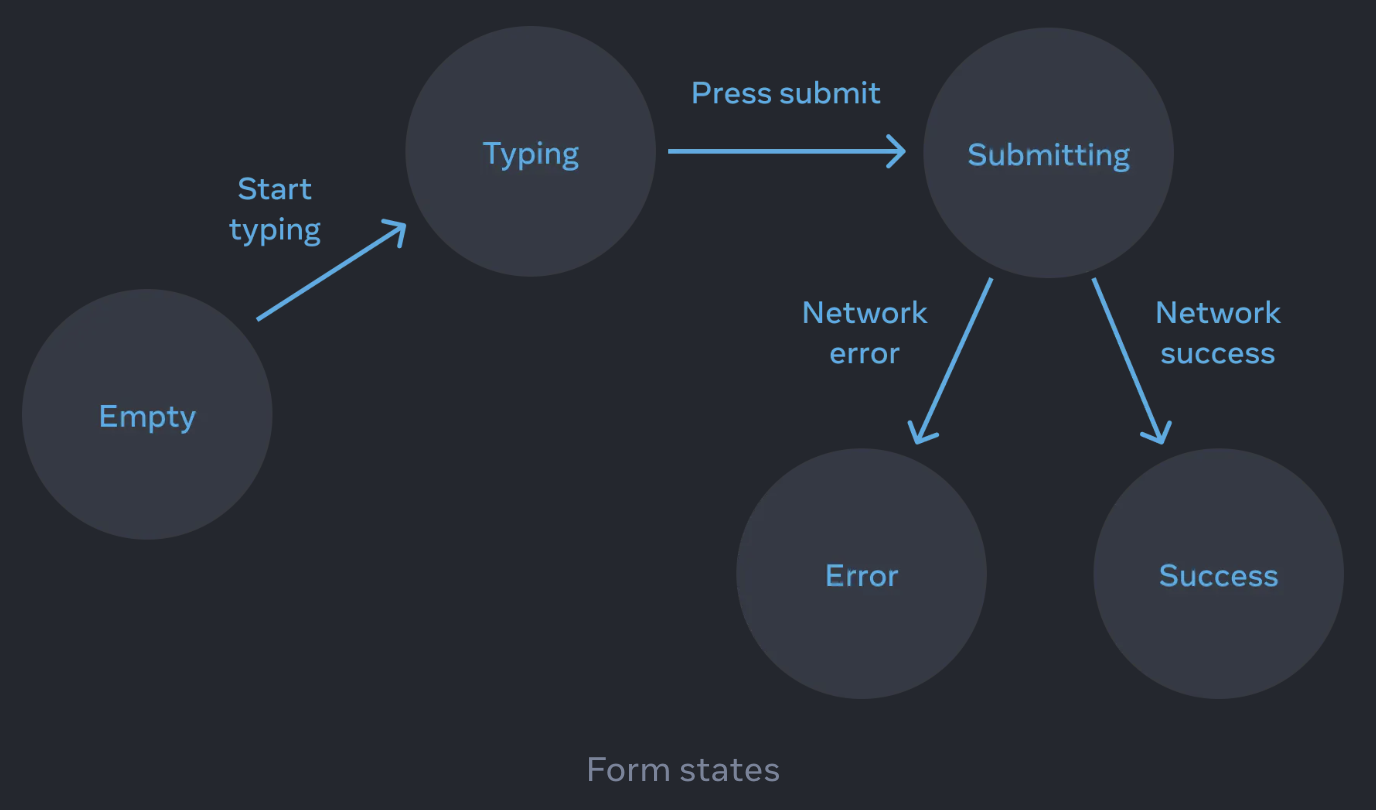
먼저, 사용자에게 표시될 수 있는 UI의 다양한 '상태'를 모두 시각화해야 함:
- Empty: form의 'Submit' 버튼이 비활성화
- Typing: form의 '제출' 버튼이 활성화
- Submitting: form이 완전히 비활성화, 스피너가 표시
- Success: form 대신 "Thank you" 메시지가 표시
- Error: 입력 상태와 동일하지만 추가 오류 메시지가 표시
디자이너와 마찬가지로 로직을 추가하기 전에 다양한 상태에 대한 '목업(mock up)'이나 '목(mocks)'을 만들어야 함.
Ex. 다음은 form의 시각적 부분만을 위한 목업. 이 목업은 기본값이 'empty'인 'status'라는 prop으로 제어됨. prop에는 원하는 이름을 붙일 수 있음. status = 'empty'를 status = 'submitting', status = 'error', status = 'success'로 수정하면 성공 메시지가 표시됨. Mocking을 사용하면 로직을 연결하기 전에 UI를 빠르게 확할 수 있음.
export default function Form({
  // Try 'submitting', 'error', 'success':
  status = 'empty'
}) {
  if (status === 'success') {
    return <h1>That's right!</h1>
  }
  return (
    <>
      <h2>City quiz</h2>
      <p>
        In which city is there a billboard that turns air into drinkable water?
      </p>
      <form>
        <textarea disabled={
          status === 'submitting'
        } />
        <br />
        <button disabled={
          status === 'empty' ||
          status === 'submitting'
        }>
          Submit
        </button>
        {status === 'error' &&
          <p className="Error">
            Good guess but a wrong answer. Try again!
          </p>
        }
      </form>
      </>
  );
}
Step 2: Determine what triggers those state changes
두 종류의 입력에 대한 응답으로 상태 업데이트를 트리거할 수 있음:
- 버튼 클릭, 필드 입력, 링크 탐색과 같은 Human inputs.
- 네트워크 응답 도착, 시간 초과 완료, 이미지 로딩과 같은 Computer inputs.
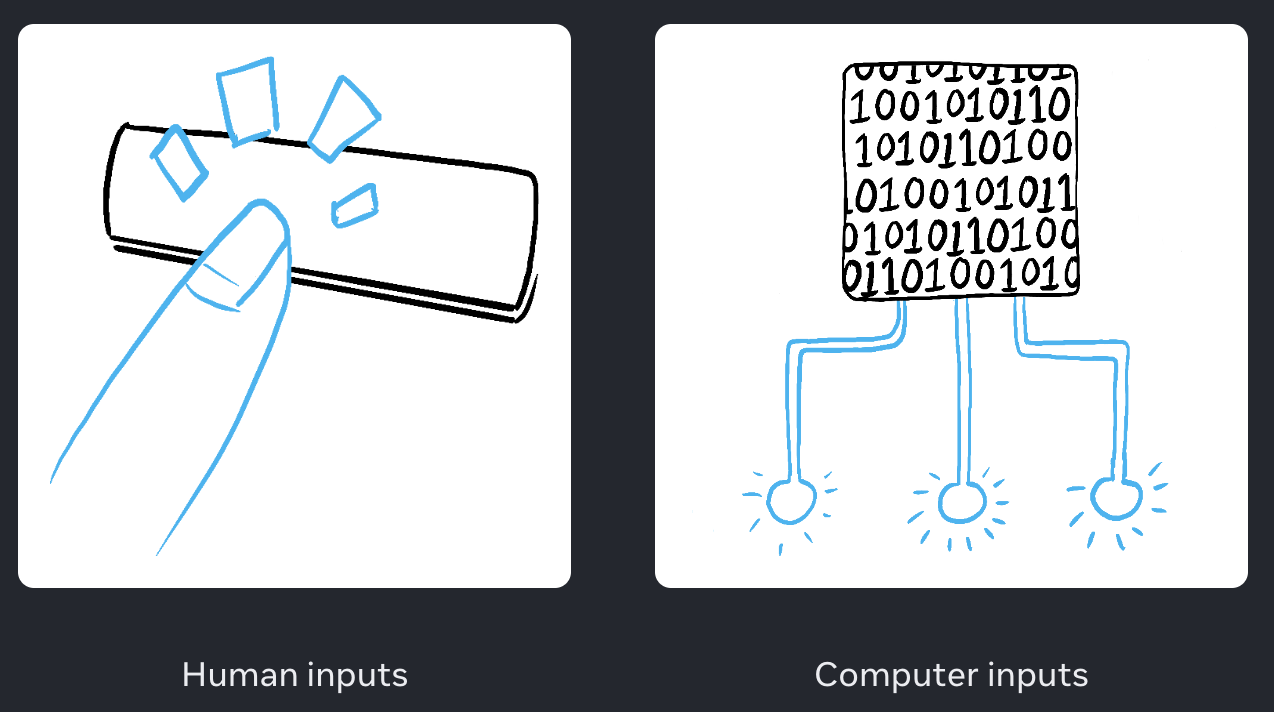
두 경우 모두 UI를 업데이트하려면 상태 변수를 설정해야함. 우리가 함께 개발중인 form의 경우 몇 가지 다른 입력에 대한 응답으로 상태를 변경해야 함:
- 텍스트 입력 변경(human inputs): 텍스트 상자가 비어 있는지 여부에 따라 'empty' 상태에서 'typing' 상태로, 혹은 그 반대로 전환
- 제출 버튼을 클릭(human inputs): 제출 중 상태로 전환
- 네트워크 응답 성공(computer inputs): 성공 상태로 전환
- 네트워크 응답 실패(computer inputs): 적절한 오류 메시지와 함께 오류 상태로 전환
흐름을 시각화하기 위해 각 상태는 원으로, 두 상태 사이의 각 변경 사항은 화살표로 그리면 구현하기 훨씬 전에 버그를 찾아낼 수 있음.
Step 3: Represent the state in memory with useState
다음으로 컴포넌트의 시각적 상태를 useState로 표현해야 함. 단순함이 핵심! 각 상태 조각은 "움직이는 조각"이며, 가능한 한 적은 수의 "움직이는 조각"이 필요함. 복잡할수록 버그가 더 많이 발생!
'꼭' 필요한 상태 관리부터 시작! 예를 들어, 입력에 대한 answer 상태를 저장하고, (오류가 있다면) 오류 메시지를 기억할 error 상태를 설정.
const [answer, setAnswer] = useState('');
const [error, setError] = useState(null);
그런 다음 표시하려는 시각적 상태 중 하나를 나타내는 상태 변수가 필요. 이를 표현하는 방법은 여러 가지가 있으므로 실험해 볼 필요가 있지만, 가장 좋은 방법이 바로 떠오르지 않는다면 가능한 모든 시각적 상태를 포함하도록 충분한 상태를 추가하는 것부터 시작!:
const [isEmpty, setIsEmpty] = useState(true);
const [isTyping, setIsTyping] = useState(false);
const [isSubmitting, setIsSubmitting] = useState(false);
const [isSuccess, setIsSuccess] = useState(false);
const [isError, setIsError] = useState(false);
첫 번째 아이디어가 최선이 아닐 수도 있지만, 리팩토링도 과정의 일부!
Step 4: Remove any non-essential state variables
필수적인 상태만 추적하기 위해 상태 중복을 피하고 싶다면? 상태 구조를 리팩토링하는 데 약간의 시간만 투자하면 컴포넌트를 더 쉽게 이해하고, 중복을 줄이며, 의도하지 않은 의미를 피할 수 있음. 목표는 상태가 유효한 UI를 나타내지 않는 경우를 방지하는 것! (예를 들어 오류 메시지를 표시하면서 동시에 입력을 비활성화하면 사용자가 오류를 수정할 수 없게 됨.)
상태 변수에 대해 물어볼 수 있는 몇 가지 질문:
- 상태가 역설적, 모순적인가?: 예를 들어,
isTyping과isSubmitting은 둘 다 참일 수 없음. 역설, 모순은 일반적으로 상태가 충분히 제약되지 않았음을 의미. 두boolean의 조합은 네 가지가 가능하지만 유효한 상태에 해당하는 것은 'typing', 'submitting', 'success' 세 가지뿐! - 다른 상태 변수에서 이미 동일한 정보를 포함하고 있는가?: 또 다른 역설은
isEmpty와isTyping이 동시에 참일 수 없다는 것. 두 변수를 별도의 상태 변수로 만들면 동기화되지 않아 버그가 발생할 위험이 있음. 다행히도isEmpty를 제거하고 대신answer.length === 0을 확인할 수 있음. - 다른 상태 변수를 통해 동일한 정보를 얻을 수 있는가?:
error !== null을 통해 확인할 수 있으므로isError는 필요하지 않음.
이렇게 정리하고 나면 필수 상태 변수가 3개만 남음:
const [answer, setAnswer] = useState('');
const [error, setError] = useState(null);
const [status, setStatus] = useState('typing'); // 'typing', 'submitting', or 'success'
위의 세가지 중 하나라도 없으면 요구하는 기능을 구현할 수 없기 때문에, 세가지 모두 필수 상태!
Step 5: Connect the event handlers to set state
마지막으로 상태를 업데이트하는 이벤트 핸들러를 생성:
import { useState } from 'react';

export default function Form() {
  const [answer, setAnswer] = useState('');
  const [error, setError] = useState(null);
  const [status, setStatus] = useState('typing');

  if (status === 'success') {
    return <h1>That's right!</h1>
  }

  async function handleSubmit(e) {
    e.preventDefault();
    setStatus('submitting');
    try {
      await submitForm(answer);
      setStatus('success');
    } catch (err) {
      setStatus('typing');
      setError(err);
    }
  }

  function handleTextareaChange(e) {
    setAnswer(e.target.value);
  }

  return (
    <>
      <h2>City quiz</h2>
      <p>
        In which city is there a billboard that turns air into drinkable water?
      </p>
      <form onSubmit={handleSubmit}>
        <textarea
          value={answer}
          onChange={handleTextareaChange}
          disabled={status === 'submitting'}
        />
        <br />
        <button disabled={
          answer.length === 0 ||
          status === 'submitting'
        }>
          Submit
        </button>
        {error !== null &&
          <p className="Error">
            {error.message}
          </p>
        }
      </form>
    </>
  );
}

function submitForm(answer) {
  // Pretend it's hitting the network.
  return new Promise((resolve, reject) => {
    setTimeout(() => {
      let shouldError = answer.toLowerCase() !== 'lima'
      if (shouldError) {
        reject(new Error('Good guess but a wrong answer. Try again!'));
      } else {
        resolve();
      }
    }, 1500);
  });
}
이 코드는 원래의 명령형 예제보다 길지만 훨씬 덜 취약함. 모든 상호작용을 상태 변화로 표현하면 나중에 기존 상태를 깨지 않고도 새로운 시각적 상태를 도입할 수 있음. 또한 인터랙션 자체의 로직을 변경하지 않고도 각 상태에 표시되어야 하는 내용을 변경할 수 있음.
2. Choosing the State Structure
상태를 잘 구조화하면 버그가 끊임없이 발생하는 컴포넌트가 아닌, 수정과 디버깅이 편한 컴포넌트를 만들 수 있음. 다음은 state를 구조화할 때 고려해야 할 몇 가지 팁!
Principles for structuring state
상태를 보유하는 컴포넌트를 작성할 때는 얼마나 많은 상태 변수를 사용할지, 데이터의 구조는 어떻게 할지에 대해 선택해야 함. 차선의 상태 구조를 사용하더라도 올바른 프로그램을 작성할 수 있지만, 더 나은 선택을 할 수 있도록 안내하는 몇 가지 원칙이 있음:
- 관련 상태 그룹화하기: 항상 두 개 이상의 상태 변수를 동시에 업데이트하는 경우, 하나의 상태 변수로 병합하는 것을 고려하기
- 상태 모순 회피하기: 여러 개의 상태가 서로 모순되거나 '불일치'할 수 있는 방식으로 상태가 구성되어 있으면 실수가 발생할 여지가 있으므로 피하기
- 불필요한 상태 회피하기: 렌더링 중에 컴포넌트의 prop이나 기존 상태 변수에서 특정 정보를 계산할 수 있는 경우 해당 정보를 해당 컴포넌트의 상태로 관리하는 것을 피하기
- 중복 상태 회피하기: 동일한 데이터가 여러 상태 변수 간에 또는 중첩된 오브젝트 내에 중복되면 동기화 상태를 유지하기가 어려우므로 가능하면 중복을 줄이기
- 깊게 중첩된 상태 피하기: 계층 구조가 깊은 상태는 업데이트하기 어려우므로 가능하면 상태를 flat한 방식으로 구조화하기
이러한 원칙의 목표는 실수 없이 상태를 쉽게 업데이트할 수 있도록 하는 것! 상태에서 불필요하거나 중복되는 데이터를 제거하면 모든 데이터가 동기화된 상태를 유지하는 데 도움이 됨. 이는 데이터베이스 엔지니어가 버그 발생 가능성을 줄이기 위해 데이터베이스 구조를 '정규화'하는 것과 유사.
Make your state as simple as it can be — but no simpler. - Albert Einstein
모든 것을 더 이상 단순할 수 없을 만큼 단순하게 해야 한다. - 알버트 아인슈타인
Group related state
// ❌
const [x, setX] = useState(0);
const [y, setY] = useState(0);
// ✅
const [position, setPosition] = useState({ x: 0, y: 0 });두 개의 상태 변수가 항상 함께 변경되는 경우에는 하나의 상태 변수로 통합하는 것이 좋음. 그러면 커서를 움직이면 빨간색 점의 좌표가 모두 업데이트되는 이 예제에서처럼 항상 동기화 상태를 유지하는 것을 잊지 않을 수 있음.
import { useState } from 'react';

export default function MovingDot() {
  const [position, setPosition] = useState({
    x: 0,
    y: 0
  });
  return (
    <div
      onPointerMove={e => {
        setPosition({
          x: e.clientX,
          y: e.clientY
        });
      }}
      style={{
        position: 'relative',
        width: '100vw',
        height: '100vh',
      }}>
      <div style={{
        position: 'absolute',
        backgroundColor: 'red',
        borderRadius: '50%',
        transform: `translate(${position.x}px, ${position.y}px)`,
        left: -10,
        top: -10,
        width: 20,
        height: 20,
      }} />
    </div>
  )
}
얼마나 많은 상태가 필요한지 모를 때(ex. 사용자가 사용자 정의 필드를 추가할 수 있는 form이 있을 때)에도 데이터를 객체나 배열로 그룹화하는 것이 유용.
Avoid contradictions in state
// ❌
import { useState } from 'react';

export default function FeedbackForm() {
  const [text, setText] = useState('');
  const [isSending, setIsSending] = useState(false);
  const [isSent, setIsSent] = useState(false);

  async function handleSubmit(e) {
    e.preventDefault();
    setIsSending(true);
    await sendMessage(text);
    setIsSending(false);
    setIsSent(true);
  }

  if (isSent) {
    return <h1>Thanks for feedback!</h1>
  }

  return (
    <form onSubmit={handleSubmit}>
      <p>How was your stay at The Prancing Pony?</p>
      <textarea
        disabled={isSending}
        value={text}
        onChange={e => setText(e.target.value)}
      />
      <br />
      <button
        disabled={isSending}
        type="submit"
      >
        Send
      </button>
      {isSending && <p>Sending...</p>}
    </form>
  );
}

// Pretend to send a message.
function sendMessage(text) {
  return new Promise(resolve => {
    setTimeout(resolve, 2000);
  });
}
이 코드는 작동하지만 "불가능한" 상태에 대한 문을 열어두는 것. 예를 들어, setIsSent와 setIsSending을 함께 호출하는 것을 잊어버리면 isSending과 isSent가 동시에 true가 되는 상황이 발생할 수 있음. 컴포넌트가 복잡할수록 어떤 일이 발생했는지 파악하기가 더 어려워짐.
isSending과 isSent는 동시에 참이 되어서는 안 되므로, 세 가지 유효한 상태('typing' - initial, 'sending', and 'sent') 중 하나를 취할 수 있는 하나의 상태 변수로 대체하는 것이 좋음.
import { useState } from 'react';

export default function FeedbackForm() {
  const [text, setText] = useState('');
  const [status, setStatus] = useState('typing');

  async function handleSubmit(e) {
    e.preventDefault();
    setStatus('sending');
    await sendMessage(text);
    setStatus('sent');
  }

  const isSending = status === 'sending';
  const isSent = status === 'sent';

  if (isSent) {
    return <h1>Thanks for feedback!</h1>
  }

  return (
    <form onSubmit={handleSubmit}>
      <p>How was your stay at The Prancing Pony?</p>
      <textarea
        disabled={isSending}
        value={text}
        onChange={e => setText(e.target.value)}
      />
      <br />
      <button
        disabled={isSending}
        type="submit"
      >
        Send
      </button>
      {isSending && <p>Sending...</p>}
    </form>
  );
}

// Pretend to send a message.
function sendMessage(text) {
  return new Promise(resolve => {
    setTimeout(resolve, 2000);
  });
}
가독성을 위해 일부 상수를 선언할 수 있음:
const isSending = status === 'sending';
const isSent = status === 'sent';
이는 상태 변수가 아니므로 서로 동기화되지 않을 것을 걱정할 필요는 없음.
Avoid redundant state
렌더링 중에 컴포넌트의 prop이나 기존 상태 변수에서 일부 정보를 계산할 수 있는 경우 해당 정보를 해당 컴포넌트의 상태에 포함하지 않아야 함.
// ❌
const [firstName, setFirstName] = useState('');
const [lastName, setLastName] = useState('');
const [fullName, setFullName] = useState('');
렌더링 중에 언제든지 firstName과 lastName에서 fullName을 계산할 수 있으므로 state에서 제거!
// ✅
const [firstName, setFirstName] = useState('');
const [lastName, setLastName] = useState('');
const fullName = firstName + ' ' + lastName;
setFirstName 또는 setLastName을 호출하면 다시 렌더링이 트리거되고 새 데이터를 이용해 다음 fullName이 계산됨.
Avoid duplication in state
// ❌
import { useState } from 'react';

const initialItems = [
  { title: 'pretzels', id: 0 },
  { title: 'crispy seaweed', id: 1 },
  { title: 'granola bar', id: 2 },
];

export default function Menu() {
  const [items, setItems] = useState(initialItems);
  const [selectedItem, setSelectedItem] = useState(
    items[0]
  );

  function handleItemChange(id, e) {
    setItems(items.map(item => {
      if (item.id === id) {
        return {
          ...item,
          title: e.target.value,
        };
      } else {
        return item;
      }
    }));
  }

  return (
    <>
      <h2>What's your travel snack?</h2>
      <ul>
        {items.map((item, index) => (
          <li key={item.id}>
            <input
              value={item.title}
              onChange={e => {
                handleItemChange(item.id, e)
              }}
            />
            {' '}
            <button onClick={() => {
              setSelectedItem(item);
            }}>Choose</button>
          </li>
        ))}
      </ul>
      <p>You picked {selectedItem.title}.</p>
    </>
  );
}
선택된 항목이 selectedItem 상태 변수에 객체로 저장됨. 그러나 selectedItem의 내용은 items 목록 내의 항목 중 하나와 동일한 객체. 즉, item 자체에 대한 정보가 두 곳에 중복되어 저장되는 것! item에서 "선택"을 클릭한 다음 내용을 수정하면 input은 업데이트되지만 하단의 레이블에 편집 내용이 반영되지 않음. 이는 상태가 중복되어 있고 selectedItem을 업데이트하는 것을 잊었기 때문.
selectedItem도 업데이트할 수 있지만 중복을 제거하는 것이 더 쉬움. 이 예제에서는 selectedItem 객체 대신 selectedId를 상태로 유지한 다음 항목 배열에서 해당 ID를 가진 항목을 검색하여 selectedItem을 가져오는 것이 좋은 방법:
import { useState } from 'react';

const initialItems = [
  { title: 'pretzels', id: 0 },
  { title: 'crispy seaweed', id: 1 },
  { title: 'granola bar', id: 2 },
];

export default function Menu() {
  const [items, setItems] = useState(initialItems);
  const [selectedId, setSelectedId] = useState(0);

  const selectedItem = items.find(item =>
    item.id === selectedId
  );

  function handleItemChange(id, e) {
    setItems(items.map(item => {
      if (item.id === id) {
        return {
          ...item,
          title: e.target.value,
        };
      } else {
        return item;
      }
    }));
  }

  return (
    <>
      <h2>What's your travel snack?</h2>
      <ul>
        {items.map((item, index) => (
          <li key={item.id}>
            <input
              value={item.title}
              onChange={e => {
                handleItemChange(item.id, e)
              }}
            />
            {' '}
            <button onClick={() => {
              setSelectedId(item.id);
            }}>Choose</button>
          </li>
        ))}
      </ul>
      <p>You picked {selectedItem.title}.</p>
    </>
  );
}
중복은 사라지고 필수 상태만 남아있음! 이제 선택한 항목을 편집하면 아래 메시지가 즉시 업데이트됨. setItems가 다시 렌더링을 트리거하고 items.find(...)가 업데이트된 title을 가진 항목을 찾기 때문. 렌더링 중에 계산할 수 있는 selectedItem을 상태로 유지할 필요가 없음.
Avoid deeply nested state
// ❌
export const initialTravelPlan = {
  id: 0,
  title: '(Root)',
  childPlaces: [{
    id: 1,
    title: 'Earth',
    childPlaces: [{
      id: 2,
      title: 'Africa',
      childPlaces: [{
        id: 3,
        title: 'Botswana',
        childPlaces: []
      }, {
        id: 4,
        title: 'Egypt',
        childPlaces: []
      }, {
        id: 5,
        title: 'Kenya',
        childPlaces: []
      }, {
        id: 6,
        title: 'Madagascar',
        childPlaces: []
      }, {
        id: 7,
        title: 'Morocco',
        childPlaces: []
      }, {
        id: 8,
        title: 'Nigeria',
        childPlaces: []
      }, {
        id: 9,
        title: 'South Africa',
        childPlaces: []
      }]
    }, {
      id: 10,
      title: 'Americas',
      childPlaces: [{
        id: 11,
        title: 'Argentina',
        childPlaces: []
      }, {
        id: 12,
        title: 'Brazil',
        childPlaces: []
      }, {
        id: 13,
        title: 'Barbados',
        childPlaces: []
      }, {
        id: 14,
        title: 'Canada',
        childPlaces: []
      }, {
        id: 15,
        title: 'Jamaica',
        childPlaces: []
      }, {
        id: 16,
        title: 'Mexico',
        childPlaces: []
      }, {
        id: 17,
        title: 'Trinidad and Tobago',
        childPlaces: []
      }, {
        id: 18,
        title: 'Venezuela',
        childPlaces: []
      }]
    }, {
      id: 19,
      title: 'Asia',
      childPlaces: [{
        id: 20,
        title: 'China',
        childPlaces: []
      }, {
        id: 21,
        title: 'India',
        childPlaces: []
      }, {
        id: 22,
        title: 'Singapore',
        childPlaces: []
      }, {
        id: 23,
        title: 'South Korea',
        childPlaces: []
      }, {
        id: 24,
        title: 'Thailand',
        childPlaces: []
      }, {
        id: 25,
        title: 'Vietnam',
        childPlaces: []
      }]
    }, {
      id: 26,
      title: 'Europe',
      childPlaces: [{
        id: 27,
        title: 'Croatia',
        childPlaces: [],
      }, {
        id: 28,
        title: 'France',
        childPlaces: [],
      }, {
        id: 29,
        title: 'Germany',
        childPlaces: [],
      }, {
        id: 30,
        title: 'Italy',
        childPlaces: [],
      }, {
        id: 31,
        title: 'Portugal',
        childPlaces: [],
      }, {
        id: 32,
        title: 'Spain',
        childPlaces: [],
      }, {
        id: 33,
        title: 'Turkey',
        childPlaces: [],
      }]
    }, {
      id: 34,
      title: 'Oceania',
      childPlaces: [{
        id: 35,
        title: 'Australia',
        childPlaces: [],
      }, {
        id: 36,
        title: 'Bora Bora (French Polynesia)',
        childPlaces: [],
      }, {
        id: 37,
        title: 'Easter Island (Chile)',
        childPlaces: [],
      }, {
        id: 38,
        title: 'Fiji',
        childPlaces: [],
      }, {
        id: 39,
        title: 'Hawaii (the USA)',
        childPlaces: [],
      }, {
        id: 40,
        title: 'New Zealand',
        childPlaces: [],
      }, {
        id: 41,
        title: 'Vanuatu',
        childPlaces: [],
      }]
    }]
  }, {
    id: 42,
    title: 'Moon',
    childPlaces: [{
      id: 43,
      title: 'Rheita',
      childPlaces: []
    }, {
      id: 44,
      title: 'Piccolomini',
      childPlaces: []
    }, {
      id: 45,
      title: 'Tycho',
      childPlaces: []
    }]
  }, {
    id: 46,
    title: 'Mars',
    childPlaces: [{
      id: 47,
      title: 'Corn Town',
      childPlaces: []
    }, {
      id: 48,
      title: 'Green Hill',
      childPlaces: []
    }]
  }]
};
깊게 중첩된 상태를 업데이트하거나 삭제하려면 하려면 변경된 부분부터 위쪽까지 개체의 복사본을 만들어야 함. 이러한 코드는 매우 장황할 수 있음.
상태가 너무 중첩되어 쉽게 업데이트할 수 없는 경우 상태를 "flat"하게 만드는 것이 좋음. 다음은 이 데이터를 재구성할 수 있는 한 가지 방법: 각 장소에 하위 장소의 배열이 포함된 트리 구조 대신 각 장소에 하위 장소 ID의 배열을 포함되도록 함. 그런 다음 각 장소 ID에서 해당 장소로의 매핑을 저장.
// ✅
export const initialTravelPlan = {
  0: {
    id: 0,
    title: '(Root)',
    childIds: [1, 42, 46],
  },
  1: {
    id: 1,
    title: 'Earth',
    childIds: [2, 10, 19, 26, 34]
  },
  2: {
    id: 2,
    title: 'Africa',
    childIds: [3, 4, 5, 6 , 7, 8, 9]
  },
  3: {
    id: 3,
    title: 'Botswana',
    childIds: []
  },
  4: {
    id: 4,
    title: 'Egypt',
    childIds: []
  },
  5: {
    id: 5,
    title: 'Kenya',
    childIds: []
  },
  6: {
    id: 6,
    title: 'Madagascar',
    childIds: []
  },
  7: {
    id: 7,
    title: 'Morocco',
    childIds: []
  },
  8: {
    id: 8,
    title: 'Nigeria',
    childIds: []
  },
  9: {
    id: 9,
    title: 'South Africa',
    childIds: []
  },
  10: {
    id: 10,
    title: 'Americas',
    childIds: [11, 12, 13, 14, 15, 16, 17, 18],
  },
  11: {
    id: 11,
    title: 'Argentina',
    childIds: []
  },
  12: {
    id: 12,
    title: 'Brazil',
    childIds: []
  },
  13: {
    id: 13,
    title: 'Barbados',
    childIds: []
  },
  14: {
    id: 14,
    title: 'Canada',
    childIds: []
  },
  15: {
    id: 15,
    title: 'Jamaica',
    childIds: []
  },
  16: {
    id: 16,
    title: 'Mexico',
    childIds: []
  },
  17: {
    id: 17,
    title: 'Trinidad and Tobago',
    childIds: []
  },
  18: {
    id: 18,
    title: 'Venezuela',
    childIds: []
  },
  19: {
    id: 19,
    title: 'Asia',
    childIds: [20, 21, 22, 23, 24, 25],
  },
  20: {
    id: 20,
    title: 'China',
    childIds: []
  },
  21: {
    id: 21,
    title: 'India',
    childIds: []
  },
  22: {
    id: 22,
    title: 'Singapore',
    childIds: []
  },
  23: {
    id: 23,
    title: 'South Korea',
    childIds: []
  },
  24: {
    id: 24,
    title: 'Thailand',
    childIds: []
  },
  25: {
    id: 25,
    title: 'Vietnam',
    childIds: []
  },
  26: {
    id: 26,
    title: 'Europe',
    childIds: [27, 28, 29, 30, 31, 32, 33],
  },
  27: {
    id: 27,
    title: 'Croatia',
    childIds: []
  },
  28: {
    id: 28,
    title: 'France',
    childIds: []
  },
  29: {
    id: 29,
    title: 'Germany',
    childIds: []
  },
  30: {
    id: 30,
    title: 'Italy',
    childIds: []
  },
  31: {
    id: 31,
    title: 'Portugal',
    childIds: []
  },
  32: {
    id: 32,
    title: 'Spain',
    childIds: []
  },
  33: {
    id: 33,
    title: 'Turkey',
    childIds: []
  },
  34: {
    id: 34,
    title: 'Oceania',
    childIds: [35, 36, 37, 38, 39, 40, 41],
  },
  35: {
    id: 35,
    title: 'Australia',
    childIds: []
  },
  36: {
    id: 36,
    title: 'Bora Bora (French Polynesia)',
    childIds: []
  },
  37: {
    id: 37,
    title: 'Easter Island (Chile)',
    childIds: []
  },
  38: {
    id: 38,
    title: 'Fiji',
    childIds: []
  },
  39: {
    id: 40,
    title: 'Hawaii (the USA)',
    childIds: []
  },
  40: {
    id: 40,
    title: 'New Zealand',
    childIds: []
  },
  41: {
    id: 41,
    title: 'Vanuatu',
    childIds: []
  },
  42: {
    id: 42,
    title: 'Moon',
    childIds: [43, 44, 45]
  },
  43: {
    id: 43,
    title: 'Rheita',
    childIds: []
  },
  44: {
    id: 44,
    title: 'Piccolomini',
    childIds: []
  },
  45: {
    id: 45,
    title: 'Tycho',
    childIds: []
  },
  46: {
    id: 46,
    title: 'Mars',
    childIds: [47, 48]
  },
  47: {
    id: 47,
    title: 'Corn Town',
    childIds: []
  },
  48: {
    id: 48,
    title: 'Green Hill',
    childIds: []
  }
};
이제 상태가 "flat"("정규화"라고도 함)해졌으므로 중첩된 항목을 업데이트하는 것이 더 쉬워짐.
장소를 제거하려면 두 단계의 상태만 업데이트하면 됨:
- 부모의 childIds 배열에서 제거된 장소의 ID를 제외
- 1.에서 업데이트된 부모를 루트 객체에 반영
import { useState } from 'react';
import { initialTravelPlan } from './places.js';

export default function TravelPlan() {
  const [plan, setPlan] = useState(initialTravelPlan);

  function handleComplete(parentId, childId) {
    const parent = plan[parentId];
    // Create a new version of the parent place
    // that doesn't include this child ID.
    const nextParent = {
      ...parent,
      childIds: parent.childIds
        .filter(id => id !== childId)
    };
    // Update the root state object...
    setPlan({
      ...plan,
      // ...so that it has the updated parent.
      [parentId]: nextParent
    });
  }

  const root = plan[0];
  const planetIds = root.childIds;
  return (
    <>
      <h2>Places to visit</h2>
      <ol>
        {planetIds.map(id => (
          <PlaceTree
            key={id}
            id={id}
            parentId={0}
            placesById={plan}
            onComplete={handleComplete}
          />
        ))}
      </ol>
    </>
  );
}

function PlaceTree({ id, parentId, placesById, onComplete }) {
  const place = placesById[id];
  const childIds = place.childIds;
  return (
    <li>
      {place.title}
      <button onClick={() => {
        onComplete(parentId, id);
      }}>
        Complete
      </button>
      {childIds.length > 0 &&
        <ol>
          {childIds.map(childId => (
            <PlaceTree
              key={childId}
              id={childId}
              parentId={id}
              placesById={placesById}
              onComplete={onComplete}
            />
          ))}
        </ol>
      }
    </li>
  );
}
상태는 얼마든지 중첩할 수 있지만 'flat'하게 만들면 상태를 더 쉽게 업데이트할 수 있고 중첩된 객체의 다른 부분에 중복이 생기지 않도록 할 수 있음.
때로는 중첩된 상태의 일부를 하위 컴포넌트로 이동하여 상태 중첩을 줄일 수도 있음. 이 방법은 항목에 마우스 커서가 있는지 여부와 같이 저장할 필요가 없는 임시 UI 상태에 적합.
3. Sharing State Between Components
두 컴포넌트의 상태가 항상 함께 변경되기를 원한다면? 두 컴포넌트에서 state를 제거하고 가장 가까운 공통 부모로 이동한 다음 props를 통해 자식 컴포넌트에 전달. 이것이 React 코드를 작성할 때 가장 흔히 하는 작업 중 하나인 '상태 끌어올리기'!
Lifting state up by example
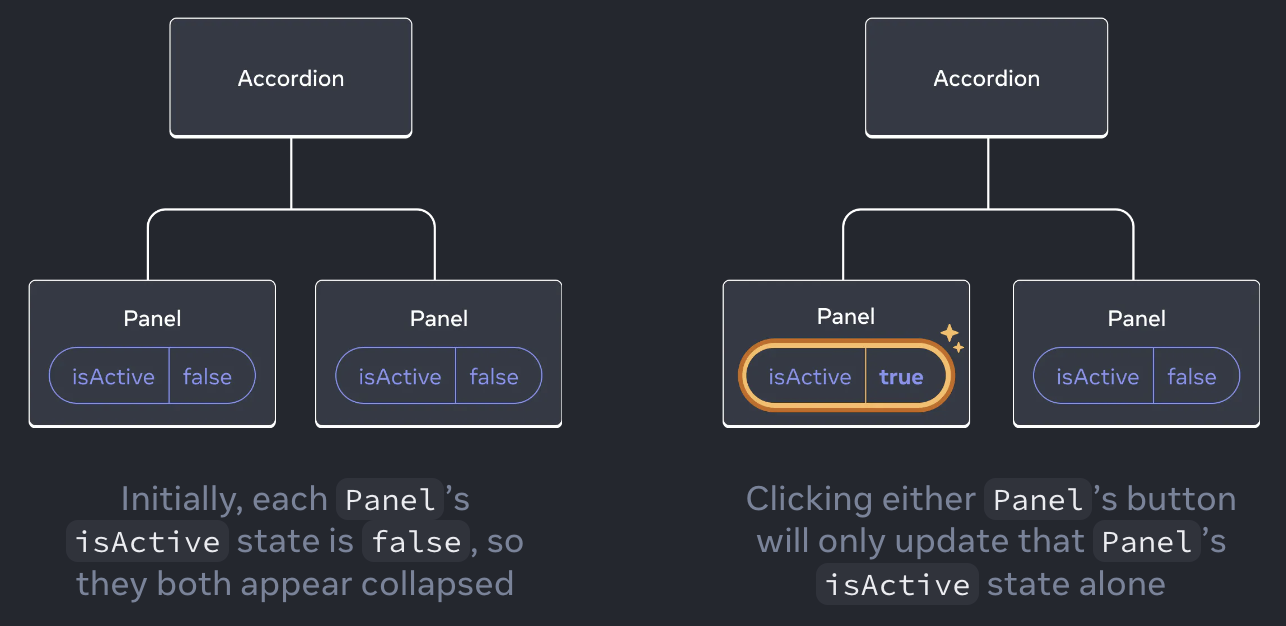
부모 Accordion 컴포넌트가 두 개의 개별 Panel 컴포넌트를 렌더링하고, 각 Panel 컴포넌트에는 콘텐츠가 표시되는지 여부를 결정하는 boolean isActive 상태가 있음.
import { useState } from 'react';

function Panel({ title, children }) {
  const [isActive, setIsActive] = useState(false);
  return (
    <section className="panel">
      <h3>{title}</h3>
      {isActive ? (
        <p>{children}</p>
      ) : (
        <button onClick={() => setIsActive(true)}>
          Show
        </button>
      )}
    </section>
  );
}

export default function Accordion() {
  return (
    <>
      <h2>Almaty, Kazakhstan</h2>
      <Panel title="About">
        With a population of about 2 million, Almaty is Kazakhstan's largest city. From 1929 to 1997, it was its capital city.
      </Panel>
      <Panel title="Etymology">
        The name comes from <span lang="kk-KZ">алма</span>, the Kazakh word for "apple" and is often translated as "full of apples". In fact, the region surrounding Almaty is thought to be the ancestral home of the apple, and the wild <i lang="la">Malus sieversii</i> is considered a likely candidate for the ancestor of the modern domestic apple.
      </Panel>
    </>
  );
}
한 Panel의 버튼을 눌러도 다른 Panel에 영향을 미치지 않음!
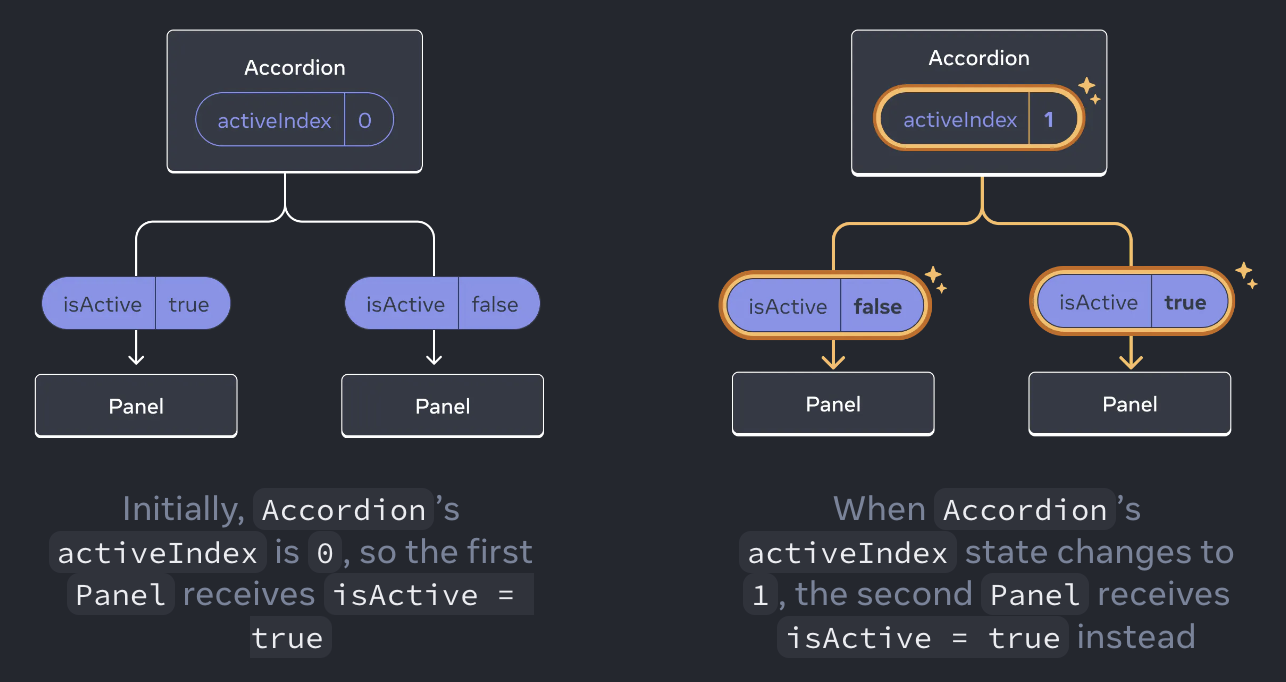
한번에 하나의 Panel만 확장되도록 변경하고 싶다면? 즉, 두 번째 Panel을 확장하면 첫 번째 Panel이 접혀야 한다면? 세 단계에 걸쳐 부모 컴포넌트로 "상태를 끌어올려야" 함:
- 자식 컴포넌트에서 상태를 제거
- 공통 부모에서 하드코딩된 데이터를 전달합니다.
- 공통 부모에 상태를 추가하고 이벤트 핸들러와 함께 전달
이렇게 하면 Accordion 컴포넌트가 두 Paneel을 조정하고 한 번에 하나씩만 확장할 수 있음
Step 1: Remove state from the child components
가장 가까운 공통 부모 컴포넌트인 Accordion 컴포넌트가 Panel 컴포넌트의 isActive를 제어할 수 있는 권한을 갖고, 대신 isActive를 Panel 컴포넌트에 prop으로 전달.
Panel 컴포넌트에서 const [isActive, setIsActive] = useState(false);를 제거하고
패널의 prop 목록에 isActive를 추가. Panel 컴포넌트는 이제 isActive 값을 스스로 제어할 수 없음.
Step 2: Pass hardcoded data from the common parent
Accordion 컴포넌트는 두 Panel의 공통 부모 컴포넌트이고 prop을 제어할 수 있으므로 현재 어떤 Panel이 활성화되어 있는지에 대한 "source of truth"가 됨.
Accordion 컴포넌트가 두 Panel 모두에 하드코딩된 isActive 값(예: true)을 전달하도록 함:
import { useState } from 'react';

export default function Accordion() {
  return (
    <>
      <h2>Almaty, Kazakhstan</h2>
      <Panel title="About" isActive={true}>
        With a population of about 2 million, Almaty is Kazakhstan's largest city. From 1929 to 1997, it was its capital city.
      </Panel>
      <Panel title="Etymology" isActive={true}>
        The name comes from <span lang="kk-KZ">алма</span>, the Kazakh word for "apple" and is often translated as "full of apples". In fact, the region surrounding Almaty is thought to be the ancestral home of the apple, and the wild <i lang="la">Malus sieversii</i> is considered a likely candidate for the ancestor of the modern domestic apple.
      </Panel>
    </>
  );
}

function Panel({ title, children, isActive }) {
  return (
    <section className="panel">
      <h3>{title}</h3>
      {isActive ? (
        <p>{children}</p>
      ) : (
        <button onClick={() => setIsActive(true)}>
          Show
        </button>
      )}
    </section>
  );
}
Step 3: Add state to the common parent
상태를 끌어올리면 상태로 저장하는 항목의 특성이 변경되는 경우가 많음.
이 예시에서는 한 번에 하나의 패널만 활성화해야 함. 즉, Accordion 컴포넌트는 어떤 Panel이 활성화된 Panel인지 추적해야 함. 상태 변수로 boolean 값 대신 활성화된 Panel의 인덱스를 사용할 수 있음:
const [activeIndex, setActiveIndex] = useState(0);
activeIndex가 0이면 첫 번째 패널이 활성화되고, 1이면 두 번째 패널이 활성화됨.
Panel에서 "Show" 버튼을 클릭하면 Accordion의 activeIndex가 변경되어야 함. activeIndex 상태는 Accordion 내부에 정의되어 있기 때문에 Panel이 직접 설정할 수 없음. Accordion 컴포넌트는 이벤트 핸들러를 prop으로 전달하여 패널 컴포넌트가 상태를 변경할 수 있도록 명시적으로 허용해야 함.
import { useState } from 'react';

export default function Accordion() {
  const [activeIndex, setActiveIndex] = useState(0);
  return (
    <>
      <h2>Almaty, Kazakhstan</h2>
      <Panel
        title="About"
        isActive={activeIndex === 0}
        onShow={() => setActiveIndex(0)}
      >
        With a population of about 2 million, Almaty is Kazakhstan's largest city. From 1929 to 1997, it was its capital city.
      </Panel>
      <Panel
        title="Etymology"
        isActive={activeIndex === 1}
        onShow={() => setActiveIndex(1)}
      >
        The name comes from <span lang="kk-KZ">алма</span>, the Kazakh word for "apple" and is often translated as "full of apples". In fact, the region surrounding Almaty is thought to be the ancestral home of the apple, and the wild <i lang="la">Malus sieversii</i> is considered a likely candidate for the ancestor of the modern domestic apple.
      </Panel>
    </>
  );
}

function Panel({
  title,
  children,
  isActive,
  onShow
}) {
  return (
    <section className="panel">
      <h3>{title}</h3>
      {isActive ? (
        <p>{children}</p>
      ) : (
        <button onClick={onShow}>
          Show
        </button>
      )}
    </section>
  );
}
이것으로 상태 리프팅이 완료됨! 상태를 공통 상위 컴포넌트로 이동하면 두 Panel을 조정할 수 있음. 두 개의 "isShown" 플래그 대신 activeIndex를 사용하면 한번에 하나의 패널만 활성화되도록 할 수 있음. 또, 이벤트 핸들러를 자식에게 전달하면 자식이 부모의 상태를 변경할 수 있음.
A single source of truth for each state
React 애플리케이션에서 많은 컴포넌트는 고유한 state를 가짐. 일부 상태는 <input>처럼 leaf 컴포넌트(트리 하단에 있는 컴포넌트)에 가깝게 존재할 수 있음. 다른 상태는 앱의 상단에 더 가깝게 존재할 수도 있음. 예를 들어 클라이언트 측 라우팅 라이브러리조차도 일반적으로 현재 경로를 React 상태에 저장하고 props를 통해 전달하는 방식으로 구현됨!
각각의 고유한 state에 대해 이를 "소유"할 컴포넌트를 선택함. 이를 "single source of truth" 라고도 함. 모든 상태가 한 곳에 존재한다는 뜻이 아니라, 각 상태를 보유하는 특정 컴포넌트가 있다는 뜻! 컴포넌트 간에 공유 상태를 복제하는 대신 공통의 공유 부모로 올려서 필요한 자식에게 전달.
앱은 작업하면서 계속해서 변경됨. 각 상태의 '위치'를 파악하는 동안 상태를 아래로 이동하거나 끌어올리는 것이 일반적임. 이 모든 것이 과정의 일부일 뿐!
4. Preserving and Resetting State
상태는 컴포넌트 간에 격리됨. React는 UI 트리에서 어떤 컴포넌트가 어떤 상태에 속하는지를 추적하고, 언제 상태를 보존할지, 언제 재렌더링 사이에 재설정할지 제어.
State is tied to a position in the render tree
React는 UI의 컴포넌트 구조에 대한 렌더링 트리를 빌드함.
컴포넌트에 state를 부여하면 그 state가 컴포넌트 내부에 "존재"한다고 생각할 수 있음. 하지만 state는 실제로 React 내부에 유지됨. React는 렌더 트리에서 해당 컴포넌트의 위치에 따라 보유하고 있는 각 state를 올바른 컴포넌트와 연결함.
import { useState } from 'react';

export default function App() {
  const [showB, setShowB] = useState(true);
  return (
    <div>
      <Counter />
      {showB && <Counter />}
      <label>
        <input
          type="checkbox"
          checked={showB}
          onChange={e => {
            setShowB(e.target.checked)
          }}
        />
        Render the second counter
      </label>
    </div>
  );
}

function Counter() {
  const [score, setScore] = useState(0);
  const [hover, setHover] = useState(false);

  let className = 'counter';
  if (hover) {
    className += ' hover';
  }

  return (
    <div
      className={className}
      onPointerEnter={() => setHover(true)}
      onPointerLeave={() => setHover(false)}
    >
      <h1>{score}</h1>
      <button onClick={() => setScore(score + 1)}>
        Add one
      </button>
    </div>
  );
}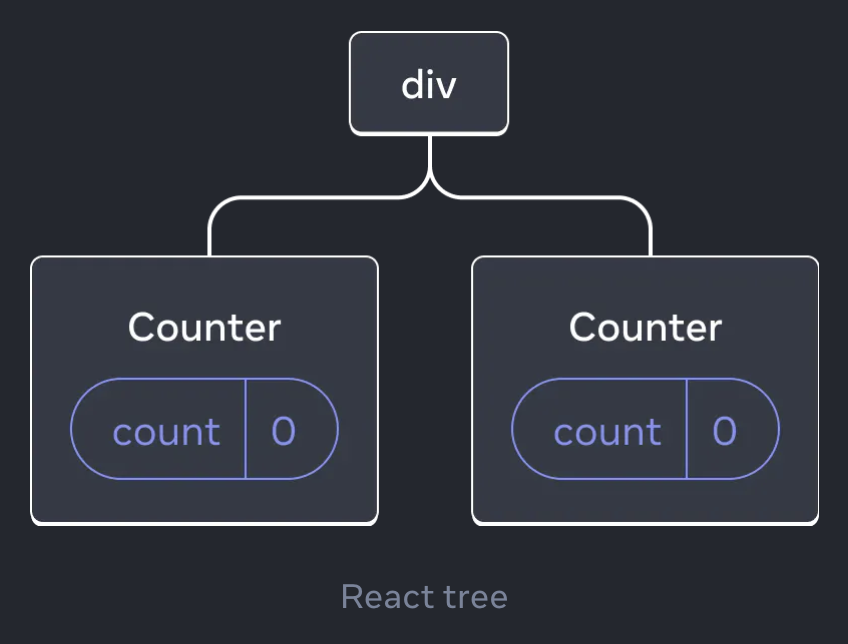
두 카운터는 각각 트리에서 고유한 위치에 렌더링되기 때문에 두 개의 개별 카운터임. React에서 화면의 각 컴포넌트는 완전히 분리된 상태를 가짐. 이 두 개의 카운터 컴포넌트는 각각 독립적인 count와 호버 상태를 가짐. 카운터 하나가 업데이트되면 해당 컴포넌트의 상태만 업데이트됨:
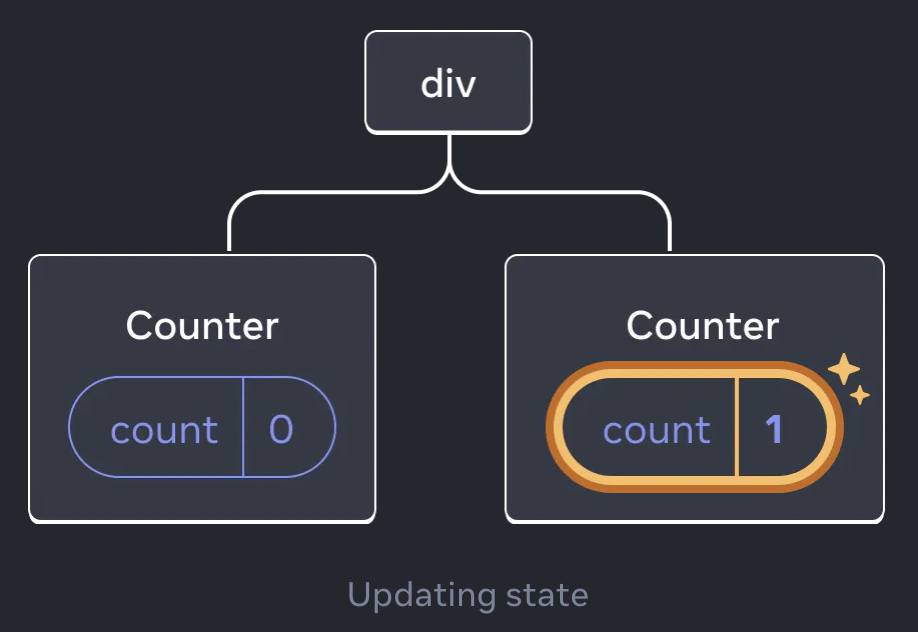
두 카운터를 모두 증가시킨 다음 "Render the second counter" 체크박스를 이용해 두 번째 컴포넌트를 제거한 후 다시 추가하면?
두 번째 카운터의 렌더링을 중단하는 순간 해당 카운터의 상태가 완전히 사라짐. React가 컴포넌트를 제거하면 그 상태는 소멸됨:
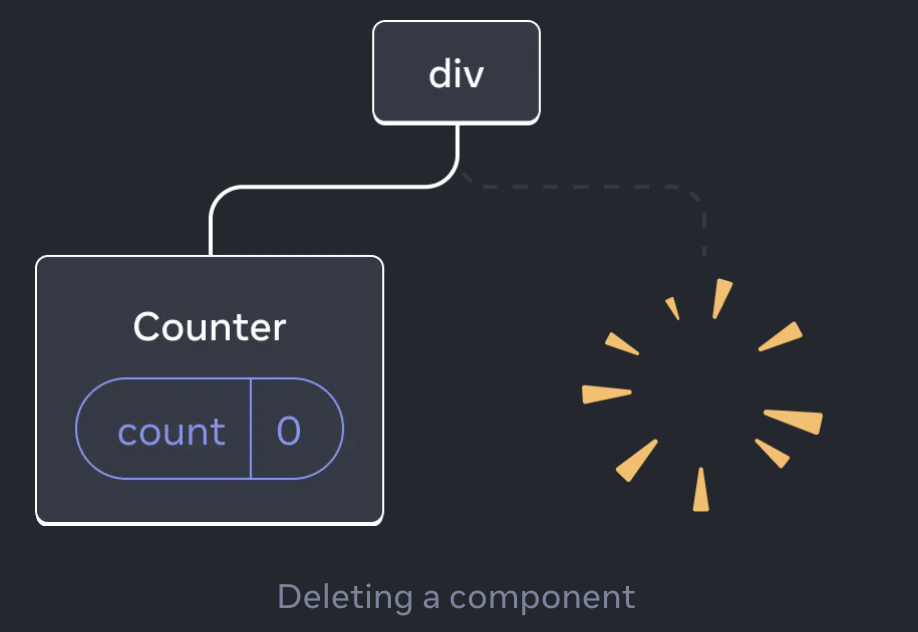
"Render the second counter"을 다시 누르면 두 번째 카운터와 그 상태가 처음부터 초기화되고(count = 0) DOM에 추가됨.
React는 컴포넌트가 UI 트리의 같은 위치에서 렌더링되는 한 컴포넌트의 상태를 유지함. 컴포넌트가 제거되거나 같은 위치에 다른 컴포넌트가 렌더링되면 React는 해당 컴포넌트의 상태를 삭제함.
Same component at the same position preserves state
import { useState } from 'react';

export default function App() {
  const [isFancy, setIsFancy] = useState(false);
  return (
    <div>
      {isFancy ? (
        <Counter isFancy={true} />
      ) : (
        <Counter isFancy={false} />
      )}
      <label>
        <input
          type="checkbox"
          checked={isFancy}
          onChange={e => {
            setIsFancy(e.target.checked)
          }}
        />
        Use fancy styling
      </label>
    </div>
  );
}

function Counter({ isFancy }) {
  const [score, setScore] = useState(0);
  const [hover, setHover] = useState(false);

  let className = 'counter';
  if (hover) {
    className += ' hover';
  }
  if (isFancy) {
    className += ' fancy';
  }

  return (
    <div
      className={className}
      onPointerEnter={() => setHover(true)}
      onPointerLeave={() => setHover(false)}
    >
      <h1>{score}</h1>
      <button onClick={() => setScore(score + 1)}>
        Add one
      </button>
    </div>
  );
}
이 예제에는 두 개의 서로 다른 <Counter /> 태그가 있지만 체크박스를 선택하거나 선택 취소해도 카운터 상태는 재설정되지 않음. isFancy가 참이든 거짓이든, 루트 App 컴포넌트에서 반환된 <div>의 첫 번째 자식에는 항상 <Counter />가 있기 때문:
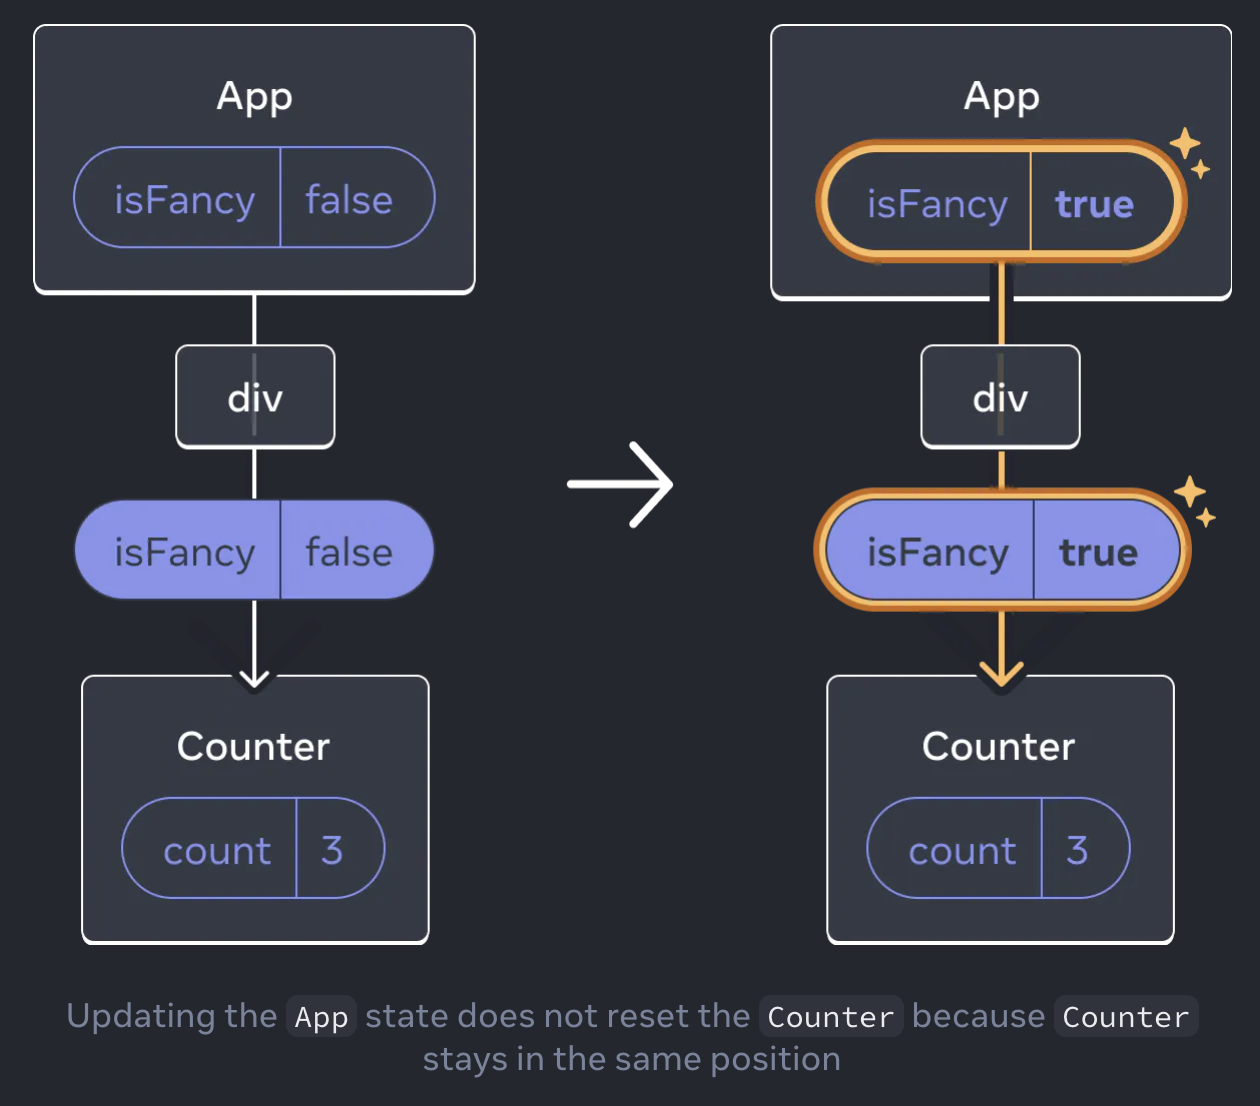
같은 위치에 있는 같은 컴포넌트이므로 React의 관점에서 보면 같은 카운터!
Different components at the same position reset state
import { useState } from 'react';
export default function App() {
const [isPaused, setIsPaused] = useState(false);
return (
<div>
{isPaused ? (
<p>See you later!</p>
) : (
<Counter />
)}
<label>
<input
type="checkbox"
checked={isPaused}
onChange={e => {
setIsPaused(e.target.checked)
}}
/>
Take a break
</label>
</div>
);
}
function Counter() {
const [score, setScore] = useState(0);
const [hover, setHover] = useState(false);
let className = 'counter';
if (hover) {
className += ' hover';
}
return (
<div
className={className}
onPointerEnter={() => setHover(true)}
onPointerLeave={() => setHover(false)}
>
<h1>{score}</h1>
<button onClick={() => setScore(score + 1)}>
Add one
</button>
</div>
);
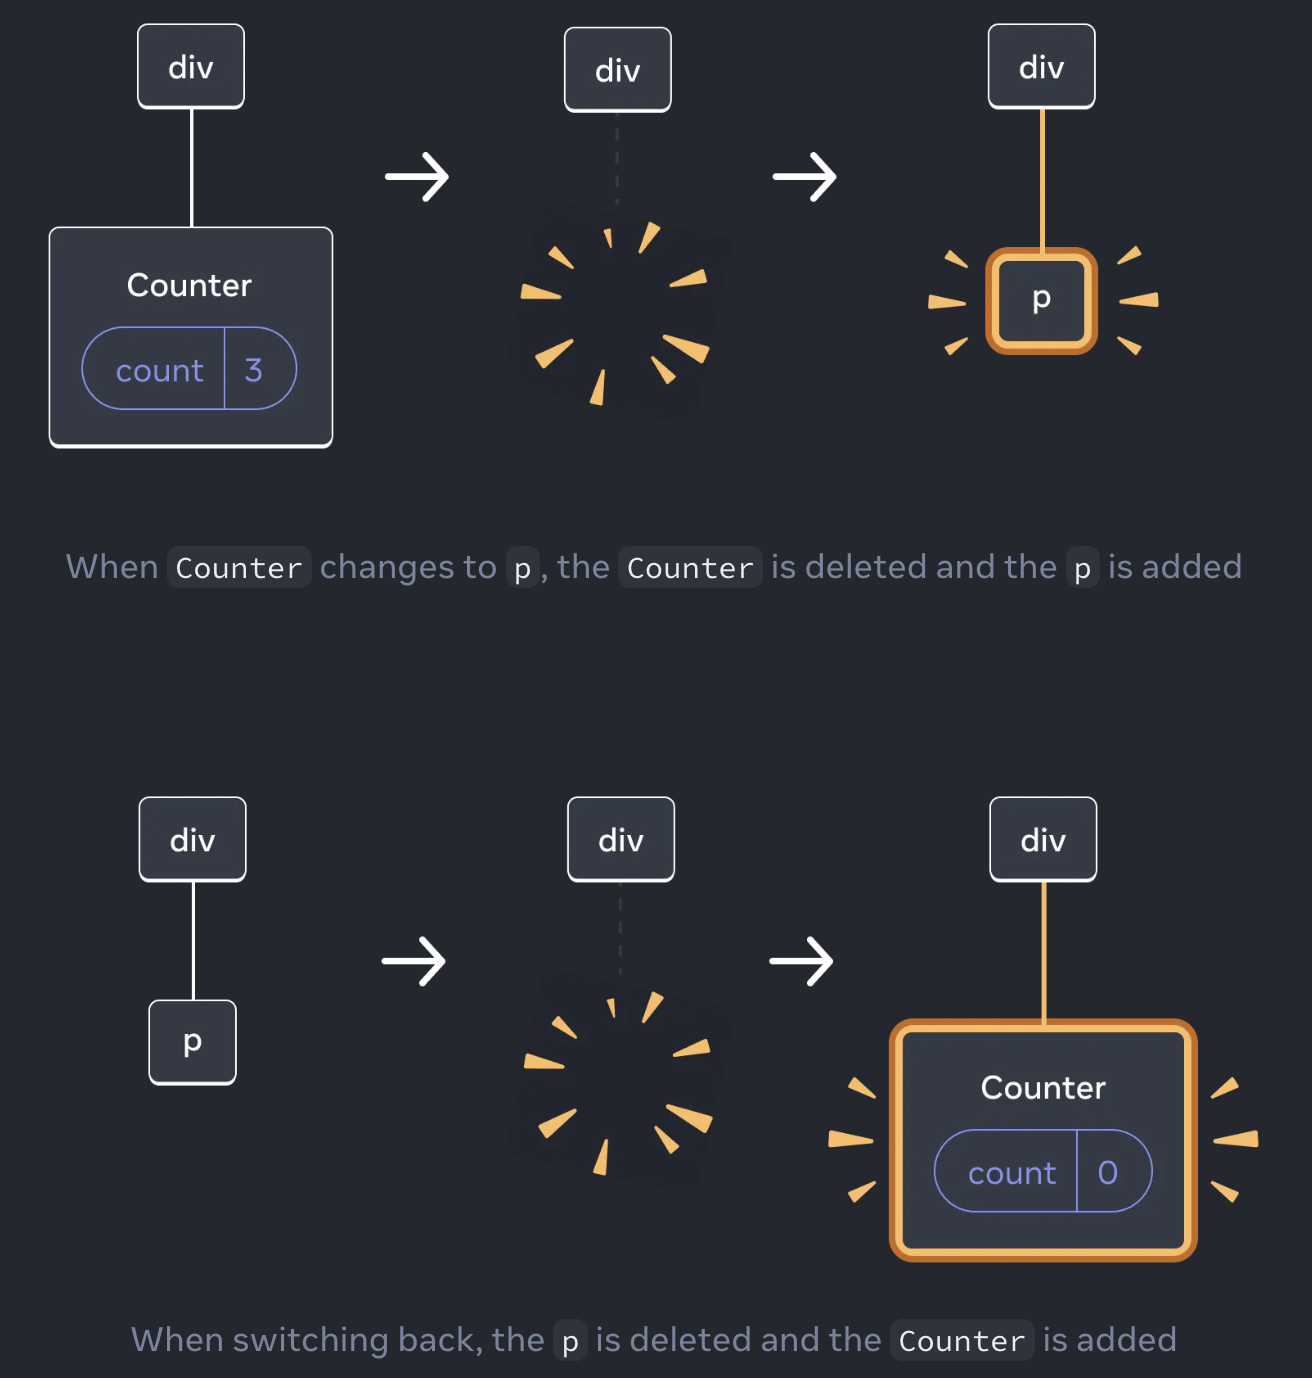
}이 예제에서는 체크박스를 클릭하면 <Counter>가 <p>로 대체됨. 즉, 같은 위치에 다른 컴포넌트가 렌더링됨. 처음에 <div>의 첫 번째 자식에는 <Counter>가 있었지만, <p>로 대체될 때 React는 UI 트리에서 <Counter>를 제거하고 그 상태를 파괴함:
또, 같은 위치에 다른 컴포넌트를 렌더링하면 전체 하위 트리의 상태가 재설정됨:
import { useState } from 'react';

export default function App() {
  const [isFancy, setIsFancy] = useState(false);
  return (
    <div>
      {isFancy ? (
        <div>
          <Counter isFancy={true} />
        </div>
      ) : (
        <section>
          <Counter isFancy={false} />
        </section>
      )}
      <label>
        <input
          type="checkbox"
          checked={isFancy}
          onChange={e => {
            setIsFancy(e.target.checked)
          }}
        />
        Use fancy styling
      </label>
    </div>
  );
}

function Counter({ isFancy }) {
  const [score, setScore] = useState(0);
  const [hover, setHover] = useState(false);

  let className = 'counter';
  if (hover) {
    className += ' hover';
  }
  if (isFancy) {
    className += ' fancy';
  }

  return (
    <div
      className={className}
      onPointerEnter={() => setHover(true)}
      onPointerLeave={() => setHover(false)}
    >
      <h1>{score}</h1>
      <button onClick={() => setScore(score + 1)}>
        Add one
      </button>
    </div>
  );
}
이 예제에서는 체크박스를 클릭하면 루트 App 컴포넌트에서 반환된 <div>의 첫 번째 자식이 <div>에서 <section>으로 변경됨. 자식 <div>가 DOM에서 제거될 때 그 아래의 전체 트리(카운터 및 해당 상태 포함)도 함께 제거됨:
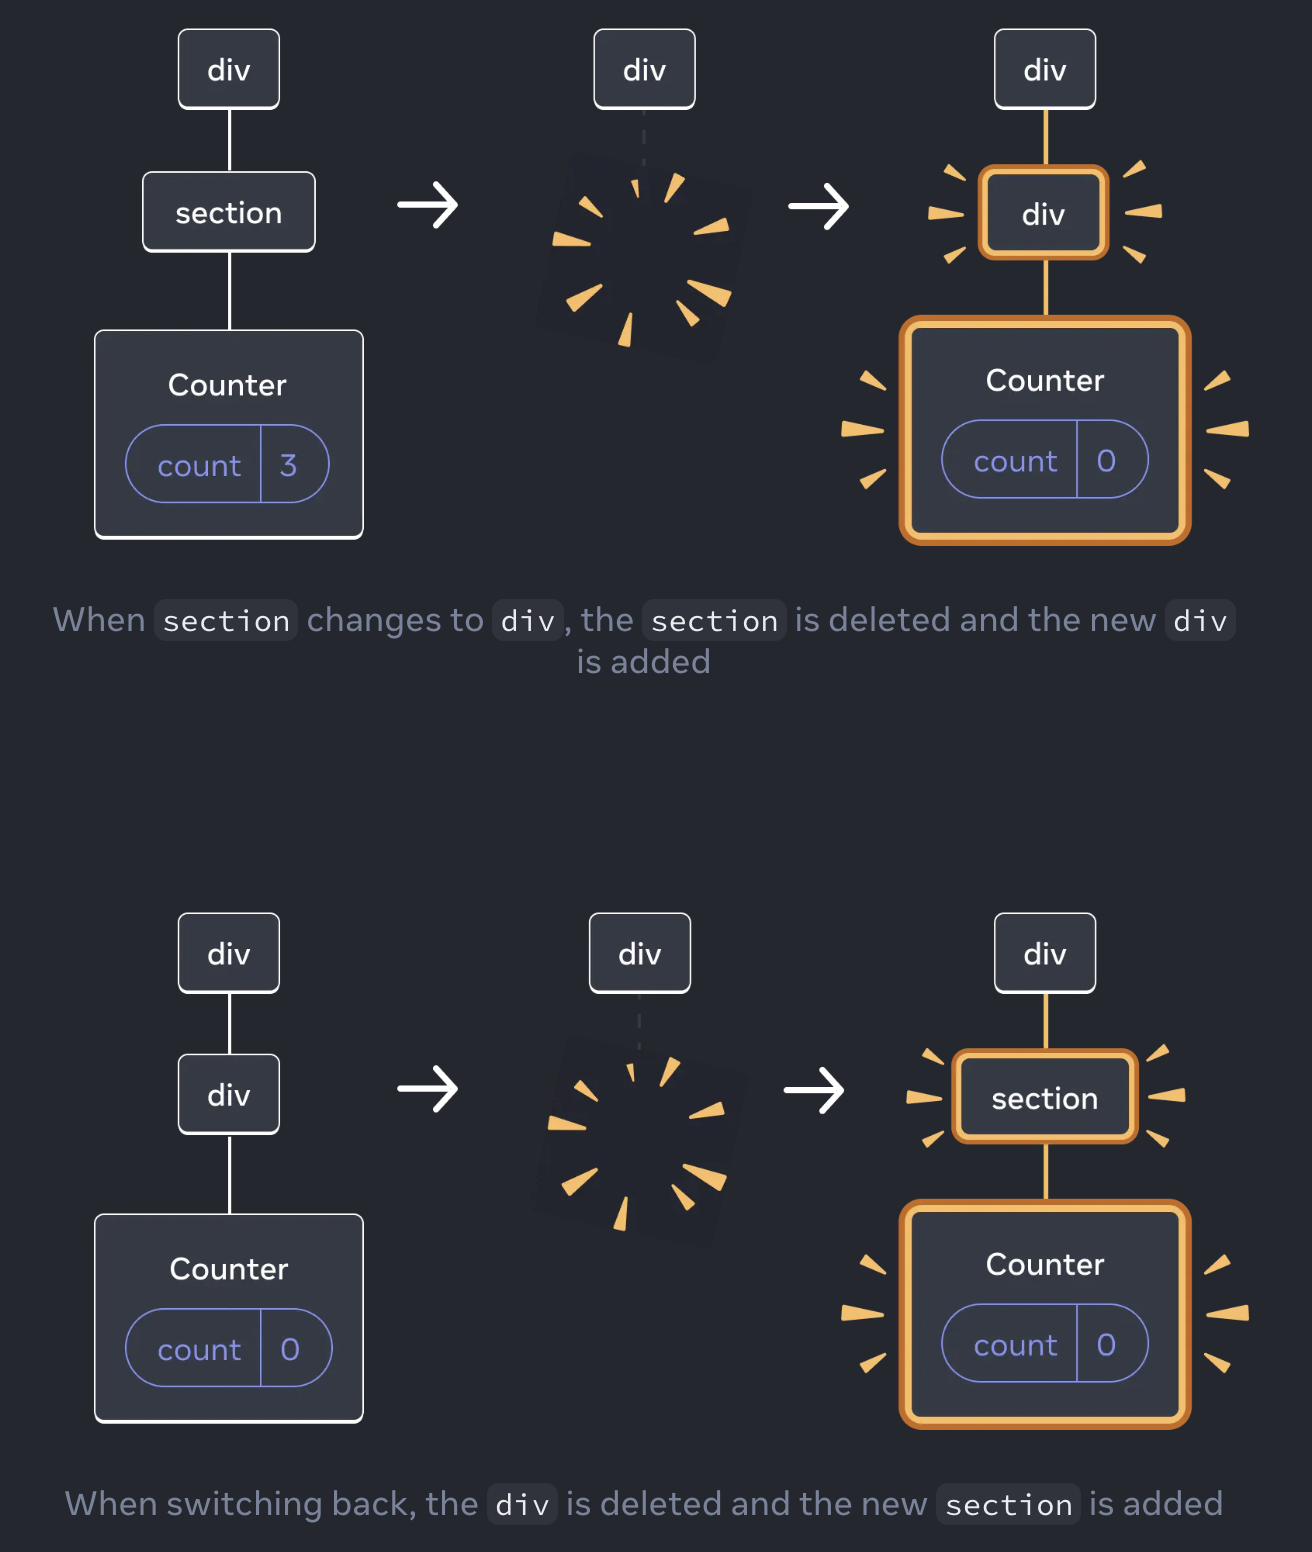
즉, 재렌더링 사이에 상태를 유지하려면 트리의 구조가 렌더링 전, 후에 "일치"해야 함. 구조가 다르면 React는 트리에서 컴포넌트를 제거할 때 state를 파괴함.
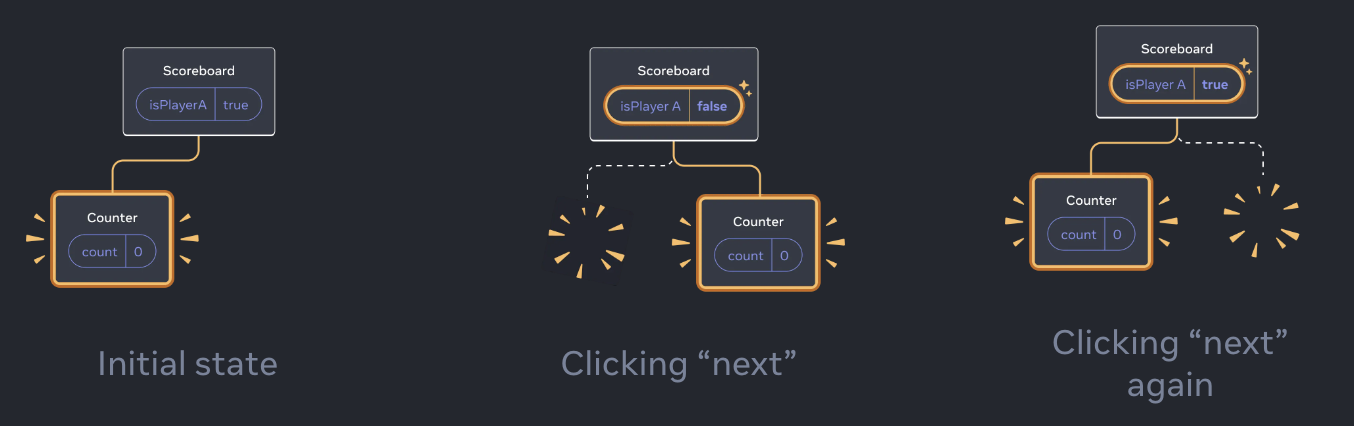
Resetting state at the same position
기본적으로 React는 컴포넌트가 같은 위치에 있는 동안 컴포넌트의 상태를 보존함. 하지만 컴포넌트의 상태를 리셋하고 싶다면?
import { useState } from 'react';

export default function Scoreboard() {
  const [isPlayerA, setIsPlayerA] = useState(true);
  return (
    <div>
      {isPlayerA ? (
        <Counter person="Taylor" />
      ) : (
        <Counter person="Sarah" />
      )}
      <button onClick={() => {
        setIsPlayerA(!isPlayerA);
      }}>
        Next player!
      </button>
    </div>
  );
}

function Counter({ person }) {
  const [score, setScore] = useState(0);
  const [hover, setHover] = useState(false);

  let className = 'counter';
  if (hover) {
    className += ' hover';
  }

  return (
    <div
      className={className}
      onPointerEnter={() => setHover(true)}
      onPointerLeave={() => setHover(false)}
    >
      <h1>{person}'s score: {score}</h1>
      <button onClick={() => setScore(score + 1)}>
        Add one
      </button>
    </div>
  );
}
두 Counter는 같은 위치에 표시되므로 React는 person prop이 변경된 동일한 카운터로 간주하고, 따라서 현재 플레이어를 변경해도 점수가 보존됨.
두 카운터를 별개의 카운터로 간주하고 싶다면? 두 카운터 사이를 전환할 때 상태를 재설정하는 방법은 두 가지가 있음:
- 컴포넌트를 서로 다른 위치에 렌더링
- 각 컴포넌트에
key로 명시적인 아이덴티티 부여
Option 1: Rendering a component in different positions
두 카운터를 독립적으로 만들려면 두 개의 다른 위치에 렌더링하면 됨:
import { useState } from 'react';

export default function Scoreboard() {
  const [isPlayerA, setIsPlayerA] = useState(true);
  return (
    <div>
      {isPlayerA &&
        <Counter person="Taylor" />
      }
      {!isPlayerA &&
        <Counter person="Sarah" />
      }
      <button onClick={() => {
        setIsPlayerA(!isPlayerA);
      }}>
        Next player!
      </button>
    </div>
  );
}

function Counter({ person }) {
  const [score, setScore] = useState(0);
  const [hover, setHover] = useState(false);

  let className = 'counter';
  if (hover) {
    className += ' hover';
  }

  return (
    <div
      className={className}
      onPointerEnter={() => setHover(true)}
      onPointerLeave={() => setHover(false)}
    >
      <h1>{person}'s score: {score}</h1>
      <button onClick={() => setScore(score + 1)}>
        Add one
      </button>
    </div>
  );
}- 처음에는
isPlayerA가 참이므로 첫 번째 위치에는 카운터 상태가 있고 두 번째 위치는 비어 있음. - "Next player" 버튼을 클릭하면 첫 번째 위치는 비워지지만 두 번째 위치에는 카운터가 있음.
각 카운터의 상태는 카운터가 DOM에서 제거될 때마다 소멸되기 때문에 버튼을 클릭할 때마다 초기화됨.
이 솔루션은 같은 위치에 독립적인 컴포넌트 몇 개만 렌더링할 때 편리. 이 예시에서는 두 개만 있으므로 JSX에서 두 개를 따로 렌더링하는 것이 번거롭지 않음.
Option 2: Resetting state with a key
컴포넌트의 상태를 재설정하는 더 일반적인 방법도 있음.
'key'는 리스트에만 사용되는 것이 아님! 'key'를 사용해 React는 모든 컴포넌트를 구분할 수 있음. 기본적으로 React는 부모 내에서의 순서("첫 번째 카운터", "두 번째 카운터")를 사용해 컴포넌트를 구분함. 하지만 키를 사용하면 이것이 첫 번째 카운터나 두 번째 카운터가 아니라 특정 카운터(예: Taylor의 카운터)임을 React에 알릴 수 있음.
import { useState } from 'react';

export default function Scoreboard() {
  const [isPlayerA, setIsPlayerA] = useState(true);
  return (
    <div>
      {isPlayerA ? (
        <Counter key="Taylor" person="Taylor" />
      ) : (
        <Counter key="Sarah" person="Sarah" />
      )}
      <button onClick={() => {
        setIsPlayerA(!isPlayerA);
      }}>
        Next player!
      </button>
    </div>
  );
}

function Counter({ person }) {
  const [score, setScore] = useState(0);
  const [hover, setHover] = useState(false);

  let className = 'counter';
  if (hover) {
    className += ' hover';
  }

  return (
    <div
      className={className}
      onPointerEnter={() => setHover(true)}
      onPointerLeave={() => setHover(false)}
    >
      <h1>{person}'s score: {score}</h1>
      <button onClick={() => setScore(score + 1)}>
        Add one
      </button>
    </div>
  );
}
이 예제에서 두 <Counter />는 같은 위치에 표시되지만 상태를 공유하지 않음.
key를 지정해서 React에게 부모 내 순서가 아닌 key 자체를 위치의 일부로 사용하도록 지시할 수 있음. 그렇기 때문에 JSX에서 같은 위치에 렌더링하더라도 React는 두 카운터를 서로 다른 카운터로 인식하므로 상태를 공유하지 않음. 카운터가 화면에 나타날 때마다 새로운 상태가 생성되고, 카운터가 제거될 때마다 그 상태는 소멸됨. 두 카운터 사이를 토글하면 상태가 계속 초기화됨.
Resetting a form with a key
key로 상태를 재설정하는 것은 양식을 다룰 때 특히 유용함.
// App.js
import { useState } from 'react';
import Chat from './Chat.js';
import ContactList from './ContactList.js';

export default function Messenger() {
  const [to, setTo] = useState(contacts[0]);
  return (
    <div>
      <ContactList
        contacts={contacts}
        selectedContact={to}
        onSelect={contact => setTo(contact)}
      />
      <Chat contact={to} />
    </div>
  )
}

const contacts = [
  { id: 0, name: 'Taylor', email: 'taylor@mail.com' },
  { id: 1, name: 'Alice', email: 'alice@mail.com' },
  { id: 2, name: 'Bob', email: 'bob@mail.com' }
];
// ContactList.js
export default function ContactList({
selectedContact,
contacts,
onSelect
}) {
return (
<section className="contact-list">
<ul>
{contacts.map(contact =>
<li key={contact.id}>
<button onClick={() => {
onSelect(contact);
}}>
{contact.name}
</button>
</li>
)}
</ul>
</section>
);
}// Chat.js
import { useState } from 'react';
export default function Chat({ contact }) {
const [text, setText] = useState('');
return (
<section className="chat">
<textarea
value={text}
placeholder={'Chat to ' + contact.name}
onChange={e => setText(e.target.value)}
/>
<br />
<button>Send to {contact.email}</button>
</section>
);
}<Chat> 컴포넌트는 text 상태를 가지고 있음. 입력란에 무언가를 입력한 후 "Alice" 또는 "Bob"을 눌러 다른 수신자를 선택해도 <Chat>이 트리의 동일한 위치에 렌더링되므로 입력 상태가 유지.
채팅 앱에서는 사용자가 이미 입력한 메시지를 실수로 엉뚱한 사람에게 보내는 것을 원하지 않을 것! 이 문제를 해결하려면 키를 추가하면 됨:
<Chat key={to.id} contact={to} />이렇게 하면 사용자가 다른 수신자를 선택할 때, Chat 컴포넌트가 그 아래 트리 전체를 포함하여 처음부터 다시 생성됨. 또한 React는 DOM 엘리먼트를 재사용하는 대신 다시 생성함. 따라서 수신자가 바뀌면 입력란이 비워짐.
5. Extracting State Logic into a Reducer
많은 상태 업데이트가 여러 이벤트 핸들러에 분산되어 있는 컴포넌트는 과부하가 걸릴 수 있음. 이러한 경우 컴포넌트 외부의 모든 상태 업데이트 로직을 리듀서라고 하는 단일 함수로 통합할 수 있음.
Consolidate state logic with a reducer
컴포넌트가 복잡해지면 컴포넌트의 상태가 업데이트되는 다양한 방법을 한 눈에 보기 어려워질 수 있음.
예를 들어, 아래의 TaskApp 컴포넌트는 tasks을 상태로 유지하고 세 가지 이벤트 핸들러를 사용하여 task를 추가, 제거 및 편집함:
import { useState } from 'react';
import AddTask from './AddTask.js';
import TaskList from './TaskList.js';

export default function TaskApp() {
  const [tasks, setTasks] = useState(initialTasks);

  function handleAddTask(text) {
    setTasks([
      ...tasks,
      {
        id: nextId++,
        text: text,
        done: false,
      },
    ]);
  }

  function handleChangeTask(task) {
    setTasks(
      tasks.map((t) => {
        if (t.id === task.id) {
          return task;
        } else {
          return t;
        }
      })
    );
  }

  function handleDeleteTask(taskId) {
    setTasks(tasks.filter((t) => t.id !== taskId));
  }

  return (
    <>
      <h1>Prague itinerary</h1>
      <AddTask onAddTask={handleAddTask} />
      <TaskList
        tasks={tasks}
        onChangeTask={handleChangeTask}
        onDeleteTask={handleDeleteTask}
      />
    </>
  );
}

let nextId = 3;
const initialTasks = [
  {id: 0, text: 'Visit Kafka Museum', done: true},
  {id: 1, text: 'Watch a puppet show', done: false},
  {id: 2, text: 'Lennon Wall pic', done: false},
];
각 이벤트 핸들러는 state를 업데이트하기 위해 setTasks를 호출함. 이 컴포넌트가 커짐에 따라 여기저기 흩어져 있는 상태 로직의 양도 늘어남. 이러한 복잡성을 줄이고 모든 로직을 접근하기 쉬운 한 곳에 유지하려면 해당 상태 로직을 컴포넌트 외부의 단일 함수, 즉 "리듀서"로 옮길 수 있음.
리듀서는 상태를 처리하는 다른 방식. useState에서 useReducer로 변경하는 세 단계:
- 상태 설정에서 액션 디스패치로 변경
- 리듀서 함수를 작성
- 컴포넌트에서 리듀서를 사용
Step 1: Move from setting state to dispatching actions
현재 이벤트 핸들러는 상태를 설정하여 수행할 작업을 지정함:
function handleAddTask(text) {
  setTasks([
    ...tasks,
    {
      id: nextId++,
      text: text,
      done: false,
    },
  ]);
}

function handleChangeTask(task) {
  setTasks(
    tasks.map((t) => {
      if (t.id === task.id) {
        return task;
      } else {
        return t;
      }
    })
  );
}

function handleDeleteTask(taskId) {
  setTasks(tasks.filter((t) => t.id !== taskId));
}
리듀서로 상태를 관리하는 것은 직접 상태를 설정하는 것과 약간 다름. 상태를 설정하여 React에게 "무엇을 할 것"을 지시하는 대신, 이벤트 핸들러에서 "action"을 디스패치하여 "사용자가 방금 한 일"을 지정. (상태 업데이트 로직은 다른 곳에 있음!) 따라서 이벤트 핸들러를 통해 "tasks를 설정"하는 대신 "task를 추가/변경/삭제"하는 액션을 디스패치하는 것. 이것이 사용자의 의도를 더 잘 설명함.
function handleAddTask(text) {
  dispatch({
    type: 'added',
    id: nextId++,
    text: text,
  });
}

function handleChangeTask(task) {
  dispatch({
    type: 'changed',
    task: task,
  });
}

function handleDeleteTask(taskId) {
  dispatch({
    type: 'deleted',
    id: taskId,
  });
}
dispatch로 전달되는 객체를 "action"이라고 부름. 이는 일반 자바스크립트 객체로, 일반적으로 어떤 일이 일어났는지에 대한 최소한의 정보를 포함해야 함.
Step 2: Write a reducer function
리듀서 함수는 상태 로직을 넣는 곳. '현재 상태'와 '액션 객체' 두 개의 인수를 받아 다음 상태를 반환하면 React는 반환된 값으로 상태를 설정함.
이 예제에서 상태 설정 로직을 이벤트 핸들러에서 리듀서 함수로 변경하려면:
- 현재 상태(tasks)를 첫 번째 인수로 선언
- 액션 객체를 두 번째 인자로 선언
- 리듀서에서 다음 상태(React가 상태를 설정할 값)를 반환
function tasksReducer(tasks, action) {
  if (action.type === 'added') {
    return [
      ...tasks,
      {
        id: action.id,
        text: action.text,
        done: false,
      },
    ];
  } else if (action.type === 'changed') {
    return tasks.map((t) => {
      if (t.id === action.task.id) {
        return action.task;
      } else {
        return t;
      }
    });
  } else if (action.type === 'deleted') {
    return tasks.filter((t) => t.id !== action.id);
  } else {
    throw Error('Unknown action: ' + action.type);
  }
}
리듀서 함수는 상태(작업)를 인수로 받기 때문에 컴포넌트 외부에서 선언할 수 있음. 이렇게 하면 들여쓰기 수준이 줄어들고 코드를 더 읽기 쉽게 만들 수 있음.
Note
리듀서 안에는 switch 문을 사용하는 것이 일반적인 관례. 결과는 동일하지만 스위치 문을 한 눈에 보기가 더 쉬울 수 있음.function tasksReducer(tasks, action) { switch (action.type) { case 'added': { return [ ...tasks, { id: action.id, text: action.text, done: false, }, ]; } case 'changed': { return tasks.map((t) => { if (t.id === action.task.id) { return action.task; } else { return t; } }); } case 'deleted': { return tasks.filter((t) => t.id !== action.id); } default: { throw Error('Unknown action: ' + action.type); } } }
Step 3: Use the reducer from your component
마지막으로, 컴포넌트에 tasksReducer를 연결해야 함. React에서 useReducer Hook을 가져오고, useState를 useReducer로 대체함.
import { useReducer } from 'react';
import AddTask from './AddTask.js';
import TaskList from './TaskList.js';
export default function TaskApp() {
const [tasks, dispatch] = useReducer(tasksReducer, initialTasks);
function handleAddTask(text) {
dispatch({
type: 'added',
id: nextId++,
text: text,
});
}
function handleChangeTask(task) {
dispatch({
type: 'changed',
task: task,
});
}
function handleDeleteTask(taskId) {
dispatch({
type: 'deleted',
id: taskId,
});
}
return (
<>
<h1>Prague itinerary</h1>
<AddTask onAddTask={handleAddTask} />
<TaskList
tasks={tasks}
onChangeTask={handleChangeTask}
onDeleteTask={handleDeleteTask}
/>
</>
);
}
function tasksReducer(tasks, action) {
  switch (action.type) {
    case 'added': {
      return [
        ...tasks,
        {
          id: action.id,
          text: action.text,
          done: false,
        },
      ];
    }
    case 'changed': {
      return tasks.map((t) => {
        if (t.id === action.task.id) {
          return action.task;
        } else {
          return t;
        }
      });
    }
    case 'deleted': {
      return tasks.filter((t) => t.id !== action.id);
    }
    default: {
      throw Error('Unknown action: ' + action.type);
    }
  }
}
let nextId = 3;
const initialTasks = [
{id: 0, text: 'Visit Kafka Museum', done: true},
{id: 1, text: 'Watch a puppet show', done: false},
{id: 2, text: 'Lennon Wall pic', done: false},
];useReducer 훅은 초기 상태를 전달해야 하며 상태값과 상태를 설정하는 방법을 반환한다는 점에서 useState와 유사하지만, 두 개의 인수를 받아서(리듀서 함수, 초기 상태), 상태값과 디스패치 함수를 반환한다는 점에서 useState와 다름.
이렇게 관심사를 분리하면 컴포넌트 로직을 더 쉽게 읽을 수 있음. 이제 이벤트 핸들러는 액션을 디스패치하여 어떤 일이 일어났는지만 지정하고, 리듀서 함수는 그에 대한 응답으로 상태가 업데이트되는 방식을 결정함.
Comparing useState and useReducer
리듀서에도 단점이 없는 것은 아님! useState vs useReducer:
- 코드 크기: 일반적으로 useReducer를 사용하면 리듀서 함수와 디스패치 액션을 모두 작성해야 하기 때문에 작성해야 하는 코드가 많음. 그러나 많은 이벤트 핸들러가 비슷한 방식으로 상태를 수정하는 경우 useReducer를 사용하면 코드를 줄일 수 있음.
- 가독성: state 업데이트가 단순할 때 useState는 매우 읽기 쉬움. state 업데이트가 복잡해지면 컴포넌트의 규모가 커지고 코드를 읽기 어려워질 수 있음. 이 경우 useReducer를 사용하면 업데이트 로직의 방법과 이벤트 핸들러의 결과를 깔끔하게 분리할 수 있음.
? - 디버깅: useState와 관련된 버그가 발생하면 상태가 잘못 설정된 위치와 그 이유를 파악하기 어려울 수 있음. useReducer를 사용하면 리듀서에 콘솔 로그를 추가하여 모든 상태 업데이트와 그 이유(어떤 작업으로 인해 발생했는지)를 확인할 수 있음. 각 작업이 올바르다면 실수가 리듀서 로직 자체에 있다는 것을 알 수 있음. 하지만 useState를 사용할 때보다 더 많은 코드를 살펴봐야 함. - 테스트: 리듀서는 컴포넌트에 의존하지 않는 순수한 함수임. 즉, 별도로 내보내고 테스트할 수 있음. 일반적으로 보다 현실적인 환경에서 컴포넌트를 테스트하는 것이 가장 좋지만, 복잡한 상태 업데이트 로직의 경우 리듀서가 특정 초기 상태와 동작에 대해 특정 상태를 반환하는 것ㅇ을 테스트하는 것이 유용할 수 있음.
- 개인적인 취향: 리듀서를 좋아하는 사람도 있고 그렇지 않은 사람도 있음. 어디까지나 취향의 차이일 뿐 useState와 useReducer는 상태를 관리한다는 점에서는 동일함!
일부 컴포넌트에서 잘못된 상태 업데이트로 인해 버그가 자주 발생하고 코드에 더 많은 구조를 도입하려는 경우 리듀서를 사용하는 것이 좋음. 모든 컴포넌트에 리듀서를 사용할 필요는 없으니 자유롭게 혼합하여 사용해도 도딤! 같은 컴포넌트에서 useState와 useReducer를 함께 사용할 수도 있음.
Writing reducers well
리듀서를 작성할 때 두 가지 팁:
- 리듀서는 순수해야 함: 상태 업데이터 함수와 마찬가지로, 감속기는 렌더링 중에 실행됨! (액션은 다음 렌더링까지 대기) 즉, 리듀서는 순수해야 하며 동일한 입력은 항상 동일한 출력으로 이어져야 함. 네트워크 요청을 보내거나, 타이머를 예약하거나 사이드 이펙트(컴포넌트 외부에 영향을 미치는 작업 등)를 수행해서는 안됨. mutations 없이 객체와 배열을 업데이트해야함.
- 각 액션이 데이터에 여러 가지를 변경하더라도 단일 상호 작용만 설명해야함: 예를 들어, 사용자가 리듀서가 관리하는 5개의 입력 필드가 있는 form에서 사용자가 'Reset'을 누른 경우, 5개의 개별 set_field 액션보다는 하나의 reset_form 액션을 전송하는 것이 더 합리적. 리듀서에 모든 액션을 기록하는 경우 어떤 상호작용이나 응답이 어떤 순서로 발생했는지 재구성할 수 있을 정도로 로그가 명확해야 하고, 이는 디버깅에 도움이 됨!
Writing concise reducers with Immer
일반 상태의 객체와 배열을 업데이트할 때와 마찬가지로 Immer 라이브러리를 사용해 리듀서를 더 간결하게 만들 수 있음. useImmerReducer를 사용하면 push 또는 arr[i] = 할당으로 상태를 변경할 수 있음:
import { useImmerReducer } from 'use-immer';
import AddTask from './AddTask.js';
import TaskList from './TaskList.js';

function tasksReducer(draft, action) {
  switch (action.type) {
    case 'added': {
      draft.push({
        id: action.id,
        text: action.text,
        done: false,
      });
      break;
    }
    case 'changed': {
      const index = draft.findIndex((t) => t.id === action.task.id);
      draft[index] = action.task;
      break;
    }
    case 'deleted': {
      return draft.filter((t) => t.id !== action.id);
    }
    default: {
      throw Error('Unknown action: ' + action.type);
    }
  }
}

export default function TaskApp() {
  const [tasks, dispatch] = useImmerReducer(tasksReducer, initialTasks);

  function handleAddTask(text) {
    dispatch({
      type: 'added',
      id: nextId++,
      text: text,
    });
  }

  function handleChangeTask(task) {
    dispatch({
      type: 'changed',
      task: task,
    });
  }

  function handleDeleteTask(taskId) {
    dispatch({
      type: 'deleted',
      id: taskId,
    });
  }

  return (
    <>
      <h1>Prague itinerary</h1>
      <AddTask onAddTask={handleAddTask} />
      <TaskList
        tasks={tasks}
        onChangeTask={handleChangeTask}
        onDeleteTask={handleDeleteTask}
      />
    </>
  );
}

let nextId = 3;
const initialTasks = [
  {id: 0, text: 'Visit Kafka Museum', done: true},
  {id: 1, text: 'Watch a puppet show', done: false},
  {id: 2, text: 'Lennon Wall pic', done: false},
];
리듀서는 순수해야 하므로 상태가 변하지 않아야 함. 하지만 Immer는 안전하게 변경할 수 있는 특별한 원본 객체를 제공함. 내부적으로 Immer는 사용자가 변경한 상태의 복사본을 생성함. 따라서 useImmerReducer로 관리되는 리듀서는 첫 번째 인수를 변경할 수 있고 상태를 반환할 필요가 없음.
6. Passing Data Deeply with Context
일반적으로 부모 컴포넌트에서 자식 컴포넌트로 정보를 전달할 때는 prop을 통해 전달함. 하지만 중간에 여러 컴포넌트를 거쳐야 하거나 앱의 여러 컴포넌트가 동일한 정보를 필요로 하는 경우 프로퍼티 전달은 장황하고 불편할 수 있음. 컨텍스트를 사용하면 부모 컴포넌트가 prop을 통해 명시적으로 전달하지 않고도 그 아래 트리에 있는 모든 컴포넌트가 일부 정보를 사용할 수 있음.
The problem with passing props
prop 전달은 UI 트리를 통해 데이터를 사용하는 컴포넌트로 명시적으로 내려보내는 좋은 방법임.
하지만 일부 prop을 트리 깊숙이 전달해야 하거나 여러 컴포넌트에 동일한 prop이 필요한 경우 prop 전달이 장황하고 불편해질 수 있음. 가장 가까운 공통 조상은 데이터가 필요한 컴포넌트에서 멀리 떨어져 있을 수 있으며, 상태를 그렇게 높이 올리면 'prop drilling'이라는 상황이 발생할 수 있음.
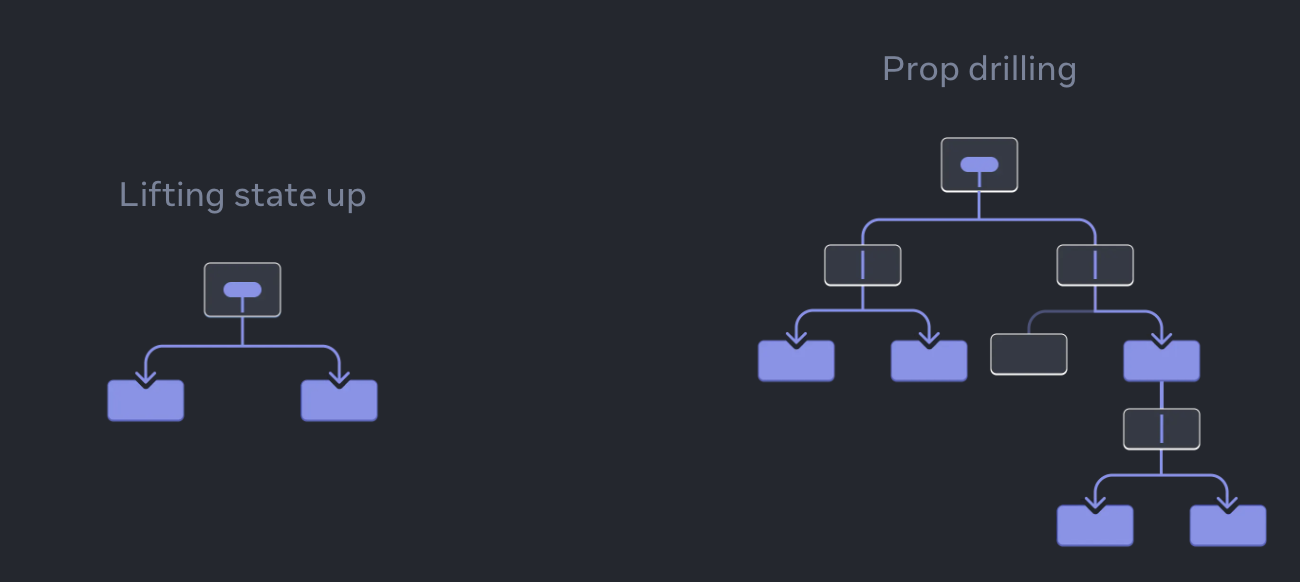
prop을 전달하지 않고도 트리에서 데이터를 필요한 컴포넌트로 '텔레포트'할 수 있는 방법이 있다면? React의 컨텍스트 기능을 사용하면 가능!
Context: an alternative to passing props
컨텍스트를 사용하면 상위 컴포넌트가 그 아래 전체 트리에 데이터를 제공할 수 있음. 컨텍스트는 다양한 용도로 사용됨.
Ex. 레벨을 설정할 수 있는 Heading 컴포넌트:
// App.js
import Heading from './Heading.js';
import Section from './Section.js';

export default function Page() {
  return (
    <Section>
      <Heading level={1}>Title</Heading>
      <Heading level={2}>Heading</Heading>
      <Heading level={3}>Sub-heading</Heading>
      <Heading level={4}>Sub-sub-heading</Heading>
      <Heading level={5}>Sub-sub-sub-heading</Heading>
      <Heading level={6}>Sub-sub-sub-sub-heading</Heading>
    </Section>
  );
}
// Section.js
export default function Section({ children }) {
return (
<section className="section">
{children}
</section>
);
}// Heading.js
export default function Heading({ level, children }) {
switch (level) {
case 1:
return <h1>{children}</h1>;
case 2:
return <h2>{children}</h2>;
case 3:
return <h3>{children}</h3>;
case 4:
return <h4>{children}</h4>;
case 5:
return <h5>{children}</h5>;
case 6:
return <h6>{children}</h6>;
default:
throw Error('Unknown level: ' + level);
}
}동일한 section 내의 여러 heading이 항상 같은 level을 갖도록 하려면? 각 <Heading>에 level prop을 각각 전달하면 됨:
// App.js
import Heading from './Heading.js';
import Section from './Section.js';

export default function Page() {
  return (
    <Section>
      <Heading level={1}>Title</Heading>
      <Section>
        <Heading level={2}>Heading</Heading>
        <Heading level={2}>Heading</Heading>
        <Heading level={2}>Heading</Heading>
        <Section>
          <Heading level={3}>Sub-heading</Heading>
          <Heading level={3}>Sub-heading</Heading>
          <Heading level={3}>Sub-heading</Heading>
          <Section>
            <Heading level={4}>Sub-sub-heading</Heading>
            <Heading level={4}>Sub-sub-heading</Heading>
            <Heading level={4}>Sub-sub-heading</Heading>
          </Section>
        </Section>
      </Section>
    </Section>
  );
}
level prop을 <section> 컴포넌트로 전달하고 <heading>에서 제거할 수 있다면 같은 섹션의 모든 제목이 같은 level을 갖도록 강제할 수 있음. 하지만 <Heading> 컴포넌트가 가장 가까운 <Section>의 레벨을 어떻게 아는 방법은?
자식이 트리 위 어딘가에 데이터를 '요청'할 수 있는 방법이 필요함. Props 전달 만으로는 문제가 해결되지 않음. 이런 경우 Context 사용이 적절하며 세 단계로 진행됨:
- 컨텍스트 생성: (제목 레벨을 위한 컨텍스트이므로 LevelContext라고 부름)
- 데이터가 필요한 컴포넌트에서 해당 컨텍스트를 사용: (Heading에서 LevelContext를 사용)
- 데이터를 지정하는 컴포넌트가 해당 컨텍스트를 제공: (Section이 LevelContext를 제공합니다.)
컨텍스트를 사용하면 부모(멀리 떨어져 있는 부모라도!)가 그 안에 있는 전체 트리에 일부 데이터를 제공할 수 있음!
Step 1: Create the context
먼저 컨텍스트를 생성한 후 컴포넌트에서 컨텍스트를 사용할 수 있도록 파일에서 내보내야 함.
// LevelContext.js
import { createContext } from 'react';

export const LevelContext = createContext(1);
createContext의 유일한 인수는 기본값으로, 여기서 1은 가장 큰 제목 수준을 의미하지만 모든 종류의 값(객체 포함)을 전달할 수 있음. 기본값의 중요성은 다음 단계에서 확인할 수 있음.
Step 2: Use the context
React와 컨텍스트에서 useContext 훅을 가져오고, <Heading> 컴포넌트에서 prop으로 level을 받는 대신 가져온 LevelContext에서 useContext 훅을 사용해 level 값을 읽음. useContext는 Hook이므로 useState 및 useReducer와 마찬가지로 React 컴포넌트 내부(루프나 조건 내부가 아닌)에서 바로 Hook을 호출할 수 있음. useContext는 Heading 컴포넌트가 LevelContext를 읽기를 원한다고 React에 알려줌:
// Heading.js
import { useContext } from 'react';
import { LevelContext } from './LevelContext.js';

export default function Heading({ children }) {
  const level = useContext(LevelContext);
  switch (level) {
    case 1:
      return <h1>{children}</h1>;
    case 2:
      return <h2>{children}</h2>;
    case 3:
      return <h3>{children}</h3>;
    case 4:
      return <h4>{children}</h4>;
    case 5:
      return <h5>{children}</h5>;
    case 6:
      return <h6>{children}</h6>;
    default:
      throw Error('Unknown level: ' + level);
  }
}
이제 Heading 컴포넌트에는 레벨 prop이 없으므로 더 이상 JSX에서 Heading에 레벨 프로퍼티를 전달할 필요가 없음:
// App.js
import Heading from './Heading.js';
import Section from './Section.js';

export default function Page() {
  return (
    <Section level={1}>
      <Heading>Title</Heading>
      <Section level={2}>
        <Heading>Heading</Heading>
        <Heading>Heading</Heading>
        <Heading>Heading</Heading>
        <Section level={3}>
          <Heading>Sub-heading</Heading>
          <Heading>Sub-heading</Heading>
          <Heading>Sub-heading</Heading>
          <Section level={4}>
            <Heading>Sub-sub-heading</Heading>
            <Heading>Sub-sub-heading</Heading>
            <Heading>Sub-sub-heading</Heading>
          </Section>
        </Section>
      </Section>
    </Section>
  );
}
컨텍스트를 사용하고 있지만 컨텍스트를 제공하지 않았기 때문에 아직 모든 제목의 크기가 동일함. 컨텍스트를 제공하지 않으면 React는 이전 단계에서 지정한 기본값을 사용함. 이 예제에서는 createContext의 인수로 1을 지정했기 때문에, useContext(LevelContext)는 1을 반환하고 모든 제목을 <h1>으로 설정함.
각 섹션이 자체 컨텍스트를 제공하도록 하여 이 문제를 해결하면?
Step 3: Provide the context
Section 컴포넌트를 context providder로 감싸 레벨 컨텍스트를 제공! 이는 React에게 "이 <Section> 안에 있는 컴포넌트가 LevelContext를 요청하면 이 레벨을 제공하라"고 지시함. 컴포넌트는 그 위에 있는 UI 트리에서 가장 가까운 <LevelContext.Provider>의 값을 사용함.
// Section.js
import { LevelContext } from './LevelContext.js';

export default function Section({ level, children }) {
  return (
    <section className="section">
      <LevelContext.Provider value={level}>
        {children}
      </LevelContext.Provider>
    </section>
  );
}
원래 코드와 결과는 같지만 각 Heading 컴포넌트에 level prop을 전달할 필요가 없음! 대신, 위의 가장 가까운 섹션에 요청하여 제목 레벨을 "파악"함:
- level prop을
<Section>에 전달 - 섹션은 그 자식들을
<LevelContext.Provider value={level}>로 래핑 - Heading은
useContext(LevelContext)를 사용하여 위에 있는 UI 트리에서 가장 가까운 LevelContext에게 값을 물어봄.
Using and providing context from the same component
현재는 여전히 각 섹션의 level을 수동으로 지정해야 하지만, 컨텍스트를 사용하면 위의 컴포넌트에서 정보를 읽을 수 있으므로 각 섹션은 위의 섹션에서 level을 읽고 level + 1을 자동으로 아래로 전달할 수 있음. 이렇게 변경하면 level prop을 <Section>이나 <Heading>에 전달할 필요가 없음!:
// App.js
import Heading from './Heading.js';
import Section from './Section.js';

export default function Page() {
  return (
    <Section>
      <Heading>Title</Heading>
      <Section>
        <Heading>Heading</Heading>
        <Heading>Heading</Heading>
        <Heading>Heading</Heading>
        <Section>
          <Heading>Sub-heading</Heading>
          <Heading>Sub-heading</Heading>
          <Heading>Sub-heading</Heading>
          <Section>
            <Heading>Sub-sub-heading</Heading>
            <Heading>Sub-sub-heading</Heading>
            <Heading>Sub-sub-heading</Heading>
          </Section>
        </Section>
      </Section>
    </Section>
  );
}
// Section.js
import { useContext } from 'react';
import { LevelContext } from './LevelContext.js';
export default function Section({ children }) {
const level = useContext(LevelContext);
return (
<section className="section">
<LevelContext.Provider value={level + 1}>
{children}
</LevelContext.Provider>
</section>
);
}// Heading.js
import { useContext } from 'react';
import { LevelContext } from './LevelContext.js';
export default function Heading({ children }) {
const level = useContext(LevelContext);
switch (level) {
case 0:
throw Error('Heading must be inside a Section!');
case 1:
return <h1>{children}</h1>;
case 2:
return <h2>{children}</h2>;
case 3:
return <h3>{children}</h3>;
case 4:
return <h4>{children}</h4>;
case 5:
return <h5>{children}</h5>;
case 6:
return <h6>{children}</h6>;
default:
throw Error('Unknown level: ' + level);
}
}// LevelContext.js
import { createContext } from 'react';
export const LevelContext = createContext(0);Context passes through intermediate components
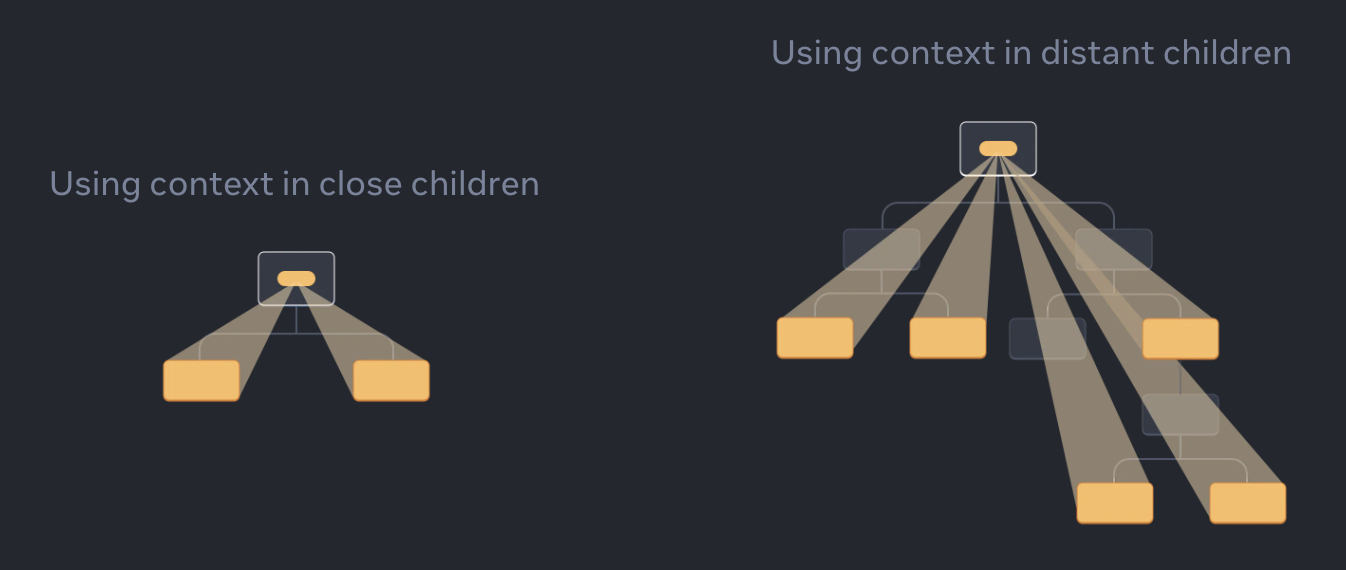
컨텍스트를 제공하는 컴포넌트와 컨텍스트를 사용하는 컴포넌트 사이에 원하는 만큼의 컴포넌트(<div>와 같은 기본 제공 컴포넌트와 직접 작성한 컴포넌트 모두 포함)를 삽입할 수 있음.
아래 예제에서는 동일한 Post 컴포넌트(점선 테두리)가 두 개의 서로 다른 중첩 레벨에서 렌더링됨. 그 안의 <Heading>이 가장 가까운 <Section>에서 자동으로 레벨을 가져옴:
// App.js
import Heading from './Heading.js';
import Section from './Section.js';

export default function ProfilePage() {
  return (
    <Section>
      <Heading>My Profile</Heading>
      <Post
        title="Hello traveller!"
        body="Read about my adventures."
      />
      <AllPosts />
    </Section>
  );
}

function AllPosts() {
  return (
    <Section>
      <Heading>Posts</Heading>
      <RecentPosts />
    </Section>
  );
}

function RecentPosts() {
  return (
    <Section>
      <Heading>Recent Posts</Heading>
      <Post
        title="Flavors of Lisbon"
        body="...those pastéis de nata!"
      />
      <Post
        title="Buenos Aires in the rhythm of tango"
        body="I loved it!"
      />
    </Section>
  );
}

function Post({ title, body }) {
  return (
    <Section isFancy={true}>
      <Heading>
        {title}
      </Heading>
      <p><i>{body}</i></p>
    </Section>
  );
}
// Section.js
import { useContext } from 'react';
import { LevelContext } from './LevelContext.js';
export default function Section({ children, isFancy }) {
const level = useContext(LevelContext);
return (
<section className={
'section ' +
(isFancy ? 'fancy' : '')
}>
<LevelContext.Provider value={level + 1}>
{children}
</LevelContext.Provider>
</section>
);
}// Heading.js
import { useContext } from 'react';
import { LevelContext } from './LevelContext.js';
export default function Heading({ children }) {
const level = useContext(LevelContext);
switch (level) {
case 0:
throw Error('Heading must be inside a Section!');
case 1:
return <h1>{children}</h1>;
case 2:
return <h2>{children}</h2>;
case 3:
return <h3>{children}</h3>;
case 4:
return <h4>{children}</h4>;
case 5:
return <h5>{children}</h5>;
case 6:
return <h6>{children}</h6>;
default:
throw Error('Unknown level: ' + level);
}
}// LevelContext.js
import { createContext } from 'react';
export const LevelContext = createContext(0);따로 특별한 작업을 수행하지 않아도 <Section>이 하위 트리의 컨텍스트를 지정하므로 <Heading>을 아무 곳에나 삽입해도 올바른 크기를 가짐.
컨텍스트를 사용하면 "주변 환경에 적응"하고 "렌더링되는 위치(즉, 어떤 컨텍스트에서 렌더링되는지)에 따라 다르게 표시되는" 컴포넌트를 작성할 수 있음.
컨텍스트가 작동하는 방식은 CSS 속성 상속과 유사함. CSS에서는 <div>에 color: blue를 지정하면 그 안에 있는 모든 DOM 노드는 중간에 있는 다른 DOM 노드가 color: green으로 재정의되지 않는 한 아무리 깊어도 color: blue를 상속받음. 마찬가지로 React에서 위에서 오는 컨텍스트를 재정의하는 유일한 방법은 자식을 다른 값의 context provider 로 감싸는 것.
CSS에서는 color와 background-color처럼 서로 다른 프로퍼티가 서로 재정의하지 않음. background-color에 영향을 주지 않고 모든 <div>의 색상을 빨간색으로 설정할 수 있음. 마찬가지로 서로 다른 React 컨텍스트도 서로 재정의하지 않음. createContext()로 만드는 각 컨텍스트는 다른 컨텍스트와 완전히 분리되어 있으며, 특정 컨텍스트를 사용하거나 제공하는 컴포넌트를 함께 묶음. 즉, 하나의 컴포넌트가 문제없이 다양한 컨텍스트를 사용하거나 제공할 수 있음.
Before you use context
컨텍스트는 사용하는 것은 매우 매력적잉지만, 이는 또한 너무 쉽게 남용될 수 있다는 의미이기도 함. prop을 몇 단계 깊이 전달해야 한다고 해서 해당 정보를 컨텍스트에 넣어야 한다는 의미는 아님.
-
다음은 컨텍스트를 사용하기 전에 고려해야 할 몇 가지 대안:
-
prop 전달부터 시작하기: 컴포넌트가 복잡하다면 수십 개의 컴포넌트를 통해 수십 개의 prop을 전달해야 하는 경우도 흔함. 느리게 느껴질 수도 있지만, 어떤 컴포넌트가 어떤 데이터를 사용하는지 매우 명확해짐! 당신이 작성한 코드를 유지 관리하는 사람은 prop을 사용하여 데이터 흐름을 명확하게 만든 것에 만족할 것.
-
컴포넌트를 추출하고 JSX를 자식으로 전달하기: 일부 데이터를 해당 데이터를 사용하지 않는 중간 컴포넌트의 여러 계층을 거쳐 전달한다면, 이는 종종 그 과정에서 일부 컴포넌트를 추출하는 것을 잊어버렸다는 것을 의미함. 예를 들어, posts와 같은 데이터 prop을 직접 사용하지 않는 시각적 컴포넌트에 넘기는(
<Layout posts={posts} />) 대신, Layout이 자식을 소품으로 사용하도록(<Layout><Posts posts={posts} /></Layout>) 하면, 데이터를 지정하는 컴포넌트와 데이터를 필요로 하는 컴포넌트 사이의 레이어 수가 줄어듦.
이 두 가지 접근 방식이 모두 적합하지 않은 경우에 컨텍스트를 고려!
Use cases for context
- 테마: 앱에서 사용자가 앱의 모양을 변경할 수 있는 경우(ex. 다크 모드) 앱 상단에 컨텍스트 공급자를 배치하고 시각적 모양을 조정해야 하는 컴포넌트에서 해당 컨텍스트를 사용할 수 있음.
- 현재 계정: 많은 컴포넌트가 현재 로그인한 사용자를 알아야 할 수 있음. 이를 컨텍스트에 넣으면 트리의 어느 곳에서나 편리하게 읽을 수 있음. 또한 일부 앱에서는 여러 계정을 동시에 조작할 수 있음(ex. 다른 사용자로 댓글을 남기는 경우). 이러한 경우 UI의 일부를 계정 값이 다른 중첩된 context provider로 래핑하는 것이 편리할 수 있음.
- 라우팅: 대부분의 라우팅 솔루션은 내부적으로 컨텍스트를 사용하여 현재 경로를 유지함. 이것이 모든 링크가 활성 상태인지 아닌지를 '아는' 방식. 자체 라우터를 구축하는 경우에도 이 방식을 사용할 수 있음.
- 상태 관리: 앱이 성장함에 따라 앱 상단에 더 많은 상태가 있을 수 있고, 아래에 있는 많은 멀리 떨어진 컴포넌트에서 이를 변경하고 싶을 수 있음. 컨텍스트와 함께 리듀서를 사용하면 복잡한 상태를 관리하고 멀리 떨어진 컴포넌트에 큰 번거로움 없이 전달할 수 있음.
컨텍스트는 정적인 값에만 국한되지 않음. 다음 렌더링에서 다른 값을 전달하면 React는 아래에서 이를 읽는 모든 컴포넌트를 업데이트함! 이것이 컨텍스트가 state와 함께 자주 사용되는 이유임.
일반적으로 트리의 다른 부분에 있는 멀리 떨어진 컴포넌트에서 일부 정보가 필요한 경우 컨텍스트가 도움이 될 수 있음.
7. Scaling Up with Reducer and Context
리듀서를 사용하면 컴포넌트의 상태 업데이트 로직을 통합할 수 있음. 컨텍스트를 사용하면 다른 컴포넌트에 정보를 깊숙이 전달할 수 있음. 리듀서와 컨텍스트를 함께 결합하여 복잡한 화면의 상태를 관리할 수 있음.
Combining a reducer with context
- Extracting State Logic into a Reducer에서 나온 다음 예제에서 상태는 리듀서에 의해 관리됨. 리듀서 함수에는 모든 상태 업데이트 로직이 포함되어 있으며 이 파일 최하단에 선언되어 있음:
// App.js
import { useReducer } from 'react';
import AddTask from './AddTask.js';
import TaskList from './TaskList.js';

export default function TaskApp() {
  const [tasks, dispatch] = useReducer(
    tasksReducer,
    initialTasks
  );

  function handleAddTask(text) {
    dispatch({
      type: 'added',
      id: nextId++,
      text: text,
    });
  }

  function handleChangeTask(task) {
    dispatch({
      type: 'changed',
      task: task
    });
  }

  function handleDeleteTask(taskId) {
    dispatch({
      type: 'deleted',
      id: taskId
    });
  }

  return (
    <>
      <h1>Day off in Kyoto</h1>
      <AddTask
        onAddTask={handleAddTask}
      />
      <TaskList
        tasks={tasks}
        onChangeTask={handleChangeTask}
        onDeleteTask={handleDeleteTask}
      />
    </>
  );
}

function tasksReducer(tasks, action) {
  switch (action.type) {
    case 'added': {
      return [...tasks, {
        id: action.id,
        text: action.text,
        done: false
      }];
    }
    case 'changed': {
      return tasks.map(t => {
        if (t.id === action.task.id) {
          return action.task;
        } else {
          return t;
        }
      });
    }
    case 'deleted': {
      return tasks.filter(t => t.id !== action.id);
    }
    default: {
      throw Error('Unknown action: ' + action.type);
    }
  }
}

let nextId = 3;
const initialTasks = [
  { id: 0, text: 'Philosopher’s Path', done: true },
  { id: 1, text: 'Visit the temple', done: false },
  { id: 2, text: 'Drink matcha', done: false }
];
// AddTask.js
import { useState } from 'react';
export default function AddTask({ onAddTask }) {
const [text, setText] = useState('');
return (
<>
<input
placeholder="Add task"
value={text}
onChange={e => setText(e.target.value)}
/>
<button onClick={() => {
setText('');
onAddTask(text);
}}>Add</button>
</>
)
}// TaskList.js
import { useState } from 'react';
export default function TaskList({
tasks,
onChangeTask,
onDeleteTask
}) {
return (
<ul>
{tasks.map(task => (
<li key={task.id}>
<Task
task={task}
onChange={onChangeTask}
onDelete={onDeleteTask}
/>
</li>
))}
</ul>
);
}
function Task({ task, onChange, onDelete }) {
const [isEditing, setIsEditing] = useState(false);
let taskContent;
if (isEditing) {
taskContent = (
<>
<input
value={task.text}
onChange={e => {
onChange({
...task,
text: e.target.value
});
}} />
<button onClick={() => setIsEditing(false)}>
Save
</button>
</>
);
} else {
taskContent = (
<>
{task.text}
<button onClick={() => setIsEditing(true)}>
Edit
</button>
</>
);
}
return (
<label>
<input
type="checkbox"
checked={task.done}
onChange={e => {
onChange({
...task,
done: e.target.checked
});
}}
/>
{taskContent}
<button onClick={() => onDelete(task.id)}>
Delete
</button>
</label>
);
}리듀서는 이벤트 핸들러를 짧고 간결하게 유지하는 데 도움이 됨. 그러나 앱의 규모가 커짐에 따라 또 다른 어려움에 직면할 수 있음. 현재 tasks 상태와 디스패치 함수는 최상위 TaskApp 컴포넌트에서만 사용할 수 있음. 다른 컴포넌트가 tasks를 읽거나 변경할 수 있도록 하려면 현재 상태와 이를 변경하는 이벤트 핸들러를 프로퍼티로 명시적으로 전달해야 함.
예를 들어, TaskApp은 tasks와 이벤트 핸들러를 TaskList로 넘김:
<TaskList
  tasks={tasks}
  onChangeTask={handleChangeTask}
  onDeleteTask={handleDeleteTask}
/>
또 TaskList는 이벤트 핸듣러를 Task로 넘김:
<Task
  task={task}
  onChange={onChangeTask}
  onDelete={onDeleteTask}
/>
이와 같은 작은 예시에서는 괜찮지만 중간에 수십, 수백 개의 컴포넌트가 있는 경우 모든 상태와 함수를 전달하는 것은 상당히 답답할 수 있음!
그렇기 때문에 prop을 통해 전달하는 대신 tasks 상태와 디스패치 함수를 모두 컨텍스트에 넣는 것이 좋음. 이렇게 하면 트리의 TaskApp 아래에 있는 모든 컴포넌트가 반복적인 "prop drilling" 없이 tasks를 읽고 tasks를 디스패치할 수 있음.
리듀서와 컨텍스트를 결합하려면:
- 컨텍스트 생성
- 상태 및 디스패치를 컨텍스트에 넣음
- 트리의 어느 곳에서나 컨텍스트를 사용
Step 1: Create the context
useReducer Hook은 현재 tasks와, 이를 업데이트할 수 있는 dispatch 함수를 반환함:
const [tasks, dispatch] = useReducer(tasksReducer, initialTasks);
트리에 전달하기 위해 두 개의 컨텍스트를 별도로 생성해야함:
- TasksContext는 현재 tasks 목록을 제공
- TasksDispatchContext는 컴포넌트가 작업을 디스패치할 수 있는 함수를 제공
나중에 다른 파일에서 가져올 수 있도록 별도의 파일에서 관리할 것:
// TasksContext.js
import { createContext } from 'react';

export const TasksContext = createContext(null);
export const TasksDispatchContext = createContext(null);
두 컨텍스트 모두에 기본값으로 null을 전달하고 있지만, 실제 값은 TaskApp 컴포넌트에서 제공될 예정ㅇ.
Step 2: Put state and dispatch into context
이제 TaskApp 컴포넌트에서 두 컨텍스트를 모두 가져올 수 있음. useReducer()가 반환한 tasks와 디스패치를 가져와서 아래 전체 트리에 제공:
// App.js
import { useReducer } from 'react';
import AddTask from './AddTask.js';
import TaskList from './TaskList.js';
import { TasksContext, TasksDispatchContext } from './TasksContext.js';

export default function TaskApp() {
  const [tasks, dispatch] = useReducer(
    tasksReducer,
    initialTasks
  );

  function handleAddTask(text) {
    dispatch({
      type: 'added',
      id: nextId++,
      text: text,
    });
  }

  function handleChangeTask(task) {
    dispatch({
      type: 'changed',
      task: task
    });
  }

  function handleDeleteTask(taskId) {
    dispatch({
      type: 'deleted',
      id: taskId
    });
  }

  return (
    <TasksContext.Provider value={tasks}>
      <TasksDispatchContext.Provider value={dispatch}>
        <h1>Day off in Kyoto</h1>
        <AddTask
          onAddTask={handleAddTask}
        />
        <TaskList
          tasks={tasks}
          onChangeTask={handleChangeTask}
          onDeleteTask={handleDeleteTask}
        />
      </TasksDispatchContext.Provider>
    </TasksContext.Provider>
  );
}

function tasksReducer(tasks, action) {
  switch (action.type) {
    case 'added': {
      return [...tasks, {
        id: action.id,
        text: action.text,
        done: false
      }];
    }
    case 'changed': {
      return tasks.map(t => {
        if (t.id === action.task.id) {
          return action.task;
        } else {
          return t;
        }
      });
    }
    case 'deleted': {
      return tasks.filter(t => t.id !== action.id);
    }
    default: {
      throw Error('Unknown action: ' + action.type);
    }
  }
}

let nextId = 3;
const initialTasks = [
  { id: 0, text: 'Philosopher’s Path', done: true },
  { id: 1, text: 'Visit the temple', done: false },
  { id: 2, text: 'Drink matcha', done: false }
];
Step 3: Use context anywhere in the tree
이제 tasks 목록이나 이벤트 핸들러를 트리 아래로 전달할 필요가 없음. 대신 tasks 목록이 필요한 모든 컴포넌트는 TaskContext에서 해당 목록을 읽을 수 있음. tasks 목록을 업데이트하려면 모든 컴포넌트가 컨텍스트에서 디스패치 함수를 읽고 호출할 수 있음. 즉, TaskApp 컴포넌트는 어떠한 이벤트 핸들러도 전달하지 않으며, TaskList 역시 어떠한 이벤트 핸들러도 Task 컴포넌트로 전달하지 않음. 대신, 각 컴포넌트는 필요한 컨텍스트를 읽음:
// App.js
import { useReducer } from 'react';
import AddTask from './AddTask.js';
import TaskList from './TaskList.js';
import { TasksContext, TasksDispatchContext } from './TasksContext.js';

export default function TaskApp() {
  const [tasks, dispatch] = useReducer(
    tasksReducer,
    initialTasks
  );

  return (
    <TasksContext.Provider value={tasks}>
      <TasksDispatchContext.Provider value={dispatch}>
        <h1>Day off in Kyoto</h1>
        <AddTask />
        <TaskList />
      </TasksDispatchContext.Provider>
    </TasksContext.Provider>
  );
}

function tasksReducer(tasks, action) {
  switch (action.type) {
    case 'added': {
      return [...tasks, {
        id: action.id,
        text: action.text,
        done: false
      }];
    }
    case 'changed': {
      return tasks.map(t => {
        if (t.id === action.task.id) {
          return action.task;
        } else {
          return t;
        }
      });
    }
    case 'deleted': {
      return tasks.filter(t => t.id !== action.id);
    }
    default: {
      throw Error('Unknown action: ' + action.type);
    }
  }
}

const initialTasks = [
  { id: 0, text: 'Philosopher’s Path', done: true },
  { id: 1, text: 'Visit the temple', done: false },
  { id: 2, text: 'Drink matcha', done: false }
];
// TasksContext.js
import { createContext } from 'react';

export const TasksContext = createContext(null);
export const TasksDispatchContext = createContext(null);// AddTask.js
import { useState, useContext } from 'react';
import { TasksDispatchContext } from './TasksContext.js';
export default function AddTask() {
const [text, setText] = useState('');
const dispatch = useContext(TasksDispatchContext);
return (
<>
<input
placeholder="Add task"
value={text}
onChange={e => setText(e.target.value)}
/>
<button onClick={() => {
setText('');
dispatch({
type: 'added',
id: nextId++,
text: text,
});
}}>Add</button>
</>
);
}
let nextId = 3;// TaskList.js
import { useState, useContext } from 'react';
import { TasksContext, TasksDispatchContext } from './TasksContext.js';
export default function TaskList() {
const tasks = useContext(TasksContext);
return (
<ul>
{tasks.map(task => (
<li key={task.id}>
<Task task={task} />
</li>
))}
</ul>
);
}
function Task({ task }) {
const [isEditing, setIsEditing] = useState(false);
const dispatch = useContext(TasksDispatchContext);
let taskContent;
if (isEditing) {
taskContent = (
<>
<input
value={task.text}
onChange={e => {
dispatch({
type: 'changed',
task: {
...task,
text: e.target.value
}
});
}} />
<button onClick={() => setIsEditing(false)}>
Save
</button>
</>
);
} else {
taskContent = (
<>
{task.text}
<button onClick={() => setIsEditing(true)}>
Edit
</button>
</>
);
}
return (
<label>
<input
type="checkbox"
checked={task.done}
onChange={e => {
dispatch({
type: 'changed',
task: {
...task,
done: e.target.checked
}
});
}}
/>
{taskContent}
<button onClick={() => {
dispatch({
type: 'deleted',
id: task.id
});
}}>
Delete
</button>
</label>
);
}상태는 여전히 최상위 TaskApp 컴포넌트에 '존재'하며, useReducer로 관리됨. 하지만 이제 이러한 컨텍스트를 가져와서 사용하면 트리 아래의 모든 컴포넌트에서 tasks와 디스패치를 사용할 수 있음.
Moving all wiring into a single file
이렇게 할 필요는 없지만, 리듀서와 컨텍스트를 모두 단일 파일로 이동하여 구성 요소를 더욱 깔끔하게 정리할 수 있음. 현재 TasksContext.js에는 컨텍스트 선언이 두 개만 포함되어 있음:
import { createContext } from 'react';
export const TasksContext = createContext(null);
export const TasksDispatchContext = createContext(null);리듀서를 같은 파일로 옮기고, 같은 파일에 새 TasksProvider 컴포넌트를 선언. 이 컴포넌트가 모든 조각을 하나로 묶어줄 것:
- 리듀서로 상태를 관리
- TasksProvider는 아래 컴포넌트에 두 가지 컨텍스트를 모두 제공
- JSX를 전달할 수 있도록 자식을 prop으로 받음
이렇게 하면 TaskApp 컴포넌트에서 모든 복잡성이 제거됨:
// App.js
import AddTask from './AddTask.js';
import TaskList from './TaskList.js';
import { TasksProvider } from './TasksContext.js';

export default function TaskApp() {
  return (
    <TasksProvider>
      <h1>Day off in Kyoto</h1>
      <AddTask />
      <TaskList />
    </TasksProvider>
  );
}
// TaskContext.js
import { createContext, useReducer } from 'react';
export const TasksContext = createContext(null);
export const TasksDispatchContext = createContext(null);
export function TasksProvider({ children }) {
const [tasks, dispatch] = useReducer(
tasksReducer,
initialTasks
);
return (
<TasksContext.Provider value={tasks}>
<TasksDispatchContext.Provider value={dispatch}>
{children}
</TasksDispatchContext.Provider>
</TasksContext.Provider>
);
}
function tasksReducer(tasks, action) {
switch (action.type) {
case 'added': {
return [...tasks, {
id: action.id,
text: action.text,
done: false
}];
}
case 'changed': {
return tasks.map(t => {
if (t.id === action.task.id) {
return action.task;
} else {
return t;
}
});
}
case 'deleted': {
return tasks.filter(t => t.id !== action.id);
}
default: {
throw Error('Unknown action: ' + action.type);
}
}
}
const initialTasks = [
{ id: 0, text: 'Philosopher’s Path', done: true },
{ id: 1, text: 'Visit the temple', done: false },
{ id: 2, text: 'Drink matcha', done: false }
];// AddTask.js
import { useState, useContext } from 'react';
import { TasksDispatchContext } from './TasksContext.js';
export default function AddTask() {
const [text, setText] = useState('');
const dispatch = useContext(TasksDispatchContext);
return (
<>
<input
placeholder="Add task"
value={text}
onChange={e => setText(e.target.value)}
/>
<button onClick={() => {
setText('');
dispatch({
type: 'added',
id: nextId++,
text: text,
});
}}>Add</button>
</>
);
}
let nextId = 3;// TaskList.js
import { useState, useContext } from 'react';
import { TasksContext, TasksDispatchContext } from './TasksContext.js';
export default function TaskList() {
const tasks = useContext(TasksContext);
return (
<ul>
{tasks.map(task => (
<li key={task.id}>
<Task task={task} />
</li>
))}
</ul>
);
}
function Task({ task }) {
const [isEditing, setIsEditing] = useState(false);
const dispatch = useContext(TasksDispatchContext);
let taskContent;
if (isEditing) {
taskContent = (
<>
<input
value={task.text}
onChange={e => {
dispatch({
type: 'changed',
task: {
...task,
text: e.target.value
}
});
}} />
<button onClick={() => setIsEditing(false)}>
Save
</button>
</>
);
} else {
taskContent = (
<>
{task.text}
<button onClick={() => setIsEditing(true)}>
Edit
</button>
</>
);
}
return (
<label>
<input
type="checkbox"
checked={task.done}
onChange={e => {
dispatch({
type: 'changed',
task: {
...task,
done: e.target.checked
}
});
}}
/>
{taskContent}
<button onClick={() => {
dispatch({
type: 'deleted',
id: task.id
});
}}>
Delete
</button>
</label>
);
}TasksContext.js에서 컨텍스트를 사용하는 함수를 내보낼 수도 있음:
export function useTasks() {
  return useContext(TasksContext);
}

export function useTasksDispatch() {
  return useContext(TasksDispatchContext);
}
컴포넌트가 컨텍스트를 읽어야 하는 경우 다음과 같은 함수를 통해 이를 수행할 수 있음:
const tasks = useTasks();
const dispatch = useTasksDispatch();
이렇게 해도 똑같이 작동하지만, 나중에 이러한 컨텍스트를 더 분할하거나 이러한 함수에 로직을 추가할 수 있음. 이렇게 하면 컴포넌트를 깔끔하고 정돈된 상태로 유지하면서 데이터를 가져오는 위치가 아닌 표시되는 내용에 집중할 수 있음:
// App.js
import AddTask from './AddTask.js';
import TaskList from './TaskList.js';
import { TasksProvider } from './TasksContext.js';

export default function TaskApp() {
  return (
    <TasksProvider>
      <h1>Day off in Kyoto</h1>
      <AddTask />
      <TaskList />
    </TasksProvider>
  );
}
// TasksContext.js
import { createContext, useContext, useReducer } from 'react';
const TasksContext = createContext(null);
const TasksDispatchContext = createContext(null);
export function TasksProvider({ children }) {
const [tasks, dispatch] = useReducer(
tasksReducer,
initialTasks
);
return (
<TasksContext.Provider value={tasks}>
<TasksDispatchContext.Provider value={dispatch}>
{children}
</TasksDispatchContext.Provider>
</TasksContext.Provider>
);
}
export function useTasks() {
return useContext(TasksContext);
}
export function useTasksDispatch() {
return useContext(TasksDispatchContext);
}
function tasksReducer(tasks, action) {
switch (action.type) {
case 'added': {
return [...tasks, {
id: action.id,
text: action.text,
done: false
}];
}
case 'changed': {
return tasks.map(t => {
if (t.id === action.task.id) {
return action.task;
} else {
return t;
}
});
}
case 'deleted': {
return tasks.filter(t => t.id !== action.id);
}
default: {
throw Error('Unknown action: ' + action.type);
}
}
}
const initialTasks = [
{ id: 0, text: 'Philosopher’s Path', done: true },
{ id: 1, text: 'Visit the temple', done: false },
{ id: 2, text: 'Drink matcha', done: false }
];// AddTask.js
import { useState } from 'react';
import { useTasksDispatch } from './TasksContext.js';
export default function AddTask() {
const [text, setText] = useState('');
const dispatch = useTasksDispatch();
return (
<>
<input
placeholder="Add task"
value={text}
onChange={e => setText(e.target.value)}
/>
<button onClick={() => {
setText('');
dispatch({
type: 'added',
id: nextId++,
text: text,
});
}}>Add</button>
</>
);
}
let nextId = 3;// TaskList.js
import { useState } from 'react';
import { useTasks, useTasksDispatch } from './TasksContext.js';
export default function TaskList() {
const tasks = useTasks();
return (
<ul>
{tasks.map(task => (
<li key={task.id}>
<Task task={task} />
</li>
))}
</ul>
);
}
function Task({ task }) {
const [isEditing, setIsEditing] = useState(false);
const dispatch = useTasksDispatch();
let taskContent;
if (isEditing) {
taskContent = (
<>
<input
value={task.text}
onChange={e => {
dispatch({
type: 'changed',
task: {
...task,
text: e.target.value
}
});
}} />
<button onClick={() => setIsEditing(false)}>
Save
</button>
</>
);
} else {
taskContent = (
<>
{task.text}
<button onClick={() => setIsEditing(true)}>
Edit
</button>
</>
);
}
return (
<label>
<input
type="checkbox"
checked={task.done}
onChange={e => {
dispatch({
type: 'changed',
task: {
...task,
done: e.target.checked
}
});
}}
/>
{taskContent}
<button onClick={() => {
dispatch({
type: 'deleted',
id: task.id
});
}}>
Delete
</button>
</label>
);
}TasksProvider는 작업을 처리하는 방법을 알고 있는 화면의 일부로, useTasks는 작업을 읽는 방법으로, useTasksDispatch는 트리 아래의 모든 컴포넌트에서 작업을 업데이트하는 방법으로 생각할 수 있음.
Note
useTasks 및 useTasksDispatch와 같은 함수를 Custom Hooks라고 함. 함수의 이름이 use로 시작하면 사용자 정의 Hook으로 간주됨. 이를 통해 그 안에서 useContext와 같은 다른 Hook을 사용할 수 있음.
앱의 규모가 커지면서 이와 같은 컨텍스트-리듀서 쌍이 많이 생길 수 있음. 이는 트리 깊숙한 곳의 데이터에 액세스하고 싶을 때마다 많은 작업 없이 앱을 확장하고 상태를 끌어올릴 수 있는 강력한 방법!