참고:
ReactNative Naver Login
crossplatformkorea/react-native-naver-login
1. Install
필요한 라이브러리 설치
$ npm install @react-native-seoul/naver-login --savepod install
$ cd ios
$ pod install
$ cd ..
2. Info.plist
ios → [프로젝트 이름] → Info.plist
<key>CFBundleTypeRole</key>
<string>Editor</string>
<key>CFBundleURLName</key>
<string>{{ APP NAME }}</string>
<key>CFBundleURLSchemes</key>
<array>
	<string>{{ URL SCHEME }}</string>
</array>

...

<key>LSApplicationQueriesSchemes</key>
<array>
	<string>naversearchapp</string>
	<string>naversearchthirdlogin</string>
</array>- LSApplicationQueriesSchemes 하위 array는 한개여야 할 것
3. Add URL Scheme
xcode → [프로젝트 이름].xcworkspace → targets → [프로젝트 이름]
1. 탭 → Build Settings
플러스 버튼을 눌러 Add User-Defined Setting을 추가한다.

하단의 User-Defined에 새로운 칸이 생기면 다음과 같이 작성한다.
- 이름: APP_URL_SCHEME
- Debug Scheme : [스키마]-dev (형식은 자유다)
- Release Scheme : [스키마] (형식은 자유다)

2. 탭 → Info
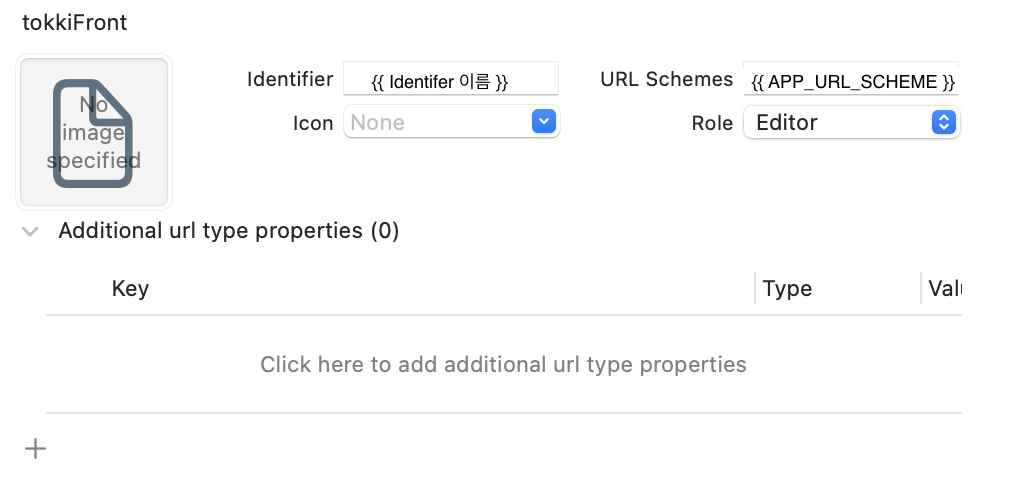
스크린 하단의 URL Types를 열고 플러스 버튼(+)을 눌러 타입을 추가한다.
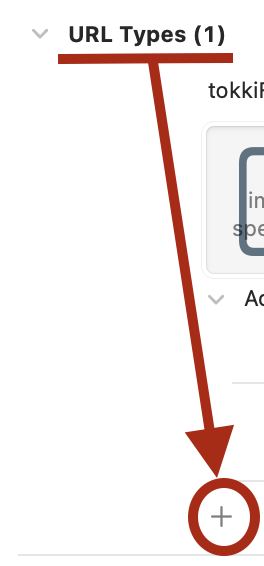
1번에서 작성한 APP_URL_SCHEME의 Release에 할당된 이름을 적고, Identifier를 적는다.
3. App.Delegate.mm
ios → [프로젝트 이름] → AppDelegate.mm
URL 핸들링 로직을 추가한다.
...

#import <NaverThirdPartyLogin/NaverThirdPartyLoginConnection.h>

...

- (BOOL)application:(UIApplication *)application
            openURL:(NSURL *)url
            options:(NSDictionary<UIApplicationOpenURLOptionsKey,id> *)options {
  return [[NaverThirdPartyLoginConnection getSharedInstance] application:application openURL:url options:options];
}
4. MainActivity.java
android → app → src → main → java/com/[프로젝트 이름] → MainActivity.java
...

import com.dooboolab.naverlogin.RNNaverLoginModule;
...

public class MainActivity extends ReactActivity {
	...

	@Override
  protected void onCreate(Bundle savedInstanceState) {
    super.onCreate(savedInstanceState);
    RNNaverLoginModule.initialize(this);
  }
}
5. 코드 작성!
Naver Developments → Application → 내 애플리케이션 → 애플리케이션 선택

const naverData = () => {
    const data = {
      consumerKey: NAVER_LOGIN_API_KEY,
      consumerSecret: NAVER_LOGIN_API_SECRET,
      appName: APP_NAME,
    };
    if (Platform.OS === 'ios') {
      return {
        ...data,
        serviceUrlScheme: NAVER_LOGIN_URL_SCHEME,
      };
    }
    return data;
  };
const naverLogin = async () => {
const {successResponse, failureResponse} = await NaverLogin.login({
...naverData(),
});
if (successResponse) {
setToken(successResponse.accessToken)
}
...
};끝!
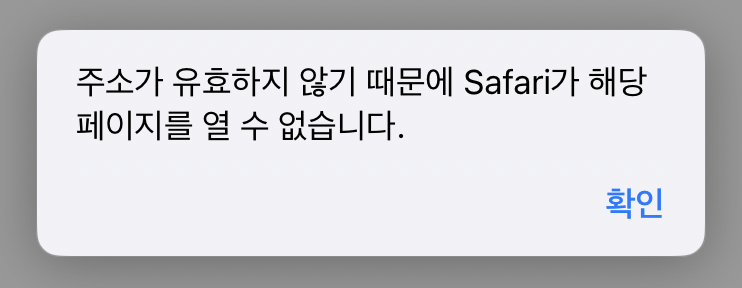
⚠️ 주소가 유효하지 않기 때문에 Safari가 해당 페이지를 열 수 없습니다.
사파리만 그런지 모르겠는데 로그인 후에 앱으로 돌아가지 않는다. 해결 중. (11/25)
✚ 해결!
코드를 수정했더니 정상적으로 작동한다. (11/26)
- Info.plist의 기존 TypeRole, URLName, URLSchemes를 CFBundleURLTypes key 안에 array와 dict로 감싸 넣는 것으로 수정!
v <key>CFBundleURLTypes</key>
v	<array>
v		<dict>
			<key>CFBundleTypeRole</key>
			<string>Editor</string>
			<key>CFBundleURLName</key>
			<string>naver</string>
			<key>CFBundleURLSchemes</key>
			<array>
				<string>{{ Custom URL Scheme }}</string>
			</array>
v		</dict>
v </array>- 다른 로그인 코드도 들어갈 것을 감안하여 if 조건문을 사용해서 return문을 분리하였다.
// 기존의 AppDelegate.mm

return [[NaverThirdPartyLoginConnection getSharedInstance] application:application openURL:url options:options];
// 변경된 AppDelegate.mm
if ([url.scheme isEqualToString:@"{{ CUSTOM URL SCHEME }}"]) {
return [[NaverThirdPartyLoginConnection getSharedInstance] application:application openURL:url options:options];
}
return YES;
👩🏻💻🌱