클라이언트와 서버 프로그램을 모두 개발할 수 있는 node.js를 배워보자
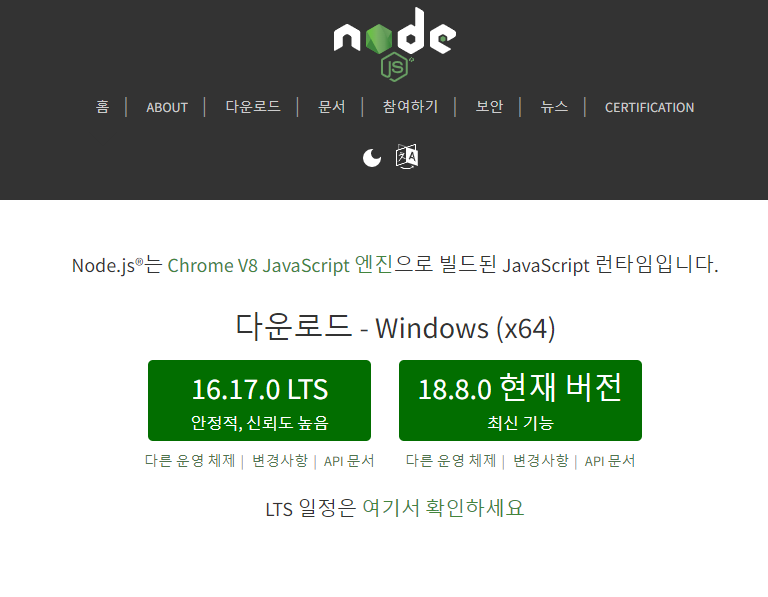
node.js 설치

자바 스크립트랑 문법이 똑같음
메일 보내는 프로그램 만들기
npm => node.js 프로그램 매니저
ex) npm nodemailer => 이렇게 구글 검색하면 된다!

이렇게 npm을 적어서 터미널 창에 적어주면 설치끝
const nodemailer = require('nodemailer');
const email = { // mailtrap을 이용하여 생성
    host: "smtp.mailtrap.io",
    port: 2525,
    auth: {
      user: "f4eebf7d4b8e18",
      pass: "e80955f6356c63"
    }
  };

const send = async(option) => {
    nodemailer.createTransport(email).sendMail(option, (error, info) => {
        if(error){
            console.log(error);
        }else{
            consolse.log(info);
            return info.response;
        }
    });
};

let email_data = {
    from: '1x2z@naver.com',
    to: '1x2z@naver.com',
    subject: '테스트 메일 입니다.',
    text: 'node.js 한시간안에 끝내보자.'
}

send(email_data);
모듈을 이용하여 아주 쉽고 빠르게 메일 프로그램 구현
=> node.js의 장점 npm 검색만으로 다양한 기능을 아주 빠르게 구현할 수 있다
서버 구축
npm 설치를 통하여 간단한 서버 구축이 가능하다
터미널창에 npm express 서버 구축 모듈을 깔아준다
npm install express --savehttp://expressjs.com/ko/guide/routing.html => 요기서 코드를 긁어와 준다
app.listen(3000, () => {
    console.log('Start Server : localhost : 3000')
    });

app.set('views', __dirname+'/views'); // 경로 설정
app.set('view engine', 'ejs'); // ejs : html 안에서 javascript 를 쓸수있게 해주는 것
app.engine('html', require('ejs').renderFile); // 엔진설정
이런식으로 포트설정과 html 폴더 경로 설정을 해주고 엔진 설정을 해준다

이렇게 views 폴더를 만들어 놓고 안에 index.html 파일을 만든다
<!DOCTYPE html>
<html lang="en">
<head>
    <meta charset="UTF-8">
    <meta http-equiv="X-UA-Compatible" content="IE=edge">
    <meta name="viewport" content="width=device-width, initial-scale=1.0">
    <title>Document</title>
</head>
<body>
    <h1>About page</h1>
</body>
</html>
html로 간단한 페이지 만들기
app.listen(3000, () => {
    console.log('Start Server : localhost : 3000')
    });

app.set('views', __dirname+'/views'); // 경로 설정
app.set('view engine', 'ejs'); // ejs : html 안에서 javascript 를 쓸수있게 해주는 것
app.engine('html', require('ejs').renderFile); // 엔진설정

app.get('/', function (req,res) {
    res.render('index.html')
});

app.get('/about', function (req,res) {
    res.render('about.html')
});
그리고 / 경로로 들어왔을때 화면이 보일 수 있게 app.get으로 경로를 설정해 주고 res.render로 index.html 파일을 랜딩 해준다.
DB 연동
db 연동에 앞서 mysql을 설치해 주자
코드를 입력하세요https://dev.mysql.com/downloads/mysql/
여기로 접속후
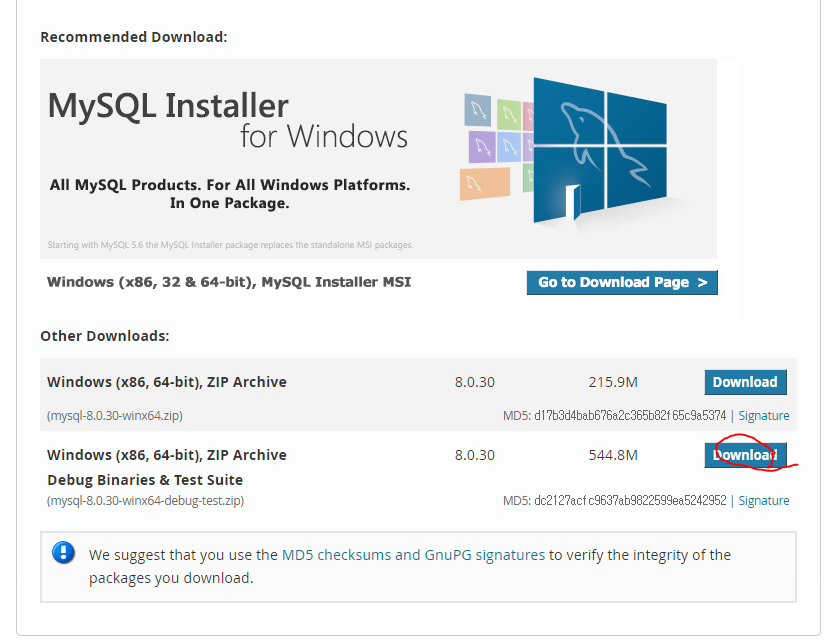
클릭
이후로는 이분것을 따라해준다
그후에 mysql workbench를 열어서 root 계정 접속후
show databases;

use mysql; /*mysql db 사용 */

select user, host from user;

create user 'scy'@'%' identified by '비밀번호'; /*유저생성 */

grant all privileges on *.* to 'scy';

grant all privileges on *.* to 'scy'@localhost; /*생성 계정에 모든 권한 부여 */

flush privileges;  /*권한 부여 내용 메모리 반영 */

show grants for scy@localhost; /*권한 확인 */

show grants for scy;

create database scy_database; /*데이터 베이스 생성 */

use scy_database; /* scy_database 데이터 베이스 사용 */

SELECT * FROM scy_database.test;

commit;

alter user 'scy'@localhost identified with mysql_native_password by '비밀번호'; /*Node.js 에서 사용하기 위하여 설정*/
이렇게 차례대로 쿼리를 써주고

이렇게 test 테이블을 만들어주면 준비끝!
npm install mysql --save커맨드 창에 입력하여 db연결 npm을 설치해 주고
https://www.npmjs.com/package/mysql#install
여기서 코드를 긁어와 주자
app.listen(3000, () => {
    console.log('Start Server : localhost : 3000')
    });

app.set('views', __dirname+'/views'); // 경로 설정
app.set('view engine', 'ejs'); // ejs : html 안에서 javascript 를 쓸수있게 해주는 것
app.engine('html', require('ejs').renderFile); // 엔진설정

app.get('/', function (req,res) {
    res.render('index.html')
});

app.get('/about', function (req,res) {
    res.render('about.html')
});

var mysql = require('mysql');
var pool  = mysql.createPool({
  connectionLimit : 10,
  host            : 'localhost',
  user            : 'scy',
  password        : '0429',
  database        : 'scy_database'
}); // db 정보

app.get('/db', function (req,res) {
    pool.getConnection(function(err, connection) {
        if (err) throw err; // not connected!

        // Use the connection
        connection.query('SELECT * FROM Test', function (error, results, fields) {
          res.send(JSON.stringify(results))
          console.log('results',results);
            // When done with the connection, release it.
          connection.release();

          // Handle error after the release.
          if (error) throw error;

          // Don't use the connection here, it has been returned to the pool.
        });
      });
});
기존 server.js에 /db 경로를 추가하고 db 정보를 입력후 쿼리를 입력하고 가져온 정보를 res.send로 JSON 타입으로 화면에 표시해 준다.
이렇게 Node.js로 간단한 서버를 구축하고 db연결 까지 해보았다.
오랜만에 코드 칠려니 단축키도 까먹고 말이 아니다.
mysql 까는데도 1시간 걸렸다....
node.js 사용해보니 첫인상은 진짜 간단하는 느낌이 들었다 좀더 공부해 보겠다.
-끝-
