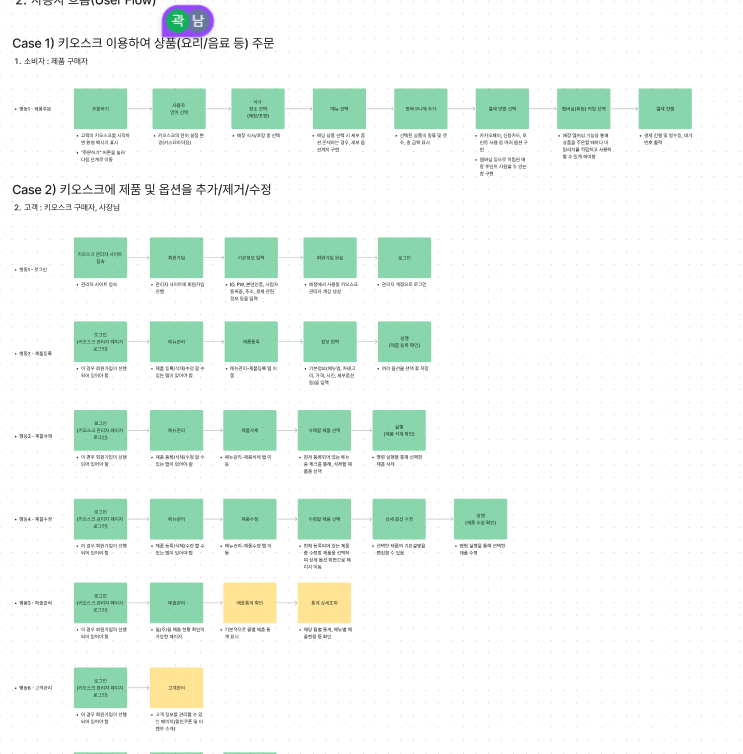
윤홍님이 유저 플로우 짜주신 것
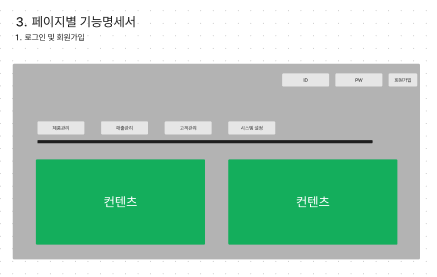
1. 홈 화면 html
레이아웃 나누기
--💥💥💥💥💥
버튼 구현 하고 보고 싶었는데 계속 그전에 했던 blog 파일만 떠서 왜 그러지 하고 여쭤보았는데
import { Routes } from '@angular/router';

export const routes: Routes = [
    {
        path: 'blog',
        loadComponent: () => import('./pages/blog/blog.component').then(c => c.BlogComponent)
    },
    {
        path: 'spaced',
        loadComponent: () => import('./pages/spaced/spaced.component').then(c => c.SpacedComponent)
    },
    {
        path: 'home',
        loadComponent: () => import('./pages/home/home.component').then(c => c.HomeComponent)
    },
    {
        path: '',
        pathMatch: 'full',
        redirectTo: 'home'
    }
localhost:4200 ⇒ 의 연결이 blog 파일로 연결로 되어서 그런거였음
path : ‘’ 가 localhost:4200 뒤에 지정해주는 파일 명을 쓰면 연결이 된다고 생각하면 됨
파일 명을 쓰고
loadComponent 를 하여 보내는 파일이 html 파일인 home 콤포넌트로 보낸다
아직 자바스크립트.. 타입 스크립트는 어려워서 우선 화면 구현이 목적이기 때문에
이것은 앵귤러 공식문서를 통해 다음에 공부해보겠다.

왼쪽으로 마진 20 남기고 정렬을 해야함

2. nav
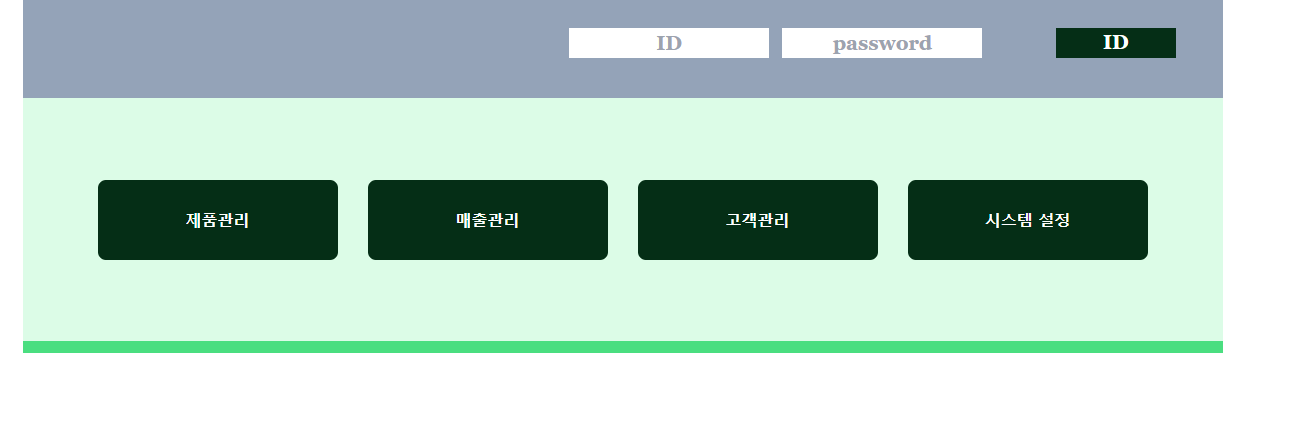
 <nav class="w-[1200px] items-center">
    <ul class="h-[243px] bg-green-100 flex items-center justify-center">
      <li>
        <a href="#"
          ><button
            class="w-[240px] h-[80px] bg-green-950 text-white font-bold rounded-lg mr-[15px]"
          >
            제품관리
          </button></a
        >
      </li>
      <li>
        <a href="#"
          ><button
            class="w-[240px] h-[80px] bg-green-950 text-white font-bold rounded-lg mx-[15px]"
          >
            매출관리
          </button></a
        >
      </li>
      <li>
        <a href="#"
          ><button
            class="h-[80px] bg-green-950 text-white font-bold rounded-lg mx-[15px] w-[240px]"
          >
            고객관리
          </button></a
        >
      </li>
      <li>
        <a href="#"
          ><button
            class="h-[80px] bg-green-950 text-white font-bold rounded-lg ml-[15px] w-[240px]"
          >
            시스템 설정
          </button></a
        >
      </li>
    </ul>
    <p class="border-8 border-green-400 border-solid mx-0 my-0 border-b-4"></p>
  </nav>
3. main - article

chan