학습에 걸린 총 시간 59.41h
논문에서는 300Epoch까지 진행하였으나 테스트로는 100Epoch까지만 진행.
train 환경 구성
GPU : Geforce 4070 super
anaconda3 가상환경
python : 3.12.3
github의 requirement.txt 설치
pytorch 설치 : pip3 install torch torchvision torchaudio --index-url https://download.pytorch.org/whl/cu118

학습 종료 CLI
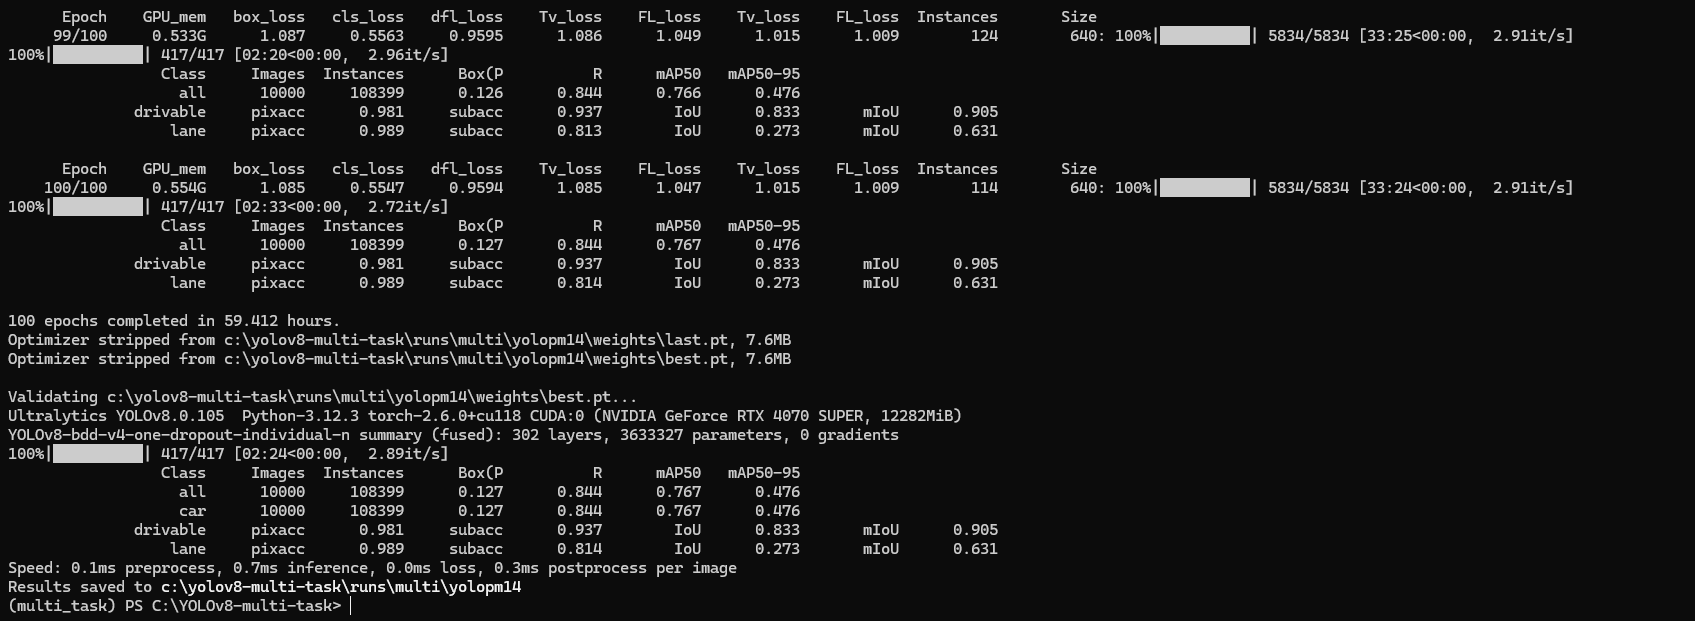
학습 결과
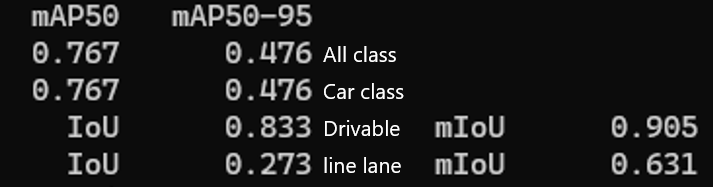
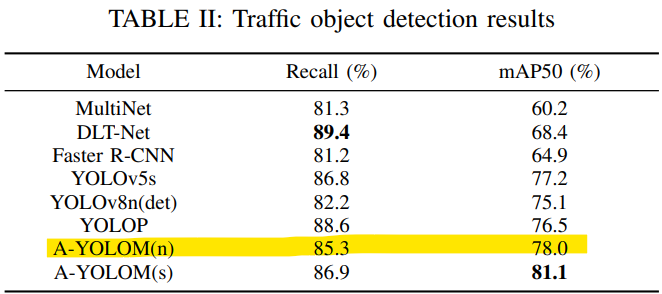
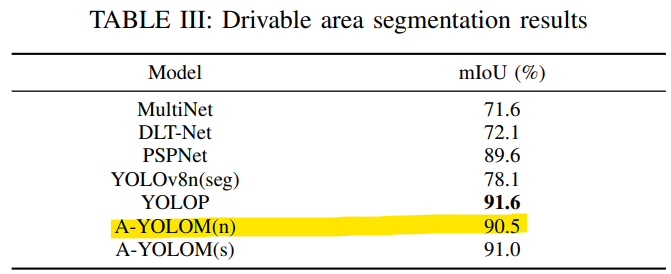
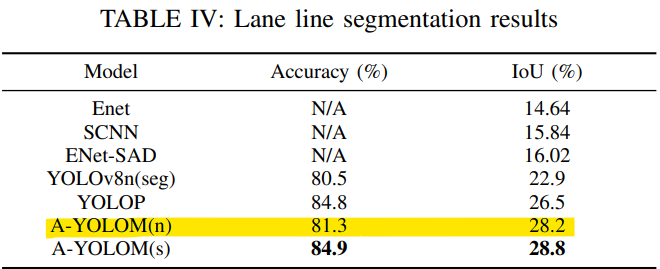
논문에서의 결과 (mIoU와 IoU에 대해 동일한 값으로 판단하지 않도록 유의)
A-YOLOM(n) 모델에 대하여 인접하거나 살짝 낮은 결과값을 보임 loss값 추세와 결과물을 확인하였을 때 300Epoch 진행시 논문과 동일한 성능을 가질 것으로 예상된다.
predict 환경 구성
anaconda3 가상환경
python : 3.12.3
github의 requirement.txt 설치
pytorch : 2.2.0 + cu118
torchaudio : 2.2.0 + cu118
torchvision : 0.17.0 + cu118
ultralytics 라이브러리를 pip install로 다운로드 받을 시 sys.path.insert로 경로를 설정해주어도 Anaconda환경에서 먼저 라이브러리를 찾게 되므로 pip install ultralytics 커멘드는 사용하지 말아야 함.
테스트 입력 이미지 사이즈 1280*720 고정
이미지를 Input으로 진행할 때 코드
import sys
import torch

sys.path.insert(0, "C:/YOLOv8-multi-task/ultralytics")

from ultralytics import YOLO

number = 3 #input how many tasks in your work
model = YOLO('C:/YOLOv8-multi-task/runs/multi/yolopm14/weights/best.pt')  # Validate the model
model.predict(source='./img_path', imgsz=(384,672), device=0,name='output_path', save=True, conf=0.25, iou=0.45, show_labels=False, speed=True)
폴더를 경로에 입력해주면 폴더 내부에 있는 모든 이미지에 대해서 예측 작업을 진행해준다.
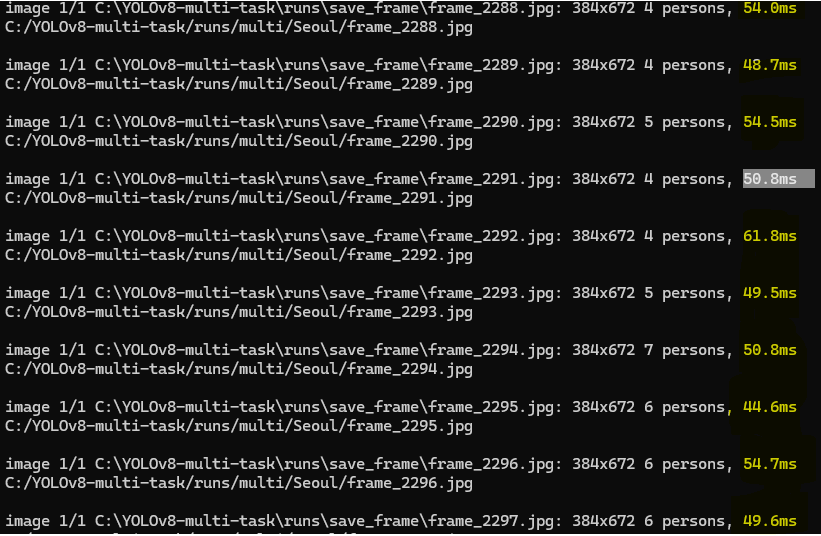
동영상을 Input으로 진행할 때 코드
import cv2
import time
import sys

sys.path.insert(0, "C:/YOLOv8-multi-task/ultralytics")

from ultralytics import YOLO

number = 3 #input how many tasks in your work
model = YOLO('C:/YOLOv8-multi-task/runs/multi/yolopm14/weights/best.pt')  # Validate the model

# Open the video file
video_path = "C:/yolov10/Seoul_30fps.mp4"
cap = cv2.VideoCapture(video_path)

# Get video properties
fps = cap.get(cv2.CAP_PROP_FPS)  # Frame rate
width = int(cap.get(cv2.CAP_PROP_FRAME_WIDTH))  # Frame width
height = int(cap.get(cv2.CAP_PROP_FRAME_HEIGHT))  # Frame height

# Define the codec and create VideoWriter object
fourcc = cv2.VideoWriter_fourcc(*'mp4v')  # Codec for mp4
output_path = "Seoul_predict.mp4"
out = cv2.VideoWriter(output_path, fourcc, fps, (width, height))

black= (0, 0, 0)
font =  cv2.FONT_HERSHEY_PLAIN

frame_number = 0

# Loop through the video frames
while cap.isOpened():
    # Read a frame from the video
    start_time = time.time()
    success, frame = cap.read()

    if success:
        #Mat객체를 넣어야 하는데 source에는 jpg형태의 객체만 받아들임.
        cv2.imwrite("./runs/save_frame/frame_" + str(frame_number) + ".jpg", frame)
        model.predict(source="./runs/save_frame/frame_" + str(frame_number) + ".jpg",
            imgsz=(384,672), device=0, name='Seoul', save=True, conf=0.25, iou=0.45, show_labels=False, speed=True)

        print("C:/YOLOv8-multi-task/runs/multi/Seoul/frame_" + str(frame_number) + ".jpg")
        annotated_frame = cv2.imread("C:/YOLOv8-multi-task/runs/multi/Seoul/frame_" + str(frame_number) + ".jpg")

        cv2.imshow("YOLO Inference", annotated_frame)

        frame_number+=1

        end_time = time.time() - start_time
        end_time = f"{end_time * 1000: .2f}"

        annotated_frame = cv2.putText(annotated_frame, "inference and process time :"
                                       + str(end_time) + "ms", (20, 40), font, 2, black, 1, cv2.LINE_AA)

        # Write the annotated frame to the output video
        out.write(annotated_frame)

        # Display the annotated frame
        #cv2.imshow("YOLO Inference", annotated_frame)

        # Break the loop if 'q' is pressed
        if cv2.waitKey(10) & 0xFF == ord("q"):
            break
    else:
        # Break the loop if the end of the video is reached
        break

cap.release()
out.release()
cv2.destroyAllWindows()
불필요한 작업을 진행(저장 -> 호출 -> 저장)하느라 frame당 시간이 오래 걸리는 것을 확인할 수 있다.
frame당 순수한 예측 작업은 평균적으로 50ms 초중반대가 나온다.