권한 부여 서버로는 이전에 구현한 권한 부여 서버를 사용한다.
리소스 서버의 예제 엔드포인트
@RestController
public class DemoController {
    @GetMapping("/demo")
    public Authentication demo(Authentication a) {
        return a;
    }
}
리소스 서버의 ProjectConfig
@Configuration
public class ProjectConfig {
    @Value("${keySetURI}")
    private String keySetURI;

    @Bean
    public SecurityFilterChain securityFilterChain(HttpSecurity http) throws Exception {
        http.oauth2ResourceServer(
                c->c.jwt(
                        j->j.jwkSetUri(keySetURI)
                )
        );

        http.authorizeHttpRequests(
                authorizeRequests -> authorizeRequests.anyRequest().authenticated()
        );

        return http.build();
    }
}
oauth2ResourceServer는 http basic, loginform처럼 인증 필터을 등록하는 메서드다.
Authorization헤더에 Bearer를 접두사로 붙여 access_token을 넣으면 된다.
jwt의 유효성 검증을 위해 공개 키가 필요한데 이는 권한 부여 서버에서 JWKSource 등록을 했기 때문에 아래 엔드포인트로 제공한다.
keySetURI=http://localhost:8080/oauth2/jwkskeySetURI=http://localhost:8080/oauth2/jwksauthorizeHttpRequests를 통해 모든 엔드포인트를 인증이 필요한 엔드포인트로 등록한다.
사용자 정의 jwt사용
http.oauth2ResourceServer는 기본 동작으로 authentication 객체로 JwtAuthenticationToken을 사용한다.
Security Context는 authentication 객체를 저장하기 때문에 사용자 정의 필드를 정의한 커스텀 authentication객체가 있어야한다.
public class CustomAuthentication extends JwtAuthenticationToken {
    private final String priority;
    public CustomAuthentication(Jwt jwt, Collection<? extends GrantedAuthority> authorities, String priority) {
        super(jwt, authorities);
        this.priority = priority;
    }

    public String getPriority() {
        return priority;
    }
}
http.oauth2ResourceServer의 동작을 authentication 객체로 CustomAuthentication을 사용하게 해야한다.
spring security는 하지만 커스텀 jwt로 CustomAuthentication을 변환하는 방법을 모른다.
따라서 컨버터를 등록해야한다
@Component
public class JwtAuthenticationConverter implements Converter<Jwt, CustomAuthentication> {
    @Override
    public CustomAuthentication convert(Jwt source) {
        List<GrantedAuthority> authorities = List.of(()->"read");
        String priority = String.valueOf(source.getClaims().get("priority"));

        return new CustomAuthentication(source, authorities, priority);
    }
}
컨버터 사용
@Configuration
@RequiredArgsConstructor
public class ProjectConfig {
    @Value("keySetURI")
    private String keySetURI;

    private final JwtAuthenticationConverter jwtAuthenticationConverter;

    @Bean
    public SecurityFilterChain securityFilterChain(HttpSecurity http) throws Exception {
        http.oauth2ResourceServer(
                c->c.jwt(
                        j->j.jwkSetUri(keySetURI)
                            .jwtAuthenticationConverter(jwtAuthenticationConverter)
                )
        );
권한 부여 서버에서 커스텀 jwt를 사용하기 위해서 필요한 context Bean
@Bean
public OAuth2TokenCustomizer<JwtEncodingContext> jwtCustomizer() {
return context -> {
JwtClaimsSet.Builder claims = context.getClaims();
claims.claim("priority", "HIGH");
};
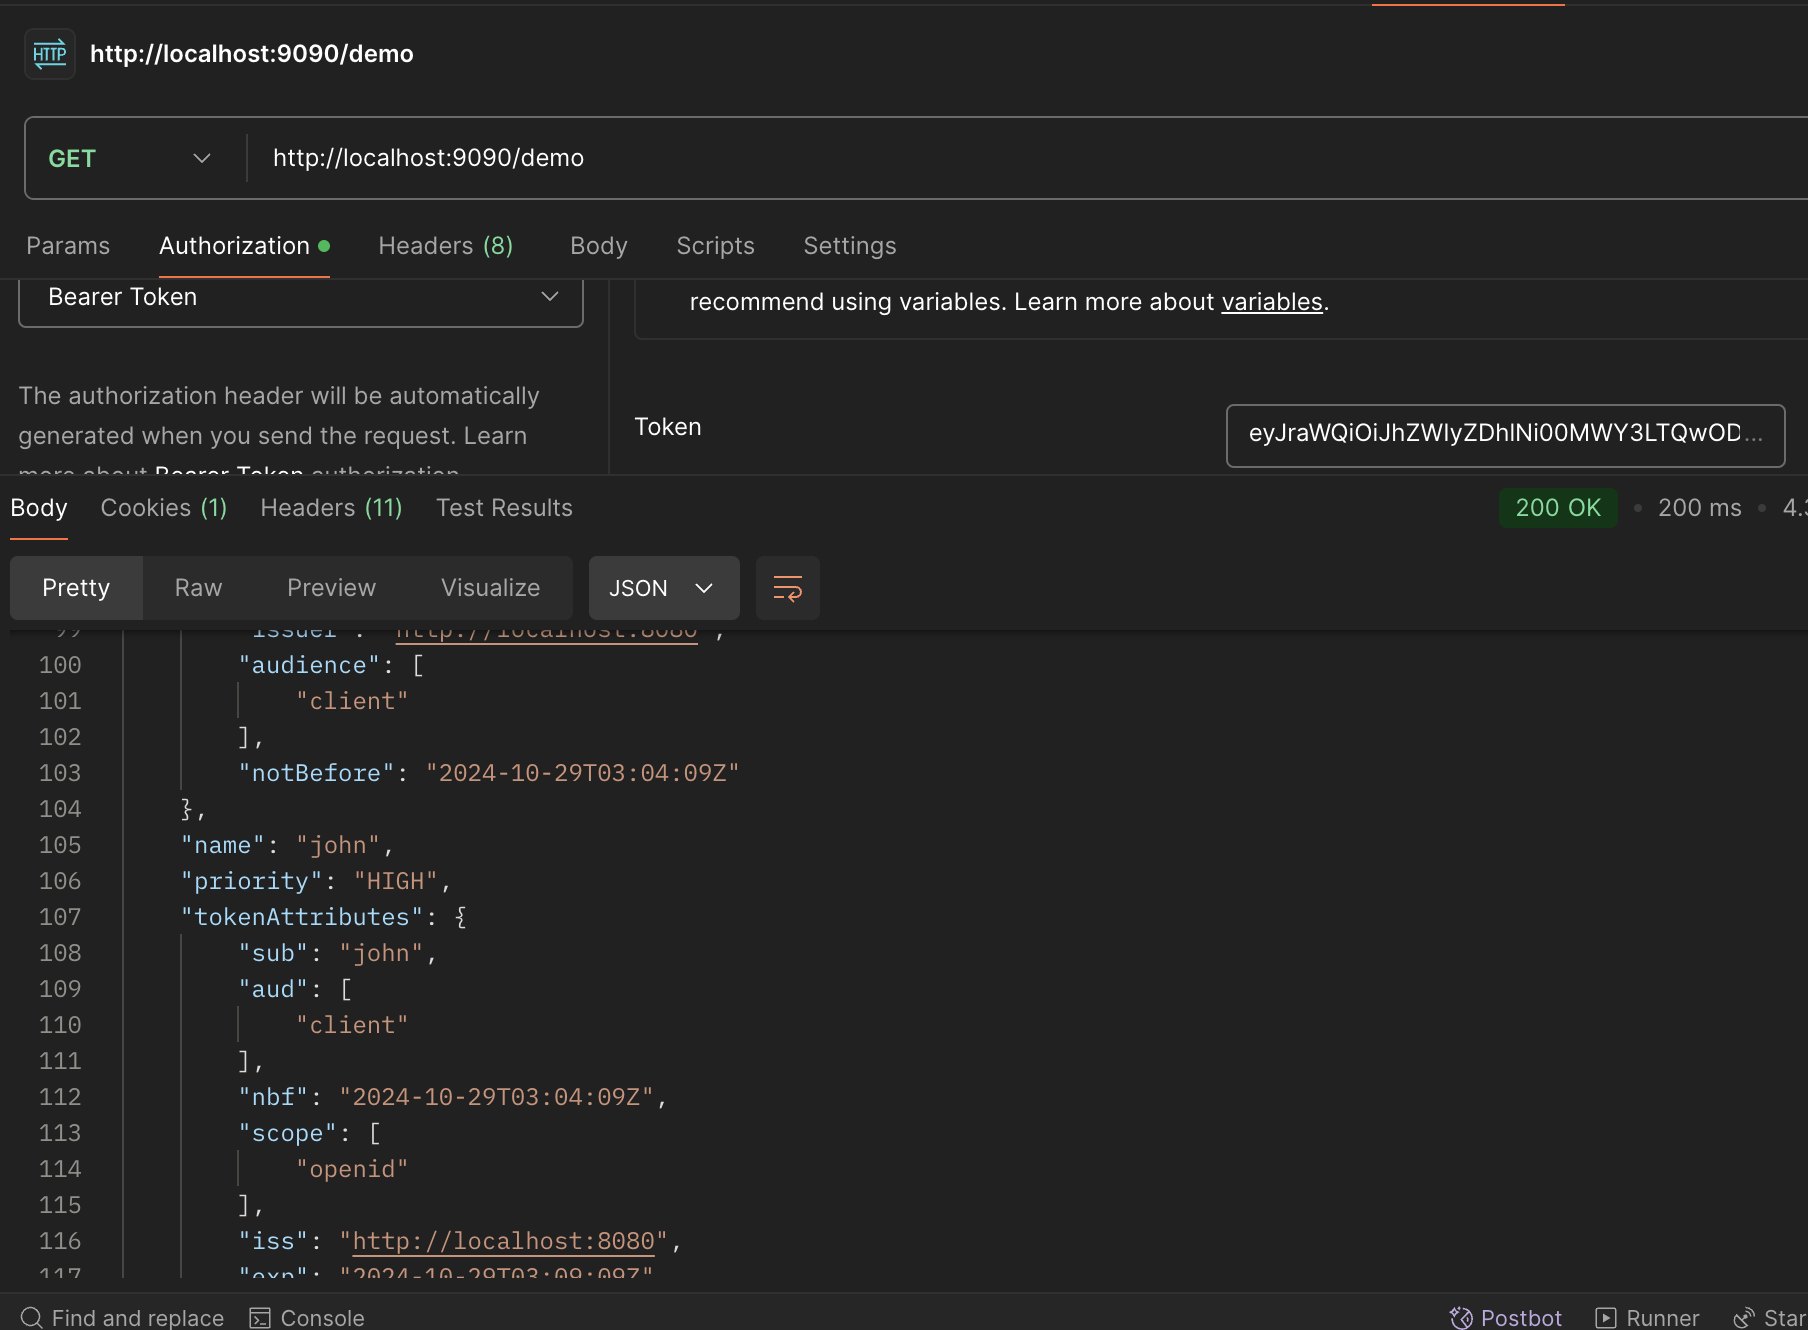
}작동 확인
클라이언트가 없기 때문에 이전 방법대로 access_token을 구하고 구한 access_token으로
아래와 같은 요청을 보낸다.
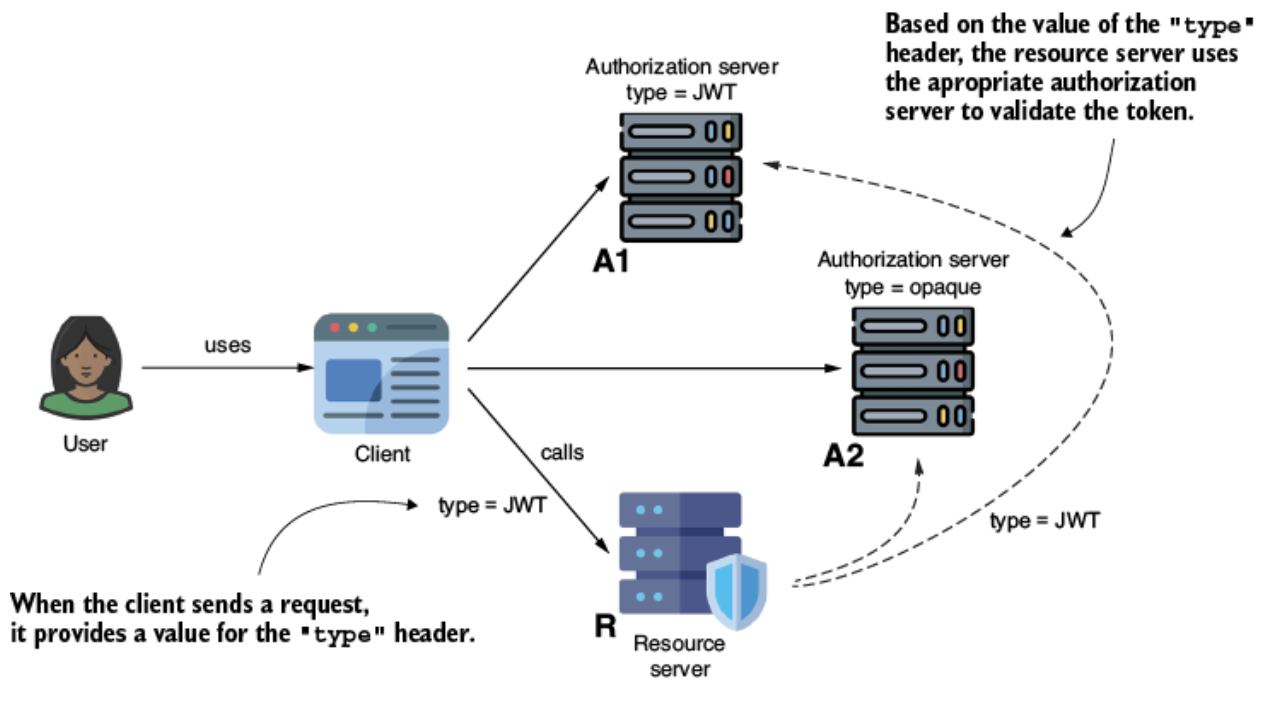
멀티테넌트 시스템
인증을 위해 권한 부여 서버에 의존해야될때도 발생한다.
리소스 서버는 어떤 권한 부여 서버를 사용하여 인증을 처리할지 정해야한다.
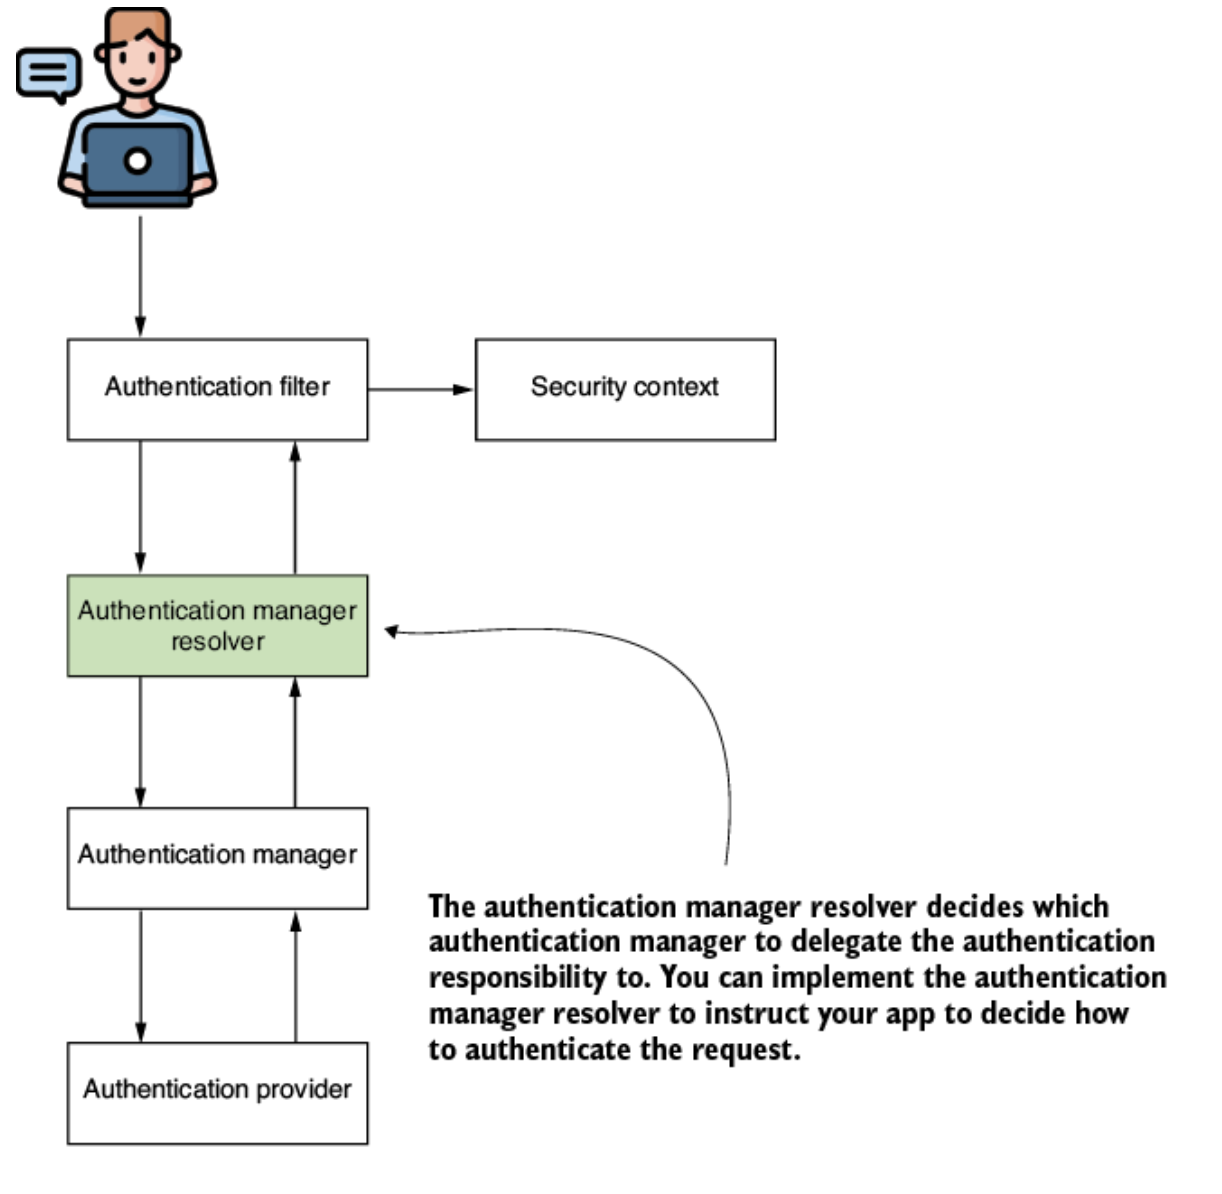
Authentication Manager는 인증의 책임을 가진다.
인증 타입에 따라 Authentication Manager을 여러개 구성하여 다양한 종류의 인증을 처리하고자 한다.
리졸버를 등록해서 필터가 어떤 Authentication Manager를 선택해야할지 정한다.
리졸버 구현
    @Bean
    public AuthenticationManagerResolver<HttpServletRequest> authenticationManagerResolver(
            JwtDecoder jwtDecoder,
            OpaqueTokenIntrospector introspector
    ) {
        AuthenticationManager jwtAuth = new ProviderManager(new JwtAuthenticationProvider(jwtDecoder));
        AuthenticationManager opaqueTokenAuth = new ProviderManager(new OpaqueTokenAuthenticationProvider(introspector));

        return (request) -> {
            if("jwt".equals(request.getHeader("type"))) {
                return jwtAuth;
            } else {
                return opaqueTokenAuth;
            }
        };
    }
request의 헤더의 type필드를 보고 jwt이면 jwtAuth로 opaqueToken이면 opaqueTokenAuth로 Authentication Manager를 선택한다.
jwtAuth가 유효검증을 하기 위해서는 공개키가 있어야되기 때문에 jwtDecoder를 매개변수로 넘겼다.
    @Bean
    public JwtDecoder jwtDecoder() {
        return NimbusJwtDecoder.withJwkSetUri(keySetURI).build();
    }
opaqueToken이면 introspection를 통해 유효성 검증이 필요하기 때문에 introspector를 매개변수로 넘겼다.
    @Bean
    public OpaqueTokenIntrospector opaqueTokenIntrospector() {
        return new SpringOpaqueTokenIntrospector(
                introspectUri, clientId, clientSecret
        );
    }
introspectUri는 jwt권한 부여 서버와 다르게 임의로 localhost:7070을 설정했다.
기본설정 엔드포인트는 /outh2/introspect이다
intropect를 위해서는 클라이언트 자격증명이 필요하기 때문에 리소스서버를 클라이언트로 등록하고 clientId,clientSecret을 매개변수로 넘겨준다.
SecurityChain설정
사용자 정의를 한 AuthenticationManagerResolver을 필터에 설정
    @Bean
    public SecurityFilterChain securityFilterChain(HttpSecurity http)
            throws Exception {

        http.oauth2ResourceServer(
                j -> j.authenticationManagerResolver(
                        authenticationManagerResolver(
                                jwtDecoder(),
                                opaqueTokenIntrospector()
                        ))
        );

        http.authorizeHttpRequests(
                c -> c.anyRequest().authenticated()
        );

        return http.build();
    }