
문과 vs 이과
문과 : 일단 외우고 나서, 이해하기 시작
이과 : 일단 원리를 파악하고 나서, 원리를 적용해가며 이해하기 시작
- 프로그래밍은 작은 원리를 적용하는 방법을 익히고, 연습을 통해 익숙해져야함
자료 구조
용어 : 자료구조, 데이터구조, data structure
대량의 데이터를 효율적으로 관리할 수 있는 데이터의 구조를 의미
코드 상에서 효율적으로 데이터를 처리하기 위해, 데이터 특성에 따라, 체계적으로 데이터를 구조화해야함.
어떤 데이터 구조를 사용하느냐에 따라, 코드 효율이 달라짐
-
대표적인 자료구조 : 배열, 스택, 큐, 링크드 리스트, 해쉬 테이블, 힙...
-
알고리즘 : 어떤 문제를 풀기 위한 절차 / 방법
어떤 문제에 대해, 특정한 '입력'을 넣으면 원하는 '출력'을 얻을 수 있도록 만드는 프로그래밍
자료구조 - 배열
1. 배열은 왜 필요할까?
- 같은 종류의 데이터를 효율적으로 관리하기 위해 사용
- 같은 종류의 데이터를 순차적으로 저장 (흩어져 있지 않고)
- 장점:
- 빠른 접근 가능
- 첫 데이터의 위치에서 상대적인 위치로 데이터 접근(인덱스 번호로 접근)
- 빠른 접근 가능
- 단점:
- 데이터 추가/삭제의 어려움
- 미리 최대 길이를 지정해야 함
- 데이터 추가/삭제의 어려움
- C 언어 예: 영어 단어 저장 => 미리 사이즈를 결정함 : 본래의 배열은 미리 길이를 정해놓고 값을 대입해야했음
#include <stdio.h>

int main(int argc, char * argv[])
{
    char country[3] = "US";
    printf ("%c%c\n", country[0], country[1]);
    printf ("%s\n", country);
    return 0;
}- 파이썬 언어 예: 영어 단어 저장
country = 'US'
print (country)
2. 파이썬에서의 배열
- 파이썬에서는 리스트로 배열 구현 가능
1차원 배열: 리스트로 구현시
data_list = [1, 2, 3, 4, 5]
data_list
2차원 배열: 리스트로 구현시
data_list = [[1, 2, 3], [4, 5, 6], [7, 8, 9]]
data_list
2차원 배열 => 대괄호가 2개
-
유사한 데이터를 연결된 데이터 공간에 넣을 수 있는 것 : 배열
-
최대 길이를 알지 못하면 추가/ 수정이 어렵다.
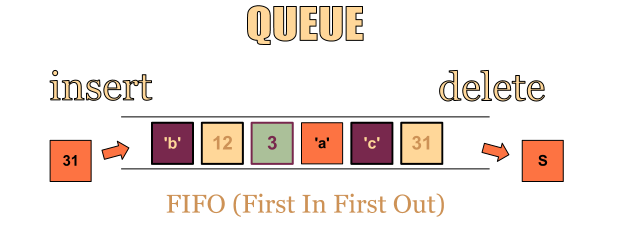
자료구조 - 큐(Queue)
1. 큐 구조
- 줄을 서는 행위와 유사
- 가장 먼저 넣은 데이터를 가장 먼저 꺼낼 수 있는 구조
- 추출된 값은 list에서 삭제됨
- 음식점에서 가장 먼저 줄을 선 사람이 제일 먼저 음식점에 입장하는 것과 동일
- FIFO(First-In, First-Out) 또는 LILO(Last-In, Last-Out) 방식으로 스택과 꺼내는 순서가 반대
2. 알아둘 용어
- Enqueue: 큐에 데이터를 넣는 기능
- Dequeue: 큐에서 데이터를 꺼내는 기능
3. 파이썬 queue 라이브러리 활용해서 큐 자료 구조 사용하기
- queue 라이브러리에는 다양한 큐 구조로 Queue(), LifoQueue(), PriorityQueue() 제공
- 프로그램을 작성할 때 프로그램에 따라 적합한 자료 구조를 사용
- Queue(): 가장 일반적인 큐 자료 구조
- LifoQueue(): 나중에 입력된 데이터가 먼저 출력되는 구조 (스택 구조라고 보면 됨)
- PriorityQueue(): 데이터마다 우선순위를 넣어서, 우선순위가 높은 순으로 데이터 출력
일반적인 큐 외에 다양한 정책이 적용된 큐들이 있음
3.1. Queue()로 큐 만들기 (가장 일반적인 큐, FIFO(First-In, First-Out))
import queue
data_queue = queue.Queue()
3.2. LifoQueue()로 큐 만들기 (LIFO(Last-In, First-Out))
import queue
data_queue = queue.LifoQueue()
3.3. PriorityQueue()로 큐 만들기 : 데이터와 우선순위를 같이 넣어주는 큐 => 우선순위가 높은 데이터부터 출력
- tuple로 값을 넣어줌 (우선순위, data)
- 우선 순위의 수가 낮을 수록 우선 순위는 높은 것
어디에 큐가 많이 쓰일까?
- 멀티 태스킹을 위한 프로세스 스케쥴링 방식을 구현하기 위해 많이 사용됨 (운영체제 참조)
큐의 경우에는 장단점 보다는 (특별히 언급되는 장단점이 없음), 큐의 활용 예로 프로세스 스케쥴링 방식을 함께 이해해두는 것이 좋음
Queue()로 큐 만들기 (가장 일반적인 큐, FIFO(First-In, First-Out))
import queue
data_queue = queue.Queue()
data_queue.put("funcoding")
data_queue.put(1)
data_queue.qsize() #2
data_queue.get() # 'funcoding'
리스트 변수로 큐를 다루는 enqueue, dequeue 기능 python으로 구현해보기
queue_list = list()
def enqueue(data):
queue_list.append(data)
def dequeue():
data = queue_list[0]
del queue_list[0]
return data
for index in range(10):
enqueue(index)
len(queue_list)
#10
dequeue()
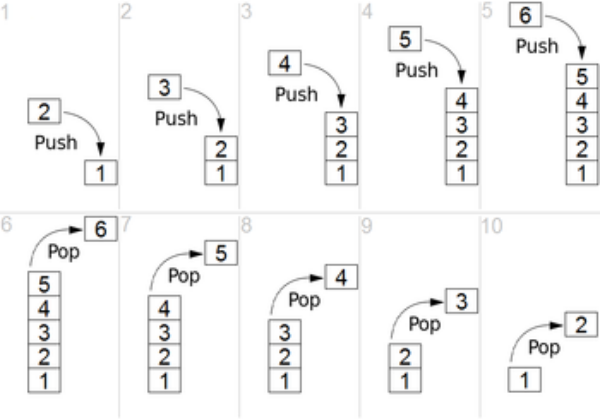
#0 : first in first out!자료구조 - 스택 (Stack)
- 데이터를 제한적으로 접근할 수 있는 구조
- 한쪽 끝에서만 자료를 넣거나 뺄 수 있는 구조 => 큐와 유사
- 가장 나중에 쌓은 데이터를 가장 먼저 빼낼 수 있는 데이터 구조
- 큐: FIFO 정책
- 스택: LIFO 정책
1. 스택 구조
- 스택은 LIFO(Last In, Fisrt Out) 또는 FILO(First In, Last Out) 데이터 관리 방식을 따름
- LIFO: 마지막에 넣은 데이터를 가장 먼저 추출하는 데이터 관리 정책
- FILO: 처음에 넣은 데이터를 가장 마지막에 추출하는 데이터 관리 정책
-
대표적인 스택의 활용
- 컴퓨터 내부의 프로세스 구조의 함수 동작 방식
-
주요 기능
- push(): 데이터를 스택에 넣기
- pop(): 데이터를 스택에서 꺼내기
2. 스택 구조와 프로세스 스택
- 스택 구조는 프로세스 실행 구조의 가장 기본
- 함수 호출시 프로세스 실행 구조를 스택과 비교해서 이해 필요
=> 다음 함수의 동작 방식이 스택과 유사
# 재귀 함수
def recursive(data):
    if data < 0:
        print ("ended")
    else:
        print(data)
        recursive(data - 1)
        print("returned", data)

recursive(4)
'''
#result
4
3
2
1
0
ended
returned 0
returned 1
returned 2
returned 3
returned 4
'''
3. 자료 구조 스택의 장단점
- 장점
- 구조가 단순해서, 구현이 쉽다.
- 데이터 저장/읽기 속도가 빠르다.
- 단점 (일반적인 스택 구현시)
- 데이터 최대 갯수를 미리 정해야 한다.
- 파이썬의 경우 재귀 함수는 1000번까지만 호출이 가능함
- 저장 공간의 낭비가 발생할 수 있음
- 미리 최대 갯수만큼 저장 공간을 확보해야 함
- 데이터 최대 갯수를 미리 정해야 한다.
- 스택은 단순하고 빠른 성능을 위해 사용되므로, 보통 배열 구조를 활용해서 구현하는 것이 일반적임.
- 이 경우, 위에서 열거한 단점이 있을 수 있음
4. 파이썬 리스트 기능에서 제공하는 메서드로 스택 사용해보기
- append(push), pop 메서드 제공
data_stack = list()
data_stack.append(1)
data_stack.append(2)
data_stack
# [1, 2]
data_stack.pop()
# 2
python을 통해 리스트 변수로 스텍을 다루는 pop, push 기능 구현해보기
stack_list = list()

def push(data):
    stack_list.append(data)

def pop():
    data = stack_list[-1]
    del stack_list[-1]
    return data
자료구조 - 링크드 리스트 (Linked List)
1. 링크드 리스트 (Linked List) 구조
-
연결 리스트라고도 함
-
배열은 순차적으로 연결된 공간에 데이터를 나열하는 데이터 구조 => 미리 공간의 크기를 설정하고 데이터를 입력해야하는 단점
-
링크드 리스트는 떨어진 곳에 존재하는 데이터를 화살표로 연결해서 관리하는 데이터 구조 => 미리 예약을 하지 않고 필요 시 데이터를 연결해서 추가
-
본래 C언어에서는 주요한 데이터 구조이지만, 파이썬은 리스트 타입이 링크드 리스트의 기능을 모두 지원
-
링크드 리스트 기본 구조와 용어
- 노드(Node): 데이터 저장 단위 (데이터값, 포인터) 로 구성
- 포인터(pointer): 각 노드 안에서, 다음이나 이전의 노드와의 연결 정보를 가지고 있는 공간
- data + 그 다음 data를 가리키는 주소
- 이때 위의 형식을 노드라 하며, 주소 부분을 포인터라고 한다.
- 노드 단위로 저장하고, 포인터를 통해 순서대로 연결한다.
- 일반적인 링크드 리스트 형태

2. 간단한 링크드 리스트 예
Node 구현 : 보통 파이썬에서 링크드 리스트 구현시, 파이썬 클래스를 활용함
class Node:
    def __init__(self, data, next=None):
        self.data = data
        self.next = next

def add(data):
    node = head
    while node.next: # node.next가 있으면..! => True
        node = node.next
    node.next = Node(data)
3. 링크드 리스트의 장단점 (전통적인 C언어에서의 배열과 링크드 리스트)
- 장점
- 미리 데이터 공간을 미리 할당하지 않아도 됨
- 배열은 미리 데이터 공간을 할당 해야 함
- 미리 데이터 공간을 미리 할당하지 않아도 됨
- 단점
- 연결을 위한 별도 데이터 공간 (다음 노드의 주소)이 필요하므로, 저장공간 효율이 높지 않음
- 연결 정보를 찾는 시간이 필요하므로 접근 속도가 느림
- 중간 데이터 삭제시, 앞뒤 데이터의 연결을 재구성해야 하는 부가적인 작업 필요
4. 링크드 리스트의 복잡한 기능1 (링크드 리스트 데이터 사이에 데이터를 추가)
- 링크드 리스트는 유지 관리에 부가적인 구현이 필요함

node = head
while node.next:
    print(node.data)
    node = node.next
print (node.data)
"""
1
2
3
4
5
6
7
8
9
"""
코드를 입력하세요node3 = Node(1.5) # 1.5라는 data를 1과 2 사이에 넣고 싶다!
node = head
search = True
while search:
if node.data == 1:
search = False
else:
node = node.next
node_next = node.next
node.next = node3
node3.next = node_next
node = head
while node.next:
print(node.data)
node = node.next
print (node.data)
"""
1
1.5
2
3
4
5
6
7
8
9
"""5. 파이썬 객체지향 프로그래밍으로 링크드 리스트 구현하기
class Node:
    def __init__(self, data, next=None):
        self.data = data
        self.next = next

class NodeMgmt: # 링크드 리스트를 관리하는 클래스
    def __init__(self, data):
        self.head = Node(data)

    def add(self, data):
        if self.head == '': # 방어 코드로, 보통은 else로 실행됨
            self.head = Node(data) # data를 받아 node를 만들고, head 함수로 설정한다.
        else:
            node = self.head
            while node.next:
                node = node.next
            node.next = Node(data)

    def desc(self):
        node = self.head
        while node:
            print (node.data)
            node = node.next
6. 링크드 리스트의 복잡한 기능 2 (특정 노드를 삭제)
- head 삭제
- 마지막 노드 삭제
- 중간 노드 삭제
- 다음 코드는 위의 코드에서 delete 메서드만 추가한 것이므로 해당 메서드만 확인하면 됨
class Node:
    def __init__(self, data, next=None):
        self.data = data
        self.next = next

class NodeMgmt:
    def __init__(self, data):
        self.head = Node(data)

    def add(self, data):
        if self.head == '':
            self.head = Node(data)
        else:
            node = self.head
            while node.next:
                node = node.next
            node.next = Node(data)

    def desc(self):
        node = self.head
        while node:
            print (node.data)
            node = node.next

    def delete(self, data):
        if self.head == '':
            print ("해당 값을 가진 노드가 없습니다.")
            return

        if self.head.data == data:
            temp = self.head
            self.head = self.head.next
            del temp
        else:
            node = self.head
            while node.next:
                if node.next.data == data:
                    temp = node.next
                    node.next = node.next.next # 마지막 노드 삭제, 중간 노드 삭제 동시에 해결 가능한 코드
                    del temp
                    return
                else:
                    node = node.next
노드 데이터가 특정 숫자인 노드를 찾는 함수를 만들기
 def search_node(self, data):
     node = self.head
     while node:
        if node.data == data:
           return node
        else:
           node = node.next
7. 다양한 링크드 리스트 구조
- 더블 링크드 리스트(Doubly linked list) 기본 구조
- 이중 연결 리스트라고도 함
- 기존 노드의 앞에 이전 데이터 주소도 같이 표기
- 장점: 양방향으로 연결되어 있어서 노드 탐색이 양쪽으로 모두 가능
- 기존의 링크드 리스트는 항상 앞에서부터만 검색이 가능하다는 단점을 개선함

#double_linked_list

# self.head : list의 가장 첫번째 노드
# self.tail : list의 가장 마지막 노드

class Node:
    def __init__(self, data, prev=None, next=None):
        self.prev = prev
        self.data = data
        self.next = next

class NodeMgmt:
    def __init__(self, data):
        self.head = Node(data)
        self.tail = self.head

    def insert(self, data):  # 리스트의 마지막에 data를 추가하는 메서드
        if self.head == None:
            self.head = Node(data)
            self.tail = self.head
        else:
            node = self.head
            while node.next: # 가장 마지막 노드에 도착하면 node.next = None으로 while문이 False가 되어 반복문이 멈춤
                node = node.next
            new = Node(data)
            node.next = new
            new.prev = node
            self.tail = new

    def desc(self):
        node = self.head
        while node:
            print (node.data)
            node = node.next
노드 데이터가 특정 숫자인 노드 앞에 데이터를 추가하는 함수를 만들기
class Node:
    def __init__(self, data, prev=None, next=None):
        self.prev = prev
        self.data = data
        self.next = next

class NodeMgmt:
    def __init__(self, data):
        self.head = Node(data)
        self.tail = self.head

    def insert(self, data):
        if self.head == None:
            self.head = Node(data)
            self.tail = self.head
        else:
            node = self.head
            while node.next:
                node = node.next
            new = Node(data)
            node.next = new
            new.prev = node
            self.tail = new

    def desc(self):
        node = self.head
        while node:
            print (node.data)
            node = node.next

    def search_from_head(self, data):
        if self.head == None:
            return False

        node = self.head
        while node:
            if node.data == data:
                return node
            else:
                node = node.next
        return False

    def search_from_tail(self, data):
        if self.head == None:
            return False

        node = self.tail
        while node:
            if node.data == data:
                return node
            else:
                node = node.prev
        return False

    def insert_before(self, data, before_data):
        if self.head == None:
            self.head = Node(data)
            return True # True : 값이 제대로 추가되었음을 의미
        else:
            node = self.tail
            while node.data != before_data: # 반복문을 거쳐 나왔다는 것은 해당 data를 갖는 Node를 찾았다는 것이고, 해당 노드 전에 data를 갖는 노드를 생성한다.
                node = node.prev
                if node == None:
                    return False
            new = Node(data)
            before_new = node.prev
            before_new.next = new
            new.prev = before_new
            new.next = node
            node.prev = new
            return True
노드 데이터가 특정 숫자인 노드 뒤에 데이터를 추가하는 함수를 만들기
class Node:
    def __init__(self, data, prev=None, next=None):
        self.prev = prev
        self.data = data
        self.next = next

class NodeMgmt:
    def __init__(self, data):
        self.head = Node(data)
        self.tail = self.head

    def insert_before(self, data, before_data):
        if self.head == None:
            self.head = Node(data)
            return True
        else:
            node = self.tail
            while node.data != before_data:
                node = node.prev
                if node == None:
                    return False
            new = Node(data)
            before_new = node.prev
            before_new.next = new
            new.next = node
            return True

    def insert_after(self, data, after_data):
        if self.head == None:
            self.head = Node(data)
            return True
        else:
            node = self.head
            while node.data != after_data:
                node = node.next
                if node == None:
                    return False
            new = Node(data)
            after_new = node.next
            new.next = after_new
            new.prev = node
            node.next = new
            if new.next == None:
                self.tail = new
            return True

    def insert(self, data):
        if self.head == None:
            self.head = Node(data)
        else:
            node = self.head
            while node.next:
                node = node.next
            new = Node(data)
            node.next = new
            new.prev = node
            self.tail = new

    def desc(self):
        node = self.head
        while node:
            print (node.data)
            node = node.next