
참조
안드로이드 developer - Notifications
틀린 부분을 댓글로 남겨주시면 수정하겠습니다..!!
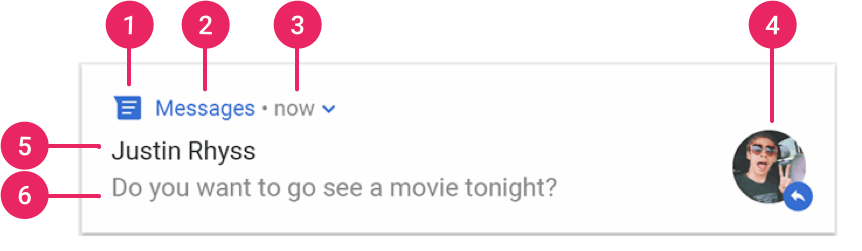
1. 알림의 기본적인 모습
앱의 화면이 출력되는 상황에서는 상황이나 데이터를 화면에 보여주면 되므로 알림은 거의 사용되지 않고, 서비스 컴포넌트나 브로드캐스트 리시버에서는 화면으로 사용자에게 특정 상황이나 데이터를 보여줄 수 없으므로 알림의 이용 비율이 높습니다.
- Small icon: This is required and set with setSmallIcon().
- App name: This is provided by the system.
- Time stamp: This is provided by the system but you can override with setWhen() or hide it with setShowWhen(false).
- Large icon: This is optional (usually used only for contact photos; do not use it for your app icon) and set with setLargeIcon().
- Title: This is optional and set with setContentTitle().
- Text: This is optional and set with setContentText()
2. 알림의 기본 구성
알림은 다음과 같은 클래스를 이용하여 구성합니다
- NotificationManager : 알림을 시스템에 발생시키는 SystemService
- Notification : 알림 구성 정보를 가지는 객체
- NotificationCompat.Builder : 알림을 다양한 정보로 생성
- NotificationChannel : 알림의 관리 단위(Android Oreo에서 추가)
결국, Notification 객체에 각종 정보를 담고 이 객체를 NotificationManager로 시스템에 등록하는 구조입니다. getSystemService() 함수를 이용하여 NotificationManager를 얻습니다.
// NotificationManager 객체 획득
val notificationManager = getSystemService(NOTIFICATION_SERVICE) as NotificationManager
2.1 NotificationChannel
Notification 객체는 직접 생성되지 않고 NotificationCompat.Builder로 생성합니다.
그런데 Android O(API Level 26) 부터는 Builder를 만드는 방법이 변경되었습니다.
NotificationChannel이라는 개념이 추가되었고 NotificationChannel에 의해서 Builder가 생성되게 변경되었습니다.
아래의 이미지에서 Categories가 채널에 해당하는 것이고, 채널의 역할은 일종의 알림에 대한 관리 단위입니다.
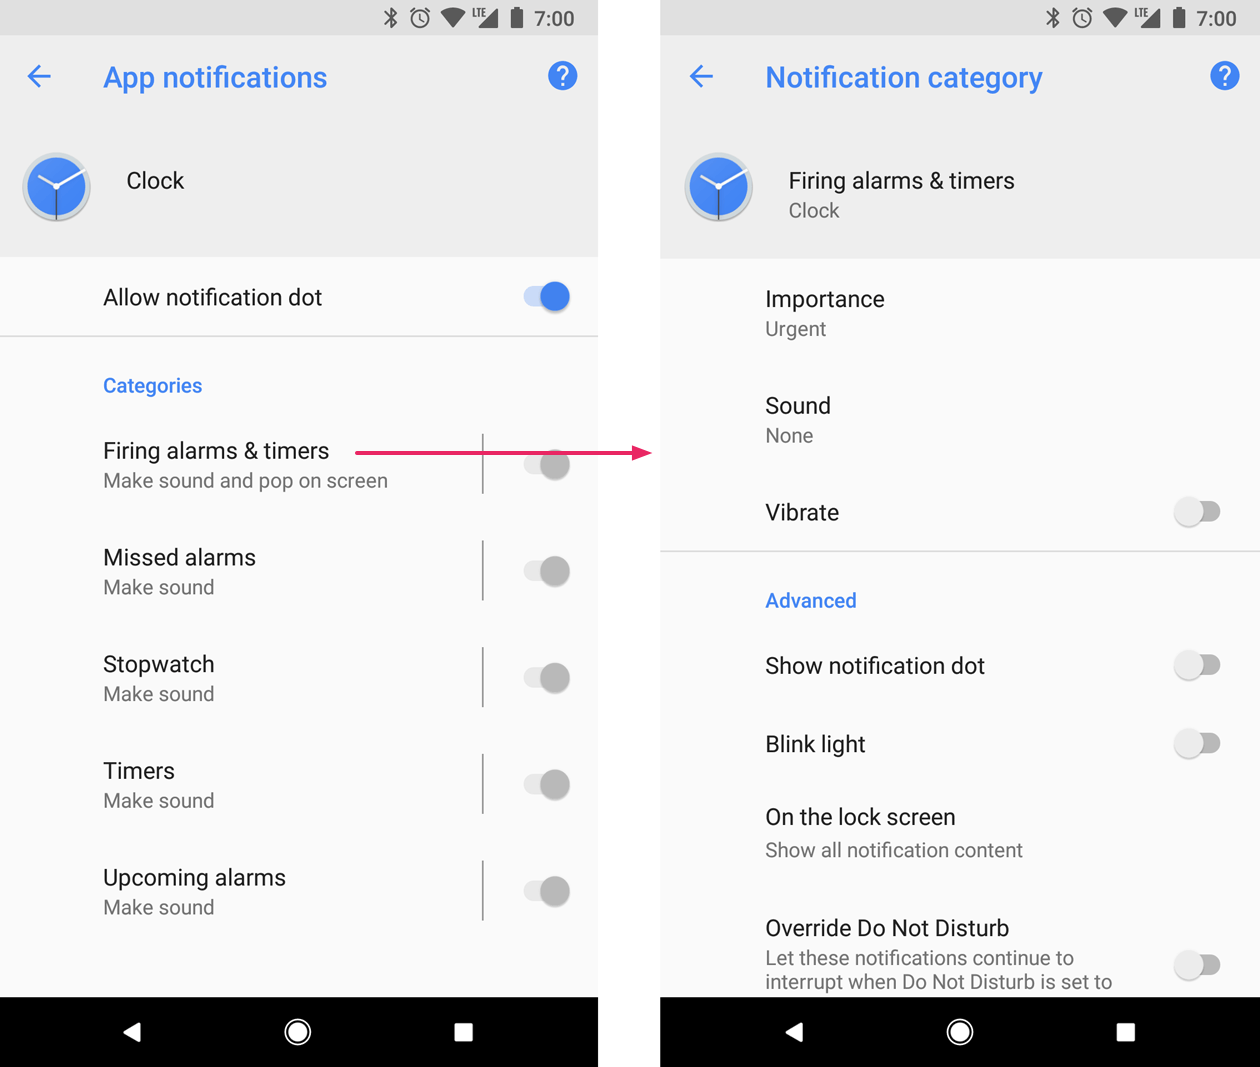
개발자는 전송해야하는 알림에 대하여 개별 유형의 채널을 만들어야 합니다. 또한 앱의 사용자가 선택한 내용을 반영하는 알림 채널을 만들 수 있습니다. 예를 들어 메세지앱에서 사용자가 만든 각 대화 그룹에 대해 별도의 알림 채널을 설정할 수 있습니다.(예시, 카카오톡 그룹 채팅 알림 설정)
2.1.1 NotificationChannel 생성
NotificationChannel은 API Level 26부터 제공되므로 그 하위 버전까지 지원한다면 실행되지 않게 Build.VERSION.SDK_INT를 이용하여 버전 분기 프로그램을 작성해야 합니다. NotificationChannel에 대한 설정을 하고 생성하는 코드는 아래와 같습니다.
// NotificationManager 객체 생성
val notificationManager = getSystemService(NOTIFICATION_SERVICE) as NotificationManager

if(Build.VERSION.SDK_INT >= Build.VERSION_CODES.O) {
    // Notification Channel 아이디, 이름, 설명, 중요도 설정
    val channelId = "channel_one"
    val channelName = "첫 번째 채널"
    val channelDescription = "첫 번째 채널에 대한 설명입니다."
    val importance = NotificationManager.IMPORTANCE_DEFAULT

    // NotificationChannel 객체 생성
    val notificationChannel = NotificationChannel(channelId, channelName, importance)
    // 설명 설정
    notificationChannel.description = channelDescription

    // 채널에 대한 각종 설정(불빛, 진동 등)
    notificationChannel.enableLights(true)
    notificationChannel.lightColor = Color.RED
    notificationChannel.enableVibration(true)
    notificationChannel.vibrationPattern = longArrayOf(100L, 200L, 300L)
    // 시스템에 notificationChannel 등록
    notificationManager.createNotificationChannel(notificationChannel)
}- NotificationChannel의 생성자로 NotificationChannel의 id, name, importance를 설정합니다.
- description을 설정하고 NotificationChannel에 대해 진동, 불빛 등의 옵션을 설정합니다.
- NotificationManager의 createNotificationChannel 함수를 사용하여 시스템에 NotificationChannel을 설정하면 됩니다.
2.1.2 importance level
importance 설정은 채널에 게시되는 모든 알림의 interruption 수준에 영향을 미치므로 NotificationChannel 생성자에서 지정해야 합니다. importance의 단계는 4단계로 구성됩니다.
(IMPORTANCE_NONE(0) - IMPORTANCE_MIN(1) - IMPORTANCE_LOW(2) - IMPORTANCE_DEFAULT(3) - IMPORTANCE_HIGH(4))
NotificationChannel은 API Level 26부터 지원하는데 그 아래버전(API Level 25) 이하에서 importance는 setPriority() 함수를 사용하여 설정합니다. 각각의 notification에 설정해야 하며, priority 상수값을 매개변수로 넣는데 이 값은 NotificationCompat 클래스에 잇습니다.
2.2 NotificationCompat.Builder
NotificationCompat.Builder를 사용하여 Builder를 생성해야 합니다.
그리고 Builder에 각종 setter 함수를 사용하여 알림의 구성 정보를 명시한 후 Notification을 만들고 NotificationManager로 알림을 발생시키면 됩니다.
if(Build.VERSION.SDK_INT >= Build.VERSION_CODES.O) {
    // Notification Channel 아이디, 이름, 설명, 중요도 설정
    val channelId = "channel_one"

    // 채널 생성 코드...

    // API Level 26(O) 이상에서는 Builder 생성자에 NotificationChannel의 아이디값을 설정
    notificationCompatBuilder = NotificationCompat.Builder(this, channelId)
} else {
    // 26버전 미만은 생성자에 context만 설정
    notificationCompatBuilder = NotificationCompat.Builder(this)
}

notificationCompatBuilder?.let {
    // 작은 아이콘 설정
    it.setSmallIcon(android.R.drawable.ic_notification_overlay)
    // 시간 설정
    it.setWhen(System.currentTimeMillis())
    // 알림 메시지 설정
    it.setContentTitle("Content Title")
    // 알림 내용 설정
    it.setContentText("Content Message")
    // 알림과 동시에 진동 설정(권한 필요(
    it.setDefaults(Notification.DEFAULT_VIBRATE)
    // 클릭 시 알림이 삭제되도록 설정
    it.setAutoCancel(true)
}
API Level 26 이상의 휴대폰에서는 Builder를 생성 시 NotificationChannel을 등록해 주어야 합니다. 따라서 NotificationCompat.Builder의 생성자로 NotificationChannel의 아이디 값을 주었고 26 미만의 버전에서는 NotificationChannel이 없으므로 생성자에 context만 주었습니다. 그 후 Builder의 setter 함수를 이용하여 알림의 구성 정보를 명시하면 됩니다.
2.3 Notification
builder를 통해 알림 내용을 구성하였다면 이제 NotificationManager를 통해 알림을 상태바에 등록합니다.
// Notification 객체 생성
val notification = notificationCompatBuilder?.build()
// Notification 식별자 값, Notification 객체
notificationManager?.notify(0, notification)
Builder.build() 함수를 사용하여 Notification 객체를 생성한 후 NotificationManager의 notify 함수를 통해 알림을 등록합니다. 이 때, 식별자 값을 두는데 이 값은 알림을 업데이트 하너가 지울 때 사용합니다.
2.4 알림 터치
기본적으로 알림은 탭에 응답합니다. 대부분은 탭을 하게 되면 알림에 응답하는 앱의 액티비티 화면을 키는데 사용하게 됩니다. 탭 이벤트가 발생하면 앱에서의 화면이 아니라 상태바(시스템 화면)에서 발생하는 것이므로 시스템에 이벤트가 발생하면 어떻게 처리해달라고 의뢰하는 방식을 사용하여 탭에 응답합니다.
이러한 방식을 사용하기 위해서 PendingIntent 객체가 사용되고 이를 setContentIntent()의 인자로 대입합니다.
- PendingIntent는 알림에서만 사용되지 않으며 인텐트 발생을 누군가에게 의뢰해야 하는 여러 곳에서 사용합니다.
// Create an explicit intent for an Activity in your app
val intent = Intent(this, AlertDetails::class.java).apply {
    flags = Intent.FLAG_ACTIVITY_NEW_TASK or Intent.FLAG_ACTIVITY_CLEAR_TASK
}
val pendingIntent: PendingIntent = PendingIntent.getActivity(this, 0, intent, 0)

val builder = NotificationCompat.Builder(this, CHANNEL_ID)
        .setSmallIcon(R.drawable.notification_icon)
        .setContentTitle("My notification")
        .setContentText("Hello World!")
        .setPriority(NotificationCompat.PRIORITY_DEFAULT)
        // Set the intent that will fire when the user taps the notification
        .setContentIntent(pendingIntent)
.setAutoCancel(true)-
알림 터치 시 사용할 인텐트를 선언합니다.
-
PendingIntent 객체를 생성하는데 PendingIntent.getActivity(), 혹은 getBroadcast(), getService() 함수로 만들며, 함수의 매개변수로 의뢰 정보를 설정합니다.
두 번째 매개변수는 requestCode 값으로 의뢰를 식별하기 위해 사용되고, 코드에서 취소할 때 이 값을 사용하면 됩니다. 세 번째 매개변수는 의뢰하고자 하는 인텐트 객체이고, 네 번째 매개변수는 flag 값으로 태스크를 제어하기 위하여 Intent flag를 설정하는 것과 비슷합니다. -
builder의 setContentIntent 함수의 매개변수로 pendingIntent 객체를 지정하면 됩니다.
3. 알림의 다양한 구성
3.1 간단한 이벤트 처리 : Action
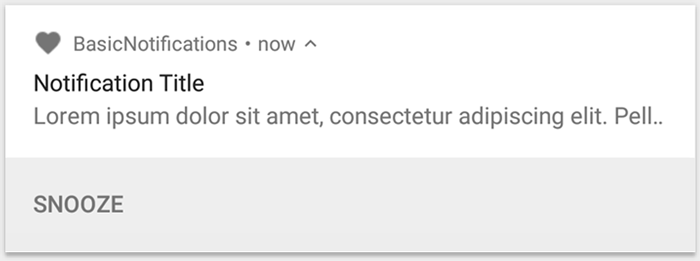
알림에는 최대 3개의 action button을 추가하여 사용자에게 화면 전환 없이 알림에서 바로 처리할 수 있습니다. 이 또한 PendingIntent를 사용하는데 builder의 addAction() 함수의 매개변수로 지정하면 됩니다. 이를 활용하면 Activity를 시작하는 대신 백그라운드에서 작업을 수행하는 BroadcastReceiver를 시작하여 이미 켜져 있는 앱을 방해하지 않을 수 있습니다.
val snoozeIntent = Intent(this, MyBroadcastReceiver::class.java).apply {
    action = ACTION_SNOOZE
    putExtra(EXTRA_NOTIFICATION_ID, 0)
}
val snoozePendingIntent: PendingIntent =
    PendingIntent.getBroadcast(this, 0, snoozeIntent, 0)
val builder = NotificationCompat.Builder(this, CHANNEL_ID)
        .setSmallIcon(R.drawable.notification_icon)
        .setContentTitle("My notification")
        .setContentText("Hello World!")
        .setPriority(NotificationCompat.PRIORITY_DEFAULT)
        .setContentIntent(pendingIntent)
        .addAction(R.drawable.ic_snooze, getString(R.string.snooze),
snoozePendingIntent)- action button을 클릭할 시 응답할 Intent를 준비합니다(위의 예제에서는 BroadcastReceiver 사용)
- PendingIntent 객체를 생성하며 getBroadcast() 함수를 사용해 BroadcastReceiver 의뢰를 요청하도록 만듭니다.
- bulder의 addAction() 함수의 매개변수로 아이콘과 문자열 그리고 actionButton을 클릭할 시 인텐트 발생을 의뢰할 PendingIntent 객체를 지정합니다.
(아이콘은 API Leel 24부터는 나오지 않습니다.)
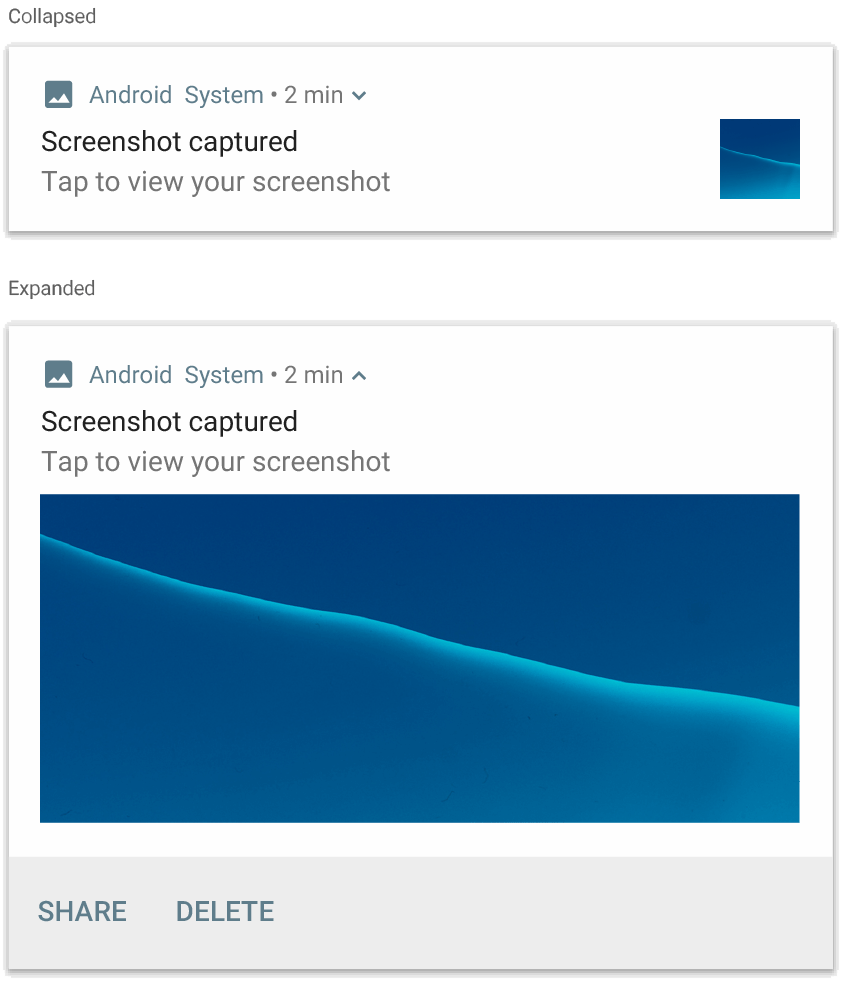
3.2 큰 이미지 : BigPictureStyle
알림 화면에서 ContentTitle, ContentText을 이용한 문자열 출력 이외에도 다양한 콘텐츠로 구성할 수 있습니다. 이를 지원하기 위한 것이 스타일이며 여러 스타일을 제공합니다. 그중 BigPictureStyle은 알림에 큰 크기의 이미지를 출력하기 위한 스타일입니다.
var notification = NotificationCompat.Builder(context, CHANNEL_ID)
        .setSmallIcon(R.drawable.new_post)
        .setContentTitle(imageTitle)
        .setContentText(imageDescription)
        .setStyle(NotificationCompat.BigPictureStyle()
                .bigPicture(myBitmap))
        .build()
NotificationCompat.BigPictureStyle의 bigPicture() 함수의 매개변수로 bitmap 객체를 설정하고 builder의 setStyle 함수로 style을 지정하면 됩니다.
3.3 긴 문자열 : BigTextStyle
알림에서 긴 문자열도 출력할 수 있는데 NotificationCompat.BigTextStyle()을 사용합니다.
var notification = NotificationCompat.Builder(context, CHANNEL_ID)
        .setSmallIcon(R.drawable.new_mail)
        .setContentTitle(emailObject.getSenderName())
        .setContentText(emailObject.getSubject())
        .setLargeIcon(emailObject.getSenderAvatar())
        .setStyle(NotificationCompat.BigTextStyle()
                .bigText(emailObject.getSubjectAndSnippet()))
        .build()
NotificationCompat.BigTextStyle의 bigText 함수를 사용하여 텍스트를 설정한 후 builder의 setStyle 함수로 style을 지정하면 됩니다.

3.4 목록 : InboxStyle
알림에 여러 데이터를 목록 형태로 제공할 수도 있는데 이를 지원하는 것이 NotificationCompat.InboxStyle() 입니다.
var notification = NotificationCompat.Builder(context, CHANNEL_ID)
        .setSmallIcon(R.drawable.new_mail)
        .setContentTitle("5 New mails from " + sender.toString())
        .setContentText(subject)
        .setLargeIcon(aBitmap)
        .setStyle(NotificationCompat.InboxStyle()
                .addLine(messageSnippet1)
                .addLine(messageSnippet2))
        .build()
NotificationCompat.InboxStyle의 addLine 함수를 통해 추가하고자 하는 라인을 추가하고 그 후 builder의 setStyle 함수로 style을 지정하면 됩니다.
3.5 프로그레스: Progress
알림에 프로그레스바로 작업의 진행 사항을 표시해야 할 때도 있습니다. 프로그레스바는 특별한 스타일로 제공되지 않고 builder의 setProgress() 함수로 progress 값을 대입해 주면 자동으로 나타납니다.
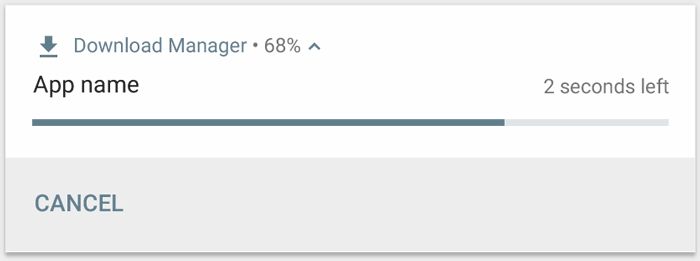
setProgress()의 첫 번째 매개변수로는 max값, 두 번째 매개변수로는 현재 progress 값, 세 번째 매개변수로 작업이 완료되는 시점을 측정이 불가능한지 가능한지 boolean 값을 주면 됩니다.
그리고 값을 증가시키기 위해 계속 해서 setProgress() 함수를 호출하면 됩니다.
(세 번째 매개변수를 false로 주면 측정이 가능하다는 의미로 progress bar가 애니메이션 형식으로 업데이트 되고 true로 주면 progress bar는 나타나지만 업데이트 되는 애니메이션이 없습니다.)
val builder = NotificationCompat.Builder(this, CHANNEL_ID).apply {
    setContentTitle("Picture Download")
    setContentText("Download in progress")
    setSmallIcon(R.drawable.ic_notification)
    setPriority(NotificationCompat.PRIORITY_LOW)
}
val PROGRESS_MAX = 100
val PROGRESS_CURRENT = 0
NotificationManagerCompat.from(this).apply {
    // Issue the initial notification with zero progress
    builder.setProgress(PROGRESS_MAX, PROGRESS_CURRENT, false)
    notify(notificationId, builder.build())

    // Do the job here that tracks the progress.
    // Usually, this should be in a
    // worker thread
    // To show progress, update PROGRESS_CURRENT and update the notification with:
    // builder.setProgress(PROGRESS_MAX, PROGRESS_CURRENT, false);
    // notificationManager.notify(notificationId, builder.build());

    // When done, update the notification one more time to remove the progress bar
    builder.setContentText("Download complete")
            .setProgress(0, 0, false)
    notify(notificationId, builder.build())
}
progress bar를 종료하기 위해서는 첫 번째 매개변수 max값과 두 번째 매개변수 progress값을 일치시키면 됩니다. 혹은 NotificationManager의 cancel 함수를 사용하여 종료할 수도 있습니다.
알림의 progress bar는 계속해서 업데이트 되기에, 대부분 background service로 구현합니다.
3.6 메세지 : MessagingStyle
NotificationCompat.MessagingStyle을 적용하면 사람들 사이의 순차적인 메세지를 보여줄 수 있습니다. 여러 줄의 메세지를 보여줄 수 있고 보내는 사람의 이름과 메세지를 분리하여 보여주는 일관성 있는 레이아웃을 제공하기에 메세지앱과 같은 곳에서 사용하기 좋습니다.
새로운 메세지를 추가하기 위해서 addMessage()를 사용하고 매개변수로는 메세지 텍스트와, 받은 시간, 보내는 사람의 이름을 넣으면 됩니다. 이러한 정보를 NotificationCompat.MessagingStyle.Message 객체에 넣고 사용할 수도 있습니다.
var message1 = NotificationCompat.MessagingStyle.Message(messages[0].getText(),
        messages[0].getTime(),
        messages[0].getSender())
var message2 = NotificationCompat.MessagingStyle.Message(messages[1].getText(),
        messages[1].getTime(),
        messages[1].getSender())
var notification = NotificationCompat.Builder(context, CHANNEL_ID)
        .setSmallIcon(R.drawable.new_message)
        .setStyle(NotificationCompat.MessagingStyle(resources.getString(R.string.reply_name))
                .addMessage(message1)
                .addMessage(message2))
        .build()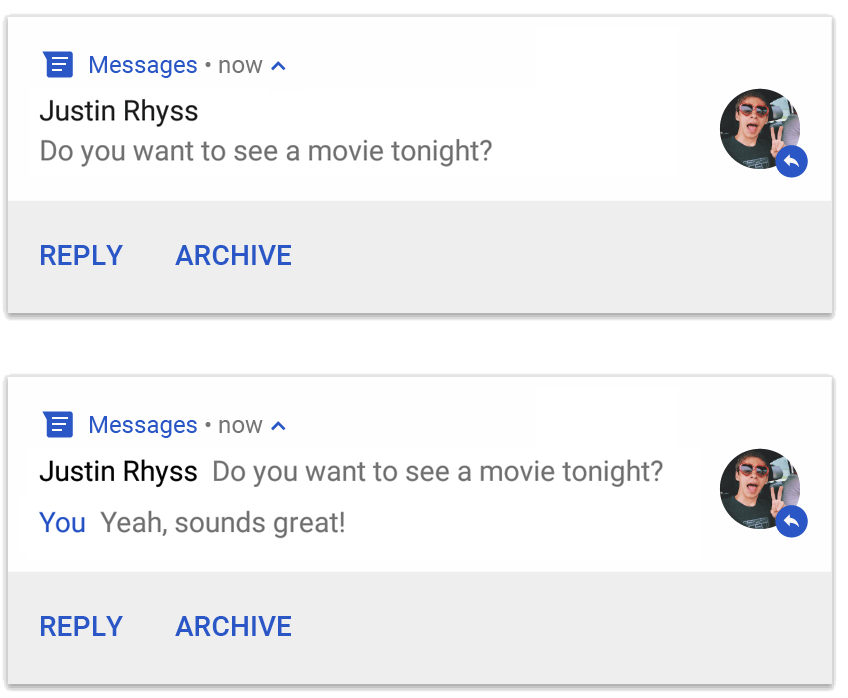
이 스타일은 Android Pie(API Level 24)버전 이상에서 사용할 수 있습니다.
