블루투스 연동
안드로이드는 블루투스를 지원하여 스마트폰이 다른 블루투스 기기와 무선으로 통신할 수 있습니다. 통신은 Android Bluetooth API를 통해서 이루어지는데, 이를 사용해서 다음과 같은 작업을 수행할 수 있습니다.
- 다른 블루투스 기기 스캔(기기 검색, 페어링된 기기확인)
- 블루투스 기기 연결
- 연결된 기기간 데이터 전송 및 수신
- 블루투스 프로필
이제 위와 같은 기능들을 차례대로 수행하며 안드로이드에서 블루투스 연동을 사용해보도록 하겠습니다.
기본적인 권한
위의 블루투스 기능들을 사용하기 위해서 기본적으로 선언해야 하는 권한이 있습니다. 예제에서 사용할 프로젝트의 Target API가 32인 관계로 Android 12버전을 목표로 권한을 설정해보도록 하겠습니다.
<!-- Android 11 버전까지를 위한 권한 -->
<uses-permission
    android:name="android.permission.BLUETOOTH"
    android:maxSdkVersion="30" />
<uses-permission
    android:name="android.permission.BLUETOOTH_ADMIN"
    android:maxSdkVersion="30" />

<!-- 기기 검색을 위한 권한(위치가 필요하지 않고 장비만 검색하기 위해 위치는 무시) -->
<uses-permission android:name="android.permission.BLUETOOTH_SCAN"
    android:usesPermissionFlags="neverForLocation"
    tools:targetApi="s" />
<!-- 페어링된 기기를 확인하기 위한 권한 -->
<uses-permission android:name="android.permission.BLUETOOTH_CONNECT" />
블루투스 설정(블루투스 활성화, 블루투스 비활성화)
기본적으로 블루투스를 사용하기 위해서는 기기에서 블루투스가 지원되는지 확인하고 지원된다면 활성화되어 있는지 확인해야 합니다. 블루투스가 활성화 되어 있는지 확인하기 위해서는 BluetoothManager, BluetoothAdapter 두 클래스를 이용해야 합니다. 두 클래스는 다음과 같은 역할을 수행합니다.
-
BluetoothManager:
BluetoothAdapter객체를 획득할 때 사용하는 클래스로 전체적인 블루투스 관리를 수행합니다. -
BluetoothAdapter: 모든 Bluetooth 상호작용의 진입점입니다. 이를 사용해 다른 Bluetooth 장치를 검색하고, 연결된(페어링된) 장치 목록을 쿼리하고, MAC 주소를 사용하여 Bluetooth 기기를 인스턴스화(
BluetoothDevice객체 생성) 할 수 있고, 다른 기기와 통신을 위해 Socket(BluetoothServerSocket)을 생성할 수 있습니다.
class MainActivity: AppCompatActivity() {
	private val bluetoothManager: BluetoothManager by lazy {
        getSystemService(BluetoothManager::class.java)
    }
    private val bluetoothAdapter: BluetoothAdapter? by lazy {
        bluetoothManager.adapter
    }
    private val activityResultLauncher: ActivityResultLauncher<Intent> =
        registerForActivityResult(ActivityResultContracts.StartActivityForResult()) {
            if (it.resultCode == RESULT_OK) {
                showMessage(this, "블루투스 활성화")
            } else if (it.resultCode == RESULT_CANCELED) {
                showMessage(this, "취소")
            }
        }

    override fun onCreate(savedInstanceState: Bundle?) {
    	super.onCreate(savedInstanceState)
    	// BluetoothAdapter가 Null이라면 블루투스를 지원하지 않는 것이므로 종료
        if(bluetoothAdapter == null) {
            showMessage(this, "블루투스를 지원하지 않는 장비입니다.")
            finish()
        }
    }

    // 활성화 요청
    fun setActivate() {
        bluetoothAdapter?.let {
            // 비활성화 상태라면
            if (!it.isEnabled) {
                // 활성화 요청
                val intent = Intent(BluetoothAdapter.ACTION_REQUEST_ENABLE)
                activityResultLauncher.launch(intent)
            } else { // 활성 상태라면
                showMessage(this, "이미 활성화 되어 있습니다")
            }
        }
    }

    // 비활성화 요청
    fun setDeActivate() {
        bluetoothAdapter?.let {
            // 비활성화 상태라면
            if (!it.isEnabled) {
                showMessage(this, "이미 비활성화 되어 있습니다")
                // 활성 상태라면
            } else {
                // 블루투스 비활성화
                it.disable()
                showMessage(this, "블루투스를 비활성화 하였습니다")
            }

        }
    }
}BluetoothManager는getSystemService()메서드를 통해서 획득할 수 있습니다.BluetoothAdapter는BluetoothManager.getAdapter()메서드를 통해서 획득할 수 있습니다. 이때, 해당 객체가 Null 이라면 블루투스를 지원하지 않는 장비입니다.isEnabled메서드를 사용하면 현재 스마트폰에서 블루투스가 활성화 상태인지 비활성화 상태인지 알 수 있습니다.- 활성화가 필요하다면
Intent(BluetoothAdapter.ACTION_REQUEST_ENABLE)를 시스템에 요청해서 블루투스 활성화를 요청할 수 있고, 비활성화가 필요하다면BluetoothAdapter.disalbe()메서드를 사용해서 비활성화로 만들 수 있습니다.
기기 검색과 페어링
기기 검색과 페어링 모두 BluetoothAdapter 클래스를 사용해서 수행합니다. 기기 검색은 로컬 영역에서 Bluetooth 지원 장치를 검색하는 것으로 검색이 가능하면 해당 기기의 이름, 클래스 및 고유 MAC 주소와 같은 정보를 공유하여 검색 요청에 응답합니다. 페어링은 처음으로 기기와 연결될 때 이루어지는 것으로, 페어링이 되면 해당 기기에 대한 정보가 저장됩니다.
기기 검색과 페어링에 대한 자세한 내용은 아래에서 확인해보겠습니다.
페어링된 기기 검색
등록된 기기가 페어링된 기기에 해당
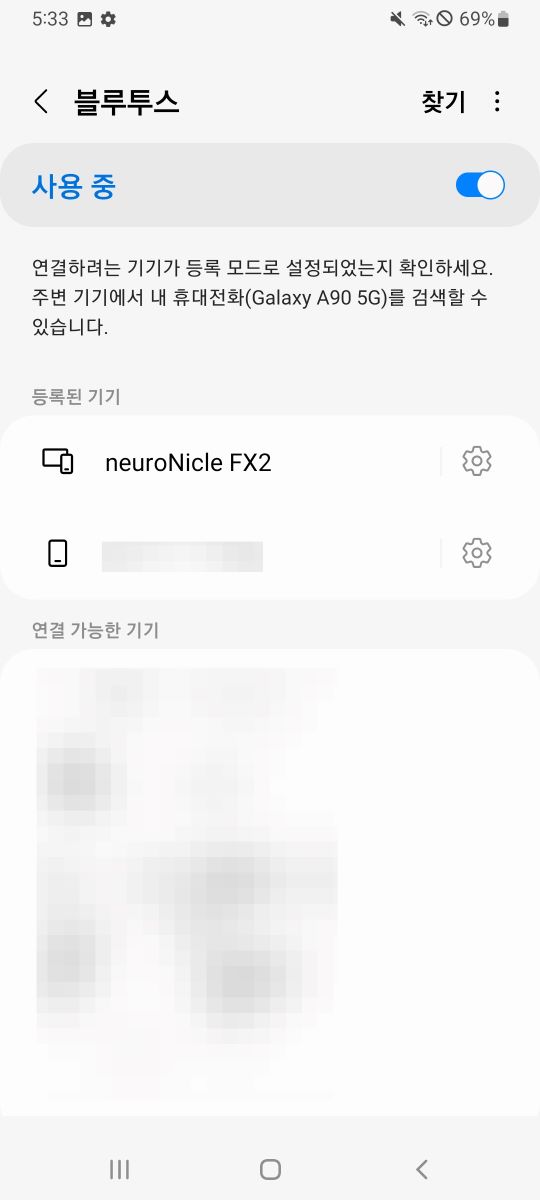
- 기기와 처음으로 연결되면 페어링 요청이 자동으로 사용자에게 제공됩니다.
- 기기가 페어링되면 기기 이름, 클래스 및 MAC 주소와 같은 해당 기기에 대한 정보가 자동으로 저장됩니다. 저장된 MAC 주소를 사용하면 언제든지 연결을 시작할 수 있습니다.
- 페어링되었다는 것은 두 기기가 서로의 존재를 인식하고 인증에 사용할 수 있는 공유 링크 키를 가지고 있으며 서로 암호화된 연결을 설정할 수 있음을 의미합니다.
- 페어링된 기기는
BluetoothAdapter.getBoundedDevices()메서드를 통해서 획득할 수 있습니다.
// 페어링된 디바이스 검색
fun getPairedDevices() {
    bluetoothAdapter?.let {
        // 블루투스 활성화 상태라면
        if (it.isEnabled) {
            // ArrayAdapter clear
            adapter.clear()
            // 페어링된 기기 확인
            val pairedDevices: Set<BluetoothDevice> = it.bondedDevices
            // 페어링된 기기가 존재하는 경우
            if (pairedDevices.isNotEmpty()) {
                pairedDevices.forEach { device ->
                    // ArrayAdapter에 아이템 추가
                    adapter.add(Pair(device.name, device.address))
                }
            } else {
                showMessage(this, "페어링된 기기가 없습니다.")
            }
        } else {
            showMessage(this, "블루투스가 비활성화 되어 있습니다.")
        }
    }
}
주변 기기 검색
- 기기 검색의 경우
BluetoothAdapter.startDiscovery()메서드를 통해서 수행합니다. startDiscovery()메서드는 비동기 프로세스이며 검색이 성공적으로 시작했는지 여부를 나타내는 Boolean 값을 즉시 반환합니다.- 검색 프로세스는 약 12초 정도 이루어집니다.
- 검색에 대한 결과인 기기에 대한 정보를 받으려면
BroadcastReceiver를 사용해야 합니다. - 아래는 결과를 호출하는 코드와 이에 대한 결과를 받는 동적으로 등록된
BroadcastReceiver코드입니다.
기기 검색 메서드
// 기기 검색
fun findDevice() {
    bluetoothAdapter?.let {
        // 블루투스가 활성화 상태라면
        if (it.isEnabled) {
            // 현재 검색중이라면
            if (it.isDiscovering) {
                // 검색 취소
                it.cancelDiscovery()
                showMessage(this, "기기검색이 중단되었습니다.")
                return
            }

            // ArrayAdapter clear
            adapter.clear()
            // 검색시작
            it.startDiscovery()
            showMessage(this, "기기 검색을 시작하였습니다")
        } else {
            showMessage(this, "블루투스가 비활성화되어 있습니다")
        }
    }
}
BluetoothDevice.ACTION_FOUND를 탐지하는 BroadcastReceiver 등록 및 제거
private lateinit var broadcastReceiver: BroadcastReceiver

override fun onCreate(savedInstanceState: Bundle?) {
        super.onCreate(savedInstanceState)

        // 블루투스 기기 검색 브로드캐스트
        broadcastReceiver = object : BroadcastReceiver() {
            override fun onReceive(c: Context?, intent: Intent?) {
                when (intent?.action) {
                    BluetoothDevice.ACTION_FOUND -> {
                    	// BluetoothDevice 객체 획득
                        val device =
                            intent.getParcelableExtra<BluetoothDevice>(BluetoothDevice.EXTRA_DEVICE)
                        // 기기 이름
                        val deviceName = device?.name
                        // 기기 MAC 주소
                        val deviceHardwareAddress = device?.address
                        if (deviceName != null && deviceHardwareAddress != null) {
                            adapter.add(Pair(deviceName, deviceHardwareAddress))
                        }
                    }
                }
            }
        }
    }

    // BroadcastReceiver 등록
    registerReceiver(broadcastReceiver, intentFilter)
}

override fun onDestroy() {
	// BroadcastReceiver 등록해제
	unregisterReceiver(broadcastReceiver)
}
블루투스 연결
네트워크 통신을 하기 위해서는 HTTP 통신 또는 Socket 통신을 수행합니다. HTTP 통신의 경우 Request-Response 구조로 Response를 받으면 통신을 끊는 Connectionless 특성을 가집니다. 이와는 다르게 Socket의 경우 한번 연결이 이루어지면 한쪽에서 연결을 끊기 전까지는 연결을 계속해서 유지합니다.
블루투스의 경우도 무선 이어폰을 사용해보셨다면 한번에 어떤 방법을 사용하는지 이해하실 수 있습니다. 한번 연결을 수행하면 직접 연결을 끊거나 오류가 생겨서 연결이 끊어지기 전까지는 계속해서 연결이 유지됩니다. 즉, 블루투스는 Socket을 사용하여 연결을 수행하는데 이에 대해 자세히 알아보도록 하겠습니다.
- 두 기기 사이에 연결을 생성하려면 한 장치는 서버 소캣을 열어야 하고 다른 장치는 서버 장치의 MAC 주소를 사용하여 연결을 시작해야 하기에 서버 측 메커니즘과 클라이언트 측 메커니즘을 모두 구현해야 합니다.
- 서버 역할을 하는 기기와 클라이언트 역할을 하는 기기는
BluetoothSocket를 각각 다른 방법으로 획득합니다. - 서버와 클라이언트는 같은 RFCOMM 채널에 있는
BluetoothSocket에 연결되었을 때, 서로가 연결되었다고 간주합니다. - 위와 같이 연결이 된 시점에서 이제
InputStream과OutputStream을 사용해서 데이터를 주고받을 수 있습니다.
서버 역할을 수행하는 기기
- 두 기기를 연결하기 위해서 한 기기는 반드시
BluetoothServerSocket을 열어 서버의 역할을 수행해야 합니다. - 해당 기기는 연결 요청을 기다리다가 요청이 오고 승낙되면 연결된
BluetoothSocket를 제공해야 합니다. listenUsingRfcommWithServiceRecord(String, UUID)메서드를 사용하면BluetoothServerSocket을 획득할 수 있습니다.accept()메서드를 수행하면 연결 요청에 대한 수신 대기를 시작합니다. 주의할 점은accept()메서드는 blocking 메서드이므로 Main Thread에서 수행하면 안되고 작업 스레드를 생성하여 수행해야 합니다.- 하나의 기기와 연결을 성공적으로 수행하여
BluetoothServerSocket으로부터BluetoothSocket를 획득했고 더 이상의 기기와 연결을 수행하지 않으려면BluetoothServerSocket.close()메서드를 호출하여 추가 연결을 종료해야 합니다. 이래도 서버 소켓과 모든 리소스가 해제되지만 accept()가 반환한 연결된 BluetoothSocket은 닫히지 않습니다.
UUID: Universally unique identifier의 약쟈로서, 정보 식별을 위하여 사용되는 식별자이다. 128-bit 숫자로 이루어져 있으며, xxxxxxxx-xxxx-Mxxx-Nxxx-xxxxxxxxxxxx 형식으로 표현한다.
서버의 역할을 수행하는 기기
// 블루투스에서 서버의 역할을 수행하는 스레드
class AcceptThread(private val bluetoothAdapter: BluetoothAdapter): Thread() {
    private lateinit var serverSocket: BluetoothServerSocket

    companion object {
        private const val TAG = "ACCEPT_THREAD"
        private const val SOCKET_NAME = "server"
        private val MY_UUID = UUID.fromString("00001101-0000-1000-8000-00805f9b34fb")
    }

    init {
        try {
            // 서버 소켓
            serverSocket = bluetoothAdapter.listenUsingRfcommWithServiceRecord(SOCKET_NAME, MY_UUID)
        } catch(e: Exception) {
            setLog(TAG, e.message.toString())
        }
    }

    override fun run() {
        var socket: BluetoothSocket? = null
        while(true) {
            try {
                // 클라이언트 소켓
                socket = serverSocket.accept()
            } catch (e: IOException) {
                setLog(TAG, e.message.toString())
            }

            socket?.let {
                /* 클라이언트 소켓과 관련된 작업..... */

                // 더 이상 연결을 수행하지 않는다면 서버 소켓 종료(그래도 연결된 소켓은 작동)
                serverSocket.close()
            }
            break
        }
    }

    fun cancel() {
        try {
            serverSocket.close()
        } catch (e: IOException) {
            setLog(TAG, e.message.toString())
        }
    }
}
클라이언트 역할을 수행하는 기기
- 서버의 역할을 수행하는 원격 기기와 연결을 수행하기 위해서는 우선 원격 기기의
BluetoothDevice객체를 획득해야 합니다. BluetoothDevice객체를 획득했다 이를 사용해서 연결을 초기화하는BluetoothSocket객체를 획득해야 합니다.BluetoothSocket객체를 획득하는 메서드는BluetoothDevice.createRfcommSocketToServiceRecord(UUID)입니다.BluetoothSocket.connect()메서드를 호출하여 연결을 수행합니다. 주의할 점은 해당 메서드는 blocking 메서드이므로 메인 스레드가 아닌 작업 스레드에서 해당 메서드를 호출해야 합니다.
클라이언트 역할을 수행하는 기기
@SuppressLint("MissingPermission")
class ConnectThread(
    private val myUUID: UUID,
    private val device: BluetoothDevice,
) : Thread() {
    companion object {
        private const val TAG = "CONNECT_THREAD"
    }

    // BluetoothDevice 로부터 BluetoothSocket 획득
    private val connectSocket: BluetoothSocket? by lazy(LazyThreadSafetyMode.NONE) {
        device.createRfcommSocketToServiceRecord(myUUID)
    }

    override fun run() {
        try {
            // 연결 수행
            connectSocket?.connect()
            connectSocket?.let {
                val connectedThread = ConnectedThread(bluetoothSocket = it)
                connectedThread.start()
            }
        } catch (e: IOException) { // 기기와의 연결이 실패할 경우 호출
            connectSocket?.close()
            throw Exception("연결 실패")
        }
    }

    fun cancel() {
        try {
            connectSocket?.close()
        } catch (e: IOException) {
            setLog(TAG, e.message.toString())
        }
    }
}
연결 요청하는 메서드
// 디바이스에 연결
private fun connectDevice(deviceAddress: String) {
    bluetoothAdapter?.let { adapter ->
        // 기기 검색을 수행중이라면 취소
        if (adapter.isDiscovering) {
            adapter.cancelDiscovery()
        }

        // 서버의 역할을 수행 할 Device 획득
        val device = adapter.getRemoteDevice(deviceAddress)
        // UUID 선언
        val uuid = UUID.fromString("00001101-0000-1000-8000-00805f9b34fb")
        try {
            val thread = ConnectThread(uuid, device)

            thread.run()
            showMessage(this, "${device.name}과 연결되었습니다.")
        } catch (e: Exception) { // 연결에 실패할 경우 호출됨
            showMessage(this, "기기의 전원이 꺼져 있습니다. 기기를 확인해주세요.")
            return
        }
    }
}
데이터 전송
- 블루투스 연결에 성공하면
BluetoothSocket을 사용해서 데이터를 주고받을 수 있습니다. BloetoothSocket의InputStream은 데이터를 받을 때 사용하고,OutputStream은 데이터를 전송할 때 사용합니다.- 데이터를 주고받을 때 주의할점은 이 또한 blocking 메서드를 사용하므로 메인 스레드에서 수행하는것이 아니라 작업 스레드를 만들어서 수행해야 합니다.
데이터를 주고받는 코드
private inner class ConnectedThread(private val bluetoothSocket: BluetoothSocket) : Thread() {
    private lateinit var inputStream: InputStream
    private lateinit var outputStream: OutputStream

    init {
        try {
            // BluetoothSocket의 InputStream, OutputStream 초기화
            inputStream = bluetoothSocket.inputStream
            outputStream = bluetoothSocket.outputStream
        } catch (e: IOException) {
            setLog(TAG, e.message.toString())
        }
    }

    override fun run() {
        val buffer = ByteArray(1024)
        var bytes: Int

        while (true) {
            try {
                // 데이터 받기(읽기)
                bytes = inputStream.read(buffer)
                setLog(TAG, bytes.toString())
            } catch (e: Exception) { // 기기와의 연결이 끊기면 호출
                setLog(TAG, "기기와의 연결이 끊겼습니다.")
                break
            }
        }
    }

    fun write(bytes: ByteArray) {
        try {
            // 데이터 전송
            outputStream.write(bytes)
        } catch (e: IOException) {
            setLog(TAG, e.message.toString())
        }
    }

    fun cancel() {
        try {
            bluetoothSocket.close()
        } catch (e: IOException) {
            setLog(TAG, e.message.toString())
        }
    }
}
블루투스 프로필
- Bluetooth 프로필은 기기 간의 Bluetooth 기반 통신을 위한 무선 인터페이스 사양입니다.
- 예로는 헤드셋, 건강 장치 등이 있습니다.
- 스마트폰을 무선 헤드셋에 연결하려면 두 기기 모두 핸즈프리 프로필을 지원해야 합니다.
- Bluetooth API는 다음과 같은 Bluetooth 프로필에 대한 구현을 제공합니다.
- 헤드셋: 안드로이드는 블루투스 헤드셋 서비스를 컨트롤 하는 프록시인
BluetoothHeadSet클래스를 제공합니다. - A2DP: Advanced Audio Distribution Profile의 약자로 블루투스 연결을 사용해 높은 품질의 오디오를 스트리밍하기 위해서 사용합니다. 안드로이드는 A2DP 서비스를 컨트롤하는 프록시인
BluetoothA2dp클래스를 제공합니다. - Health Device: Bluetooth Health API는
BluetoothHealth,BluetoothHealCallback및BluetoothHealthAppConfiguration클르스를 포함합니다. 이를 사용하면 블루투스를 사용해 블루투스를 지원하는 의료 기기(심박측정기, 혈압게, 체온계)와 통신하는 애플리케이션을 만들 수 있습니다.
- 헤드셋: 안드로이드는 블루투스 헤드셋 서비스를 컨트롤 하는 프록시인
- 기본적인 프로필 설정의 과정은 다음과 같습니다.
BluetoothManager.getDefaultAdapter()메서드를 사용하여BluetoothAdapter객체를 획득합니다.BluetoothProfile.ServiceListener인터페이스를 구현하는 클래스를 생성합니다. 이 리스너는 서비스에 연결되거나 연결이 끊어진 경우BluetoothProfile클라이언트에게 알려줍니다.getProfileProxy()메서드를 사용하여 프로필에 연결된 프포필 프록시 객체에 대한 연결을 설정합니다.BluetoothProfile.ServiceListener.onServiceConnected()메서드에서 프록시 객체를 처리합니다.- 프록시 객체가 있다면 해당 객체를 사용해 연결 상태를 모니터링하며 해당 프로필과 관련된 작업을 수행하면 됩니다.
프록시(Proxy):
대신이라는 의미를 가지고 있습니다. 프로토콜에 있어서 대리 응답 등에서 사용하는 개념이라고 할 수 있습니다. 보안상의 문제로 직접 통신을 주고 받을 수 없는 사이에서 프록시를 이용해서 중계를 하는 개념이라고 볼 수 있습니다. 이렇게 중계의 기능을 하는 것 을 프록시 서버 라고 부릅니다.
참조
Bluetooth란 무엇인가?
블루투스 프로파일 개요
Android Developer - Bluetooth
Android-Bluetooth
neuronicle-Fx2
프록시란 무엇인가?
UUID란 무엇인가?
2022.08.31에 업데이트되었고 변동사항이 있을 경우 글을 업데이트 하도록 하겠습니다.
틀린 부분은 댓글로 남겨주시면 수정하겠습니다..!!

TEST를 해보고싶은데 전체 소스코드좀 받아볼수있을까요?