@Async
@Async는 Spring에서 제공하는 Thread Pool을 활용하는 비동기 메소드 지원 Annotaiton입니다.@Async로 annotating된 bean의 메소드는 별도의 스레드에서 실행됩니다.
기존 Java에서 비동기 방식으로 메서드를 구현할 때는 아래와 같이 구현할 수 있었다
java.util.concurrent.ExecutorService을 활용해서 비동기 방식의 method를 정의 할 때마다,
위와 같이 Runnable의 run()을 재구현해야 하는 등 동일한 작업들의 반복이 잦았다
Thread를 사용하여 비동기 코드 작성
Thread를 사용하지 않은 동기 코드
public class ThreadExample {
    public static void main(String[] args) {
        // 작업 1 - 1.5초 소요
        System.out.println("작업1 시작");
        try {
            Thread.sleep(1500);
        } catch (InterruptedException e) {
            e.printStackTrace();
        }
        System.out.println("작업1 종료");

        // 작업 2 - 0.5초 소요
        System.out.println("작업2 시작");
        try {
            Thread.sleep(500);
        } catch (InterruptedException e) {
            e.printStackTrace();
        }
        System.out.println("작업2 종료");
    }
}
실행 결과
작업1 시작
작업1 종료
작업2 시작
작업2 종료
실행 결과는 순차적으로 실행이 된 걸 볼 수 있다. 이 때 작업1은 작업 시간이 길고 작업2는 작업시간이 짧다. 작업1과 작업2는 연관성이 없지만 작업2는 작업1이 끝날 때까지 기다려야 한다. 이런 경우에는 스레드를 나누어 시간이 오래 걸리는 작업은 다른 주체(스레드)에게 맡겨 다른 작업과 동시에 실행되게 만들면 시간을 아낄 수 있다.
Thread를 사용하여 작업1을 실행
public class ThreadExampleAsync  {
    public static void main(String[] args) {

        ExecutorService executorService = Executors.newFixedThreadPool(5);
        executorService.submit(
                new Runnable() {
                    @Override
                    public void run() {
                        System.out.println(Thread.currentThread().getName() +" 작업1 시작");
                        try {
                            Thread.sleep(1500);
                        } catch (InterruptedException e) {
                            e.printStackTrace();
                        }
                        System.out.println(Thread.currentThread().getName() + " 작업1 종료");
                    }
                }
        );

        System.out.println(Thread.currentThread().getName() + " 작업2 시작");
        try {
            Thread.sleep(500);
        } catch (InterruptedException e) {
            e.printStackTrace();
        }
        System.out.println(Thread.currentThread().getName() + " 작업2 종료");
    }
}
실행 결과
pool-1-thread-1 작업1 시작
main 작업2 시작
main 작업2 종료
pool-1-thread-1 작업1 종료
@Async 사용하기
@Async annotation을 활용하면 손쉽게 비동기 메서드를 작성할 수 있다.
만약 spring boot에서 사용하고 싶다면 Application class에 @EnableAsync Annotation을 추가하고 비동기로 동작하길 원하는 method 위에 @Async Annotation을 붙여주면 사용할 수 있다.
@EnableAsync
@SpringBootApplication
public class SpringBootApplication {
    ...
}
public class AsyncClass {
@Async
public void asyncMethod( ... ) throws Exception {
....
}
}@Async 어떻게 동작할까?
Spring의 Async 지원은 JDK Proxy 또는 CGlib와 같은 객체를 사용하여 Async가 정의된 객체를 생성합니다. 그런 다음 Spring은 이 메소드의 로직을 별도의 실행 경로로 제출하기 위해 컨텍스트와 연결된 스레드 풀을 찾으려고 합니다. 구체적으로는, 고유한 TaskExecutor 빈이나 taskExecutor로 이름 지정된 빈을 검색합니다. 이러한 빈이 없으면 기본적으 SimpleAsyncTaskExecutor를 사용합니다.
SimpleAsyncTaskExecutor는 스레드풀이 아닙니다. 그렇기 때문에 스레드를 관리하고 재사용하는 것이 아니라 계속 만들어냅니다. 스레드는 자원이 많이 들기 때문에 SimpleAsyncTaskExecutor를 쓰지 말아야합니다.
따라서 다음처럼 TaskExecutor를 빈으로 등록하여 사용하는 것이 옳바른 방법입니다.
@Configuration
@EnableAsync
public class AsyncThreadConfiguration {
	@Bean
	public Executor asyncThreadTaskExecutor() {
		ThreadPoolTaskExecutor threadPoolTaskExecutor = new ThreadPoolTaskExecutor();
		threadPoolTaskExecutor.setCorePoolSize(5);
		threadPoolTaskExecutor.setMaxPoolSize(10);
		threadPoolTaskExecutor.setThreadNamePrefix("Executor-");
		return threadPoolTaskExecutor;
	}
}-
The corePoolSize is the minimum number of workers to keep alive without timing out.
-
The maxPoolSize defines the maximum number of threads that can ever be created. 생성될 수 있는 최대 쓰레드의 개수. ThreadPoolTaskExecutor의 대기열 항목 수가 queueCapacity를 초과하는 경우에만 새 스레드를 생성합니다.
스레드를 생성하는 경우
Rules for creating Threads internally by SUN:
-
the number of threads가 corePoolSize보다 작으면 새로운 스레드를 생성합니다. -
the number of threads가 corePoolSize와 같거나(또는 크다면), task를 큐에 넣습니다. -
큐가 다 찼을 때
the number of threads가 maxPoolSize보다 작으면 새로운 스레드를 생성합니다. -
큐가 다고
the number of threads가 maxPoolsize보다 같거나(또는 크다면) 해당 task를 reject합니다.
-> RejectedExecutionException
springboot 2.0이상이라면 auto configuration으로 Executor를 등록해주기 때문에 아래와 같이 설정 파일에서 설정해도 똑같이 동작합니다.
spring:
  task:
    execution:
      pool:
        core-size: 5
        max-size: 10
적용해보기
@RestController
public class TestController {
	@Autowired
	private TestService testService;

	@GetMapping("/test1")
	public void test1() {
		for(int i=0;i<10000;i++) {
			testService.asyncHello(i);
		}
	}
}

@Slf4j
@Service
public class TestService {

	@Async
	public void asyncHello(int i) {
		log.info("async i = " + i);
	}
}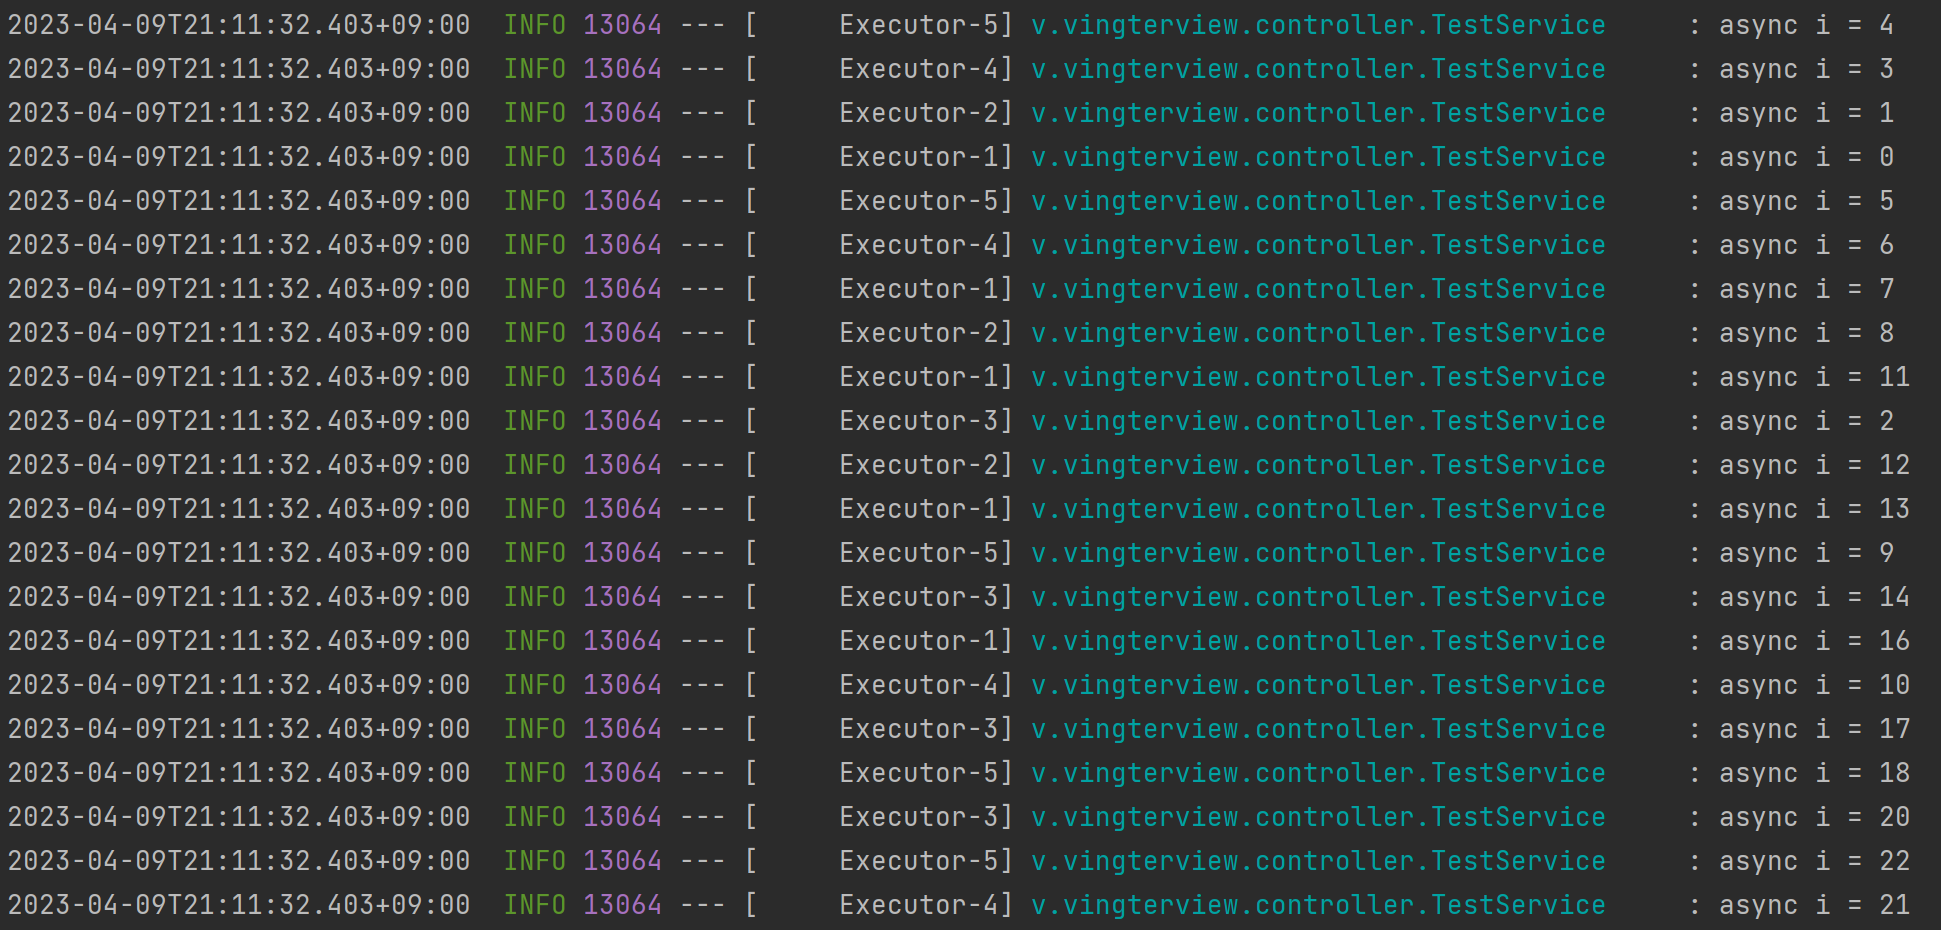
threadName을 보니 Executor로 적은 prefix가 잘 적용되어서 해당 풀을 사용하고 있음을 알 수 있고, 0부터 9999까지 순서대로 찍히는 게 아니라 비동기로 수행되기 때문에 순서가 뒤죽박죽인 것을 확인할 수 있다.
@Async 주의 사항
private 메서드는 적용이 안된다.
-> proxy로 만들 수 없기 때문에
@Async
private void senMail() {
System.out.println("A proxy on Private method "  + Thread.currentThread().getName());
}
self-invocation을 해서는 안된다.
-> 이 또한 같은 이유
@RestController
public class TestController {
	@Autowired
	private TestService testService;

	@GetMapping("/test1")
	public void test1() {
		for(int i=0;i<10000;i++) {
			testService.innerMethodCall(i);
		}
	}
}

@Slf4j
@Service
public class TestService {

	@Async
	public void asyncHello(int i) {
		log.info("async i = " + i);
	}
    public void innerMethodCall(int i) {
        this.asyncHello(i);
    }
}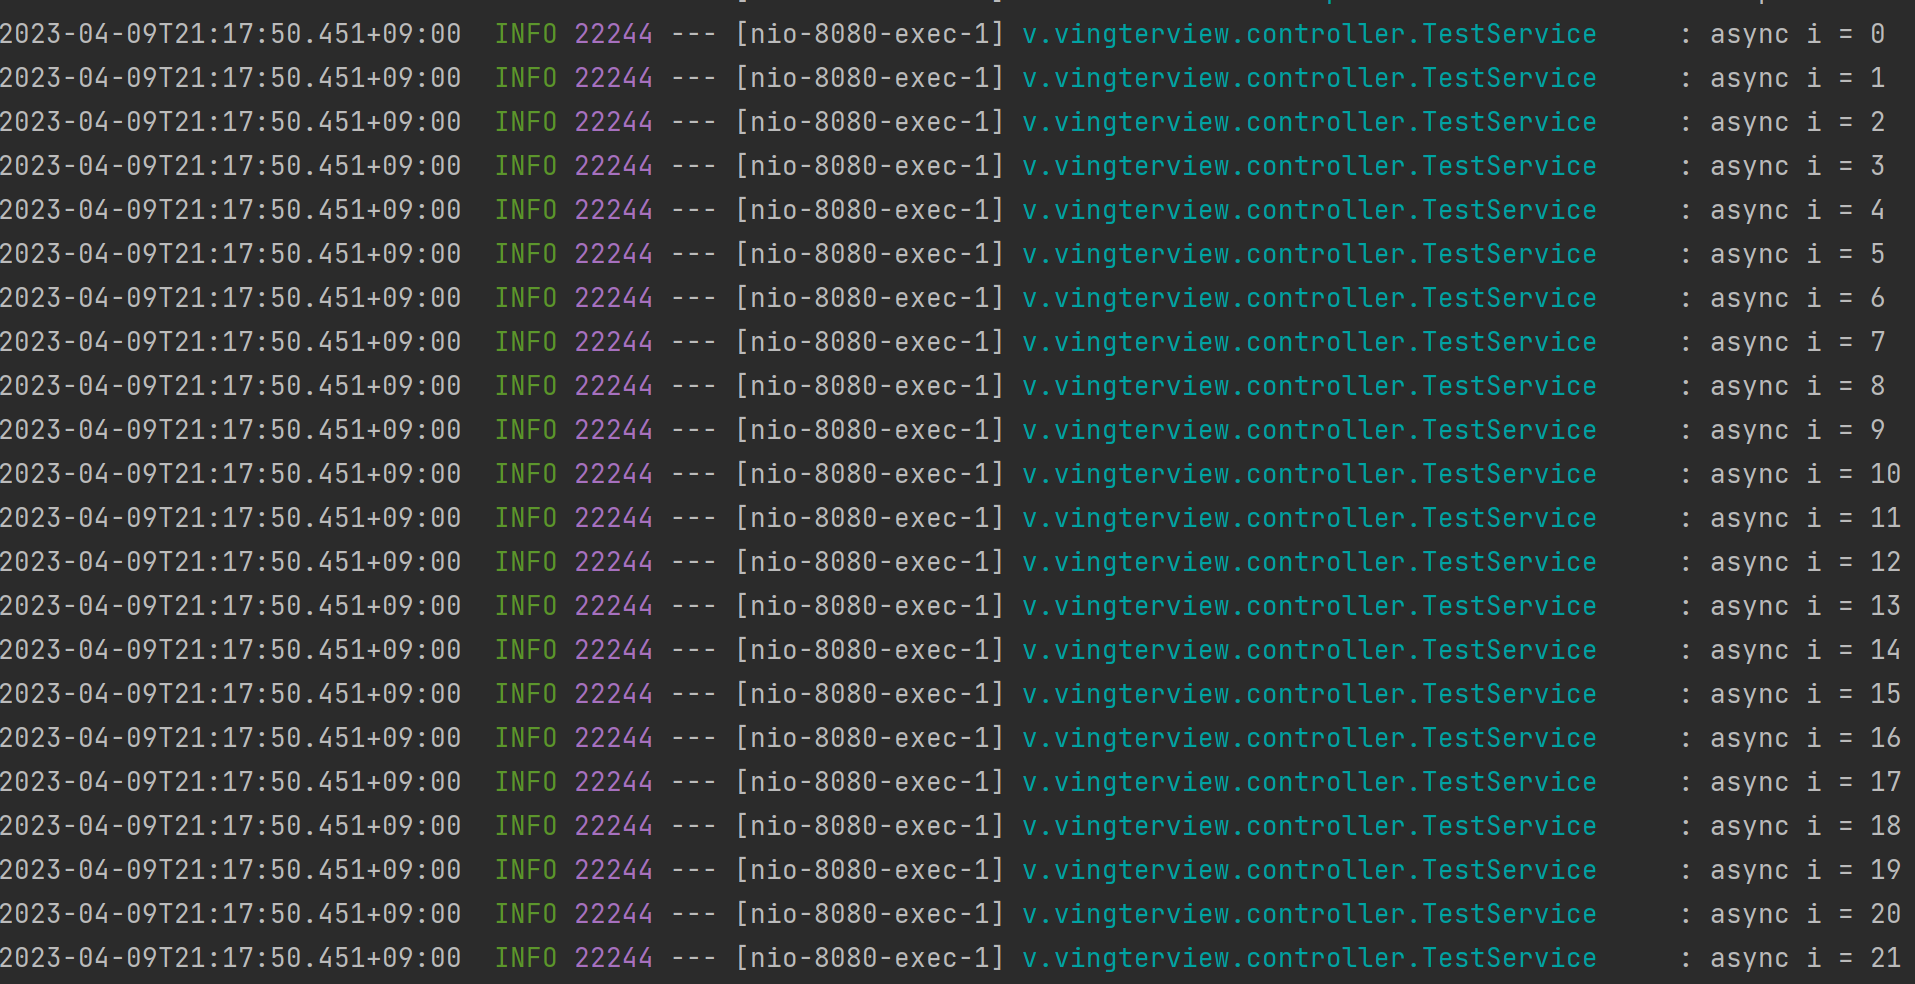
실행 결과를 보면 동기적으로 순서대로 실행된 것을 볼 수 있고 , Executor- 쓰레드 풀에 있는 쓰레드로 실행되지도 않았다. 그 이유에 대해 알아보면 다음과 같다.
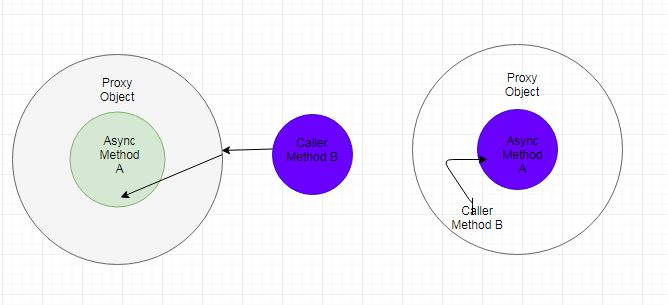
원래대로라면 왼쪽 그림처럼 Proxy 객체를 통해서 Async Method A가 실행되어야 하지만, self invocation(자기 호출)하면 오른쪽 그림처럼 Caller method B가 Async method A를 호출하면 Proxy 객체를 만들긴 하지만, 프록시를 지나쳐 직접 method A를 호출하게 된다. 그렇게 되면 우리가 원하는 대로 쓰레드를 생성하지 않고 그냥 동기적으로 실행되게 된다.
+ return 값은 void 혹은 CompletableFuture<>
출처
Effective Advice on Spring Async: Part 1[DZone]
Effective Advice on Spring Async: Final[DZone]
