JavaScript로 간단한 To-Do List 만들기
1번째 버전
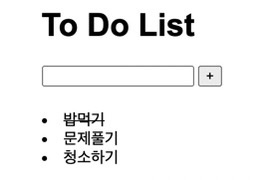
생활코딩 web2-javaScript강의를 듣고 간단한 to-do list를 만들었다. 😋
기능 목록
-
아무것도 적지 않고 '➕'버튼을 누르면 alert 메시지 출력
-
입력창에 할 일을 입력하고 ➕버튼을 누르면 리스트에 할 일을 추가
-
할 일 한 번 누르면
줄 긋기 -
할 일 더블 클릭하면 리스트에서 할 일 삭제하기
index.html
<!DOCTYPE html>
<html lang="en">
<head>
    <meta charset="UTF-8">
    <meta name="viewport" content="width=device-width, initial-scale=1.0">
    <link rel="stylesheet" href="style.css">    <!--style.css 파일 참조하기-->
    <title>To Do List</title>
</head>
<body>
    <h1>To Do List</h1>
    <div class="container">
        <input id="inputField" type="text">   <!--text 입력창(할일 입력창) 만들기-->
        <button id="addToDo"> + </button>     <!-- + 버튼 만들기 -->
        <div class="to-dos" id="toDoList"> </div>  <!-- id = inputField에 할일이 입력되고 + 버튼이 눌리면 할일이 나타날 공간 만들기-->

    </div>
    <script src="main.js"> </script>   <!--javascript 파일 참조하기-->
</body>
</html>
main.js
- 버튼 click 이벤트 만들기
let inputBox = document.getElementById('inputField');  // 할 일 입력창
let addToDo = document.getElementById('addToDo');      // 버튼
let toDoList = document.getElementById('toDoList');    // 할 일 리스트창

addToDo.addEventListener('click', function(){    // 버튼에 클릭 이벤트가 발생하면
    var list = document.createElement('li');     // html 'li' 태그 만들기
    if (!inputBox.value)            // 할 일 입력창에 내용이 입력되지 않으면 alert 발생
        alert('내용을 입력해 주세요!');
    else
    {
        list.innerText = inputBox.value;  // <li>입력된 할 일</li>
        toDoList.appendChild(list);       // 할 일 리스트창에 자식으로 붙이기
        inputBox.value= "";               // 할 일 입력창 초기화
    }

    list.addEventListener('click', function(){      // 만들어진 list에 클릭 이벤트가 발생하면 줄 긋기
        list.style.textDecoration = "line-through";
    })
    list.addEventListener('dblclick', function(){   // list에 더블클릭 이벤트가 발생하면 할 일 리스트창에서 지우기
        toDoList.removeChild(list);
    })
})
style.css
html, body {
    width: 50%;
    margin: 0 auto;
    font-family: Arial, Helvetica, sans-serif;
}

.container {
    width: 360px;
}

#inputFiled {
    width: 300px;
    height: 46px;
    border: 1px solid black;
    outline: none;
    font-size: 25px;
    vertical-align: middle;
}

.to-dos {
    margin-top:25px;
}
vscode Live Server를 사용하면 편리합니다 😊
vscode 코드 Live Server 사용하기, 실시간 미리보기
참고 자료
- script 태그의 src 속성
- Document.getElementById()
- 자바스크립트로 text-decoration 속성 부여하는 방법
- 이벤트 등록하기, addEventListener
2번째 버전
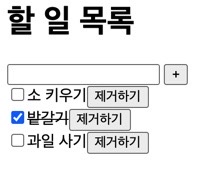
책 '혼자 공부하는 자바스크립트' 공부하며 체크박스가 추가된 새로운 to-do list를 만들 수 있었다.
기능 목록
- 아무것도 적지 않고 '➕'버튼을 누르면 리스트에 추가되지 않음, 할 일을 입력하세요 문구 출력
- 입력창에 할 일을 입력하고 ➕버튼을 누르면 리스트에 할 일을 추가
- 입력창에 할 일을 입력하고 엔터키 누르면 리스트에 할 일 추가
- 체크박스 클릭 시
줄 긋기 - 제거하기 버튼 클릭 시 리스트에서 할 일 삭제하기
<!DOCTYPE html>
<head>
    <meta charset="UTF-8">
    <meta name="viewport" content="width=device-width, initial-scale=1.0">
    <title>Document</title>
    <script>
        document.addEventListener('DOMContentLoaded', () => {
            const input = document.querySelector('#todo')
            const addButton = document.querySelector('#add-button')
            const todoList = document.querySelector('#todo-list')
            const alert = document.querySelector('span')

      		// '+' 버튼 익명 화살표 함수
            const addTodo = () => {
                if (input.value !== '') {
                    const item = document.createElement('div')
      		    // 체크박스
                    const checkbox = document.createElement('input')
                    checkbox.type='checkbox'
     		    // text
                    const text = document.createElement('span');
      		    // 제거하기 버튼
                    const deleteButton = document.createElement('button')
                    deleteButton.textContent="제거하기"

                    text.textContent = input.value
                    input.value=''

                    item.appendChild(checkbox)
                    item.appendChild(text)
                    item.appendChild(deleteButton)
                    todoList.appendChild(item)

			// 체크박스 이벤트 리스너
                    checkbox.addEventListener('change', (event) =>{
                        if (event.currentTarget.checked)
                        {
                            text.style.textDecoration='line-through'
                        }
                        else {
                            text.style.textDecoration='none'
                        }
                    })

      		    // 제거하기 버튼 클릭 이벤트 리스너
                    deleteButton.addEventListener('click', (event) => {
                        todoList.removeChild(event.currentTarget.parentNode)
                    })
                    input.value =''
                    alert.textContent = ''
                }
                else
                    alert.textContent = '할 일을 입력하세요!'
            }

            addButton.addEventListener('click', addTodo)

      		// 할 일 입력창에서 enter key가 눌렸을 때
            input.addEventListener('keypress', (event) => {
                const ENTER = 13
                if (event.keyCode === ENTER)
                    addTodo();
            })
        })
    </script>

</head>
<body>
    <h1>할 일 목록</h1>
    <span></span><br>
    <input id="todo">
    <button id="add-button">+</button>
    <div id="todo-list"></div>
</body>
</html>