Queueable Apex
Queueable Apex는 future 메소드와 동일하게 기능한다. 하지만 future 와 다른 몇가지가 있다!
- future메소드는 원시타입 자료형만 parameter로 받을 수 있었다면, Queueable 클래스에는 sObject 또는 custom 된 비원시적 데이터도 포함될 수 있다.
- System.enqueueJob() 메소드를 호출하면 AsyncApexJob 레코드의 ID를 반환한다. 이 레코드를 쿼리하여 작업을 식별하고 진행상황을 모니터링 할 수 있다.
- 실행중인 작업에서 다른 작업과 연결할 수 있다.
코드 예시
세일즈포스 내에 저장되어 있는 레코드들을 가져와서 외부 REST 엔드포인트에 대한 콜아웃을 실행하고 이를 데이터베이스에 비동기식으로 업데이트 하는 예시이다.
public class UpdateParentAccount implements Queueable {
	// Queuable interface를 implements 해서 사용
    private List<Account> accounts;
    private ID parent;

    public UpdateParentAccount(List<Account> records, ID id) {
        this.accounts = records;
        this.parent = id;
    }

    public void execute(QueueableContext context) {
        for (Account account : accounts) {
          account.parentId = parent;
          // 다른 프로세스나 콜아웃 수행
        }
        update accounts;
    }
}
클래스를 정의해두고, 다음과 같은 코드를 실행한다.
//billing state가 NY인 모든 account를 찾아서
List<Account> accounts = [select id from account where billingstate = ‘NY’];

// ACME Corp의 parentId를 저장해두고
Id parentId = [select id from account where name = 'ACME Corp'][0].Id;

// Queueable class 인스턴스화
UpdateParentAccount updateJob = new UpdateParentAccount(accounts, parentId);

// 대기열에 추가
ID jobID = System.enqueueJob(updateJob);
System.enqueueJob하면 작업이 대기열에 추가되고 시스템 리소스를 사용할 수 있을 때 처리한다.
test
동일하게 Test.startTest와 Test.stopTest 사이에 Queueable Apex 코드를 위치하여 테스트 할 수 있다. 시스템은 stopTest 이후 부터 모든 비동기 프로세스를 동기적으로 실행한다.
Chaining Jobs
만약 내가 작업을 순차적으로 진행할 예정이라면, execute() method 안에 그 다음으로 실행할 job을 호출해준다.
public class FirstJob implements Queueable {
    public void execute(QueueableContext context) {
        // Awesome processing logic here
        // Chain this job to next job by submitting the next job
        System.enqueueJob(new SecondJob());
    }
}
연속적으로 job이 실행되는 경우, Test.isRunningTest()를 chaining jobs 이전에 배치하여 확인할 수 있다.
주의할 점💥💥
- Queue에 있는 작업 실행은 한 번만 계산된다.
- 한 트랜잭션 당 System.enqueueJob은 50개까지 추가할 수 있다.
- Chaining job은 하나만 들어갈 수 있다. 즉, 동일한 Queue에서 여러개의 Chaining job을 실행하는 것은 불가능하다.
- 근데 Chaining 된 job에서 또 Chaining 하는 것은 제한이 없다! 근데 Developer Edition에선 4개까지만 연결이 가능하다
Scheduled Apex
배치 Apex를 매일 혹은 매주 유지해야 하는 작업이 있을 때 유용하다. Schedulable 인터페이스를 implements 해서 클래스를 정의하고 사용할 땐 System.schedule()에 인스턴스를 인자로 전달하면 된다!
execute()의 parameter는 SchedulableContext 객체이다. 클래스가 스케쥴되면, CronTrigger 객체가 생성된다. CronTrigger.getTriggerId()하면, CronTrigger API 객체의 ID를 반환받을 수 있다.
예시
public class RemindOpptyOwners implements Schedulable {
    public void execute(SchedulableContext ctx) {
        List<Opportunity> opptys = [SELECT Id, Name, OwnerId, CloseDate
            FROM Opportunity
            WHERE IsClosed = False AND
            CloseDate < TODAY];
        // Create a task for each opportunity in the list
        TaskUtils.remindOwners(opptys);
    }
}
이 코드는 마감일이 아직 오지 않았고 마감되지 않은 Opportunity들을 쿼리하여서 Task를 oppty owner에게 생성하는 execute 메소드이다.
System.Schedule 사용
System.schedule() 메소드는 사용자의 시간대를 사용하지만, System 모드에서 실행된다. 메소드에 전달할 인자들은 string으로 된 작업 이름, 날짜, scheduled 인스턴스다.
RemindOpptyOwners reminder = new RemindOpptyOwners();
// Seconds Minutes Hours Day_of_month Month Day_of_week optional_year
String sch = '20 30 8 10 2 ?';
String jobID = System.schedule('Remind Opp Owners', sch, reminder);
여기서 sch는 예약할 시간과 날짜이다. 시간과 날짜는 CRON 표현식을 사용하여 전달한다. 크론 표현식을 만들어주는 사이트도 있다. 링크는 요기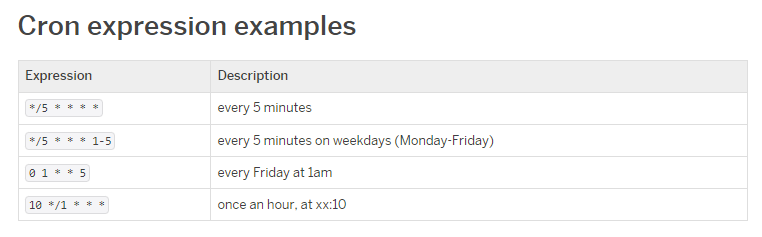
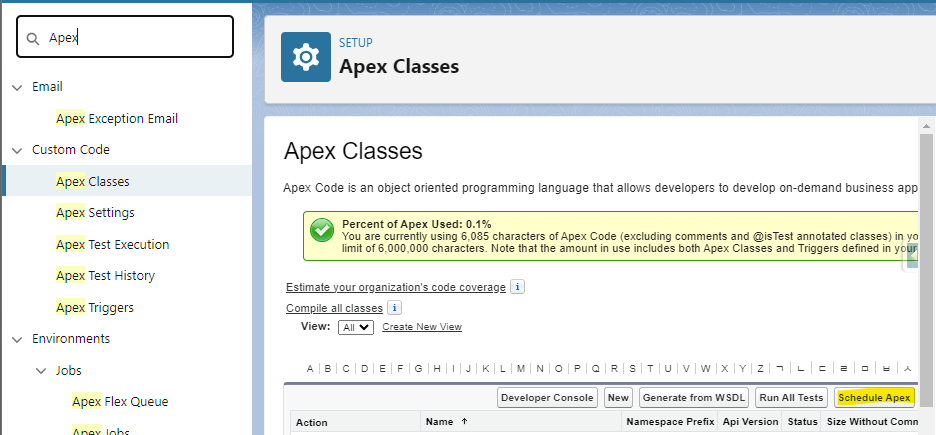
schedule은 스탠다드로도 구현이 가능하다. Setup에서 Apex Class의 Schedule Apex를 누르면 노코드 방식으로도 schedule 할 수 있다.
그리고 flow로도 보다 비즈니스 로직에 맞게 만들 수 있음!!!!
Test 코드
@IsTest
private class RemindOppyOwnersTest {
    // CRON으로 날짜 설정은 해놓지만, Test이기 때문에 stopTest()후에 바로 실행될 것임!!
    public static String CRON_EXP = '0 0 0 15 3 ? 2042';

    @IsTest
    static void testScheduledJob() {
        // 테스트 용 Oppty 레코드들을 만든다.
        List<Opportunity> opptys = new List<Opportunity>();
        Date closeDate = Date.today().addDays(-7);
        for (Integer i=0; i<10; i++) {
            Opportunity o = new Opportunity(
                Name = 'Opportunity ' + i,
                CloseDate = closeDate,
                StageName = 'Prospecting'
            );
            opptys.add(o);
        }
        insert opptys;

        // 방금 insert한 Oppty id를 저장
        Map<Id, Opportunity> opptyMap = new Map<Id, Opportunity>(opptys);
        List<Id> opptyIds = new List<Id>(opptyMap.keySet());

        Test.startTest();
        // job을 스케줄하기
        String jobId = System.schedule('ScheduledApexTest', CRON_EXP, new RemindOpptyOwners());
        // 아직 job이 실행되지 않았는지 확인하기
        List<Task> lt = [SELECT Id FROM Task WHERE WhatId IN :opptyIds];
        System.assertEquals(0, lt.size(), 'Tasks exist before job has run');
        // Test를 stop하면 비동기적으로 job이 실행될 것임.
        Test.stopTest();

        // 이제 비동기적으로 실행되었으니,
        // 다시한번 체크해보기
        lt = [SELECT Id FROM Task WHERE WhatId IN :opptyIds];
        System.assertEquals(opptyIds.size(), lt.size(), 'Tasks were not created');
    }
}
주의할 점💥💥💥
- 한번에 100개만 예약할 수 있고, 24시간 동안 실행될 수 있는 개수가 제한되어 있다.
- trigger를 통해 예약할 생각이면 각별히 주의해야한다. limit을 넘어가지 않도록 주의주의!!
- scheduled apex에선 동기적으로 웹 서비스 콜아웃을 할 수 없다. 콜아웃을 하고싶다면 @future(callout=true)로 비동기 콜아웃을 만들고 이 메소드를 schedule apex에서 호출하면 된다. => Batch apex는 됨!!
Monitoring Asyncronous Jobs
비동기 작업은 백그라운드에서 자동으로 작업되기 때문에 내부 진행 상황을 모니터링해야 한다..!! Setup에서 Apex Jobs로 들어가면 비동기 작업이 모두 표시된다. 또한 Apex Flex Queue에서 작업 순서를 변경할수도 있다.
Monitoring future Jobs
future job은 Apex Jobs에 표시되지만 Apex Flex Queue에는 표시되지 않아서 ASyncApexJob를 쿼리하여 찾아야 한다. 하지만 future job은 ID가 반환되지 않으므로 MethodName과 JobType과 같은 필드들로 필터링 하여 찾아야 한다.
System.enqueueJob()에서 반환되는 ID를 필터링하여 AsyncApexJob에서 SOQL 쿼리를 수행하면 job을 확인할 수 있다.
AsyncApexJob jobInfo = [SELECT Status, NumberOfErrors
    FROM AsyncApexJob WHERE Id = :jobID];
추가로..
Apex Flex Queue를 사용하면 batch 작업을 최대 100개까지 제출할 수 있다. 작업은 선입선출 방식으로 처리 되며, 순서를 바꿀수도 있다. batch 자체가 시스템의 리소스가 남을 때 실행되기 때문에, Apex Flex Queue에 있던 job을 앞에서부터 하나씩 Batch job queue로 이동시켜서 실행한다. 한 org당 최대 5개의 Batch를 동시에 돌릴 수 있다.
더 자세한 내용은.. 요기 참조..