📚 Fragment Manager
-
지난 글 안드로이드 학습 - Fragment 에서 Fragment에서 대략적으로 학습했습니다.
-
이 글에는 Fragment Manger와 Fragment Transaction에 대해 좀 더 깊은 내용에 대해 설명합니다.
👀 프래그먼트 관리자를 통해 프래그먼트 트랜잭션 커밋하기
-
프래그먼트 관리자는 앱 프래그먼트에서 작업을 추가, 삭제 또는 교체하고 백 스택에 추가하는 등의 작업을 실행하는 클래스입니다.
-
프래그먼트 트랜잭션 클래스는 프래그먼트 추가/교체/삭제 작업을 제공합니다.
- 프래그먼트 트랜잭션은 프래그먼트 관리자가 수행할 단일 단위이기도 합니다.
-
아래 그림을 참고하여, 2가지 방법을 통해 프래그먼트 관리자를 통해 프래그먼트 트랜잭션 커밋할 수 있습니다.
그림 1 : 프래그먼트 관리자 클래스 생성 + 프래그먼트 트랜잭션 생성하여 커밋

그림2 : 라이브러리에서 제공하는 확장 함수를 이용하여 커밋

👀 프래그먼트 관리자에 대해 알아보자
- 프래그먼트 관리자 클래스는 어떻게 생성 및 호출되는 것일까?
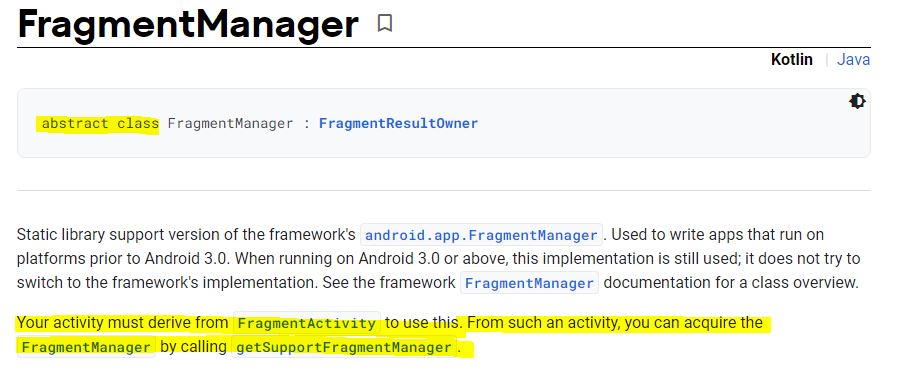
-
공식 문서를 보면 프래그먼트 관리자는 추상 클래스이며, 해당 클래스를 사용하기 위해서는 FragmentActivity에서
getSupportFragmentManager (코틀린에서는 supportFragmentManager)를 통해 생성할 수 있음을 알 수 있습니다.- 즉, FragmentManager에 대한 구현을 FragmentActivity에서 하고 있습니다.

-
그리고 MainActivity(호스트 액티비티) 에서 프래그먼트 관리자 클래스를 호출 및 사용할 수 있는 이유는 AppCompatActivity가 FragmentActivity를 상속받았기 때문입니다.

-
따라서 커스텀 액티비티에서 프래그먼트를 사용하고 싶다면 반드시 FragmentActivity를 상속받도록 해야합니다.
👉 프래그먼트 관리자를 인스턴스화 하는 다른 방법?

-
위에서 호스트 액티비티(FragmentActivity)에서 프래그먼트 관리자 클래스를 구현하여
supportFragmentManager를 통해 프래그먼트 관리자를 인스턴스화 및 호출할 수 있음을 확인했습니다. -
그렇다면,
parentFragmentManager와childFragmentManager는 어디서 구현되어있는 걸까요?
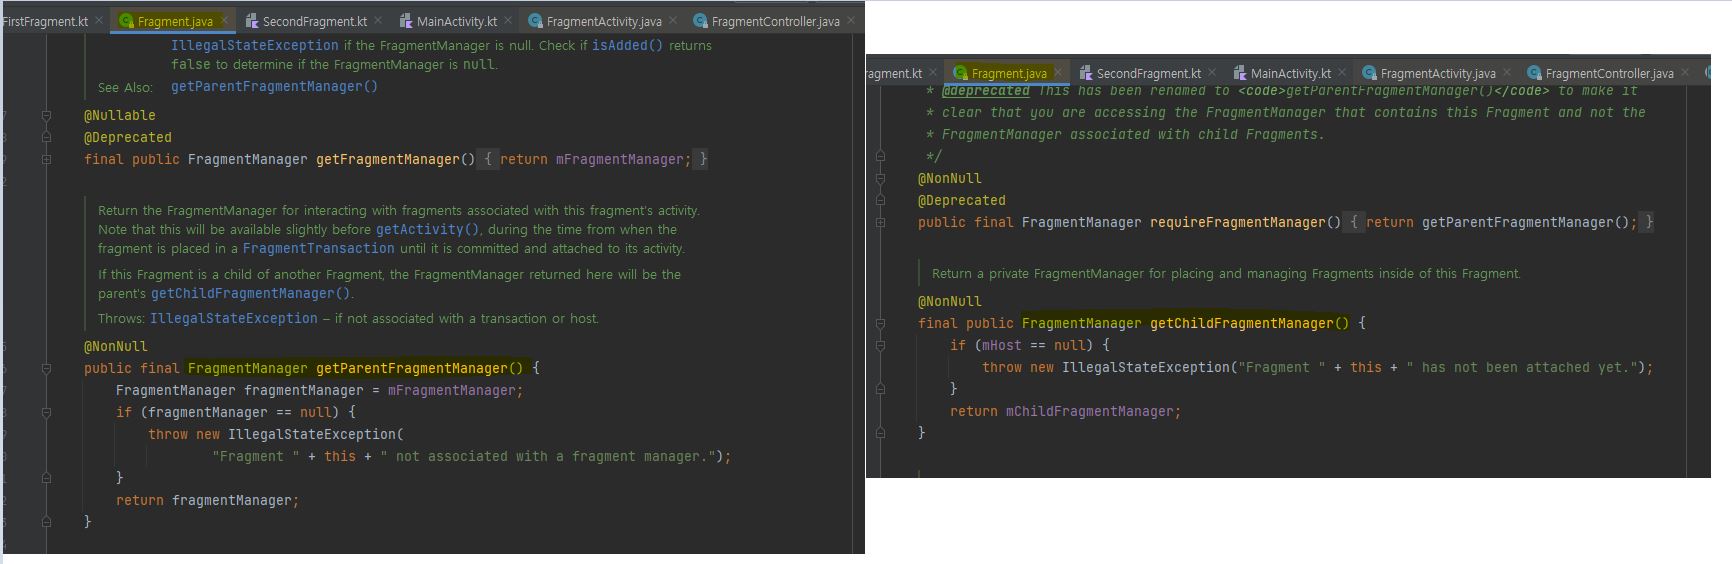
- 바로 Fragment 클래스에서 구현하고 있습니다. 그래서
parentFragmentManager와childFragmentManager를 통해 프래그먼트 관리자 클래스를 생성 및 호출할 수 있는 것입니다.
👀 프래그먼트 트랜잭션 알아보기
- 프래그먼트 트랜잭션 클래스는 어떻게 생성 및 호출되는 것일까?

- 프래그먼트 트랜잭션 클래스도 역시 추상 클래스입니다.

-
내부 코드를 따라가보면 프래그먼트 관리자 클래스에서 프래그먼트 트랜잭션 클래스를 구현하고 있으며, 프래그먼트 관리자 클래스의
beginTransaction()메서드로 프래그먼트 트랜잭션 클래스를 인스턴스화했음을 알 수 있습니다. -
프래그먼트 트랜잭션 클래스를 상속받은 클래스
BackStackRecord와 주석을 통해 백스택에 기록되는 데이터는 프래그먼트 트랜잭션임을 확인할 수 있습니다.
👀 add, remove, replace 알아보기 <추후 업데이트 필요>
- 내부 코드를 통해 간단히 프래그먼트 트랜잭션 클래스를 통해 추가, 제거, 교체하는 작업을 할 때 호출하는 add, remove, replace 에 대해 알아봅시다.
👉 add

- 결론적으로 addOp() 메서드를 통해 프래그먼트를 추가하고 있음을 알 수 있습니다.
👉 remove

- 결론적으로 addOp() 메서드를 통해 프래그먼트를 추가하고 있음을 알 수 있습니다.
👉 replace

- 결론적으로 addOp() 메서드를 통해 프래그먼트를 추가하고 있음을 알 수 있습니다.
- replace는 존재하는 프래그먼트를 remove 하고 새 프래그먼트를 add 하는 작업입니다.
<예시>

-
메인 액티비티에서 버튼을 누르면 첫번째 프래그먼트로, 첫번째 프래그먼트에서 버튼을 누르면 두번째 프래그먼트로 가는 앱이 있습니다.
-
여기서 메인 액티비티에서 버튼을 누르면 첫번째 프래그먼트를 add 하고 두번째 프래그먼트로 replace 하면 어떤 결과가 나올까요?

class MainActivity : AppCompatActivity() {

    private lateinit var button: Button

    override fun onCreate(savedInstanceState: Bundle?) {
        super.onCreate(savedInstanceState)
        Log.d(TAG, "onCreate")
        setContentView(R.layout.activity_main)

        button = findViewById<Button>(R.id.btn_main_activity)

        button.setOnClickListener {
            supportFragmentManager.commit {
                val firstFragment = FirstFragment()
                add(R.id.fragment_container, firstFragment)
                addToBackStack(null)
            }

            supportFragmentManager.commit {
                val secondFragment = SecondFragment()
                replace(R.id.fragment_container, secondFragment)
                addToBackStack(null)
               }
-
위에서 replace 메서드에 대해 설명했듯이,
첫번째 프래그먼트 생성 - 두번째 프래그먼트 생성 - 첫번째 프래그먼트 소멸 되는 과정을 볼 수 있습니다.
-
이처럼 프래그먼트를 add 한 다음에 바로 replace를 하면 불필요한 작업/중복된 작업으로 메모리 낭비가 발생할 수 있습니다.
-
다행히 프래그먼트 트랜잭션 메서드에는 이런 중복 작업을 취소해주는 메서드가 있습니다. 바로
setReorderingAllowed(true)입니다.

class MainActivity : AppCompatActivity() {

    private lateinit var button: Button

    override fun onCreate(savedInstanceState: Bundle?) {
        super.onCreate(savedInstanceState)
        Log.d(TAG, "onCreate")
        setContentView(R.layout.activity_main)

        button = findViewById<Button>(R.id.btn_main_activity)

        button.setOnClickListener {
            supportFragmentManager.commit {
                val firstFragment = FirstFragment()
                add(R.id.fragment_container, firstFragment)
                setReorderingAllowed(true)
                addToBackStack(null)
            }

            supportFragmentManager.commit {
                val secondFragment = SecondFragment()
                replace(R.id.fragment_container, secondFragment)
                setReorderingAllowed(true)
                addToBackStack(null)
            }
} 
-
위 그림에서 볼 수 있듯이
setReorderingAllowed(true)를 모든 프래그먼트 트랜잭션 클래스에서 true로 설정한 결과,첫번째 프래그먼트는 view는 onCreate() 메서드만 호출되고 더 이상 상태가 변하지 않고 바로 두번째 프래그먼트가 생성되는 점을 확인할 수 있습니다.
-
다만, 반드시 중복 작업이 발생하는 프래그먼트 트랜잭션 클래스에서 true로 설정해야 합니다. 한 곳만 설정하면 제대로 작동되지 않습니다.
👀 참고한 블로그
- 공식 문서
- 블로그

좋은내용 잘보고 갑니다~