File객체 만들기
1. new File(String 파일 또는 경로명)
⇒ 디렉토리와 디렉토이 사이 또는 디렉토리와 파일명 사이의 구분문자는 ‘\’를 사용하거나 ‘/’를 사용할 수 있다.
import java.io.File;
public class T01_FileTest {
public static void main(String[] args) throws IOException {
File file = new File("d:/D_Other/test.txt");
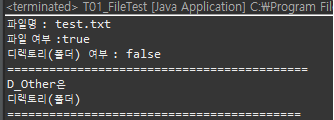
System.out.println("파일명 : "+file.getName());
System.out.println("파일 여부 :"+file.isFile());
System.out.println("디렉토리(폴더) 여부 : "+file.isDirectory());
System.out.println("===========================================");
File file2 = new File("d:\\D_Other");
System.out.println(file2.getName()+"은");
if(file2.isFile()) {
System.out.println("파일");
} else if(file2.isDirectory()) {
System.out.println("디렉토리(폴더)");
}
System.out.println("==========================================");
}
}
2. new File(File parent, String child)
- ‘parent’ 디렉토리 안에 있는 ‘child’파일 또는 디렉토리를 갖는다.
File file3 = new File(file2,"test.txt");
		System.out.println(file.getName()+"의 용량(크기) : "+file3.length()+"bytes");
3. new File(String parent, String child)
File file4 = new File("./D_Other/test/..","test.txt"); // 상대경로
		System.out.println("절대경로 : "+file4.getAbsolutePath());
		System.out.println("경로 : "+file4.getPath());
		System.out.println("표준경로 : "+file4.getCanonicalPath());
		System.out.println("--------------------------------------------------");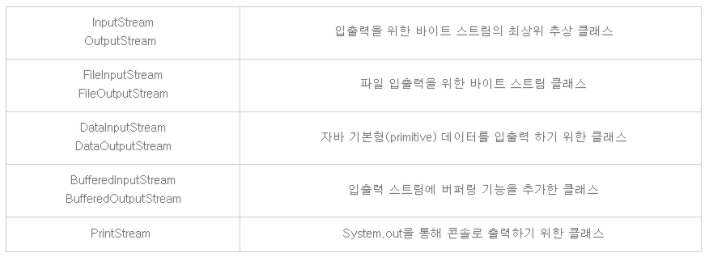
디렉토리(폴더) 만들기
1. mkdir()
- File객체의 경로 중 마지막 위치의 디렉토리를 만든다. 중간의 경로가 모두 미리 만들어져 있어야 한다. ⇒ 만들기를 성공하면 true, 실패하면 false를 반환
File file6 = new File("d:/D_Other/연습용");
		if(file6.mkdir()) {
			System.out.println(file6.getName()+"만들기 성공!");
		} else {
			System.out.println(file6.getName()+"만들기 실패!");
		}
2. mkdirs()
- 중간의 경로가 없으면 중간의 경로도 새롭게 만든 후 마지막 위치의 디렉토리를 만들어준다. ⇒ 만들기를 성공하면 true, 실패하면 false를 반환
File file5 = new File("d:/D_Other/test/java/src");
		if(file5.mkdirs()) {
			System.out.println(file5.getName()+"만들기 성공!");
		} else {
			System.out.println(file5.getName()+"만들기 실패!");
		}
// test/java 폴더도 자동생성
4. exists(), createNewFile()
import java.io.File;
import java.io.IOException;

public class T02_FileTest {
	public static void main(String[] args) throws IOException {
		File f1 = new File("d:/D_Other/sample.txt"); //절대경로
		File f2 = new File("d:/D_Other/test.txt");

		if(f1.exists()) {
			System.out.println(f1.getName()+"은 존재합니다");
		}else {
			System.out.println(f1.getName()+"은 없는 파일입니다");

		if(f1.createNewFile()) {
			System.out.println(f1.getAbsolutePath()+"파일을 새로 만들었습니다");
		}
	}

		if(f2.exists()) {
			System.out.println(f2.getName()+"은 존재합니다");
		}else {
			System.out.println(f2.getName()+"은 없는 파일입니다");
		}
		System.out.println("-----------------------------------------------------");
	}

}
5. 디렉토리 내 파일제목들 가져오기
File f3 = new File("D:/D_Other");
		File[] files = f3.listFiles();
		for(File f : files) {
			System.out.println(f.getName()+" => ");
			if(f.isFile()) {
				System.out.println("파일");
			}else if(f.isDirectory()) {
				System.out.println("디렉토리(폴더)");
			}
		}
		System.out.println("=======================================================");

		String[] strFiles = f3.list();
		for(String fileName : strFiles) {
			System.out.println(fileName);
		}
		System.out.println("=======================================================");

		displayFileList(new File("d:/D_Other"));
		}


	// 지정된 디렉토리(폴더)에 포함된 파일과 디렉토리 목록을 보여주는 메소드
	public static void displayFileList(File dir) {
		System.out.println("["+dir.getAbsolutePath()+"] 디렉토리 내용");

		// 디렉토리 안의 모든 파일 목록을 가져온다
		File[] files = dir.listFiles();

		//하위 디렉토리 정보를 저장할 ArrayList 생성(File배열의 인덱스값 저장용)
		List<Integer> subDirList = new ArrayList<Integer>();

		//날짜를 출력하기 위한 형식 설정
		SimpleDateFormat sdf = new SimpleDateFormat("yyyy-MM-dd a hh:mm");

		for(int i=0; i<files.length; i++) {
			String attr = ""; //파일의 속성(읽기, 쓰기, 히든, 디렉토리 구분)
			String size = ""; //파일의 크기

			if(files[i].isDirectory()) {
				attr = "<DIR>";
				subDirList.add(i); //인덱스값을 리스트에 추가
			}else {
				size = files[i].length()+"";

				attr = files[i].canRead()? "R" : " ";
				attr += files[i].canWrite()? "W" : " ";
				attr += files[i].isHidden()? "H" : " ";
			}

			System.out.printf("%s %5s %12s %s \n",
					sdf.format(new Date(files[i].lastModified())),
					attr, size, files[i].getName());
		}

		int dirCount = subDirList.size(); // 폴더안의 하위폴더 개수 구하기
		int fileCount = files.length - dirCount; //폴더 안의 파일 개수 구하기

		System.out.println(fileCount +"개의 파일, "+dirCount+"개의 디렉토리");

		System.out.println();


		for(int i=0; i<subDirList.size(); i++) {
			// 하위폴더의 내용들도 출력하기위해 현재 메소드를 재귀호출하여 처리한다.
			displayFileList(files[subDirList.get(i)]);
		}


	}

}
ByteArray 배열복사
직접복사
import java.util.Arrays;

public class T03_ByteArrayIOTest {
	public static void main(String[] args) {

		// inSrc를 outSrc에 복사하기
		byte[] inSrc = {0,1,2,3,4,5,6,7,8,9};
		byte[] outSrc = null;
		// 직접 복사하는 방법
		outSrc = new byte[inSrc.length]; // 우선 배열의 크기부터 확보

		for(int i= 0; i<inSrc.length; i++) {
			outSrc[i]=inSrc[i];
		}
		System.out.println("직접 복사후 outSrc => "+Arrays.toString(outSrc));

	}
}
arraycopy
import java.util.Arrays;

public class T03_ByteArrayIOTest {
	public static void main(String[] args) {

		// inSrc를 outSrc에 복사하기
		byte[] inSrc = {0,1,2,3,4,5,6,7,8,9};
		byte[] outSrc = null;
		// arraycopy 이용하는 배열복사
		outSrc = new byte[inSrc.length];
		System.arraycopy(inSrc, 0, outSrc, 0, inSrc.length);
		System.out.println("outSrc => "+Arrays.toString(outSrc));

	}
}
Stream 클래스
Byte Stream : 데이터의 종류가 파일,그림,동영상 등 바이트 기반인경우 사용하는 클래스로, 바이트 단위로 입출력을 제어
InputStream, OutputStream
read(), toByteArray()
import java.io.ByteArrayInputStream;
import java.io.ByteArrayOutputStream;
import java.io.IOException;
import java.util.Arrays;
public class T03_ByteArrayIOTest {
public static void main(String[] args) throws IOException {
// inSrc를 outSrc에 복사하기
byte[] inSrc = {0,1,2,3,4,5,6,7,8,9};
byte[] outSrc = null;
// 스트림클래스를 이용한 객체 생성
ByteArrayInputStream bais = new ByteArrayInputStream(inSrc);
ByteArrayOutputStream baos = new ByteArrayOutputStream();
int data; //읽어온 자료를 저장할 변수
//**read()메서드** => byte단위로 자료를 읽어와 int형으로 반환
// 더이상 읽어올 자료가 없으면 -1을 반환
while((data=bais.read())!=-1) {
baos.write(data);
}
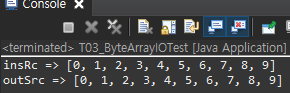
// toByteArray() : 출력된 스트림 값들을 배열로 변환해서 반환하는 메소드
outSrc = baos.toByteArray();
System.out.println("insRc => "+Arrays.toString(inSrc));
System.out.println("outSrc => "+Arrays.toString(outSrc));
// 스트림객체 닫아주기
bais.close();
baos.close();
}
}
com/secure.notion-static.com/2398edf8-a677-4a47-85bd-0b3f76ff40bf/Untitled.png)
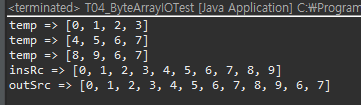
temp를 이용하여 여러개씩 읽기
import java.io.ByteArrayInputStream;
import java.io.ByteArrayOutputStream;
import java.io.IOException;
import java.lang.reflect.Array;
import java.util.Arrays;

public class T04_ByteArrayIOTest {
	public static void main(String[] args) throws IOException {
		byte[] inSrc = {0,1,2,3,4,5,6,7,8,9};
		byte[] outSrc = null;

		byte[] temp = new byte[4];

		ByteArrayInputStream bais = new ByteArrayInputStream(inSrc);
		ByteArrayOutputStream baos = new ByteArrayOutputStream();

		int data = 0;

		// 10개고 4바이트씩 읽을 수 있으니까 3번 읽어줘야
		while((data = bais.read(temp))!=-1) {
			baos.write(temp);
			System.out.println("temp => "+Arrays.toString(temp));
		}


		// 출력된 스트림 값들을 배열로 변환해서 반환하는 메소드
		outSrc = baos.toByteArray();

		System.out.println("insRc => "+Arrays.toString(inSrc));
		System.out.println("outSrc => "+Arrays.toString(outSrc));

		// 스트림객체 닫아주기
		bais.close();
		baos.close();

	}
}
.com/secure.notion-static.com/d51631cd-91b8-41ff-b1ba-dd365315f050/Untitled.png)
FileInputStream, FileOutputStream
FileInputStream : 파일읽기
import java.io.FileInputStream;
import java.io.IOException;
// 파일읽기
public class T05_FileStreamTest {
public static void main(String[] args) {
FileInputStream fis = null;
try {
fis = new FileInputStream("d:/D_Other/test.txt");
int data = 0;
// 읽어온 값이 -1이면 파일의 끝까지 다 읽었다는 의미이다.
while((data = fis.read())!=-1) {
// 읽어온 자료 출력하기
System.out.print((char) data);
}
} catch (IOException e) {
e.printStackTrace();
}finally {
try {
fis.close();
} catch (IOException e) {
e.printStackTrace();
}
}
}
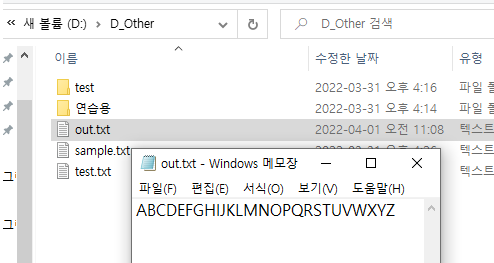
}FileOutputStream : 파일쓰기
import java.io.FileInputStream;
import java.io.FileOutputStream;
import java.io.IOException;

public class T06_FileStreamTest {
	public static void main(String[] args) {

		//파일에 출력하기
		FileOutputStream fos = null;

		try {
			// 출력용 스트림객체 생성
			fos = new FileOutputStream("d:/D_Other/out.txt");
			for(char ch='A'; ch<='Z';ch++) {
				fos.write(ch);
			}
			System.out.println("파일 쓰기 작업 완료...");

		} catch (IOException e) {
			e.printStackTrace();
			// TODO: handle exception
		}finally {
			try {
				fos.close(); //파일닫기
			} catch (IOException e) {
				e.printStackTrace();
			}
		}

}
바이트기반 스트림이기 때문에 char를 byte로 캐스팅해서 작동하고 있는것이다. (영문자는 가능한데 한글은 깨짐) → 한글의 경우 문자기반 스트림으로 진행해야한다.
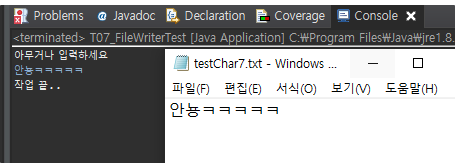
FileWriter : 문자 기반 파일 입력
- 사용자가 입력한 내용을 그대로파일로 저장하기
import java.io.FileWriter;
import java.io.IOException;
import java.io.InputStreamReader;

public class T07_FileWriterTest {
	public static void main(String[] args) {

		//콘솔(표준입출력장치)과 연결된 입력용 문자스트림 생성
		// InputStreamReader => 바이트기반 스트림을 문자기반 스트림으로 변환해주는 보조스트림

		InputStreamReader isr = new InputStreamReader(System.in);

		FileWriter fw =null;

		try {
			// 파일 출력용 문자스트림 생성
			fw = new FileWriter("d:/D_Other/testChar7.txt");

			int data =0;

			System.out.println("아무거나 입력하세요");

			// 콘솔에서 입력 할 때 입력의 끝 표시는 엔터+Ctrl+Z 키를 누른다.
			while((data= isr.read())!=-1) {
				fw.write(data); //콘솔에서 입력받은값을 파일에 출력하기
			}
			System.out.println("작업 끝..");

		} catch (IOException e) {
			e.printStackTrace();
		}finally {
			try {
				isr.close();
				fw.close();
			} catch (IOException e2) {
				// TODO: handle exception
				e2.printStackTrace();
			}
		}

	}

}
FileReader : 문자 기반 파일 출력
import java.io.FileReader;
import java.io.IOException;

public class T08_FileReaderTest {
	public static void main(String[] args) {
		// 문자기반 스트림을 이용한 파일내용읽기
		FileReader fr =null;

		try {
			// 문자단위의 입력을 담당하는 Reader형 객체 생성
			fr = new FileReader("d:/D_Other/testChar.txt");

			int data = 0;

			while((data=fr.read())!=-1) {
				System.out.println((char) data);
			}


		} catch (IOException e) {
			e.printStackTrace();
		}finally {
			try {
				fr.close();
			} catch (Exception e2) {
				e2.printStackTrace();
			}
		}
	}

}
보조스트림
- 지금까지 배운게 기본스트림(일반스트림)
- read,write를 제외한 새로운 기능을 구현한다 (암호화 등)
Encoding
: 한글 인코딩 방식은 크게 UTF-8과 EUC-KR 방식 두가지로 나뉜다
원래 한글윈도우는 CP949방식을 사용했는데 윈도우를 개발한 마이크로소프트에서 EUC-KR방식에서 확장하였기 때문에 MS949라고도 부른다
한글 windows의 메모장에서 말하는 ANSI코딩이란 CP949(Code Page 949)를 말한다.
CP949는 EUC-KR의 확장이며, 하위호환성이 있다.
- MS 949 ⇒ 윈도우의 기본 한글 인코딩 방식 (ANSI계열)
- UTF-8 ⇒ 유니코드 UTF-8 인코딩 방식(영문자 및 숫자: 1byte, 한글: 3byte) ⇒ 가변적
- US-ASCII ⇒ 영문전용 인코딩 방식
ANSI는 영어를 표기하기 위해 만든 코드로 규격 자체에 한글이 없었다가 나중에 여기에 EUC-KR, CP949라는 식으로 한글이 포함되었음.
💡 |참고| ASCII ⇒ extended ASCII(ISO 8859-1) ⇒ 조합형, 완성형(KSC 5601) ————————————————————————————————— ⇒ 윈도우 계열 : CP949 (확장 완성형) - 일부문자(8824자)를 추가함. ⇒ 유닉스 계열 : EUC-KR (확장 유닉스 코드) ————————————————————————————————— ⇒ ANSI 계열 : EUC- KR ⇒ 유니코드(UTF-8)encoding 보조스트림 : 파일읽기
import java.io.FileInputStream;
import java.io.IOException;
import java.io.InputStreamReader;

public class T09_FileEncodingTest {
	public static void main(String[] args) {
		FileInputStream fis = null;
		InputStreamReader isr = null; //보조

		try {
			// FileInputStream 객체를 생성한 후 이 객체를 매개변수로 받는 InputStreamReader객체를 생성한다
			fis = new FileInputStream("d:/D_Other/test_utf8.txt");

			// 파일의 인코딩 정보를 이용하여 읽어오기
			// InputStreamReader객체는 파일의 인코딩 방식을 지정할 수 있다
			// 형식) new InputStreamReader(바이트기반스트림, 인코딩방식)
			isr = new InputStreamReader(fis,"UTF-8");

			int data =  0;
			while((data=isr.read())!=-1) {
				System.out.print((char)data);
			}
			System.out.println();
			System.out.println("출력 끝...");
		} catch (IOException e) {
			e.printStackTrace();
		}finally {
			try {
				isr.close(); // 보조스트림만 닫아도 기반스트림까지 닫힘
			} catch (IOException e) {
				e.printStackTrace();
			}
		}
	}
}
encoding 보조스트림 : 파일저장
import java.io.FileOutputStream;
import java.io.IOException;
import java.io.InputStreamReader;
import java.io.OutputStreamWriter;

public class T10_FileEncodingTest {
	//OuptputStreamWriter => 바이트기반의 출력용 객체를 문자기반 출력용 객체로 변환해주는 보조스트림

	public static void main(String[] args) throws IOException {
		// 키보드로 입력한 내용을 파일로 저장하는데
		// out_utf8.txt 파일은 'UTF-8'인코딩 방식으로,
		// out_ansi.txt 파일은 'MS949'인코딩 방식으로 저장한다

		InputStreamReader isr = new InputStreamReader(System.in);

		//파일 출력용 스트림 객체 생성
		FileOutputStream fos1 = new FileOutputStream("d:/D_Other/out_utf8.txt");
		FileOutputStream fos2 = new FileOutputStream("d:/D_Other/out_ansi.txt");

		OutputStreamWriter osw1 = new OutputStreamWriter(fos1,"UTF-8");
		OutputStreamWriter osw2 = new OutputStreamWriter(fos2,"MS949");

		int data = 0;
		System.out.println("아무거나 입력하세요...");
		while((data = isr.read()) != -1) {
			osw1.write(data);
			osw2.write(data);
		}

		System.out.println("작업완료");
		isr.close();
		osw1.close();
		osw2.close();

	}

}
버퍼와 스트림
문자스트림 코드를 한번 보도록 하자.
import java.io.*; // FileReader 등의 클래스는 java.io에서 가져올 수 있다.

public class FileReaderEx {

	public static void main(String[] args) {

		try {
			FileReader fr = new FileReader("c:\\windows\\system.ini");
            //파일 리더 fr을 생성해주고, 생성자로 파일의 경로명을 지정해줬다.
            //만약 읽어올 파일이 프로젝트 폴더 안에 있다면 그냥 파일명만 써줘도 된다.
			int c;
			while ((c = fr.read()) != -1) {
				System.out.print((char)c);
			}
			fr.close();
		}
		catch (FileNotFoundException e) {  // 파일을 못 찾았을 경우
			System.out.println("경로 오류");
		}
		catch (IOException e) { //파일이 요상한 경우 또는 입출력에 문제가 생겼을 경우
			System.out.println("입출력 오류");
		}
코드를 실행하면 경로에 해당하는 파일의 내부 내용을 가져오게 되는데, 이경우 입출력이 너무 자주 일어난다는 단점이있다. read()메소드는 글자를 한글자씩 불러오는, 즉 한글자마다 입출력이 일어나는 메소드이다, 실행속도는 물론 메모리와 CPU사용량이 늘어난다.
→ 그래서 버퍼스트림이 만들어졌다!
import java.io.*;
import java.util.Scanner;

public class BufferedIOEx {

	public static void main(String[] args) {

		FileReader fin = null;
		int c;
		try {
			fin = new FileReader("c:\\windows\\system.ini");
			BufferedOutputStream out = new BufferedOutputStream(System.out, 5);
            //5바이트 크기의 버퍼를 가지고, 시스템 표준 출력 스트림에 연결한다.
			while ((c=fin.read())!= -1) { //파일 데이터를 모두 스크린에 출력
				out.write(c);
			}
			//파일 데이터가 모두 출력된 상태
			new Scanner(System.in).nextLine(); //<Enter> 키 입력
			out.flush(); // 버퍼에 남아있던 문자 모두 출력
			fin.close();
			out.close();
		}
		catch(IOException e) {
			e.printStackTrace(); //에러가 발생하면 처음 호출한데서부터 에러 메시지를 나타내주는 것
		}

	}
위와같이 사용하는데, 실행하면 마지막 글자가 안뜨고 엔터를 한번 쳐줘야 한다는 의문이 있다.
이는 지정해놓은 5바이트가 꽉 차지 않아서 그렇다. 그래서 이를 방지하기위해 out.flush(); 를 이용해서 버퍼에 남은 데이터를 출력하도록 만들어야 한다!
성능향상을 위한 보조스트림 예제
(바이트 기반의 Buffered스트림 사용예제)
아웃풋은 라이터...
import java.io.BufferedOutputStream;
import java.io.FileOutputStream;
import java.io.IOException;

public class T11_BufferedIOTest {
	public static void main(String[] args) {
		// 입출력 성능 향상을 위해서 버퍼를 사용하는 보조스트림


		FileOutputStream fos = null;
		BufferedOutputStream bos = null;

		try {
			fos = new FileOutputStream("d:/D_Other/bufferTest.txt");

			//버퍼의 크기를 지정하지 않으면 기본적으로 버퍼의 크기가 8192byte(8kb)로 설정

			//버퍼의 크기가 5byte인 스트림 생성학;
			bos = new BufferedOutputStream(fos,5);
			for(int i='1'; i<='9'; i++) { // 숫자 자체를 문자로 저장하기 위해서
				bos.write(i);
			}

			bos.flush(); // 작업을 종료하기 전에 버퍼에 남아있는 데이터를 모두 출력시킨다 (close시 자동으로 호출)

			System.out.println("작업 끝.....");
		} catch (IOException e) {
			e.printStackTrace();
		}finally {
			try {
				bos.close();
			} catch (IOException e2) {
				e2.printStackTrace();
			}
		}


	}


}
성능향상을 위한 보조스트림 예제(2)
import java.io.FileReader;
import java.io.IOException;

public class T12_BufferedIOTest {
	public static void main(String[] args) {


		FileReader fr = null;

		try {

			//이클립스에서 만든 자바 프로그램이 실행되는 기본위치는
			// 해당 '프로젝트 폴더'가 기본위치가 된다
			fr = new FileReader(
					"./src/kr/or/ddit/basic/T11_BufferedIOTest.java");
			// .jpg 같은 바이너리 파일이 아니므로 리더를 통해 읽는것!!


			int data = 0;
			while((data = fr.read())!=-1) {
				System.out.print((char)data);
			}
		}catch (IOException e) {
			e.printStackTrace();
		} finally {
			try {
				fr.close();
			} catch (IOException e2) {
				e2.printStackTrace();
			}
		}


	}

}
이러면 글자가 백만개면 백만개를 한땀한땀 읽어와서 띄우므로 효율적이진 않음
import java.io.BufferedReader;
import java.io.FileReader;
import java.io.IOException;

public class T12_BufferedIOTest {
	public static void main(String[] args) {


		FileReader fr = null;
		BufferedReader br =null;
		try {

			//이클립스에서 만든 자바 프로그램이 실행되는 기본위치는
			// 해당 '프로젝트 폴더'가 기본위치가 된다
			fr = new FileReader(
					"./src/kr/or/ddit/basic/T11_BufferedIOTest.java");

			br = new BufferedReader(fr);

			String temp = "";
			for(int i=1; (temp = br.readLine())!=null; i++) {
				System.out.printf("%4d : %s\n",i,temp);
			}

		}catch (IOException e) {
			e.printStackTrace();
		} finally {
			try {
				br.close();
				fr.close();
			} catch (IOException e2) {
				e2.printStackTrace();
			}
		}
	}

}
기본타입을 위한 입출력
Integer에게 4바이트를 할당했으므로 인티저의최대값인 21억이든 1이든 전부 4바이트를 할당해서 처리한다.
- 기본타입 입출력 보조스트림 예제
import java.io.DataInputStream;
import java.io.DataOutputStream;
import java.io.FileInputStream;
import java.io.FileOutputStream;
import java.io.IOException;

public class T13_DataIOStreamTest {
	public static void main(String[] args) {
		FileOutputStream fos = null;

		//출력용 데이터를 자료형에 맞게 출력해준다.
		DataOutputStream dos = null;

		try {


			fos = new FileOutputStream("d:/D_Other/test.dat");

			dos = new DataOutputStream(fos);

			dos.writeUTF("홍길동"); // 문자열데이터 출력 (UTF-8(
			dos.writeInt(17); // 정수형데이터 출력
			dos.writeFloat(3.14f); // 실수형(Float)데이터 출력
			dos.writeDouble(3.14); // 실수형(double)데이터 출력
			dos.writeBoolean(true); // 논리형데이터 출력
			System.out.println("출력오나료");


		} catch (IOException e) {
			e.printStackTrace();
		} finally {
			try {
				dos.close();
			} catch (IOException e2) {
				// TODO: handle exception
				e2.printStackTrace();
			}
		}

		///////////////////////////////////////////////////////

		// 출력한 자료 읽어오기
		FileInputStream fis = null;

		DataInputStream dis = null;

		try {
			fis = new FileInputStream("d:/D_Other/test.dat");

			dis = new DataInputStream(fis);

			System.out.println("문자열자료: "+dis.readUTF());
			System.out.println("정수형자료: "+dis.readInt());
			System.out.println("실수형(F)자료: "+dis.readFloat());
			System.out.println("실수형(D)자료: "+dis.readDouble());
			System.out.println("논리형자료: "+dis.readBoolean());


		} catch (IOException e) {
			e.printStackTrace();
		}finally {
			try {
				dis.close();
			} catch (IOException e2) {
				e2.printStackTrace();
			}
		}

	}

}
자료 읽어올때 순서 바뀌면 꼬여버림
프린터 기능 제공 보조 스트림 예제
- PrintStream은 모든 자료형을 출력할수 있는 기능을 제공하는 OutputStream의 서브클래스이다.
- PrintStream은 IOException을 발생시키지 않는다
- println 및 print등 메서드 호출시마다 autoflush 기능이 제공됨
import java.io.FileOutputStream;
import java.io.IOException;
import java.io.PrintStream;

public class T14_PrintStreamTest {
	public static void main(String[] args) throws IOException {

		FileOutputStream fos = new FileOutputStream("d:/D_Other/print.txt");
		// 기본스트림이 file이니 file로 저장...

		PrintStream out = new PrintStream(fos);
		out.print("안녕하슈 PrintStream임다 ㅎㅇㅎㅇ1\n");
		out.println("안녕하슈 PrintStream임다 ㅎㅇㅎㅇ2\n");
		out.println("안녕하슈 PrintStream임다 ㅎㅇㅎㅇ3\n");
		out.println(out); //객체출력
		out.print(3.14);

		out.close();

	}
}- PrintStream은 데이터를 문자로 출력하는 기능을 수행함(System.out)
- 향상된 기능의 PrintWriter가 추가되었지만 계속사용됨
- PrintWriter가 PrintStream보다 다양한 언어의 문자를 처리하는데 적합하다.
- 둘다 기본적으로 autoflash 기능이 꺼져있음
import java.io.FileOutputStream;
import java.io.IOException;
import java.io.OutputStreamWriter;
import java.io.PrintStream;
import java.io.PrintWriter;

public class T14_PrintStreamTest {
	public static void main(String[] args) throws IOException {

		FileOutputStream fos = new FileOutputStream("d:/D_Other/print.txt");
		// 기본스트림이 file이니 file로 저장...

		PrintStream out = new PrintStream(fos);
		out.print("안녕하슈 PrintStream임다 ㅎㅇㅎㅇ1\n");
		out.println("안녕하슈 PrintStream임다 ㅎㅇㅎㅇ2\n");
		out.println("안녕하슈 PrintStream임다 ㅎㅇㅎㅇ3\n");
		out.println(out); //객체출력
		out.print(3.14);

		out.close();


		PrintWriter pw = new PrintWriter(
								new OutputStreamWriter(
										new FileOutputStream("d:/D_Other/print2.txt"),"UTF-8")); //utf-8이 디폴트

		pw.print("안녕하세요 PrintWriter입니다\n");
		pw.println("안녕하세요 PrintWriter입니다2");
		pw.println("안녕하세요 PrintWriter입니다3");

		pw.close();


	}
}
ObjectString : 객체 입출력 보조스트림 예제 (직렬화와 역직렬화)
- 직렬화 ?
말그대로 객체를 직렬화하여 전송 가능한 형태로 만드는 것을 의미한다. 객체들의 데이터를 연속적인 데이터로 변형하여 Stream을 통해 데이터를 읽도록 해준다.
import java.io.BufferedInputStream;
import java.io.BufferedOutputStream;
import java.io.FileInputStream;
import java.io.FileOutputStream;
import java.io.IOException;
import java.io.ObjectInputStream;
import java.io.ObjectOutput;
import java.io.ObjectOutputStream;
import java.io.Serializable;

public class T15_ObjectStringTest {
	public static void main(String[] args) {

		// Member 인스턴스 생성
		Member mem1 = new Member("홍길동", 20, "대전");
		Member mem2 = new Member("일지매", 30, "경기");
		Member mem3 = new Member("이몽룡", 40, "강원");
		Member mem4 = new Member("성춘향", 20, "광주");
		//Serializable mem5 = new Member("성춘향", 20, "광주"); >> Serializable하므로 타입을 이렇게 선언해도된다.

		ObjectOutput oos = null;

		try {
			// 객체를 파일에 저장하기

			// 출력용 스트림객체 생성
			oos = new ObjectOutputStream(
					new BufferedOutputStream( // << 이런 보조기능 같은걸 써줄수도 있다. 그러면 입출력 향상이된대...
					new FileOutputStream("d:/D_Other/memObj.bin")));

			// 쓰기 작업
			oos.writeObject(mem1); //직렬화
			oos.writeObject(mem2); //직렬화
			oos.writeObject(mem3); //직렬화
			oos.writeObject(mem4); //직렬화

			System.out.println("쓰기작업 완료...");


		} catch (IOException e) {
			e.printStackTrace();
		}finally {
			try {
				oos.close();
			} catch (IOException e) {
				e.printStackTrace();
			}
		}

		ObjectInputStream ois = null;
		try {

			// 객체 읽기 위한 스트림 객체 생성 (오브젝트단위로 읽을것)
			ois = new ObjectInputStream(
					new BufferedInputStream(
					new FileInputStream("d:/D_Other/memObj.bin")));

			Object obj = null;

			while((obj = ois.readObject())!=null) {
				// 읽어온 데이터를 원래의 객체형으로 변환 후 사용
				Member mem = (Member) obj;
				System.out.println("이름 : "+mem.getName());
				System.out.println("나이 : "+mem.getAge());
				System.out.println("주소 : "+mem.getAddr());
				System.out.println("------------------------------------");
			}


		} catch (IOException e) {
			//e.printStackTrace();
			System.out.println("더이상 읽어올 객체 없음! 출력끝ㅎ");
		}catch(ClassNotFoundException ex) {
			ex.printStackTrace();
		}finally {
			try {
				ois.close();
			} catch (Exception e2) {
				e2.printStackTrace();
			}
		}

	}
}

// 회원정보 VO
// Member클래스를 IO작업 할려면 Serializable을 implement해야함
class Member implements Serializable { //자바는 Serializable 인터페이스를 구현한 클래스만 직렬화 할 수있도록 제한함

	// transient => 직렬화가 되지 않을 멤버변수에 지정한다.
	// (*static 필드도 직렬화가 되지 않는다.)
	// 직렬화가 되지 않는 멤버변수는 기본값으로 저장된다.
	// (참조형 변수 : null, 숫자형 변수 : 0)
	// (불필요한 데이터나 민감한 정보는 직렬화를 원하지 않을 수 있음)

	private String name;
	//private transient int age;
	private int age;
	private String addr;

	public Member(String name, int age, String addr) {
		super();
		this.name = name;
		this.age = age;
		this.addr = addr;
	}

	public String getName() {
		return name;
	}
	public void setName(String name) {
		this.name = name;
	}
	public int getAge() {
		return age;
	}
	public void setAge(int age) {
		this.age = age;
	}
	public String getAddr() {
		return addr;
	}
	public void setAddr(String addr) {
		this.addr = addr;
	}

}
NonSerializableParentTest
- 부모클래스가 Serializable 인터페이스를 구현하고 있지 않을 경우 부모객체의 필드값 처리 방법 1) 부모클래스가 Serializable 인터페이스를 구현하도록 해야한다. 2) 자식클래스에 writeObject()와 readObject()를 이용하여 부모객체의 필드값을 처리 할 수 있도록 직접 구현한다.
부모는 Serializable하지 않은데 자식만 Serializable할 경우 문제생김

package kr.or.ddit.basic;

import java.io.FileInputStream;
import java.io.FileOutputStream;
import java.io.IOException;
import java.io.ObjectInputStream;
import java.io.ObjectOutputStream;
import java.io.Serializable;

public class T16_NonSerializableParentTest {

	public static void main(String[] args) throws IOException, ClassNotFoundException {

		FileOutputStream fos = new FileOutputStream("d:/D_Other/nonSerializableTest.bin");
		ObjectOutputStream oos = new ObjectOutputStream(fos);

		Child child = new Child();
		child.setParentName("부모");
		child.setChildName("자식");
		oos.writeObject(child); // 직렬화가 일어남
		oos.flush(); // 생략가능
		oos.close();

		/////////////////////////////////////////

		ObjectInputStream ois =
				new ObjectInputStream(
						new FileInputStream("d:/D_Other/nonSerializableTest.bin"));
		Child child2 = (Child)ois.readObject(); //역직렬화
		System.out.println("parentName: "+child2.getParentName());
		System.out.println("childName: "+child2.getChildName());
		ois.close();
	}

}

class Parent{
	private String ParentName;

	public String getParentName() {
		return ParentName;
	}

	public void setParentName(String parentName) {
		ParentName = parentName;
	}


}

// Serializable을 구현한 자식클래스
class Child extends Parent implements Serializable{
	private String childName;

	public String getChildName() {
		return childName;
	}

	public void setChildName(String childName) {
		this.childName = childName;
	}

// 직렬화 될 때 자동으로 호출됨
// 접근제한자가 private이 아니면 자동호출되지않음

	private void writeObject(ObjectOutputStream out) throws IOException{
		out.writeUTF(getParentName()); // 부모객체 필드값 저장하기
		out.defaultWriteObject();
	}

// 역직렬화 될 때 자동으로 호출
//(접근제한자가 private이 아니면 자동호출 되지 않음)
	private void readObject(ObjectInputStream in) throws IOException, ClassNotFoundException {
		setParentName(in.readUTF());
		in.defaultReadObject();
	}

}