개요
- 기존 연습 프로젝트에
react ducks 패턴을 참고하여 모듈화를 적용 시키는 것 까지 해보았다. - 이제
RTK의 새로운 문법을 이용하여 기존redux core프로젝트를RTK로 전환해보고자 한다.
https://www.youtube.com/watch?v=UKnLwVm9suY&t=631s&ab_channel=코딩알려주는누나
를 참고했습니다.
적용하기
- 먼저 기존의 파일을 보자.
// modules/counter.ts (기존 모듈)

export const PLUS_COUNTER = 'counter/PLUS_COUNTER';
export const MINUS_COUNTER = 'counter/MINUS_COUNTER';
export const CLEAR_COUNTER = 'counter/CLEAR_COUNTER';

export const plusCounter = () => {
  return {
    type: PLUS_COUNTER,
  };
};

export const minusCounter = () => {
  return {
    type: MINUS_COUNTER,
  };
};

export const clearCounter = () => {
  return {
    type: CLEAR_COUNTER,
  };
};

const initialState = {
  count: 0,
};

function counterReducer(state = initialState, action: { type: string }) {
  switch (action.type) {
    case PLUS_COUNTER:
      return {
        ...state,
        count: state.count + 1,
      };

    case MINUS_COUNTER:
      return {
        ...state,
        count: state.count - 1,
      };

    case CLEAR_COUNTER:
      return {
        ...state,
        count: 0,
      };

    default:
      return state;
  }
}

export default counterReducer;
createSlice()
createSlice()는 리듀서와 액션을 쉽게 만들 수 있는 메소드이다.- 객체를 인자로 받으며, 내부에는
name,initialState,reducers라는 값이 존재해야한다.name은 해당slice의 이름을 결정한다. 여기서 정해진 이름은slice가 유니크한action의 값을 만드는데 사용된다.initialState는 최초 상태를 결정한다.reducers는 함수로 이루어진 객체를 받고, 실질적으로reducer를 만드는 역할을 한다.
- 기존
switch-case문을 사용하는 경우spread로 기존state를 가져온 뒤 값을 변경해야 했지만,createSlice()에서는 해당 과정을 생략 할 수 있다.
→ 이는 불변성을 지키기 위함. - 불변성을 지킬 수 있도록 보조하는 Immer 라는 라이브러리가 이미 적용되어 있으므로, 변경을 원하는 내용을 바로 전달하기만 하면 된다.
createSlice()가 유니크한action을 자동으로 생성하므로,action 생성함수,type을 작성하지 않아도 된다.
// modules/counter.ts (createSlice 사용)

import { createSlice } from '@reduxjs/toolkit';

const initialState = {
  count: 0,
};

const counterSlice = createSlice({
  name: 'counter',
  initialState,
  reducers: {
    plusCounter(state) {
      state.count++;
    },
    minusCounter(state) {
      state.count--;
    },
    clearCounter(state) {
      state.count = 0;
    },
  },
});

export const counterActions = counterSlice.actions;
export default counterSlice.reducer;- 결과적으로 기존의 코드를 위와 같이 깔끔하게 변경 할 수 있다.
- slice 를 콘솔에서 보았을 때는 아래와 같다.
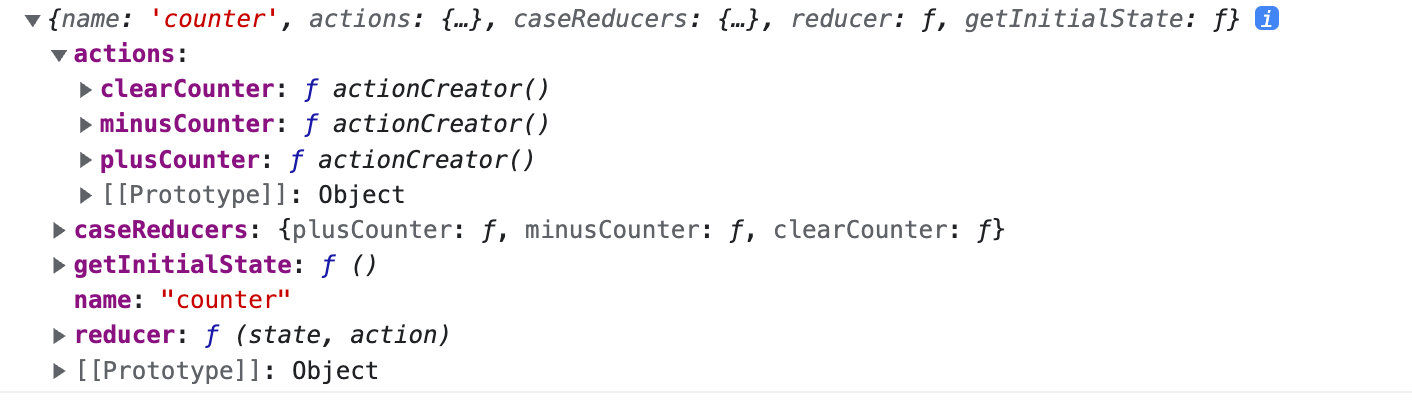
counterSlice.reducer에 해당reducer값이 담기기 때문에export default counterSlice.reducer를 사용하여 리듀서를 내보내고store에서 사용 할 수 있다.- 그리고
counterSlice.actions에action이 담기므로,counterActions에counterSlice.actions를 담아 내보내어action을dispatch할 때 사용 할 수 있다.
configureStore()
createStore()를 대체하는store생성 방법이다.createStore()에combineReducers,composeWithDevTools,thunk,applyMiddleware가 포함되어 있다고 생각하면 좋을 것 같다.
→ 즉, 위의 메소드 혹은 라이브러리를 사용하거나, 설치하거나, 불러오지 않아도 된다.- 기존에는
combineReducers()를 사용하여 만들어진rootReducer를createStore()에 전달하는 방식을 사용했다.
// modules/index.ts

import { combineReducers } from '@reduxjs/toolkit';
import arrayReducer from './array';
import counterReducer from './counter';
import objectReducer from './object';
import textReducer from './text';

const rootReducer = combineReducers({
  arrayReducer,
  counterReducer,
  objectReducer,
  textReducer,
});

export default rootReducer;
// index.tsx
import React from 'react';
import ReactDOM from 'react-dom/client';
import App from './App';
import { Provider } from 'react-redux';
import { legacy_createStore } from '@reduxjs/toolkit';
import rootReducer from './modules';
// combineReducer 로 만든 rootReducer 를 가져온다.
const root = ReactDOM.createRoot(
document.getElementById('root') as HTMLElement
);
const store = legacy_createStore(rootReducer);
root.render(
<Provider store={store}>
<App />
</Provider>
);- 하지만
configureStore()는combineReducers()의 기능을 포함하는데, 함수의 인자로 객체를 전달하고,reducer라는 키값을 가진 객체에 만들어진reducer들을 전달 하면된다.
// index.tsx

import React from 'react';
import ReactDOM from 'react-dom/client';
import App from './App';

import { Provider } from 'react-redux';
import { configureStore } from '@reduxjs/toolkit';

import arrayReducer from '././modules/array';
import counterReducer from '././modules/counter';
import objectReducer from '././modules/object';
import textReducer from '././modules/text';
// combineReducer 를 사용하지 않아도되므로, 리듀서를 직접가져온다.

const root = ReactDOM.createRoot(
  document.getElementById('root') as HTMLElement
);

const store = configureStore({
  reducer: {
    arrayReducer,
    counterReducer,
    objectReducer,
    textReducer,
    // combineReducer 처럼 동작한다.
  },
});

root.render(
  <Provider store={store}>
    <App />
  </Provider>
);
상태 변경하기
- 기존
reducer에서actions를 내보냈는데, 이는 함수(action)를 가진 객체의 형태를 띈다. - 동일하게
dispatch를 사용하되, 객체에서 메소드를 사용하듯 사용하면 된다.
import { counterActions } from '../modules/counter';
// 따로 action 을 하나하나 불러오는 것이 아니라,
// createSlice의 값을 이용한다.

function Counter(): JSX.Element {
  const state = useSelector(
    (state: { counterReducer: { count: number } }) => state
  );
  const dispatch = useDispatch();

  return (
    <>
      <div className="title">Counter</div>
      <div className="count">{state.counterReducer.count}</div>
      <div className="buttons">
        <button onClick={() => dispatch(counterActions.plusCounter())}>
          더하기
        </button>
        <button onClick={() => dispatch(counterActions.minusCounter())}>
          빼기
        </button>
        <button onClick={() => dispatch(counterActions.clearCounter())}>
          초기화
        </button>
      </div>
    </>
  );
}- action 함수의 인자로 사용되는 값은 reducer 에서 action.payload 에 저장된다.
+
- 항상 RTK 의 장점을 보면 코드양이 줄어든다 라는 말이 항상 있었는데, 직접 적용시켜보니 어이없을 정도로 확 줄어들어 많이 놀랐다.
- 보일러 플레이트가 줄어든다는 이야기를 이제는 이해 할 수 있다!
→ 보일러 플레이트 : 어떤 기능을 사용하기 위해 반드시 작성해야 하는 코드. - 참고 유튜브 : https://www.youtube.com/watch?v=UKnLwVm9suY&t=631s&ab_channel=코딩알려주는누나