

✅ 잠깐! 들어가기 전, 테스트 종류
단위 테스트(Unit Test)
위키피디아에서는 "유닛 테스트는 컴퓨터 프로그래밍에서 소스 코드의 특정 모듈이 의도된대로 정확하게 작동하는지 검증하는 절차로, 모든 함수와 메소드에 대한 테스트 케이스를 작성하는 절차"라고 정의되어 있다.
하나의 함수에 대해 하나 이상의 테스트가 존재할 수 있고, 각각의 조건에 대한 유효성을 검증한다. 이렇게 작성된 단위 테스트가 많을수록 해당 로직에 대한 신뢰도가 높아질 수 있다. 또한 작게 쪼개진 단위 테스트는 해당 로직이 어떤 역할을 하는지 쉽게 파악할 수 있다는 장점이 있다.
단위 테스트의 조건
- 독립적이어야 하며, 어떤 테스트도 다른 테스트에 의존하지 않아야 한다.
- 격리되어야 한다. Ajax, Axios, LocalStorage 등 테스트 대상이 의존하는 것을 다른 것으로 대체해야 한다.
(아직 이해 불가..)
통합 테스트(Intergration Test)
중형 테스트에 속하는 통합 테스트는 서로 다른 모듈 혹은 클래스 간 상호작용의 유효성을 검사하는 테스트이다. 이러한 통합 테스트가 필요한 이유는 각각의 단위 테스트가 검증되었다 하더라도, 모듈 간 인터페이스 및 데이터 흐름이 의도한대로 제대로 작동하지 않는 경우도 있기 때문에 추가적으로 필요하다.
✅ Jest란?
FaceBook에 의해서 만들어진 Javascript 테스팅 라이브러리이다. Jest는 이전의 Javascript 테스팅 라이브러리는 test를 진행하는데 있어서 test runner, matcher, mock 등을 다른 라이브러리로 조합해서 사용했는데 Jest라는 라이브러리는 이 모든 것을 한 번에 지원해준다!
✅ Jest 사용해보기(with typescript)
먼저 타입스크립트와 같이 쓰기 위한 라이브러리도 설치해준다.
npm i jest --save-dev
npm i ts-jest --save-dev
package.json의 scripts를 변경해준다.
scripts: {
  "test": "jest"
}
package.json에 ts로 끝나는 파일은 ts-jest를 써달라는 설정정보도 넣는다.
"jest": {
    "transform": {
      "^.+\\.ts$": "ts-jest"
    }
  }
Jest는 테스트 파일을 어떻게 찾을까?
파일 이름에 test or spec가 있을 경우, tests폴더 안에 있을 경우를 찾는다.
따라서 이에 맞게 폴더를 구성해주자.
- 단위 테스트 폴더(
unit) -> 단위 테스트 파일명(<대상이름>.test.ts) - 통합 테스트 폴더(
integration) -> 통합 테스트 파일명(<대상이름>.test.int.ts)
Jest 파일 구조
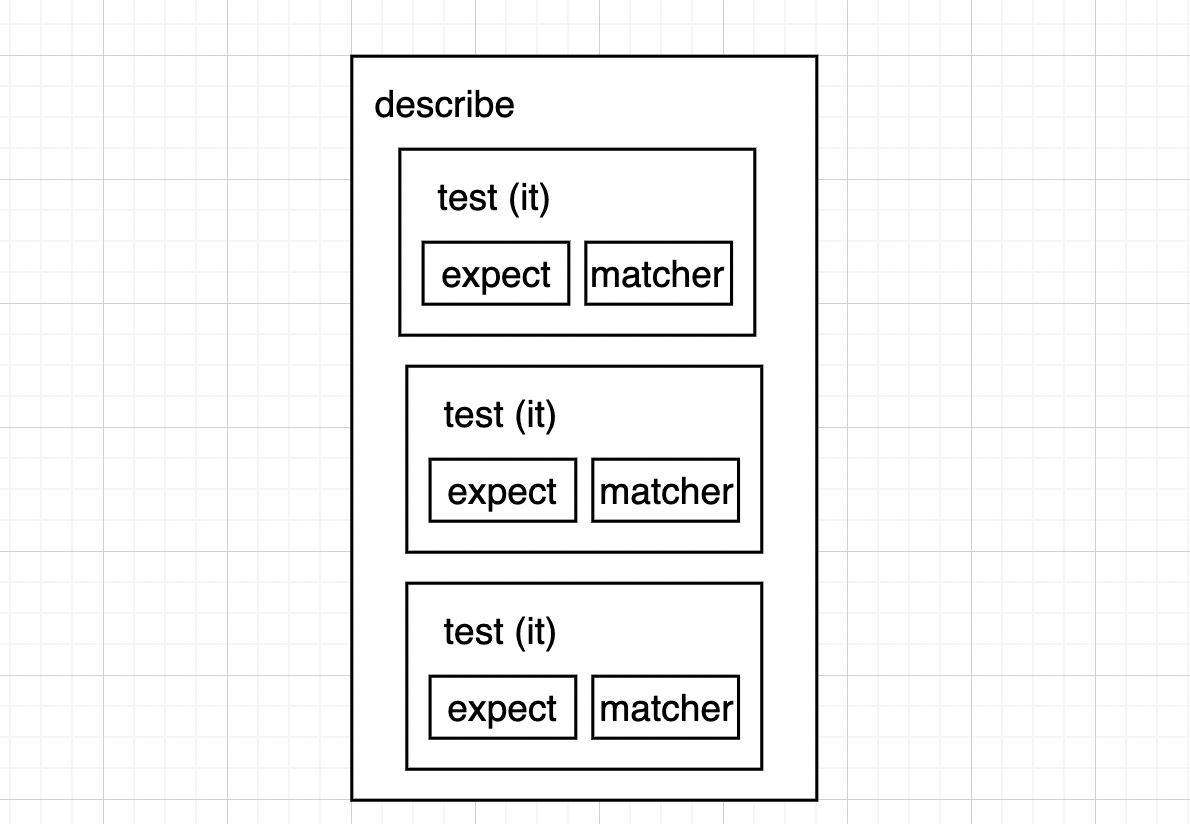
describe: 여러 관련 테스트를 그룹화하는 블록을 만듦it: 개별 테스트를 수행하는 곳, 각 테스트를 작은 문장처럼 설명expect: 값을 테스트할 때마다 사용됨, matcher랑 같이 사용됨matcher: 다른 방법으로 값을 테스트하도록 사용
jest.fn()이란?
Mock 함수를 생성하는 함수이다. 단위 테스트를 작성할 때, 해당 코드가 의존하는 부분을 가짜로 대체하는 일을 한다.
테스트 종료 후 데이터베이스에서 변경 데이터를 직접 복원하거나 rollback을 해야하는 굉장히 비효율적인 일이 발생할 수 있다. 그래서 단위 테스트는 특정 기능만 분리해서 독립적으로 사용해아한다.
jest.fn()이 생성한 가짜 함수는 이 함수에 어떤 일들이 발생했는지, 어떻게 호출되는지 기억하기 때문에 이 함수가 내부적으로 어떻게 사용되는지 검증할 수도 있다!
✅ Create 단위 테스트 작성
전반적인 폴더 구조는 Github에서 확인해주세요!
진행 순서
- 단위 테스트 작성
- 테스트에 대응하는 실제 코드 작성
Create Product 함수 생성
createProduct 함수가 있는지 확인한다.
- unit > products.test.ts
...

describe('Product Controller Create', () => {
  it('should have a createProduct function', () => {
    expect(typeof productController.createProduct).toBe('function');
  });
});
create Method로 데이터 저장하기
createProduct 함수를 호출할 때 Product Model의 Create 메소드가 호출되는지 확인해준다.
- unit > products.test.ts
...
productModel.create = jest.fn<any>();	//any 나중에 바꿔주기

describe('Product Controller Create', async () => {
  ...

  it('should call Product model', () => {
    await productController.createProduct();
    expect(productModel.create).toBeCalled();
  });
});
node-mocks-http
단위 테스트에서 request, response 객체를 얻기 위해서는 node-mocks-http 모듈을 이용한다.
- test > data > newProduct.json
{
  "name": "상품",
  "description": "상품 설명입니다",
  "price": 1500000
}- test > unit > product.test.ts
import httpMocks from 'node-mocks-http';
import newProduct from '../data/newProduct.json';

productModel.create = jest.fn<any>();	//any 나중에 바꿔주기

describe('Product Controller Create', async () => {
  ...

  it('should call Product model', () => {
    let req = httpMocks.createRequest();
    let res = httpMocks.createResponse();

    req.body = newProduct;

    await productController.createProduct(req, res);
    expect(productModel.create).toBeCalledWith(newProduct);
  });
});
beforeEach
여러 개의 테스트에 공통된 코드가 있다면 beforeEach를 통해 반복을 줄일 수 있다.
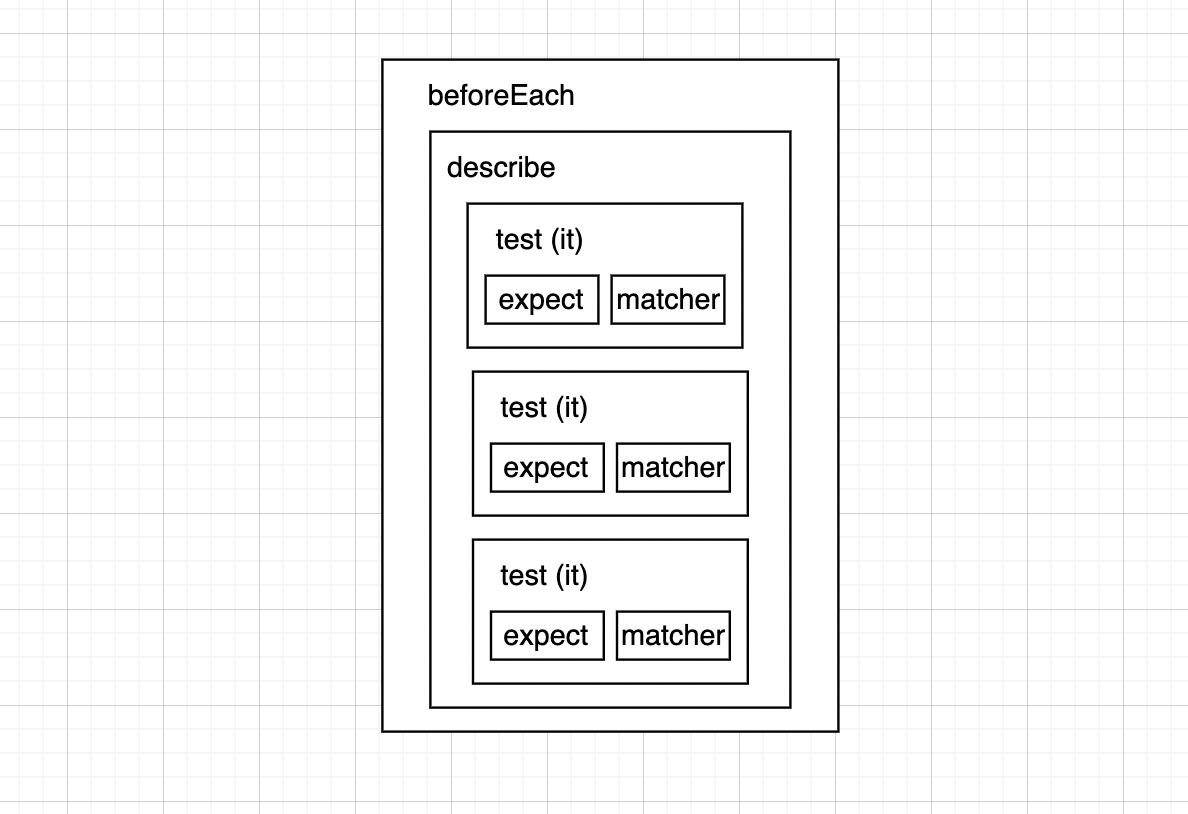
여기서는 req, res를 beforeEach에 넣어보겠다.
import httpMocks, {MockRequest, MockResponse} from 'node-mocks-http';
import newProduct from '../data/newProduct.json';

productModel.create = jest.fn<any>();	//any 나중에 바꿔주기

let req: MockRequest<any>;
let res: MockResponse<any>;

beforeEach(() => {
  req = httpMocks.createRequest();
  res = httpMocks.createResponse();
});

describe('Product Controller Create', () => {
  ...

  beforeEach(() => {
  	req.body = newProduct;
  });

  it('should call Product model', async () => {
    let req = httpMocks.createRequest();
    let res = httpMocks.createResponse();

    req.body = newProduct;

    await productController.createProduct(req, res);
    expect(productModel.create).toBeCalledWith(newProduct);
  });
});
상태값 전달
데이터베이스에 데이터를 저장했으니 그 결과를 클라이언트에게 전달해줘야한다.
import httpMocks, {MockRequest, MockResponse} from 'node-mocks-http';
import newProduct from '../data/newProduct.json';

productModel.create = jest.fn<any>();	//any 나중에 바꿔주기

let req: MockRequest<any>;
let res: MockResponse<any>;

beforeEach(() => {
  req = httpMocks.createRequest();
  res = httpMocks.createResponse();
});

describe('Product Controller Create', () => {
  ...

  beforeEach(() => {
  	req.body = newProduct;
  });

  ...

  it('should return 201 response code', async () => {
  	await productController.createProduct(req, res);
    expect(res.statusCode).toBe(201);
    expect(res._isEndCalled()).toBeTruthy();	//send가 보내졌는지
  });
});
결과값 전달
새로 저장된 데이터를 보내준다.
mockReturnValue: mock함수의 리턴 값 지정
import httpMocks, {MockRequest, MockResponse} from 'node-mocks-http';
import newProduct from '../data/newProduct.json';

productModel.create = jest.fn<any>();	//any 나중에 바꿔주기

let req: MockRequest<any>;
let res: MockResponse<any>;

beforeEach(() => {
  req = httpMocks.createRequest();
  res = httpMocks.createResponse();
});

describe('Product Controller Create', () => {
  ...

  beforeEach(() => {
  	req.body = newProduct;
  });

  ...

  it('should return json body in response', async () => {
    (Product.create as jest.Mock).mockReturnValue(newProduct);
  	await productController.createProduct(req, res);
    expect(res._getJSONData()).toStrictEqual(newProduct);
  });
});
✅ Create 에러 처리
몽고 디비에서 처리하는 부분은 문제가 없다는 것을 가정하는 단위 테스트이기 때문에 원래 몽고 디비에서 처리하는 에러 메시지 부분은 Mock 함수를 이용해 처리해준다.
import httpMocks, {MockRequest, MockResponse} from 'node-mocks-http';
import newProduct from '../data/newProduct.json';

productModel.create = jest.fn<any>();	//any 나중에 바꿔주기

let req: MockRequest<any>;
let res: MockResponse<any>;
let next;

beforeEach(() => {
  req = httpMocks.createRequest();
  res = httpMocks.createResponse();
  next = jest.fn<any>();
});

describe('Product Controller Create', () => {
  ...

  beforeEach(() => {
  	req.body = newProduct;
  });

  ...

  it('should handle errors', async () => {
    const errorMessage = { message: "description property missing" };
    const rejectedPromise = Promise.reject(errorMessage);
    productModel.create.mockReturnValue(rejectedPromise);
    await productController.createProduct(req, res, next);
    expect(next).toBeCalledWith(errorMessage);
});
✅ Create 통합 테스트 작성
supertest 모듈을 사용해서 통합 테스트를 쉽게 구현할 수 있다.
진행 순서
- 통합 테스트 작성
- 테스트에 대응하는 실제 코드 작성
성공 통합 테스트 작성
import request from 'supertest';
import app from '../../src/index';
import newProduct from '../data/newProduct.json';

it('POST /api/products', async () => {
  const response = await request(app)
  	.post('/api/products')
  	.send(newProduct);

  expect(response.statusCode).toBe(201);
  expect(response.body.name).toBe(newProduct.name);
  expect(response.body.description).toBe(newProduct.description);
})
❗️warning
하고 실행해보면 현재 이런 warning이 뜬다.
A worker process has failed to exit gracefully and has been force exited. This is likely caused by tests leaking due to improper teardown. Try running with --detectOpenHandles to find leaks. Active timers can also cause this, ensure that .unref() was called on them.
작업자 프로세스가 정상적으로 종료되지 않아 강제로 종료되었습니다. 이는 부적절한 분해로 인한 테스트 누출 때문일 수 있습니다. --detectOpenHandles로 실행하여 누출을 찾아 보십시오. 활성 타이머도 이 문제를 일으킬 수 있으므로 .unref()가 호출되었는지 확인하십시오.
블로그에서 찾아보니
찾아보니까 express는 listen하면 이벤트가 계속 열려있어 종료되지 않는 문제가 생긴다.
그래서 —detectOpenHandles 로 열려있는 리소스를 모두 닫아주고, —forceExit로 테스트가 끝나면 강제 종료를 해주는 옵션을 추가해야 한다고 한다.
근데 여기서 궁금한게 만일 그렇다고 테스트 끝나고 끊어버리면 기존에 서버도 다 꺼지는게 아닌가라는 궁금증..?
Jest has detected the following 3 open handles potentially keeping Jest from exiting:
TCPSERVERWRAP, bound-anonymous-fn, TCPWRAP
Jest가 Jest를 종료하지 못하게 할 수 있는 세 개의 열려 있는 핸들을 감지했습니다.
TCPSERVERWRAP, bound-anonymous-fn, TCPWRAP
--forceExit을 사용했는데도 잘 안먹히는 것 같다.
왜인지 모르겠는데ㅠㅠㅠ그럼 직접 끝나고 꺼주는 방식을 사용해준다.
앞에 해당 부분을 추가해준다.
afterAll(async () => {
  server.close();
  await mongoose.connection.close();
});
아까 보이던 에러는 뜨지 않는데 굉장히 찝찝
에러 처리를 위한 통합테스트 작성
import request from 'supertest';
import app from '../../src/index';
import newProduct from '../data/newProduct.json';

...

it('should be return 500 on POST /api/products', async () => {
  const response = await request(server).post('/api/products').send({ name: 'jjae' });

  expect(response.statusCode).toBe(500);
  expect(response.body).toStrictEqual({
    message: 'Product validation failed: description: Path `description` is required.'
  });
});
출처
테스트 코드 작성하기 - jest, typescript
Unit Test 시작하기
따라하며 배우는 TDD