
그래프 ( Graph )?
그래프란 상하위의 개념이 없이 각각의 node와 그 node들 간의 간선(edge)을 하나로 모아 놓은 자료 구조이다.
특징
- 그래프는 꼭 모든 node들이 서로 관계를 갖고 있어야만 하지 않다.
- 부모-자식의 개념이 없다.
- 그래프는 node간 연결이 없는고립된 부분이 있을 수도 있고, 순환할 수도 있고, 안할 수도 있기 때문에 가장 형식에 얽매이지 않는 자료구조이다.
- 그래프 자료구조를 네트워크 모델이라고 한다.
ex) 지도, 지하철 노선도의 최단경로, 전기회로의 소자들.
방향성
방향 그래프(Directed), 무방향 그래프(Undirected)모두 존재
용어
- 노드(node) - 위치라는 개념
- 간선(edge) - 위치 간의 관계, 노드를 연결하는 선
- 인접노드(adjacent vertex): 간선에 의해 직접 연결된 노드
- 노드의 차수 (degree): 무방향 그래프에서 하나의 노드에 인접한 정점의 수
무방향 그래프에 존재하는 노드의 모든 차수의 합 = 그래프의 간선 수의 2배 - 진입차수(in-degree): 방향 그래프에서 외부에서 오는 간선의 수(내차수)
- 진출 차수(out-degree): 방향 그래프에서 외부로 향하는 간선의 수(외차수)
- 경로 길이(path length): 경로를 구성하는 데 사용된 간선의 수
- 단순 경로(simple path): 경로 중에서 반복되는 정점이 없는 경우
- 사이클 (cycle): 단순 경로의 시작 정점과 종료 정점이 동일한 경우
의사코드(pseudo code)
그래프 {
  빈스토리지, 빈엣지 만들기

  addNode(val) {
    빈 스토리지에 val로 받은 같은 값을 `키`와 `값에`넣어준다.
  }

  contains(val) {
   스토리지에 val가 있는지 본다.
  };

  removeNode(val) {
    스토리지에 val를 찾아서 제거한다.
    - 제거할때 엣지도 함께 제거한다.(서로 연결되있어서 edge가 두개로 연결되어있습니다.)
  };

  hasEdg(to, from) {
  	edge[to] = from, edge[from] = to 를 이어준다. 양방향
  }

  addEdge(to, form) {
  	delte edge[to], edge[from]
  };

  forEachNode(callback){
  	스토리지를 돌면서 callback(val)를 준다.
  }
}
const _ = require("underscore"); // 언더바 사용하기

const Graph = function () {
  this.storage = {};
  this.edge = {};
}
// 받은 node를 value에도 같이 넣어주기 { '1' : 1 }
Graph.prototype.addNode = function(node) {
	this.storage[node] = node;
  // this.storage[1] === this.storage['1']
}
// hasOwnProperty로 노드 찾기
Graph.prototype.contains = function(node) {
	return this.storage.hasOwnProperty(node);
}

Graph.prototype.removeNode = function(node) {
	let iWantRemove = this.edge[node];
  	delete this.storage[node];
  	this.removeEdge(iWantRemove, node);
}

Graph.prototype.hasEdge = function(fromNode, toNode) {
    return this.edge[fromNode] === toNode;
};

// 그래프에서 서로 연결되있습니다. edge로 연결시키기.
Graph.prototype.addEdge = function(fromNode, toNode) {
    this.edge[fromNode] = toNode;
    this.edge[toNode] = fromNode;
};

// 연결선을 둘다 지워줍니다.
Graph.prototype.removeEdge = function(fromNode, toNode) {
    delete this.edge[fromNode]
    delete this.edge[toNode]
};

Graph.prototype.forEachNode = function(cb) {
    _.each(this.storage, node => cb(node))
};

}
이진 탐색(Binary Search Tree)?
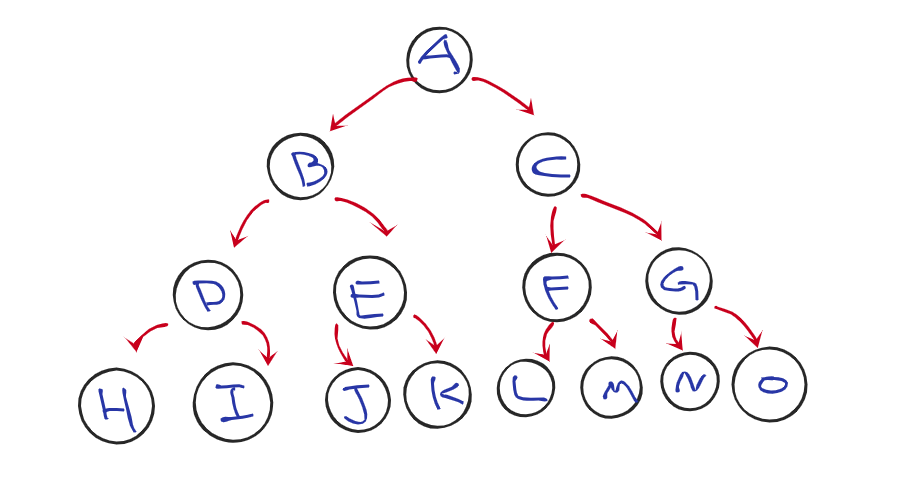
이진 트리란 자식 노드가 최대 두 개인 노드들로 구성된 트리입니다.
이진 트리의 구성은 root와 left, right로 구성되어있습니다.
찾고자 하는 값을 입력하면 value와 root를 비교한 후, 작으면 Left를,
크면 right를 root로 변환하고, 변경된 root를 기준으로 다시 비교하여 left 혹은 right로 이동
하는 방식이 이진 트리입니다. 더이상 비교할 Child Node(left, right)가 존재하지 않을 때 해당 위치에
data를 입력합니다.
이진탐색트리 {
	left, rigth, value

  insert(val) {
  	valu와 비교하여서 작은면 left, 크면 rigth로 방향을 정해줌
    리커젼으로 각 노드에 비어있는지도 확인하면서 계속 찾아간다.
  }

  contains {
  	insert에서 다른 곳에 담아 저장하여 바로 찾아내기
  }

}
const BinarySearchTree = function(value) {
// left와
const someInstance = {};
const emtyArray = [value];
this.left = null;
this.rigth = null;
this.value = value;
someInstance.insert = function(val) {
let newBst = BinarySearchTree(val);
recursive(this) // 실행시키기 실행 첫 값은 5
// 리커젼으로 왼쪽, 오른쪽을 찾아서 간다.
function recursive(node) { // 5
let bst = node.value > val ? 'left' : 'rigth'; // 2
node[bst] === null ? node[bst] = newBst : recursive(node[bst]); // 3
};
}
someInstance.contains = function() {
return emtyArray.includes(val)
}
someInstance.depthFirstLog = function(cb) {
emtyArray.forEach((item) => cb(item));
}
return someInstance;
};
해시 테이블 (hash table)
해시함수란 데이터의 효율적 관리를 목적으로 임의의 길이의 데이터를 고정된 길이의 데이터로
매핑하는 함수입니다. 이 때 매핑 전 원래 데이터의 값을 키(key), 매핑후 데이터의 값을해시값(hash value),
매핑하는 과정 자체를해싱(hashing)이라고 합니다.
여기서
매핑이란키 역할을 하는 데이터와 값 역할을 하는 데이터를 하나씩짝지어 저장하는 데이터 구조입니다.
즉, 이것을연관배열(associative array)라고 합니다.키하나와값하나로 연관되어 있으면키를 통해
값을 얻을수 있습니다.

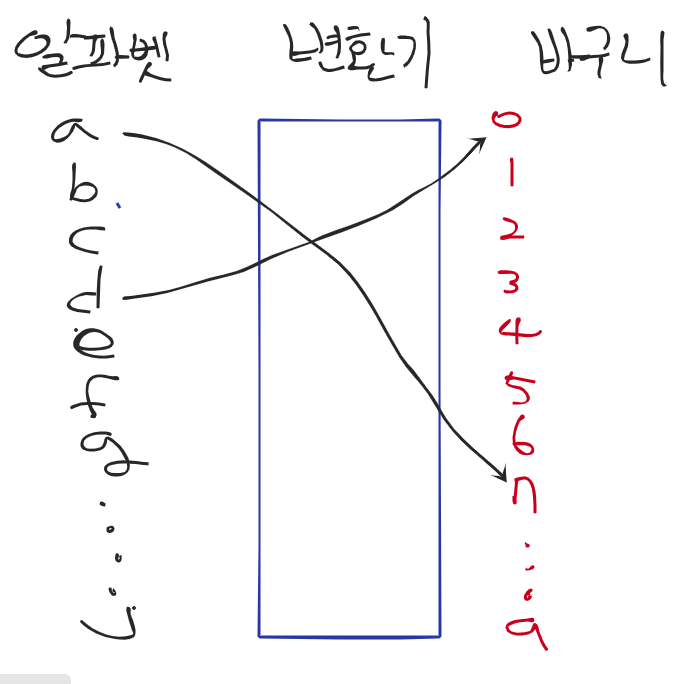
위 그림으로 기본적인 개념을 설명하자면
바구니의 전체 크기가 10이라고 가정하면
a 는 아스키 코드로 97입니다. b, c ~ 뒤로 갈 수록 1씩 증가합니다.
알파벳을 바구니에 저장하려면 컴퓨터가 알 수 있도록 숫자로 바꾼다고 생각을 합니다.
	index = 변환기("a") % 10 을 통해 인덱스 값을 구할 수있습니다.
    	그러면 7의 값이 나오니 7번 바구니에 넣어보면 됩니다.

하지만 위에서 말하였듯이 임의의 길이의 데이터를 고정켰습니다. (10개의 바구니)
바구니는 그대로이지만 알파벳이 더 들어오거나 바구니들 더 늘리면 `충돌 현상`이 발생하게됩니다.
이때, 앞에서 배운 `Linked list`를 통해서 노드를 추가하여 값을 추가하면 됩니다.
const { LimitedArray, getIndexBelowMaxForKey } = require("./hashTableHelpers");
// 받을 수 있는 최대의 양을 정의하고 해쉬 함수는 helper 에서 다 도와주기에 딱히 할 것은 없다.
const HashTable = function() {
this._limit = 8;
this._storage = LimitedArray(this._limit);
};
// set매서드에 해싱된 index를 넣어줍니다. 여기서 set은 그냥 설정해주는 곳 이라고 생각하면됩니다.
HashTable.prototype.insert = function(k, v) {
const index = getIndexBelowMaxForKey(k, this._limit);
this._storage.set(index, v)
};
// get매서드에서는 값을 정의 해준다고 생각하면 됩니다.
HashTable.prototype.retrieve = function(k) {
const index = getIndexBelowMaxForKey(k, this._limit);
return this._storage.get(index);
};
// []배열 안에 [{}, {}] 이런식으로 들어가있기에 splice로 정의하여 줍니다.
HashTable.prototype.remove = function(k) {
const index = getIndexBelowMaxForKey(k, this._limit);
this._storage.each((item, i, storage) => {
storage.splice(index, 1);
}) // storage[index] (o) - limitedArray[index](x)
};
힘들땐 블로그 하나더 적자!!![ Suyang ]